Introdução

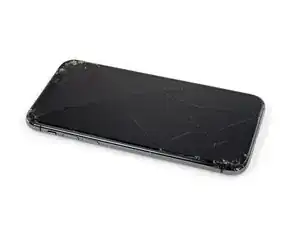
Se a tela do seu iPhone 11 estiver rachada, não responder ao toque ou não mostrar nenhuma imagem quando ligado, use este guia para fazer o iPhone funcionar novamente com uma tela nova, ou melhor, um novo conjunto de tela.

Se a parte traseira da sua nova tela já incluir uma placa metálica fina de proteção do LCD, siga este guia mais curto para facilitar o reparo. Mas se a placa não vier junto, continue lendo - este guia mostrará como substituir a tela e manter a placa de proteção do LCD antiga.

O conjunto combinado de alto-falante auricular e sensores afixado na parte traseira da tela vem emparelhado de fábrica com o seu iPhone. Portanto, é necessário seguir as instruções abaixo para transferi-lo da tela antiga para a nova. Ele contém o flood illuminator, que faz parte do sistema biométrico de segurança Face ID. Se ele for danificado ou substituído, o Face ID não funcionará, portanto, tome muito cuidado para não danificar nenhum desses componentes durante este procedimento. Se danificado, somente os técnicos "autorizados" da Apple poderão restaurar a função do Face ID.

Observação: A funcionalidade True Tone não funcionará após a substituição da tela, mesmo com o uso de uma tela original da Apple.

  1. T2yIKTYtWTOpeGir
    T2yIKTYtWTOpeGir
    1BRQlG3vB6hGYvKS
    • Antes de começar, descarregue a bateria do iPhone abaixo de 25%. Uma bateria de íons de lítio carregada pode pegar fogo e/ou explodir se for perfurada acidentalmente.

    • Desligue o iPhone antes de iniciar a desmontagem.

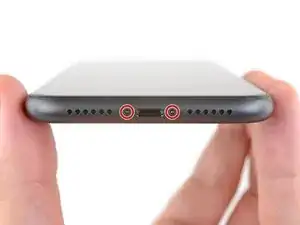
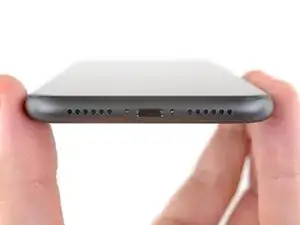
    • Remova os dois parafusos pentalobe de 6,7 mm na borda inferior do iPhone.

    • A abertura da tela do iPhone comprometerá as vedações à prova d'água. Tenha à mão vedações de reposição antes de prosseguir com esta etapa ou evite a exposição a líquidos se você for remontar o iPhone sem substituir as vedações.

    the right screws wouldn’t come off

    Yusef San Inocencio -

    ok one came of but my right wont come of either!!!!

    Aisa Jawara -

    and what did yall do about it?????

    Ottokar Kruse -

    Hello guys, I still haven't found away to power off the iphone without using the screen. Cheers!

    danielaguirre93 -

    You can try this.

    Quickly Press and release the volume up button.

    then Quickly Press and release the volume down button.

    then press and hold the power button and wait until it turns off.

    worked for me :D

    Benóný Egilson -

    Where does one get replacement seals? Is this the same as the display assembly adhesive?

    Brian Baker -

    not of the screwdrivers i have seem to be able to turn the screws

    Aisa Jawara -

    I found out that 0.8, 5 star bit it's a match, meybe this would help somebody

    Mateusz Mati -

    how do you change battery of an iPhone 11 and still the battery health shows, do you use a software for that?

    Great Me -

    Battery health won’t show on a non Apple battery.

    DON’T forget to discharge old battery before removing it. Very impressive fire (and smoke!) if you puncture it. Ask me how I know

    Doug Harrowing -

    Does anyone know which size pentalobe screws (step 1) they are ? I have P2 if that’s a size, is that the right one?

    Jannn -

    Yes, P2 is the correct one!

    Russ Torrez -

  2. 6UPwoloGBO4tmVoS
    6UPwoloGBO4tmVoS
    BmSYPJmOy6dbHipF
    3EOdQPAGOmiuhoKU
    • Se você inserir uma palheta de abertura muito fundo, você pode danificar o seu dispositivo. Execute esta etapa para marcar a palheta e evitar danos.

    • Meça 3 mm a partir da ponta e marque a palheta com um marcador permanente.

    • Você também pode marcar as outras pontas da palheta com medidas diferentes.

    • Como alternativa, prenda uma moeda com fita adesiva em uma palheta, deixando 3 mm de ponta.

    Got to step 2 and realized the fix kit doesn't include an opening pick! Looks like a guitar pick, and I have those lying around. Is that expected? Looks like the pick is used in many steps below. There's a little blue crowbar that isn't mentioned in the instructions. Perhaps that replaces the opening pick?

    Sloan Looney -

    Hi! I can't see which guide you were using when writing this comment. Can you reply here with which guide and fix kit you used?

    Clay Eickemeyer -

    I see you posted this in Meta. I hope it's resolved soon! In the meantime, a guitar pick may work well enough for your repair.

    Clay Eickemeyer -

    what fix kit?

    Meow Purr -

    Super late reply to original post but my pick was with the replacement screen and not the tools kit.

    Nichol Augustus -

    My fix kit didn't include an opening pick either

    WILLIAM HARRIS -

    Make sure you check inside the black boxes after emptying them. My pick was stuck inside one of the boxes.

    AndyF -

    My AliExpress refurbished screen came with a pick that has a coin-like circle that pops out, so no modification was necessary

    Gijs Leegwater -

    the picture shows 3 cm but the description says 3 mm's. Which one is it?

    John Pena -

    That is a misunderstanding. It is a ruler with a scale for cm, it shows 0.3 cm, i.e. 3 mm.

    VauWeh -

    Oh, come ON!

    Big Ed -

    It will ALWAYS be millimeters on a phone, but this step is ridiculous, skip it!

    Leif DeWolf -

    @leifdewolf I wouldn't skip it for a first repair.

    Gabriel-Science -

    It's not an Ifixit KIT if it doesn't include everything. You'll need to order the opening pic separately. Or head to Walmart like myself and look for guitar pics. Hopefully, this will work just as well.

    Jaleeljb97@icloud.com -

    No pick in mine as well. It’s really not clear that you have to order this separately when ordering an IPhone SE 202/2022 screen repair kit. Is this the case?

    Jackson Castiglione -

    Frustrated, I ordered a compact package where everything was encapsulated. Useless suction tools could not separate the screen. If it is unable to decouple the screen, then why sucking suction tools you have provided.

    Shourob Datta -

    For my kit the triangle pick was stuck inside the box with the screen not with the other tools maybe it's also there for you

    Henry Scheibehenne -

    Y’all are getting far, FAR too detailed with some of this stuff…. Measuring and marking the pick that you won’t actually use to open the device?!? lol that’s kinda funny. Just heat it up, grab a spudger, and the back just pops right off! The iFixit tech need to stick to the KISS method more often, you know KEEP IT SIMPLE STUPID!!! Like l, for reals, I’ve been doing this stuff for YEARS and using iFixit guides regularly and this is just ridiculous at this point!

    Leif DeWolf -

    Will the phone still work if the sensor assembly on the back of the screen is damaged?

    Mutshidzi Rambau -

    I don't have a pick, but how much better are these picks than an old credit card for opening an iPhone 13 mini?

    mike eng -

    an old credit card will do that job, although you'll have to pull a little bit more if the credit card is thicker than the picks, just again, be careful and don't insert it that far

    Russ Torrez -

    The pick in my iFixIt kit was packed with the battery, not with the rest of the toolkit.

    Tony Houlihan -

    Many of these comments are PURE GOLD. Seriously y’all, if you’re not sure if it should be 3mm or 3cm or whether you could find and use an alternative pick, mending an IPhone really isn’t for you. Find a responsible adult and get back to doing something simpler…

    Alasdair Cameron -

    indeed!!!! I agreee!!!

    Lonnie -

    I bought the kit of five just in case. I used two and marking them at 3mm was definitely helpful.

    Megolina -

    Funktioniert super. Habe vorher sicherheitshalber den Akku abgesteckt.

    Lukas D -

  3. FLq6W2khWOq4uAQr
    FLq6W2khWOq4uAQr
    2XIfBVvS5Ty5QtZF
    4Df24ZLS6kBFTyVU
    • Se o seu iPhone tiver uma tela rachada, mantenha as rachaduras sob controle e evite danos corporais durante o reparo colocando fita adesiva sobre o vidro.

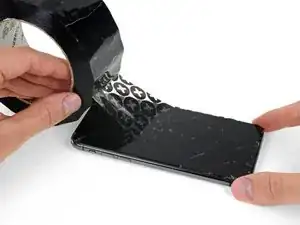
    • Coloque tiras sobrepostas de fita adesiva transparente sobre a tela do iPhone até que toda a superfície fique coberta.

    • Use óculos de segurança para proteger seus olhos de qualquer vidro que possa ser liberado durante o reparo.

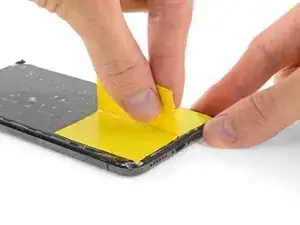
    • Se não conseguir fazer com que a ventosa grude nas próximas etapas, dobre um pedaço de fita adesiva resistente (como fita adesiva vedante) na forma de uma pega e levante a tela com ela.

    • Se tudo mais falhar, você pode colar a ventosa na tela com supercola.

  4. 4fhdeZSxwgTn4VgI
    4fhdeZSxwgTn4VgI
    BxknskOQsXXo6dog
    NEQnchvrYpEJPYKS
    • As próximas três etapas demonstram o Anti-Clamp, uma ferramenta que projetamos para facilitar o procedimento de abertura. Se não estiver usando o Anti-Clamp, pule três etapas para um método alternativo.

    • Para obter instruções completas sobre como usar o Anti-Clamp, consulte este guia.

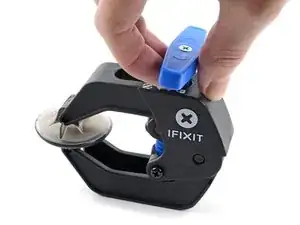
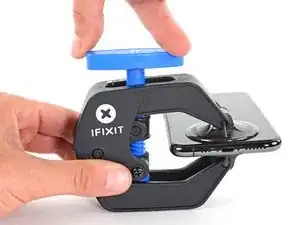
    • Puxe a pega azul para trás para destravar os braços do Anti-Clamp.

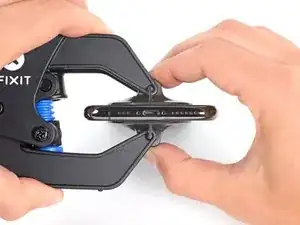
    • Deslize os braços pela borda esquerda ou direita do iPhone.

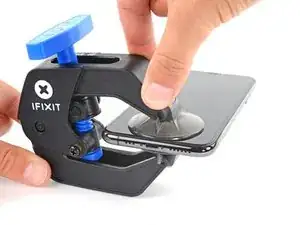
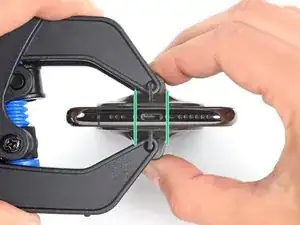
    • Posicione as ventosas próximo à borda inferior do iPhone - uma pela frente e a outra pela traseira.

    • Aperte as ventosas uma contra a outra para aplicar sucção na área desejada.

    • Se você achar que a superfície do iPhone é muito escorregadia para o Anti-Clamp se prender, você pode usar fita para deixar a superfície mais aderente.

  5. DtDpThOATcyQb4yT
    DtDpThOATcyQb4yT
    MAGI2JXwXnS5LvCO
    NgpQQ6M1sP5xBcXQ
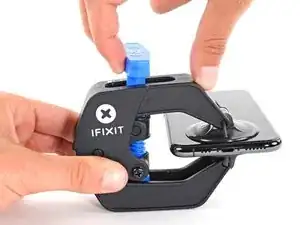
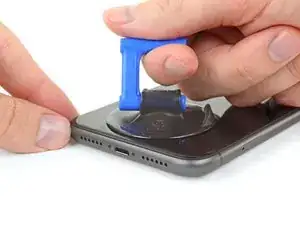
    • Puxe a pega azul para a frente para travar os braços.

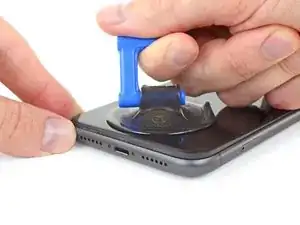
    • Gire a pega 360 graus no sentido horário ou até que as ventosas comecem a se esticar.

    • Certifique-se de que as ventosas permaneçam alinhadas uma com a outra. Se elas começarem a ficar desalinhadas, solte um pouco as ventosas e realinhe os braços.

  6. oRZ6AXaleqoRTKND
    oRZ6AXaleqoRTKND
    bDhAC4ImHIc3XQdf
    HTQodvWRCjulrPCR
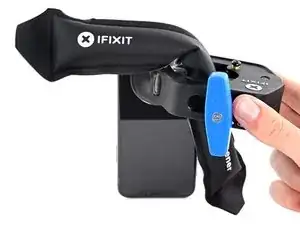
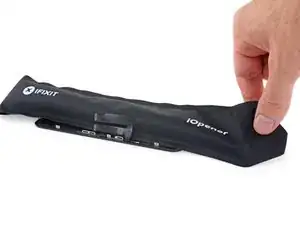
    • Aqueça uma bolsa térmica iOpener e passe-a pelos braços do Anti-Clamp.

    • Você também pode usar um secador de cabelo, pistola de ar quente ou uma chapa quente - mas calor extremo pode danificar o visor e/ou a bateria interna, portanto, proceda com cuidado.

    • Dobre a bolsa térmica iOpener de modo que ela fique sobre a borda inferior do iPhone.

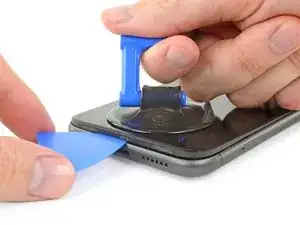
    • Aguarde um minuto para que o adesivo tenha a chance de se soltar e apresentar um vão para a abertura.

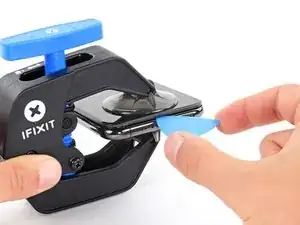
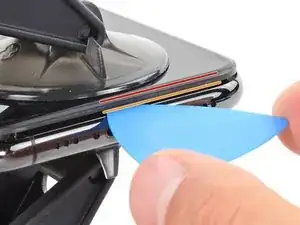
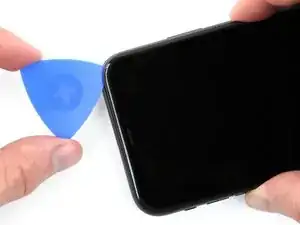
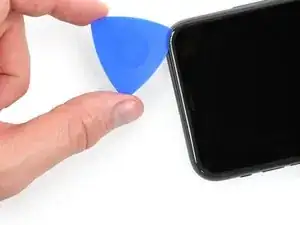
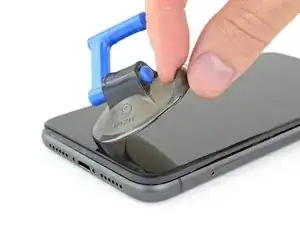
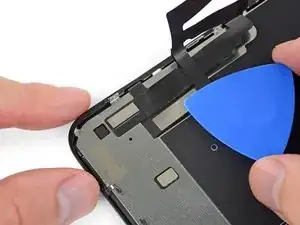
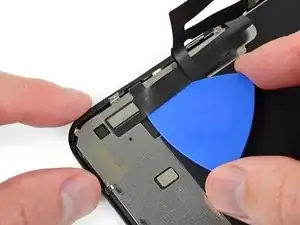
    • Insira uma palheta de abertura sob a tela e o painel de plástico, mas não abaixo da própria tela.

    • Se o Anti-Clamp não formar espaço suficiente, aplique mais calor na área e gire a pega um quarto de volta.

    • Não gire a pega mais do que um quarto de volta de cada vez e espere um minuto entre cada volta. Deixe que o Anti-Clamp e o tempo façam o trabalho por você.

    • Pule as próximas três etapas.

    Any suggestions if the screen is broken and the anti-clamp just separates the screen from the bezel?

    Nathan Friedly -

  7. yQbwAmoITNyEmrSn
    • O aquecimento da borda inferior do iPhone ajudará a amolecer o adesivo que prende a tela, facilitando a abertura.

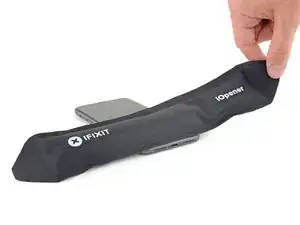
    • Use um secador de cabelo, uma pistola de ar quente ou prepare uma bolsa térmica iOpener e aplique-o(a) na borda inferior do iPhone por cerca de um minuto para amolecer o adesivo que se encontra por baixo.

    어짜피 못쓰고 버릴 거라면, 이것보다 인두기를 직접 대는 방식을 추천 합니다. 어짜피 유리라 연기나 반응도 없고 무엇보다 금방 열기가 올라와요.

    코딩의달인 -

    Gut gehen auch Kirschkernsäckchen. Damit hatte ich Erfolg!

    Hoetgen -

  8. aJCRTiaUBHVMoAUV
    aJCRTiaUBHVMoAUV
    YhJejcEpMhlQpvWX
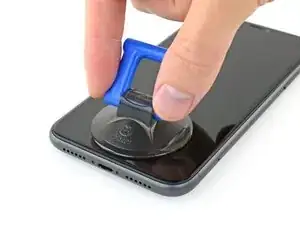
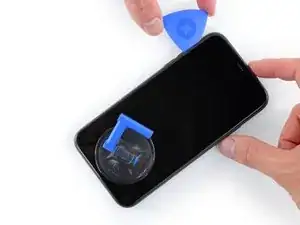
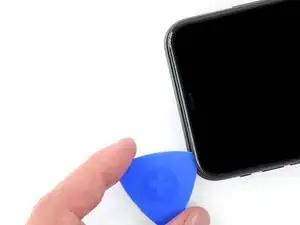
    • Se estiver usando uma ventosa de sucção simples, aplique-a na borda inferior do telefone, evitando a parte curva do vidro.

  9. MKShqPOGkjD2vOPp
    MKShqPOGkjD2vOPp
    dJknkSwVsVBaZabR
    XgeYpSK2b4NpndCh
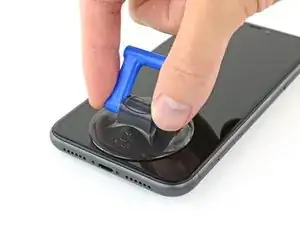
    • Puxe a ventosa para cima com pressão firme e constante para criar um pequeno vão entre o painel frontal e a estrutura traseira.

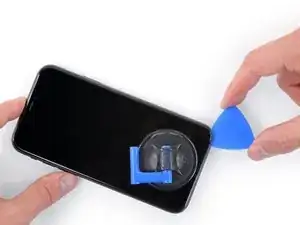
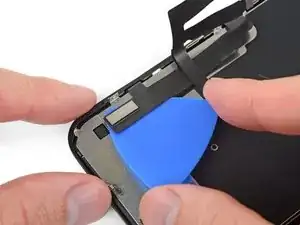
    • Insira uma palheta de abertura no espaço abaixo da, tela e da moldura de plásticomas não debaixo da própria tela.

    • O adesivo impermeabilizante que fixa a tela é muito forte; a formação dessa abertura inicial requer uma quantidade significativa de força. Se estiver com dificuldade para abrir um vão, aplique mais calor e mova suavemente a tela para cima e para baixo para amolecer o adesivo, até se formar um vão suficiente para inserir a ferramenta.

    This turned out to be the most difficult part for me. My old ifixit suction cup didn't suck hard enough to generate enough force to pry the display from the case. I ended up applying heat at least a dozen times, and I had to pull up on the suction cup forcefully over and over and over while repositioning it several times. I finally had success inserting my pick into the tiny gap after 30 or so rapid tugs on the suction cup.

    matthew r -

    I pulled the screen by accident instead of the bottom layer, now what?

    Alvaro -

    I have the same question

    Konstantinos Solakoglou -

    After heating (I used a hair dryer for 4-5 mins, moving around whole frame, to make sure was pretty hot, then let sit for 1 minute), insert a razor blade between the bezel and the frame, at the bottom edge. Lever upwards, the screen will easily pull away. You won’t even need the suction cup.

    Damian -

    For me it was quite helpful to ask another person so that one can pull and hold the and the other one puts the triangle in the gap.

    Xardas -

  10. BiTGA23MOOmtexSG
    BiTGA23MOOmtexSG
    l5NWMTOshIlqjNtG
    IfJRwFLPwsBL4klh
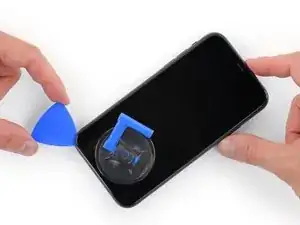
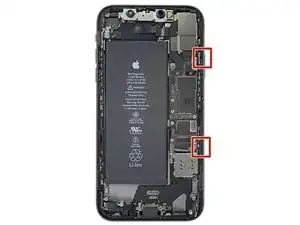
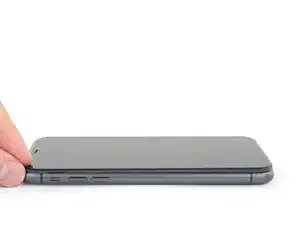
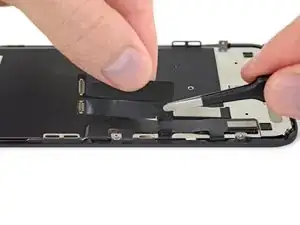
    • Deslize a palheta de abertura pelo canto inferior esquerdo e pela borda esquerda do iPhone, cortando o adesivo que mantém a tela no lugar.

    • Não insira a palheta mais do que 3 mm, pois isso pode danificar os componentes internos.

  11. FCPAxbSlJhdAIRLG
    • Há cabos sensíveis passando ao longo da borda direita do iPhone. Não insira a palheta aqui, pois isso pode danificar os cabos.

  12. K5iUxKTkELONJBVf
    K5iUxKTkELONJBVf
    ZhlLOMfaksHRxZJV
    yy5WtAu2UqSpCUTX
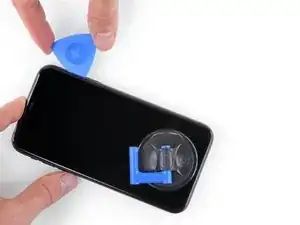
    • Insira novamente a palheta na borda inferior do iPhone e deslize-a para cima no lado direito para continuar separando o adesivo.

    • Não insira a palheta mais do que 3 mm, pois isso pode danificar os cabos da tela.

    Instructions are confusing as the last step says not to insert at certain points, while this says to slide all the way up the right side - is it that sliding is ok but inserting isn't (whatever that might mean) or just not more than 3mm?

    Peter Hill -

    Just slide slightly and the display will rise without problems on all iPhone models, sometimes if I have long nails I even insert a fingernail and lift the display.

    Tonynox -

  13. J1ZVUrqQ61e4NOZ1
    J1ZVUrqQ61e4NOZ1
    HsxeMCkPLyCeHKpI
    tegZUpHyY4wGd2Ww
    • A borda superior da tela está fixada com cola e clipes.

    • Puxe gentilmente a borda direita da tela para baixo (na direção do conector Lightning).

    • Introduza a palheta no canto superior direito do fone.

  14. 5mKceYJffKEaQo4L
    5mKceYJffKEaQo4L
    kQQD2XkOMWjrOjMu
    • Continue puxando a tela para baixo (em direção ao conector Lightning) conforme necessário para abrir um vão grande o bastante para a palheta.

    • Deslize a palheta para o canto superior esquerdo e corte o adesivo restante que está segurando a tela.

    • Não insira a palheta mais do que 3 mm, pois isso pode danificar o conjunto de sensores da identificação facial.

  15. 24nVgAyDKPTICLhV
    • Puxe a ventosa de sucção pela pequena lingueta para removê-la do painel frontal.

  16. IDOegN1rKCFFJMBF
    IDOegN1rKCFFJMBF
    QcgYHgKIt6XMTsnK
    xVdpJyR6i213HsJ2
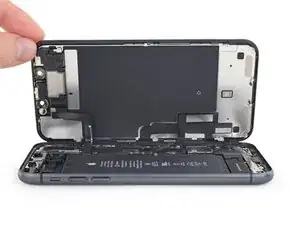
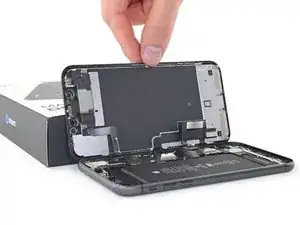
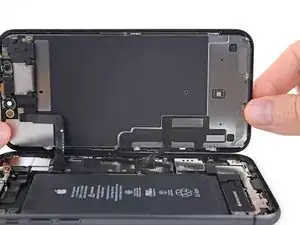
    • Abra o iPhone virando a tela para cima pelo lado esquerdo, como se estivesse virando a contra-capa de um livro.

    • Não tente ainda separar completamente a tela, pois vários cabos planos frágeis a conectam à placa lógica do iPhone.

    • Apoie a tela em algo para deixá-la de pé enquanto você executa os trabalhos no fone.

    • Durante a remontagem, vire a tela para baixo na posição de montagem, alinhe os clipes ao longo da borda superior e pressione cuidadosamente a borda superior antes de encaixar o resto da tela. Se não encaixar facilmente, verifique o estado dos clipes ao redor da tela e certifique-se que eles não estejam tortos.

    $@$*. i tore the display cables. what do i do now?

    Crystal F -

    Did you fix it?

    thuan nguyen -

    Crystal f if u tore the cabels u need to buy the part with what u tore so u can replace it! Good luck

    Phonerepair;) -

  17. KxoYscx1ItVaLely
    KxoYscx1ItVaLely
    ZA5AX6xqq3r5qUNN
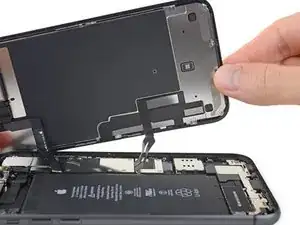
    • Para poder acessar os parafusos na etapa seguinte, incline a tela levantando levemente sua borda inferior.

    • Tenha cuidado para não esticar ou rasgar os cabos da tela.

    I tore the cables!

    FredC -

    Aiaiai be more careful next time! Haha good luck 🍀 ;)

    Phonerepair;) -

  18. fPaVWtYy3NJ53YvD
    fPaVWtYy3NJ53YvD
    jFRf1tI5V4hicZKU
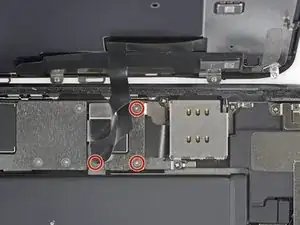
    • Com uma chave Y000, remova os três parafusos de 1,1 mm que fixam o suporte do conector da bateria.

    • Durante todo o reparo, rastreie cada um dos parafusos e certifique-se de que eles voltem exatamente para o local de onde vieram.

    • Durante a remontagem, este é um bom momento para ligar o iPhone e testar todas as funções antes de fechar a tela. Certifique-se de desligar o iPhone completamente antes de continuar o trabalho.

    During reassembly, I had to connect my phone to the charger before it would power up.

    Austin Culberson -

    Die Schrauben sind wahnsinnig kurz, tatsächlich winzig klein. Nach dem Herausdrehen könnte es im ersten Moment so aussehen, als habe man die Schrauben ausgebohrt anstatt herauszudrehen, sie sind jedoch sehr schnell gelöst und liegen dann entweder im Gehäuse oder sind neben dem Gehäuse herausgefallen. In jedem Fall sollten sie nie auf den Boden fallen, da sie dann kaum mehr auffindbar wären.

    Bernd Sonneck -

    I got to this point thinking/hoping I could eek by with a Y1 orY0 or even a PH000 driver but no such luck. The Y000 is in fact necessary. Finishing this repair will have to wait for now.

    ALSO thanks Apple, there is ABSOLUTELY no reason AT. ALL. to use so many random, oddball screw heads, BUT to make self repairs more difficult and expensive. A real F-U to the consumer!

    John M -

  19. HKBUYhWeIUlYLqdG
    • Remova o suporte.

  20. XN1PHiCYxtERqDgF
    XN1PHiCYxtERqDgF
    XKgOIM6e2mmR1ecq
    • Com uma espátula ou uma unha limpa, retire o conector da bateria de seu soquete na placa lógica.

    • Tente não danificar a vedação de silicone preta que envolve essa e outras conexões da placa. Essas vedações oferecem proteção extra contra a entrada de água e poeira.

    • Vire o conector ligeiramente para fora da placa lógica, para evitar que ele entre em contato acidentalmente com o soquete.

    i didnt do this step because i didnt know and now my phone wont work at all does the brackets need to be all the way on also, or is it a motherboard issue?

    Damienpanthers -

  21. kMZitLQGk2hTRk6G
    kMZitLQGk2hTRk6G
    Cdvg2fNT2Lf21uEE
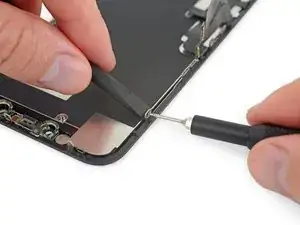
    • Use uma chave Y000 para remover os cinco parafusos de 1,1 mm que fixam o suporte que cobre a placa lógica.

    Die Schrauben sind wahnsinnig kurz, tatsächlich winzig klein. Nach dem Herausdrehen könnte es im ersten Moment so aussehen, als habe man die Schrauben ausgebohrt anstatt herauszudrehen, sie sind jedoch sehr schnell gelöst und liegen dann entweder im Gehäuse oder sind neben dem Gehäuse herausgefallen. In jedem Fall sollten sie nie auf den Boden fallen, da sie dann kaum mehr auffindbar wären.

    Bernd Sonneck -

    Thanks to that step I now have a bricked iPhone : the touchscreen is definitely non responsive even after several hard-resets. My phone contained data that I can no more access. Thank you so much!!

    C G -

  22. hwCpiXUDeKoMTWEh
    • Remova o suporte.

    Thanks to that step I now have a bricked iPhone : the touchscreen is definitely non responsive even after several hard-resets. My phone contained data that I can no more access. Thank you so much!!

    C G -

    why this step?

    Ottokar Kruse -

  23. IFoKtCq1UVwNZXJv
    IFoKtCq1UVwNZXJv
    FRZEdrhrUWadPZFT
    iT2xWjWSHH5EdMbq
    • Com uma espátula ou a unha, desconecte o conector do cabo do painel LCD.

    • Desconecte o conector do digitalizador logo ao lado.

    Be mindful when reconnecting LCD panel connector and digitizer connector. It’s looks very similar. These 2 ribbon connectors a slightly different.

    Pay attention.

    Josmaknolavic -

    내 아이폰이 디스플레이 분리 단계를 거친 후, 전원이 들어오지 않습니다. 층전기를 꽂아도 배터리에 미세한 전기 반응이 느껴지지 않고, 탭틱 엔진도 작동하지 않게 되었습니다. cpu 온도는 여전히 뜨껍습니다. 내 마더보드가 디스플레이 분리 후 갑자기 고장난건가요?

    Protoncal -

    Hast Du das Problem gelöst?

    Bernd Sonneck -

    커넥터 핀을 빼거나 다시 넣기 위해 구부러졌을 수 있습니다. 핀이 구부러진 경우 돋보기 등으로 살펴보고, 그렇다면 적절한 매장에 가져가세요.

    Hampter -

    Hier war mein Problem schon gelöst. Durch einen Sturz hat sich der Touchscreen Stecker gelöst. Wieder eingesteckt funktionierte die Touch-Eingabe wieder.

    Hoetgen -

    Thanks to that step I now have a bricked iPhone : the touchscreen is definitely non responsive even after several hard-resets. My phone contained data that I can no more access. Thank you so much!!

    C G -

  24. FXVmdXMPZpEU2F5j
    FXVmdXMPZpEU2F5j
    BxKUHpGvITeIEOQL
    • Com a ponta pontiaguda de uma espátula ou a unha, desconecte o conector do conjunto de sensores do painel frontal.

    There needs to be an extra step between 24 and 25 for reassembly, telling folks to apply adhesive here. I got the thing almost all the way put back together before realizing that the adhesive was a single piece that needs the cables to be disconnected in order to apply it.

    Nathan Friedly -

    Thanks to that step I now have a bricked iPhone : the touchscreen is definitely non responsive even after several hard-resets. My phone contained data that I can no more access. Thank you so much!!

    C G -

  25. VoZNhVF2Va3NVwit

    After this step its probably a good idea to test the new screen (you dont have to plug in the front camera assembly)

    Richard Kraus -

    Not a technician, so correct me if I'm wrong: I think that it's at this step of reassembly (before you reattach the screen) that you apply waterproof glue, if you have it.

    Athanasius Pernath -

    You are both correct. Testing the screen before putting on adhesive means the screen can be returned if faulty. Many places will not accept a screen return that has adhesive on it.

    So if it works apply adhesive at this point. When testing don’t just rely on Apple logo test touch functionality also .

    Daniel -

    Thanks to that step I now have a bricked iPhone : the touchscreen is definitely non responsive even after several hard-resets. My phone contained data that I can no more access. Thank you so much!!

    C G -

    That’s not their fault u must have done something wrong next time look step by step and do it careful but don’t blame others

    Phonerepair;) -

    Thanks to that step I now have a bricked iPhone : the touchscreen is definitely non responsive even after several hard-resets. My phone contained data that I can no more access. Thank you so much!!

    C G -

    While you build the phone back together, I recommend you to insert the new display adhesive. It has three layers of separate plastic protection. Make sure to remove the old one first. Remove the back protection layer, put it in,and fasten it. Then remove the front. Now it’s in place but with a pink protection on top only in the sides.

    Now, test connect the two display connectors and start the phone. Then, if all works fine, turn it of again. and proceed with all steps to fully reassemble it inside. Before closing, remove the last protective layer of the display adhesive.

    Xardas -

  26. c6KLaRqIueRjBTgF
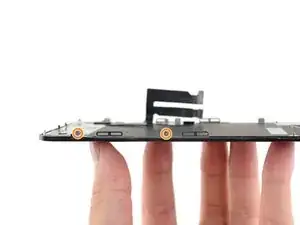
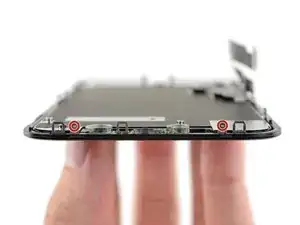
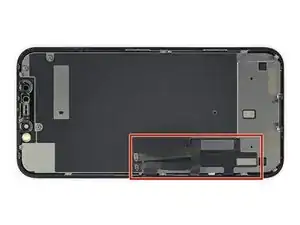
    • Remova os quatro parafusos que fixam o conjunto alto-falante/sensores:

    • Três parafusos Phillips de 1,6 mm

    • Um parafuso Y000 de 1,3 mm

    Correct me if I am wrong but you no longer need to do this as of IOS 15.2 as apple doesnt disable Face ID on 3rd party repairs

    Oliver Pressello -

    For red screw use 000 Phillips screw

    Torsten -

    Bonjour, je n'arriva pas à retirer les trois vis cruciformes. vous aurez une astuce ?

    Sedrick Azebaze -

  27. kYVNaZrgZMhtMCXL
    kYVNaZrgZMhtMCXL
    nwamPbIXeL1OewgJ
    RnjYEKHkwPDfATDD
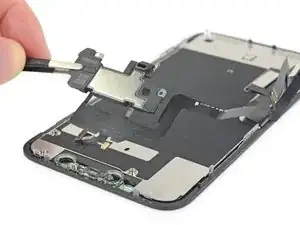
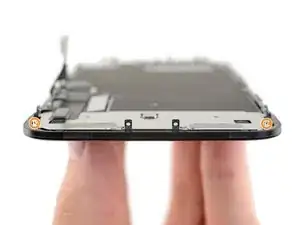
    • Com a ponta pontiaguda de uma espátula, erga com cuidado a borda superior do alto-falante.

    • Vire o conjunto do alto-falante para baixo, afastando-o da borda superior da tela.

    • O alto-falante permanece conectado por meio de cabos planos muito finos. Tenha cuidado para não esticar ou danificar os cabos.

    스피커 어셈블러가 끊어 졌습니다. 연결하거나 구할 방법이 있을까요?

    코딩의달인 -

  28. xfUHGAfxC4XQewxL
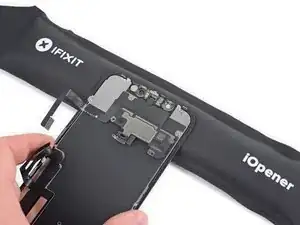
    • Aplique um secador de cabelo, uma pistola de ar quente ou um iOpener na parte superior frontal do visor por 1 a 2 minutos, para amolecer o adesivo que fixa os sensores.

    Sometimes this won't be sufficient for the glue to melt. I ripped the ambient cable twice trying to remove it from the greenish plastic piece (the one with two round holes on the two sides). Here's a less risky procedure: take off the plastic piece together with the rest of the speaker + front sensors, as a block. Then when reassembling, remove the plastic piece from the new screen, and apply the whole block instead.

    Athanasius Pernath -

  29. bwXuCcEMEB1YeDuI
    bwXuCcEMEB1YeDuI
    4vpEnJnhOv2gDdLV
    YQPQG2yANhuqASYR
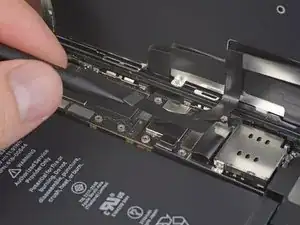
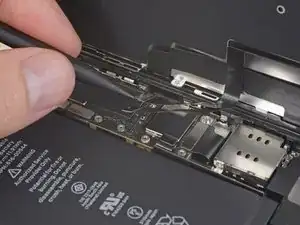
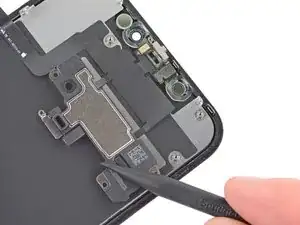
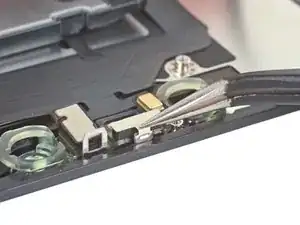
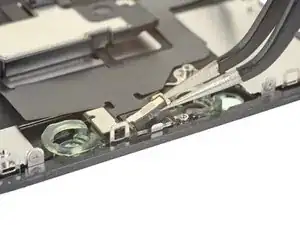
    • Passe cuidadosamente a ponta de sua palheta de abertura por debaixo do cabo conector flex até chegar abaixo do microfone.

    • Faça movimentos suaves de vai-e-vem para separar o microfone, tomando cuidado para não esticar ou danificar o cabo conector flex.

    • Se necessário, use a ponta pontiaguda da espátula para terminar de separar o microfone de seu entalhe no painel frontal.

    This step was a little bit confusing. I thought that the entire ribbon assm should be removed once the speaker was detached. The entire assm doesn’t actually come off until Step 30.

    Andre LeBlanc -

    Be careful in the next few steps, as you can easily damage some parts. Make sure that you operate gently, and that you don't pull, twist or apply too much pressure on the components.

    Athanasius Pernath -

  30. dXZ3PHSBGHLEvaLM
    dXZ3PHSBGHLEvaLM
    ENJqTZ4wTQ1X4uUB
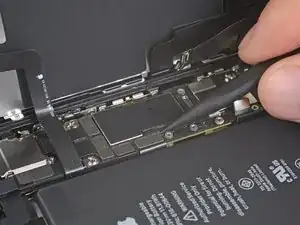
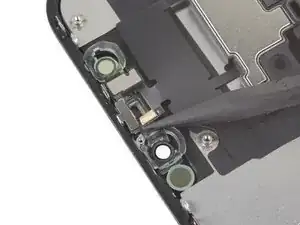
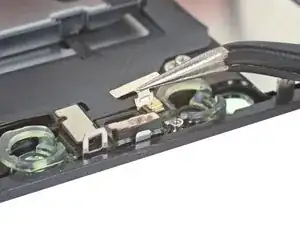
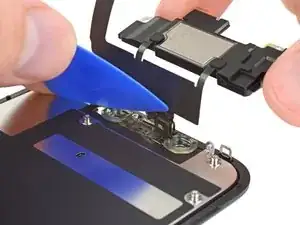
    • Com uma pinça, puxe o pequeno suporte em linha reta para cima, afastando-o do sensor de luz ambiente.

    As you remove it, familiarise with its position. It will be hard to put it back into place. If you pay close attention to how it comes out, it will be easier to put it back

    Athanasius Pernath -

  31. qyhj5vpN62hd25d5
    qyhj5vpN62hd25d5
    SUHMfqCo2aAR1pSw
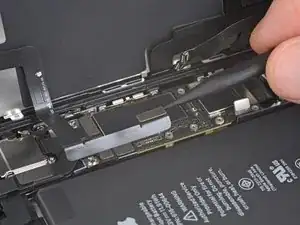
    • Com uma pinça, faça movimentos rápidos de vai-e-vem no sensor de luz ambiente e erga-o de seu entalhe na tela.

    • Se o sensor não se liberar depois de poucos segundos, aplique mais calor e tente novamente.

    • O sensor continua conectado com o resto do conjunto de sensores por meio de um cabo conector flex muito fino. Tome cuidado para não esticar ou danificar o cabo.

  32. wb6W2SWkoFbmgPjS
    wb6W2SWkoFbmgPjS
    xhy3trMJUKSBPfJo
    sKLITAxVAEeNPLu2
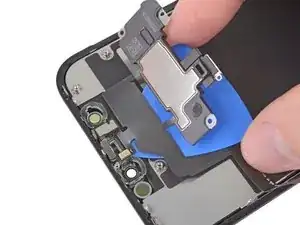
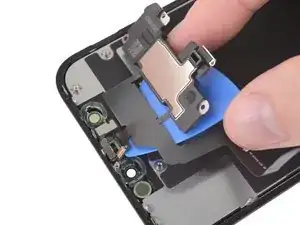
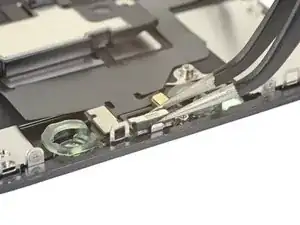
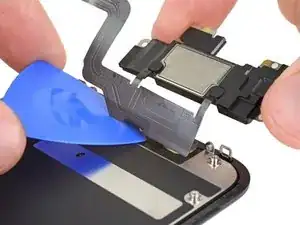
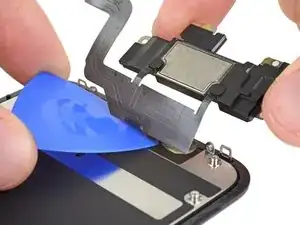
    • Vindo da esquerda para a direita, deslize uma palheta de abertura por debaixo do cabo conector flex e do módulo do sensor de proximidade + flood illuminator.

    • Faça movimentos rápidos de vai-e-vem e levante com cuidado, separando o módulo de seu entalhe no painel frontal.

    • Para abrir acesso, pode ser útil levantar e afastar o alto-falante. Apenas tome cuidado para não puxar o cabo conector flex fino enquanto estiver trabalhando.

  33. sSfLtFMiJbEoBxdc
    sSfLtFMiJbEoBxdc
    GJvrQZVwkH6MoFqI
    6ntOJfMeAsUcrAFv
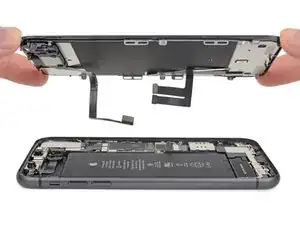
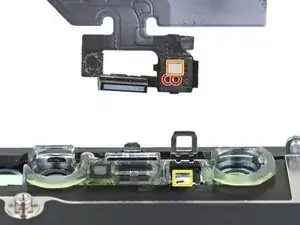
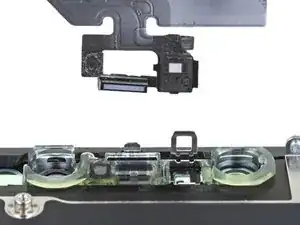
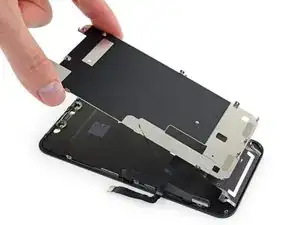
    • Remova o conjunto do alto-falante auricular e de sensores frontais.

    • Durante a remontagem, verifique a posição do módulo de plástico preto que contém estes componentes:

    • Sensor de proximidade

    • Flood illuminator

    • O módulo deve ser posicionado de modo que esses componentes não sejam obstruídos por nenhum adesivo.

    Also, your iPhone 11 will now display a notification that the screen on it is not original.

    Rob -

    Also if I‘m using an original Display? Will coping screen data with iCopy help? Or is there any other solution to get rid of this?

    Katrin -

    How about LCD shield plate removal instructions?

    Os Reini -

    When I reinstall this assembly on the new (ifixit) screen, once all the sensors are in their holes and you fold the speaker back over, the screw holes don't line up, OR the speaker doesn't fit snugly. You can move the speaker so its no longer snug, and the screw holes line up. Is there a trick to this?

    John M -

    My replacement screen didn't come with the transparent plastic bits surrounding the front camera, infrared and earpiece speaker... I wonder what would have turned up if I didn't purchase the " original" version in that dodgy shop... lol. If this is your case, you need to clean the glass off this piece of plastic and metal, try not to damage the earpiece protection included on top of that piece, and go back to that shop for a good argument! Got some pics if needed.

    Simon Villaeys -

    Correction: I finally got rid of the earpiece protection because I hadn't noticed that was included in the replacement screen, although of much lower quality than the "real" original.

    Simon Villaeys -

    In addition: be veeeeeery gentle on the heat gun, I accidentally melted a bit of the plastic in the "plastic and metal piece"... Made the ambient light sensor fit kinda loose. :/

    Simon Villaeys -

    Thanks a lot ! My son's iphone is reborned, and I'm upskilled !

    Jean-Philippe d'HAUSEN -

    I had an issue where I was trying to double up on the camrea holder bracket. I checked the old screen and realised that it didnt have the plastic Bracket. Thats why I couldn't close the screen. Some screens some with it pre attached, but mine stuck to the sensors.

    Declan Richmond -

  34. LErxnWwmQ6AGr2Kj
    LErxnWwmQ6AGr2Kj
    EwUPPqr1142GBaRv
    gFxrnm5vMsYI1CTj
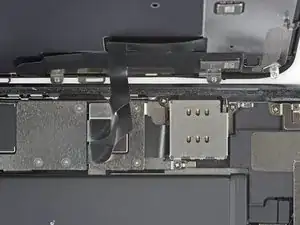
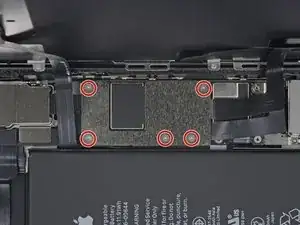
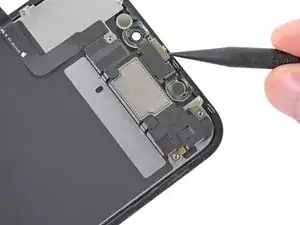
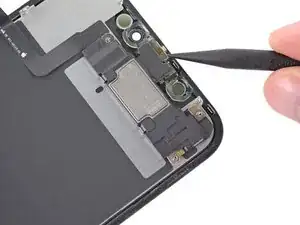
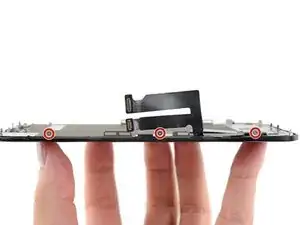
    • Com uma chave Y000, remova os parafusos de 1,1 mm que fixam a blindagem da tela LCD:

    • Três parafusos na lateral próxima dos cabos da tela

    • Mais dois parafusos no lado oposto

    • Pressione a chave firmemente no parafuso enquanto o gira. Se necessário, você pode usar a espátula para apoiar cada um dos parafusos por trás, a fim de aplicar mais pressão nos parafusos sem empenar a blindagem.

    There is two more screws at the bottom !

    ubrunner -

    L’appui sur les vis est réellement important, au risque de foirer celles-ci. N’hésitez donc pas à appuyer, en faisant contre-poids du côté opposé bien évidemment.

    Tristan Nans -

    This is the bit that was difficult. The tri'point screwdriver y0000 barely fits this tricky size. It could have been the cheap screwdriver that came with the screen replacement kit. Stripped 2 screws, drilled out with an appropriate size drill bit ' frame still intact. I had more success using a size 0.7mm flathead screwdriver.

    noname -

  35. 1CnhgaMGZO2r5iLf
    1CnhgaMGZO2r5iLf
    vGnGCFRBYSwY1MvE
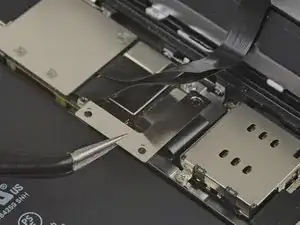
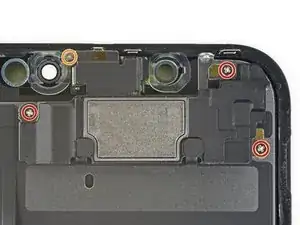
    • Remova os parafusos Y000 de 1,1 mm restantes das bordas superior e inferior da blindagem da tela LCD:

    • Dois parafusos próximos aos recortes das câmeras

    • Dois parafusos nos cantos inferiores

  36. uDReDhFA2bXRCmGY
    uDReDhFA2bXRCmGY
    3OquLX6XiiokcWmj
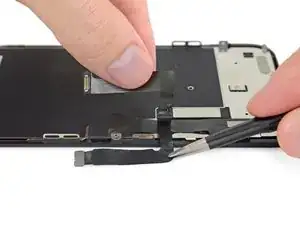
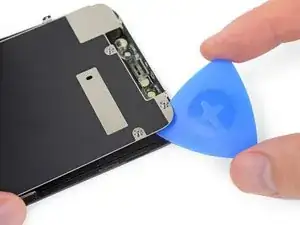
    • Aplique um pouco do calor de um iOpener (ou de um secador de cabelo ou uma pistola de ar quente) na parte traseira da tela, para amolecer o adesivo que fixa os cabos da tela na blindagem da tela LCD.

  37. jUeKbHyLYRvGYJsL
    jUeKbHyLYRvGYJsL
    w1BKSNmonggoONeE
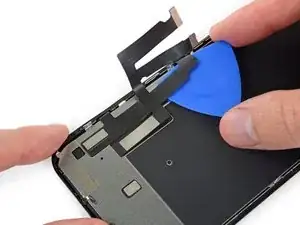
    • Insira uma palheta de abertura entre os cabos da tela e a blindagem da tela LCD.

    • Deslize-a em direção à borda inferior da tela para começar a separar os cabos.

    • Pare quando chegar ao final do primeiro cabo.Pare quando chegar ao final do primeiro cabo.

  38. fcgR2GHWiHSdC13g
    fcgR2GHWiHSdC13g
    T6giiyp3fn63fVkN
    Wl6pGKQ4ARdIfbCB
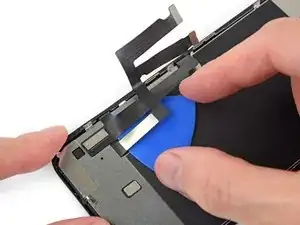
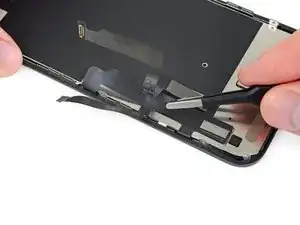
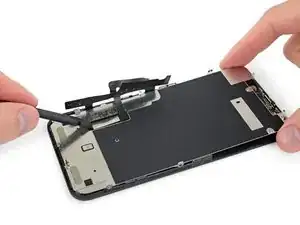
    • Insira novamente a palheta de abertura, desta vez "entre" os dois cabos.

    • Deslize a palheta até a borda inferior da tela para separar os cabos.

  39. ebZhaRcBGUTPHBmU
    ebZhaRcBGUTPHBmU
    qqSplMxIQyhShwLp
    • Pegue cada um dos cabos próximo à sua dobra de 90° e separe-os.

  40. yUBidA5PHmIuND3A
    yUBidA5PHmIuND3A
    1erlLVnZwKTYFxVF
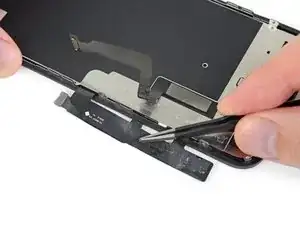
    • Puxe todo o cabo do digitalizador afastando-o da blindagem da tela LCD e vire-o para reservá-lo.

    Be very careful of all parts of the ribbon cable connected to the screen, especially the segment close to the top, as it can tear easily at this

    crtrue -

  41. nkFO3PQleSRFUECt
    nkFO3PQleSRFUECt
    UyMn2VyuE4OrTSgM
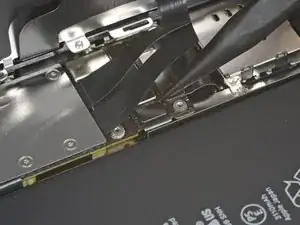
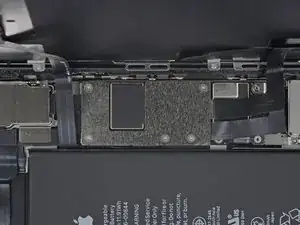
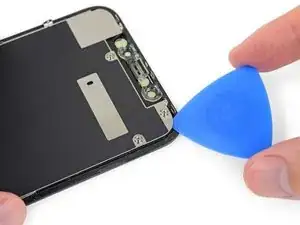
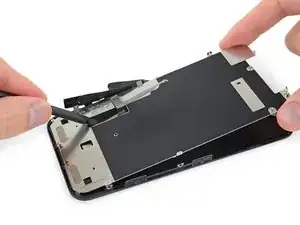
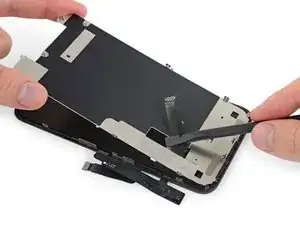
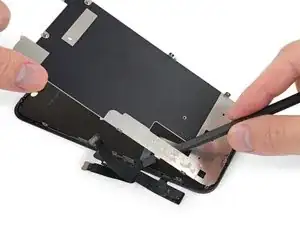
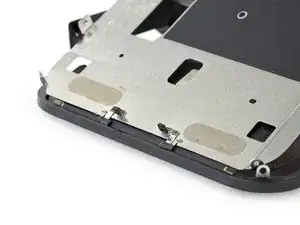
    • Insira uma palheta de abertura sob a borda superior da blindagem da tela LCD e gire-a para separá-la da tela.

  42. qSMxGj4yxRj3J5Yh
    qSMxGj4yxRj3J5Yh
    ZpwYy4EgYDZbXFqt
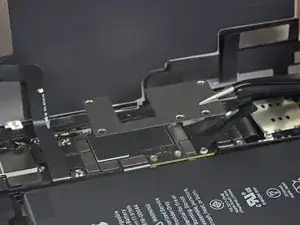
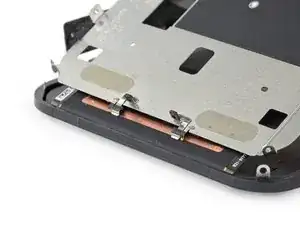
    • Segure a blindagem da tela LCD pela borda superior e pivote-a alguns poucos graus para cima.

    • Com o auxílio de uma espátula, pressione suavemente a parte inferior do cabo da tela, empurrando-o através do recorte da blindagem da tela LCD.

  43. xAeYRm6WGKRSWj2L
    xAeYRm6WGKRSWj2L
    jXPBpfu5YkGrevZ1
    pLKbrLHHUQvuNTsO
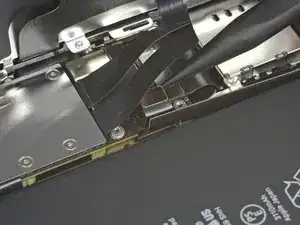
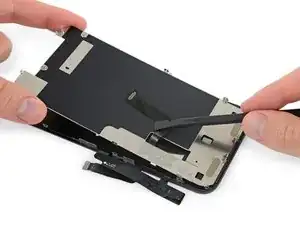
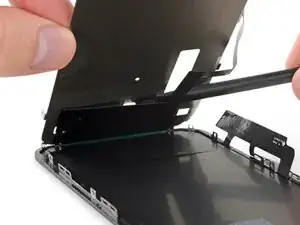
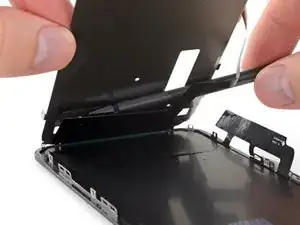
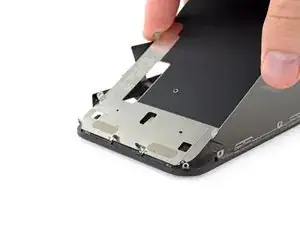
    • Levante um pouco mais a borda superior da blindagem da tela LCD e passe o restante do cabo da tela pelo recorte da blindagem.

  44. rwMpFGFiGRCyTCAK
    rwMpFGFiGRCyTCAK
    m3qLyiEQORG4VRDH
    2EcKI2U1qeIrwc3P
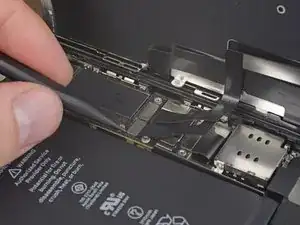
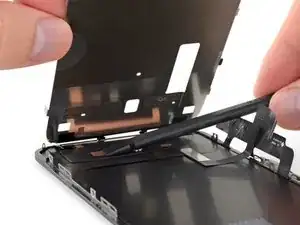
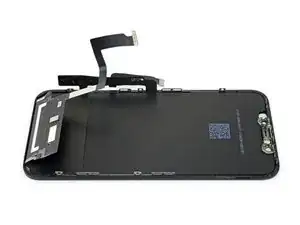
    • Levante a proteção do LCD mais até formar um ângulo alto, e você poder ver o restante do cabo da tela colado na parte traseira.

    • Passe uma espátula entre a blindagem da tela LCD e o cabo da tela e separe-os completamente.

  45. I1CskVXDHR6Tfsux
    I1CskVXDHR6Tfsux
    tDfKre6SyCpPgoMY
    cMPjSNJlHEmNaYUW
    • Ao levantar a blindagem da tela LCD, observe os pinos de metal na borda inferior.

    • Durante a remontagem, certifique-se de que esses pinos (também conhecidos como dentes EMI) estejam inseridos corretamente na estrutura da tela LCD, como mostra a figura.

    hello whaty if one of the golden contact pins ( i guess it is) to be exact right one has freyed up a bit and looks messy. could it cause harm or it is not very important?

    thetroll1401 -

    On reassembly leave the adhesive cover on the digitizer cable so that it doesn’t get caught on the LCD shield while working the other cable in place and positioning the shield on the frame. When you are ready to stick the digitizer cable to the shield remove the protective plastic.

    pgrobin -

  46. ISJKZTNwdCZN3VRM
    • Remova a placa da tela LCD.

  47. k1xqLVCC1ZKI46wY
    • Só o que sobra são a tela LCD e o digitalizador.

    Tech nor working my iphone xr

    Mohammed Chand -

Conclusão

Compare a sua nova peça de reposição com a peça original - pode ser que você precise transferir componentes remanescentes ou remover suportes adesivos da nova peça antes de instalá-la.

Para a remontagem de seu dispositivo, siga essas instruções na ordem inversa.

Leve o seu lixo eletrônico para um ponto de recolha ou uma recicladora certificada.

O reparo não está indo conforme o planejado? Consulte a nossa extensa biblioteca de soluções de problema para iPhones ou em especial a nossa página iPhone 11 não quer ligar. Tente as nossas dicas básicas para solução de problemas ou faça uma pergunta na comunidade de respostas para o iPhone 11 para obter ajuda.

Jeff Suovanen

Membro desde: 06/08/13

450006 Reputação

24 comentários

I am a repair technician from California, and I use your company’s tools and I gotta say that I love them. Very sleek, and the powerful magnetic bits help me get the job done. I did 5 repairs yesterday and each one finished was a good feeling of satisfaction. In the future, if you guys decide to make some sort of in-depth manual for the newer iPhones, that would be great because diagrams are not only a great way for me to sharpen my own skills, but will help make training new techs a breeze.

Cheers all the way from Fresno!

anthony_brletic -

Hi, I replaced the display independently, not in the Apple service, to my disappointment I found a message in the device that warned me that the part is not original, consequently the FaceID was disabled. Can you tell me about ear? Thank you

954kuki -

Getting a message saying not genuine is known issue. there is no workaround yet. as far as face ID not working, you need to check for tear on the flex as you probably damaged it during transfer. If it’s broken, there is no way to fix.

iFIX smartphone -

The Important Display Message can be removed, check here: https://www.youtube.com/watch?v=bLo0_p7O...

Ricky LV -

Great repair guide. My only issues:

1. There are no instructions for removing the metal panel from the back of the old screen (nor how to reinstall it).

2. There are no instructions for removing the old, black adhesive from around the edge of the old case (nor the much needed instructions for reinstalling the new adhesive without damaging it or compromising the purpose of replacing this adhesive). This info is also missing from the adhesive replacement page for the iPhone 11.

I was able to patiently work my way through both of these issues and complete the repair on an iPhone 11. Covering these issues as additional steps of the repair guide would be very helpful for future iFixers.

Ryan R. Smith -

Anyone have the phone randomly reboot after screen replacement? All aspects work on the phone after replacement. It just randomly goes black and then restarts

Cory Schumacher -

Maybe just a bad battery connection or a stained/bent connector

Richard Kraus -

I am a repair tech at a repair shop we do more but thats what we are called and i love you’re tools, they are just perfect for everything and all i can say really is, be super careful with the screen and the prox flex, they can be eaisly ripped and really ruin you’re day because to restore the face id with a new prox requires micro sodering but other then that just be careful

Zach Mentz -

I find the OEM screen looks more yellowish, is it me only?

Victor Santana -

OEM screens tend to have the colors a little bit off, could also be caused by disabled true tone.

Richard Kraus -

Overall a very useful repair guide, there´s just one issue I came across:

Different display manufactors.

Been looking around, due to some issues and so far I´ve seen some different manufactors for the iPhone 11 (and the XR):

Toshiba (the print on the display starts with C11 or F7C, as seen on the last picture)

LG (DTP or C3F)

Sharp (DKH)

someone else stumbled across this?

Günter Scherf -

Apple doesnt offer new displays, however afaik the original apple product manufacturer foxconn refurbishes original screens. Or you could just get a refurbished screen from somewhere else…

Richard Kraus -

For iphone 11, on the flex if there is a square code QRC is DTP and a rectangle is C11

Didier -

Awesome guide, thank you very much! By the way, after the replacement the true tone function will most likely be disabled, which can as far as i know only be fixed by copying the firmware from the old screen over to the new one with a programmer (for example Qianli iCopy Plus). Also, the phone will notify you that the screen is not genuine after every restart and it will always show a notification in the settings. The only way to get around that is to swap the chip on the display cable with a hot air station and solder paste (not worth the hustle in my opinion, i dont mind the one notification in settings). https://www.youtube.com/watch?v=agq2HPK-...

Cheers!

Richard Kraus -

Hi, since replacing my screen my ear speaker has been very muffed/static. Is there any way I can fix this? Thanks

caoife98 -

I’d suggest checking the mesh under the earpiece for dirt and stuff that could be blocking the sound and maybe trying to refit it, maybe it’s not properly seated. Could also be fixed by just reseating the earpiece flex…

Richard Kraus -

completed the guide. thx. my iphone claimed the screen is not original. anyway, seems to work correct

Miguel Cretu -

Hello I was wondering if anyone could help me. I recently replaced the screen of an iphone 11. The phone was good for the first couple of days but now the customer is having some issues. His display is something randomly scrolling up, mainly while watching videos and sometimes the screens just starts to act crazy and press random things. I’ve been doing some research and I found that something i could do is reset the phone to factory settings. However i’m unsure if this is like a software or a hardware issue. Any advice is helpful, thanks!

Andres -

From my experience this sound like a ghost touch issue. Usually caused by a loose/broken/dirty connection or an overly tight screw somewhere. It's unlikely, but if you installed a screen protector afterwards, it may have a fingerprint or dirt between the protector and the phone screen. Same thing happened when we did my sisters phone at our store, a connection was loose and a screw was a little bit tight. Maybe a more experienced tech could offer more in-depth insight.

Teejay R -

Hello, I followed the guide and repairs. My phone will not come on. Unless sitting on the charger and then I only get the Apple logo for a few seconds and it does this repeatedly. Any guess on where I went wrong? Thanks

Coty Alred -

I put yall iPhone screen on now my phone wouldn’t up n it’s say iPhone battery not genuine with my phone

Darius -

Hi all, Im still trying to get a better understanding of the different types of "screen repair" that can be done.

From what I understand, it is possible to perform a replacement of ONLY the "front glass/screen" with 3rd party, non-OEM screens that you can purcahse online) OR you can replace BOTH the screen and digitizer.

ALot of 3rd party sellers sell a "screen replacement" but I am not sure exactly what I need to look for.

My front screen is cracked but the damage that is visible is purely physical (II don't see /experience any altered pixels, flashing colors etc, just dealing with a iphone with a cracked front screen). BUT in addition to the physical damage, the right side of my iphone 11 (specifically a small area that covers the "&" sign and letter "i" on my keyboard are non-responsive.

Now, is the item Im commenting on going to fix my touch issue? If not, which Ifixit replacement part(s) will resolve this? if at all.

thanks

patrick c -

The ribbon cables used on this screen are incredibly weak, when compared to the apple ones. Did this whole thing and had the phone fully working. Made sure the cables were in the right spot and started pressing the screen in just for the display cable to split in half from a couple pounds of pressure. Absolutely livid. Waste of money and time. You can really tear these cables apart with the tiniest fold.

Thomas Rucci -

Installation guide was a success, no issues there. Touchscreen accuracy and repeatability is lacking on iPhone 11

Snakey23 -