Introdução

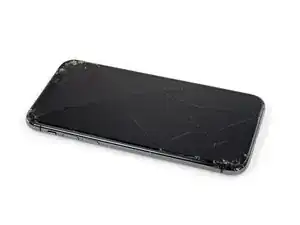
Se a sua tela do iPhone XR estiver rachada, não responder ao toque ou não mostrar nenhuma imagem quando o telefone estiver ligado, use este guia para restaurar o funcionamento do iPhone com uma nova tela, ou melhor, com o conjunto da tela.

Este guia deve ser usado somente com telas de reposição completas. A tela de reposição deve vir pré-montada em uma estrutura e ter uma blindagem do LCD feita de metal fino pré-instalada na parte traseira. Se essa blindagem do LCD estiver ausente, siga este guia mais detalhado para trocar a tela e deixar instalada a blindagem antiga do LCD.

O conjunto combinado de alto-falante auricular e sensor afixado na parte traseira da tela está emparelhado de fábrica com o seu iPhone específico, portanto, é necessário transferi-lo da tela antiga para a nova durante a substituição da tela. Ele contém o flood illuminator, que faz parte do recurso biométrico de segurança Identificação Facial. Se ele for danificado ou substituído, a identificação facial deixará de funcionar, portanto tome muito cuidado para não danificar nenhum desses componentes durante este procedimento. Se ele for danificado, somente a Apple poderá restaurar a função da identificação facial.

Nota: A funcionalidade True Tone é desativada após a substituição da tela, mesmo quando se usa uma tela original da Apple.

  1. aGeYRP3gUuAwIhn6
    aGeYRP3gUuAwIhn6
    n6aSREpvVP6h1IbH
    • Antes de começar, descarregue a bateria do iPhone abaixo de 25%. Uma bateria de íons de lítio carregada pode pegar fogo e/ou explodir, se perfurada acidentalmente.

    • Desligue o iPhone antes de iniciar a desmontagem.

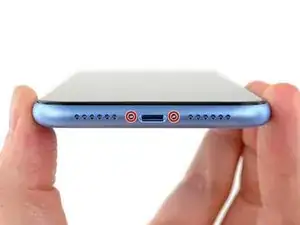
    • Remova os dois parafusos pentalobe de 6,7 mm na borda inferior do iPhone.

    • Abrir o iPhone comprometerá suas vedações impermeabilizantes. Tenha à mão as vedações de reposição antes de prosseguir com esta etapa ou tome cuidado para evitar a exposição a líquidos se você montar novamente o iPhone sem substituir as vedações.

    • Há uma gaxeta de borracha preta logo abaixo da cabeça de cada parafuso pentalobe. Para obter proteção máxima contra poeira e líquidos, verifique a condição das gaxetas ou substitua os parafusos durante a remontagem.

    One of my gaskets was as shown in your second photo, the other had been worked into the threads (as if smeared) probably from the factory and was completely unusable.

    In place of replacements (unsure of where to purchase) I just used a clear silicone caulking on both screws upon reassembly to offer at least some water seal. I wish these gaskets were included with the gasket waterproofing sealant kit!

    Erica -

    Is there any place to buy these screw gaskets? I haven’t seen it mentioned anywhere but one of mine was pretty much chewed up. Silicone should work but I’d prefer the oem solution.

    Chilinh Nguyen -

    I found a place on Amazon that sells them. It's cheapest to get a full set of screws than to get just these. $5-$6 USD.

    J Olin -

    Can it be dead?

    Lulu navarro -

    If I transfer the data from the old to the new battery with an icopy, don't I get an error message?

    David Julian Krause -

    how am i supposed to know if the battery is below 25% if the screen won't turn on?

    Beth Jackson -

    Spoiler alert! I just followed all the steps and if you bought the anti-clamp you might save a lot of time and some unreversible steps.

    I recommend that you read all the steps before beginning and follow the steps up to the point where the guide removes the screen (step 23). After that read again the precautions of step 41 and try the next thing:

    - Using something like the iOpener hot bag, heat up the back side of the phone where the battery is glued to for some minutes

    - Alternatively use a 3d printer heat bed at 60 degrees Celsius

    - Once the back of the phone is hot to the touch, enough to make it uncomfortable to the touch, find a portion of the battery with a smooth surface and attach the anti-clamp to it and the back of the phone

    - Follow the steps 4 and 5 to detach the battery from the frame

    If this procedure works you will not have to remove some elements such as:

    - lower speaker black tape (step 28)

    - lower speaker water proof gasket (step 33)

    I hope that someone find this helpful. Happy fixing!!

    Julio Beltran -

  2. 6UPwoloGBO4tmVoS
    6UPwoloGBO4tmVoS
    BmSYPJmOy6dbHipF
    3EOdQPAGOmiuhoKU
    • Se você inserir uma palheta de abertura muito fundo, você pode danificar o seu dispositivo. Execute esta etapa para marcar a palheta e evitar danos.

    • Meça 3 mm a partir da ponta e marque a palheta com um marcador permanente.

    • Você também pode marcar as outras pontas da palheta com medidas diferentes.

    • Como alternativa, prenda uma moeda com fita adesiva em uma palheta, deixando 3 mm de ponta.

    Got to step 2 and realized the fix kit doesn't include an opening pick! Looks like a guitar pick, and I have those lying around. Is that expected? Looks like the pick is used in many steps below. There's a little blue crowbar that isn't mentioned in the instructions. Perhaps that replaces the opening pick?

    Sloan Looney -

    Hi! I can't see which guide you were using when writing this comment. Can you reply here with which guide and fix kit you used?

    Clay Eickemeyer -

    I see you posted this in Meta. I hope it's resolved soon! In the meantime, a guitar pick may work well enough for your repair.

    Clay Eickemeyer -

    what fix kit?

    Meow Purr -

    Super late reply to original post but my pick was with the replacement screen and not the tools kit.

    Nichol Augustus -

    My fix kit didn't include an opening pick either

    WILLIAM HARRIS -

    Make sure you check inside the black boxes after emptying them. My pick was stuck inside one of the boxes.

    AndyF -

    My AliExpress refurbished screen came with a pick that has a coin-like circle that pops out, so no modification was necessary

    Gijs Leegwater -

    the picture shows 3 cm but the description says 3 mm's. Which one is it?

    John Pena -

    That is a misunderstanding. It is a ruler with a scale for cm, it shows 0.3 cm, i.e. 3 mm.

    VauWeh -

    Oh, come ON!

    Big Ed -

    It will ALWAYS be millimeters on a phone, but this step is ridiculous, skip it!

    Leif DeWolf -

    @leifdewolf I wouldn't skip it for a first repair.

    Gabriel-Science -

    It's not an Ifixit KIT if it doesn't include everything. You'll need to order the opening pic separately. Or head to Walmart like myself and look for guitar pics. Hopefully, this will work just as well.

    Jaleeljb97@icloud.com -

    No pick in mine as well. It’s really not clear that you have to order this separately when ordering an IPhone SE 202/2022 screen repair kit. Is this the case?

    Jackson Castiglione -

    Frustrated, I ordered a compact package where everything was encapsulated. Useless suction tools could not separate the screen. If it is unable to decouple the screen, then why sucking suction tools you have provided.

    Shourob Datta -

    For my kit the triangle pick was stuck inside the box with the screen not with the other tools maybe it's also there for you

    Henry Scheibehenne -

    Y’all are getting far, FAR too detailed with some of this stuff…. Measuring and marking the pick that you won’t actually use to open the device?!? lol that’s kinda funny. Just heat it up, grab a spudger, and the back just pops right off! The iFixit tech need to stick to the KISS method more often, you know KEEP IT SIMPLE STUPID!!! Like l, for reals, I’ve been doing this stuff for YEARS and using iFixit guides regularly and this is just ridiculous at this point!

    Leif DeWolf -

    Will the phone still work if the sensor assembly on the back of the screen is damaged?

    Mutshidzi Rambau -

    I don't have a pick, but how much better are these picks than an old credit card for opening an iPhone 13 mini?

    mike eng -

    an old credit card will do that job, although you'll have to pull a little bit more if the credit card is thicker than the picks, just again, be careful and don't insert it that far

    Russ Torrez -

    The pick in my iFixIt kit was packed with the battery, not with the rest of the toolkit.

    Tony Houlihan -

    Many of these comments are PURE GOLD. Seriously y’all, if you’re not sure if it should be 3mm or 3cm or whether you could find and use an alternative pick, mending an IPhone really isn’t for you. Find a responsible adult and get back to doing something simpler…

    Alasdair Cameron -

    indeed!!!! I agreee!!!

    Lonnie -

    I bought the kit of five just in case. I used two and marking them at 3mm was definitely helpful.

    Megolina -

    Funktioniert super. Habe vorher sicherheitshalber den Akku abgesteckt.

    Lukas D -

  3. C3NHJXiiQMPmRmH1
    C3NHJXiiQMPmRmH1
    AvZqCHCmwCqavQEa
    ElEZlRVXFlXaE11y
    • Se o seu iPhone tiver uma tela rachada, mantenha as rachaduras sob controle e evite danos corporais durante o reparo colocando fita adesiva sobre o vidro.

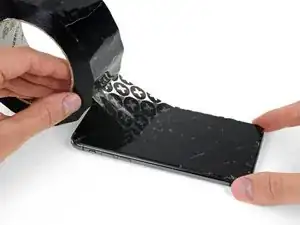
    • Coloque tiras sobrepostas de fita adesiva transparente sobre a tela do iPhone até que toda a superfície fique coberta.

    • Use óculos de segurança para proteger seus olhos de qualquer vidro que possa ser liberado durante o reparo.

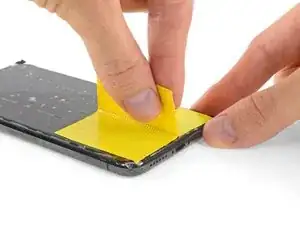
    • Se não conseguir fazer com que a ventosa grude nas próximas etapas, dobre um pedaço de fita adesiva resistente (como fita adesiva vedante) na forma de uma pega e levante a tela com ela.

    • Se tudo mais falhar, você pode colar a ventosa na tela com supercola.

    This looks like a repeat of Step 3.

    GenjideGaulle -

  4. lXwQA2bBknBmaYMk
    lXwQA2bBknBmaYMk
    FHSJhUkdlCcsOYQb
    eEJeUWVQi3pZT5nt
    • As próximas três etapas demonstram o Anti-Clamp, uma ferramenta que projetamos para facilitar o procedimento de abertura. Se não estiver usando o Anti-Clamp, pule três etapas para um método alternativo.

    • Para obter instruções completas sobre como usar o Anti-Clamp, consulte este guia.

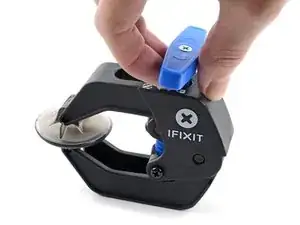
    • Puxe a pega azul para trás para destravar os braços do Anti-Clamp.

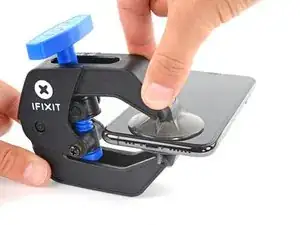
    • Deslize os braços pela borda esquerda ou direita do iPhone.

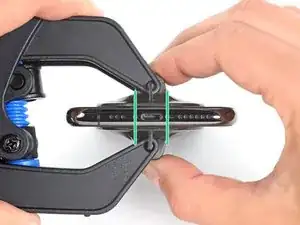
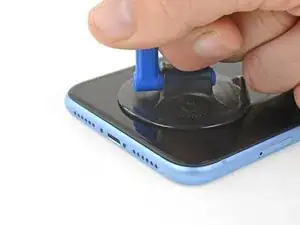
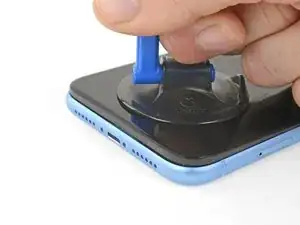
    • Posicione as ventosas próximo à borda inferior do iPhone - uma pela frente e a outra pela traseira.

    • Aperte as ventosas uma contra a outra para aplicar sucção na área desejada.

    • Se você achar que a superfície do iPhone é muito escorregadia para o Anti-Clamp se prender, você pode usar fita para deixar a superfície mais aderente.

  5. EOrAXSnhbDqUEfeq
    EOrAXSnhbDqUEfeq
    IZBIIwSmgie3pKNV
    AX2lQWb4EBr6rFML
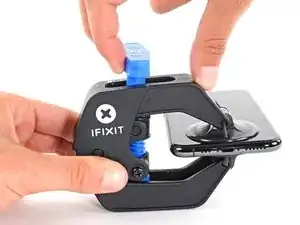
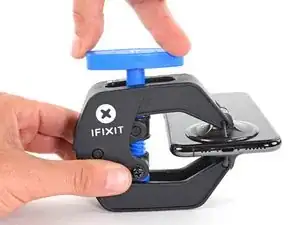
    • Puxe a pega azul para a frente para travar os braços.

    • Gire a pega 360 graus no sentido horário ou até que as ventosas comecem a se esticar.

    • Certifique-se de que as ventosas permaneçam alinhadas uma com a outra. Se elas começarem a ficar desalinhadas, solte um pouco as ventosas e realinhe os braços.

  6. rIFHrN5JZhosBVDF
    rIFHrN5JZhosBVDF
    RHq3otgHGgSRUaHQ
    MyajHuYx1EYm4LAd
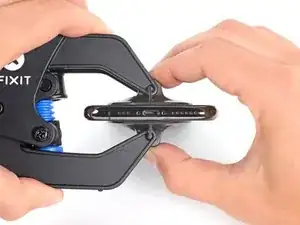
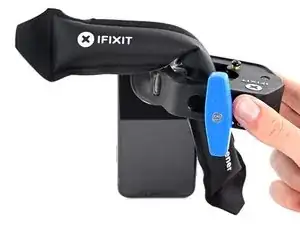
    • Aqueça uma bolsa térmica iOpener e passe-a pelos braços do Anti-Clamp.

    • Você também pode usar um secador de cabelo, pistola de ar quente ou uma superfície aquecida - mas calor extremo pode danificar o visor e/ou a bateria interna, portanto, proceda com cuidado.

    • Dobre a bolsa térmica iOpener de modo que ela fique sobre a borda inferior do iPhone.

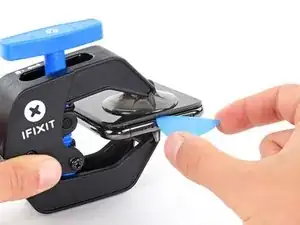
    • Aguarde um minuto para que o adesivo tenha a chance de se soltar e apresentar um vão para a abertura.

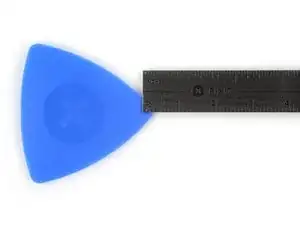
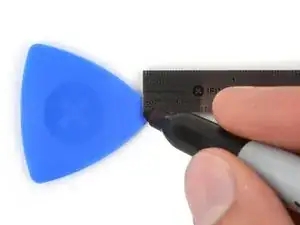
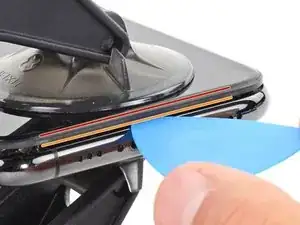
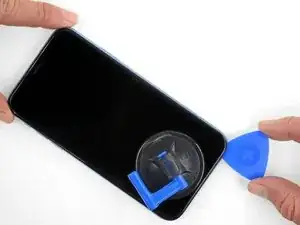
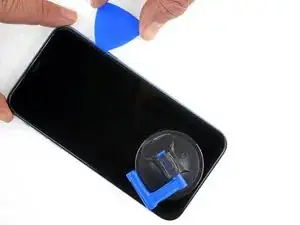
    • Insira uma palheta de abertura sob a tela e o painel de plástico, mas não abaixo da própria tela.

    • Se o Anti-Clamp não formar espaço suficiente, aplique mais calor na área e gire a pega um quarto de volta.

    • Não gire a pega mais do que um quarto de volta de cada vez e espere um minuto entre cada volta. Deixe que o Anti-Clamp e o tempo façam o trabalho por você.

    • Pule as próximas três etapas.

    Please UPDATE THIS STEP to say 'insert the opening pick underneath the PLASTIC FRAME OF THE SCREEN' and not the screen. Way too many people are taking this as the way to do it then posting their screen looks different when it's open when they've actually removed the screen leaving the frame in place. It's not rocket science.

    [deleted] -

    Thanks for the suggestion! We updated this step to clarify that.

    Arthur Shi -

  7. CvqPuR6YujN6uWQ6
    • O aquecimento da borda inferior do iPhone ajudará a amolecer o adesivo que prende a tela, facilitando a abertura.

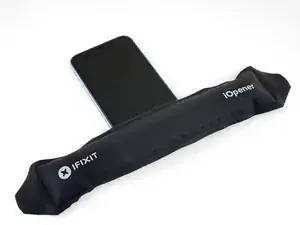
    • Use um secador de cabelo, uma pistola de ar quente ou prepare uma bolsa térmica iOpener e aplique-o(a) na borda inferior do iPhone por cerca de um minuto para amolecer o adesivo que se encontra por baixo.

    An alternative to the Iopener or heat gun is to heat water to EXACTLY 80 degrees F (cooking thermometer is great for this) and pour into a reinforced ziplock type bag. Leave the bag on the screen, but be sure that none of the hot water rests on the zipper portion, as the water is hot enough to soften that seal and leak out on to your device! This meat had is my personal favorite as the heat is distributed very equally and precisely as compared to a heat gun, but is more accessible than the Iopener.

    Colin Wylie -

    When using an iOpener, rest the glossy (transparent) side on the phone so it contacts the phone and conducts heat easily

    Afiq -

  8. P5PouqftuOuIAKpF
    P5PouqftuOuIAKpF
    IhTlLHCH2DAmlimO
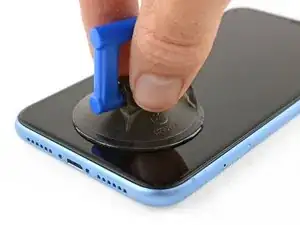
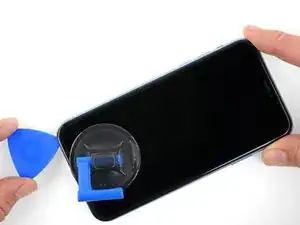
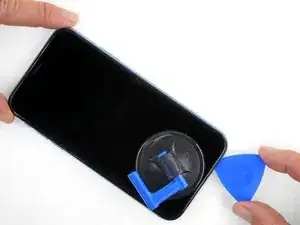
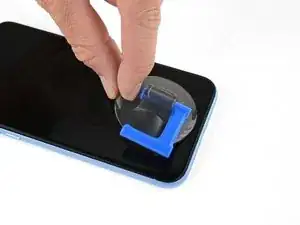
    • Se estiver usando uma ventosa de sucção simples, aplique-a na borda inferior do telefone, evitando a parte curva do vidro.

    My glass is so shattered that it is peeling off from the lcd panel. Are there any tips on how to remove both or remove just the lcd panel without the glass?

    AlexA -

  9. nmV3em2q4QXYS1al
    nmV3em2q4QXYS1al
    ade6PZ4Lt42pSQnj
    3fHmwqIgAuXYKGFA
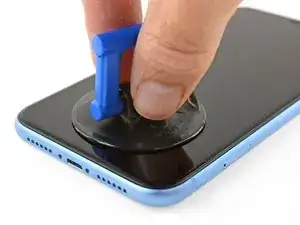
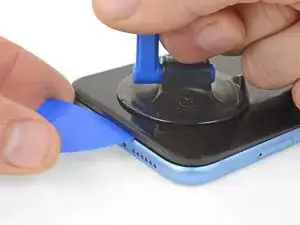
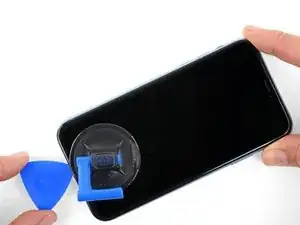
    • Puxe a ventosa para cima com pressão firme e constante para criar um pequeno vão entre o painel frontal e a estrutura traseira.

    • Insira uma palheta de abertura no espaço abaixo da, tela e da moldura de plásticomas não debaixo da própria tela.

    • O adesivo impermeabilizante que fixa a tela é muito forte; a formação dessa abertura inicial requer uma quantidade significativa de força. Se estiver com dificuldade para abrir um vão, aplique mais calor e mova suavemente a tela para cima e para baixo para amolecer o adesivo, até se formar um vão de tamanho suficiente para inserir a ferramenta.

  10. mTLhKZ2OFBeZ2Tdm
    mTLhKZ2OFBeZ2Tdm
    Y45KLZQdRY3bn32a
    frfW3Vhso4IPv1nR
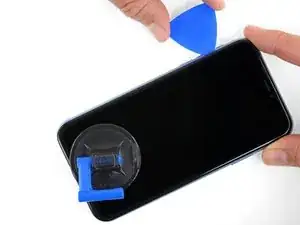
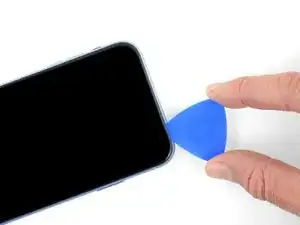
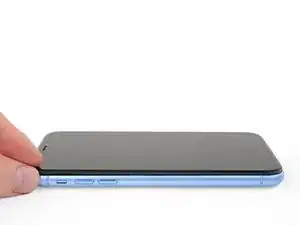
    • Deslize a palheta de abertura pelo canto inferior esquerdo e pela borda esquerda do iPhone, cortando o adesivo que mantém a tela no lugar.

    • Não insira a palheta mais do que 3 mm, pois isso pode danificar os componentes internos.

    I think it's important to note that depending on how a screen was damaged, make sure to insert the pic under the black bezel directly under the actual screen. This bezel is a frame around the digitizer. I unknowingly inserted the pic between the bezel and the screen, and separated them both. I did this all the way around the phone. So I basically had to struggle to keep together two different sections of the display assembly because of this mishap, until I removed all the ribbon connectors. It made things much more difficult.

    Dave -

    An edit to my above comment: by digitzer, I mean the LCD shield. My apologies.

    Dave -

    Yeah it’s helpful to just look at the screen they sent you. You’ll have a better idea of where to pry or stick your razor blade under!

    ryandlent -

  11. RiRjcYKAFFOeKIcv
    • Há cabos sensíveis passando ao longo da borda direita do iPhone. Não insira a palheta nos pontos marcados, do contrário você pode danificar os cabos.

  12. ciFaLRnrmwyZDMOS
    ciFaLRnrmwyZDMOS
    H5TqnANpvmXIGpQe
    SRHh1OkaYV5x5XkG
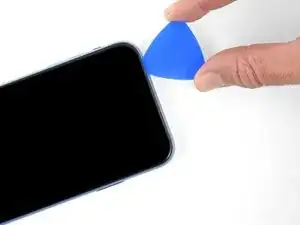
    • Insira novamente a palheta na borda inferior do iPhone e deslize-a para cima no lado direito para continuar separando o adesivo.

    • Não insira a palheta mais do que 3 mm, pois isso pode danificar os cabos da tela.

    My replacement screen for the XR has a black rim but it looks pink. Is that normal?

    Irwin Cantor -

    You can use some Isopropyl alcohol in a syringe with a thin needle to soften even more the adhesive around the screen. But be careful so as not to overdo it. Just a few drops. It will become more easier to remove the screen.

    Dan Brock -

    Step 11 says not to insert your pick around the right side to avoid damaging cables, then Step 12 says to insert it on the right side. Help, I'm confused!

    ingwis -

    Hi there!

    Thank you for the feedback! The wording in step 11 was definitely ambiguous, so we have changed it! You only need to avoid the marked spots rather than the right edge.

    Alex Diaz-Kokaisl -

  13. qJy3qiZlDfvYHwCQ
    qJy3qiZlDfvYHwCQ
    XxFonXKXmI3M5iSN
    1uZnbxjnhtQFtsUm
    • A borda superior da tela está fixada com cola e clipes.

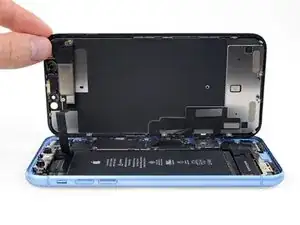
    • Deslize a palheta de abertura ao redor do canto superior da tela e, ao mesmo tempo, puxe ou movimente a tela com cuidado para baixo na direção do conector Lightning.

    • Os clipes irão se quebrar se você usar muita força. Trabalhe com cuidado e seja paciente.

    • Não insira a palheta mais do que 3 mm, pois isso pode danificar o conjunto de sensores do painel dianteiro.

    • Deslize a palheta para o canto oposto e corte o adesivo restante que estiver prendendo a tela.

  14. OHLZ3rYnPU6OUxI2
    • Puxe a ventosa de sucção pela pequena lingueta para removê-la do painel frontal.

  15. gvaAabBGpp5PNyMF
    gvaAabBGpp5PNyMF
    aLbYdtq5MLGGwHqi
    41YpqEeGtyYn5Wxq
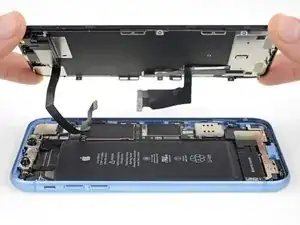
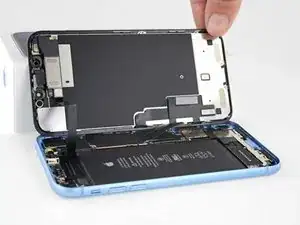
    • Abra o iPhone virando a tela para cima pelo lado esquerdo, como se estivesse virando a contra-capa de um livro.

    • Não tente ainda separar completamente a tela, pois vários cabos planos frágeis a conectam à placa lógica do iPhone.

    • Apoie a tela em algo para deixá-la de pé enquanto você executa os trabalhos no fone.

    • Durante a remontagem, vire a tela para baixo na posição de montagem, alinhe os clipes ao longo da borda superior e pressione cuidadosamente a borda superior antes de encaixar o resto da tela. Se não encaixar facilmente, verifique o estado dos clipes ao redor da tela e certifique-se que eles não estejam tortos.

    sure looks like the "hinge" is on the right hand side to me.. not left...!

    Doug Trout -

    If you leave the suction cup attached to the screen during the “hinging” process, it makes for a very handy holder for the screen until it’s completely detached.

    Richard Deubler -

    What about the sticky black adhesive clinging to the inside of the case?

    Ronald -

  16. Pm3XuCwO4BcYdoNT
    Pm3XuCwO4BcYdoNT
    dbH2ibTJKmdNSytC
    • Remova os três parafusos Y000 de 1,2 mm que prendem o suporte que cobre o conector da bateria.

    • Remova o suporte.

    • Ao longo deste reparo, rastreie todos os parafusos e certifique-se que eles retornem exatamente ao local de onde vieram para evitar danos ao seu iPhone.

    • Durante a remontagem, esta é uma boa hora para ligar o seu dispositivo e testar todas as funções antes de fechá-lo. Lembre-se de desligar novamente o seu fone por completo antes de continuar os trabalhos.

    Definitely make sure all three lobes of your tool are aligned before use (it’s a little harder to tell with this style of bit) and apply even and adequate pressure to ensure it grabs as you spin the driver to prevent disfiguring the lobes/slot of the screw head.

    Unfortunately my Y000 tool was perhaps not the best fit (tolerance a bit off) in these screws and I ended up stripping out the heads of all three of these. I started to panic but after I sanded the tip of my Y000 bit down a little with super fine grit (1000CW-C) sand paper to flatten the domed tip (visible with macro lens) and give it a bit more bite I was able to remove and reinstall without issue—in fact I had to remove and install them twice since I forgot my adhesive tape during reassembly, so the screws survived and the sanded bit worked.

    Erica -

    +1 to above comment. I bought a cheap kit from Amazon and the Y000 screw driver is not good for this job. I’m concerned that I may have disfigured the heads and i type this comment in the midst of my fix :D Be gentle and assess if you can remove at least one screw with your driver before rummaging through all three and other similar screws holding display connector as well.

    Shan Potti -

    Update to above comment. I got hold of a Y0.8 screw driver bit (lucky to find an ORIA screw driver kit in my office) and it works like wonders :) Now back to work…

    Shan Potti -

  17. wTxgGtY4ALPOaL6M
    wTxgGtY4ALPOaL6M
    oLrG4CKHkHQWnl5b
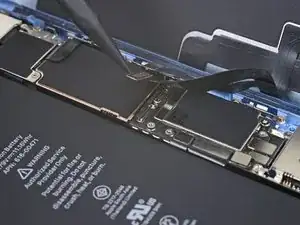
    • Com a ponta pontiaguda de uma espátula, erga o conector da bateria em linha reta, para fora do soquete.

    • Tente não danificar a vedação de silicone preta que envolve essa e outras conexões da placa. Essas vedações oferecem proteção extra contra a entrada de água e poeira.

    • Vire o conector ligeiramente para fora da placa lógica para evitar que ele entre acidentalmente em contato com o soquete e forneça energia elétrica ao telefone durante o reparo.

  18. ycOPoUnmEuOGtRXs
    ycOPoUnmEuOGtRXs
    AiuRYCepIGVGVEUA
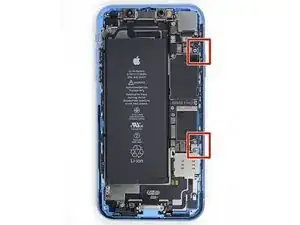
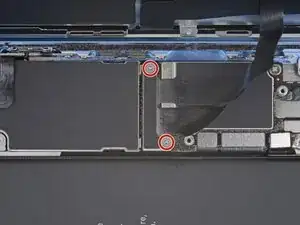
    • Remova os dois parafusos Y000 de 1,2 mm que prendem o suporte do conector da tela.

    • Remova o suporte.

    What if the screw is damaged and you can’t get one out?

    Kashawn Benjamin -

    Same issue here. These screws are a lot thighter than the others. Maybe add a caution notice to be patience with these ones.

    What you can try is superglue to make it attached to the screw.

    Lennard -

  19. CFAlA4IEWSGKiQBn
    CFAlA4IEWSGKiQBn
    NAhKByGJ4iRqHGvE
    • Com a ponta pontiaguda de uma espátula, erga e desconecte o cabo do digitalizador.

    • Para reconectar conectores press-fit como este, alinhe e pressione cuidadosamente um lado até que ele se encaixe e, em seguida, repita no outro lado. Não pressione no centro. Se o conector estiver desalinhado, os pinos podem entortar, causando danos permanentes.

    • Se alguma parte da tela não responder ao toque após o reparo, desconecte a bateria e recoloque esse conector, certificando-se de que ele se encaixe totalmente com um clique audível e de que não haja poeira nem outra coisa obstruindo o soquete.

    After getting everything back together, the bottom half of the screen didn't respond to touch, so I disconnected the battery, blew out the display connectors with canned air, and reseated them. I did that a few times, but the same problem occurred. Any other ideas?

    Bob Cassidy -

  20. EF5KUKKN1562jycp
    EF5KUKKN1562jycp
    hqHtSbHNDEqk2pPD
    • Com a ponta pontiaguda de uma espátula, desconecte o conector do cabo da tela.

    The new display cable isn’t snapping in but I was just able to snap in the old one. Did I break the new one somehow?

    Andrew Pierson -

    Same it is really frustrating, just keeps slipping up and its bound to get damaged

    Daniel Maldonado -

  21. erV5SYvpSFqRXnWJ
    erV5SYvpSFqRXnWJ
    C5NmtarPVEAnBWBm
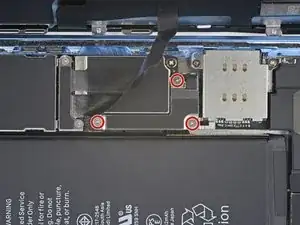
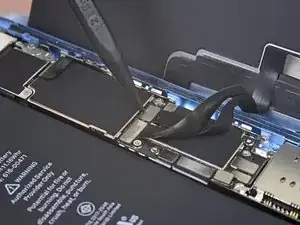
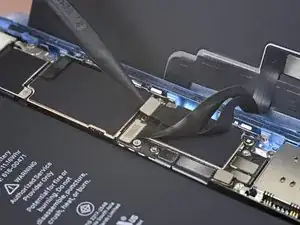
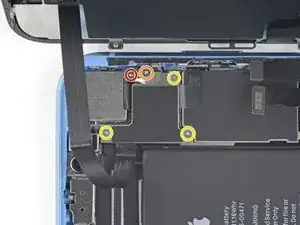
    • Remova os cinco parafusos que prendem o suporte do conector da placa lógica à estrutura traseira:

    • Um parafuso Phillips nº 000 de 1,3 mm

    • Um parafuso Phillips nº 000 de 1,5 mm

    • Três parafusos Y000 de 1,2 mm
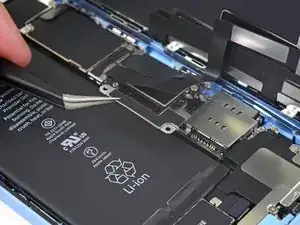
    • Remova o suporte.

    • Tenha cuidado para não perder o suporte menor preso na borda. Ele é fixado com um clipe pequeno e é fácil de ser retirado acidentalmente do suporte maior.

    Phillips screw 1.3 mm on last step is not working. The small clipped bracket has been damaged. This screw perhaps should be the first, before 1.2 Y000. - To be confirmed by others.

    Dmitri -

    I’m not sure it makes much if any difference, but we went ahead and swapped the order for you guys. Thanks for your comments!

    Jeff Suovanen -

    I just repaired another XR, and you are right! It doesn’t make any differnerce in the order these screws come out. I still damaged this fragile piece. As I work on more of these, I’ll figure out a way to remove this screw without damaging the clip. For now everyone, just use extra caution when removing the 1.3mm phillips screw! Thanks Jeff

    fabianowens -

    I’ve now done at least 6 of these so far and I have fairly consistent good results by taking the 2 Philips head screws out first, then doing the Y screws.

    Stow -

    Is this piece important for the repair if broken? I have broken it on a home repair. What is it used for? Is it a grounding connection or is it completely unimportant. More information needed please

    Squishy Horses -

    I’m wondering that too. Is this piece important?

    Phillip Gross -

    My clip broke too! on iphone XR. Any word on necessity?

    Beth Buer -

    I can confirm that taking out the 1.3 mm screw first then the 1.5 mm screw works the best. If done correctly, you should be able to to remove the rest of the screws and pull the panel off with the clip still attached to the panel. For reassembly, start with the 1.5 mm screw then the 1.3 mm screw.

    Carlos Oulman -

    I don’t remove the small screw at all. I just slide out the metal cover plate and slide back in to reassemble.

    Kyaw-Zin Win -

    this is what i have done as well. Care is still needed to avoid damaging this part. However, it is seemingly far less prone to damage or loss and thus less risky for this repair process.

    Justin Parsons -

    I too broke this shield. In looking over this problem I believe it’s best to loosen, but not remove, either screw first then the other. To be clear, loosen the red or yellow screw but only just to break it free, then the second screw. Then remove both and the others and the shield should remain in one piece. I put it back with the broken part (on the red screw) and made sure the two are in contact so there’s conductivity as these shields serve a purpose other than just holding in connectors. My phone works fine with this fix.

    pgrobin -

    Is this small bracket important if broken??

    Phillip Gross -

    Mine is broken

    Easy Repair -

    Mine is broken and my apple pay doesn’t work. Something to do with NFC antenna this little clip??

    Marcos Fernández -

    I'm guessing so. I replaced a screen on a phone I bought from a friend. I noticed this bracket was broken when I disassembled the phone but didn't think much of it. When I reassembled it my NFC also does not work. Bummer. A lot of people in these comments have asked if it is crucial that this bracket be connected. Can someone from iFixit or other please reply to those comments?

    Larry Jorgenson -

    On the 1.3 mm screw I actually chose not to remove it. I broke it loose then used the tip of the spudger to simply twist the bracket out of the way, with the screw still attached. Then I could remove the larger bracket.

    mpalma -

    Kyaw-Zin is right because the shield contains of two tin parts. But there is another option:

    1. Unscrew the yellow and orange screws first.

    2. Lift the shield gently that it can turn about 20° anticlockwise.

    3. Open the red screw and let the shield turn with it the first degrees.

    Daniel Brehm -

    The first time I did this repair, I didn’t see the comments ahead of time and broke the bracket, even removing the 1.3mm screws first. The second time I did the repair, I was prepared and being extra careful, but the simple act of turning the 1.3mm screw head was enough to break it. If I ever have to do this repair again, I’ll just leave the screw in and try to slide the plate out with the screw (and bracket, hopefully) still in tact, as per Kyaw-Zin Win.

    Debbie Thompson -

    None of the screw driver bits I got fits the 1.3mm and 1.5mm screws. How do I remove them?

    Jonatious Joseph Jawahar -

    Same issue as above. The bits provided in the kit do not work with the 1.3mm and 1.5mm screws

    Graham Hammell -

    Further to above comment about bit not working. Had to go and purchase another PH000 from Home Depot and that worked

    Graham Hammell -

    I’ve broken that little bracket attached to the red screw. Is it important and can I get a replacement????? Thanks all

    steve.arfa -

    Broken the clip. Is this important??

    kyledrumtutor -

    Yikes, broke mine too. Oh god. Think perhaps the delicate 1.3mm should come out first when everything else is secure...

    Ronald -

    Don't remove the 1.3 Phillips screw! Twisting this screw will break the smaller bracket that is clipped to the larger. Remove all the other screws. Block the smaller bracket from moving as you gently slide the larger bracket horizontally toward the battery until free. The smaller bracket can stay in place while the screen is replaced. When reassembling, support the small bracket by backing with a spudger or similar tool.

    doug68242 -

    I just broke the smaller bracket also :( I didn´t notice these comments until now :(

    It looks like part of the antenna for NFC, as all except NFC works on my iPhone now.

    It should be repairable using some wire wrap wire, either twisted around the two screws that connected that part of the bracket (or soldered in place). I will try and report back if it works.

    Richard Croyle -

    Success!! I managed to re-construct the small arm of the bracket by screwing the 1.3mm screw back in with some 0.3mm enamel wire soldered into what was left of the small bracket arm on the screw, then the other end of the enamel wire I wrapped under the 1.5 wire screw's head (enamel exposed to bare metal), then screwed both screws down. also I lifted up the small metal arm with a screw driver (to make sure it reconnects with the display grounding square) ..and NFC worked again (slightly different antenna pattern mind (need to place cards slightly higher up the rear of the phone). Anyway works again :)

    Richard Croyle -

    do you think it would be possible to repair without the use of microsoldering?

    i brought a new bracket set for the xr and replaced the old one but even with that nfc/apple pay still doesn't work. i'm questioning if i put a wrong size screw or something else

    prolificgmabit -

  22. ZKgyTMB3J2eBa6Se
    ZKgyTMB3J2eBa6Se
    RGEOVxym6PmnJXjF
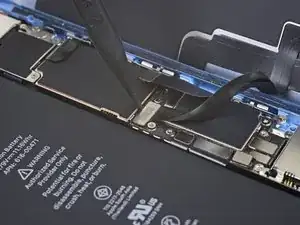
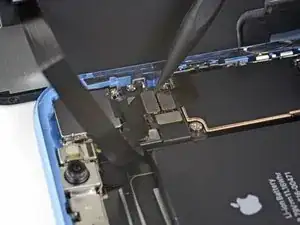
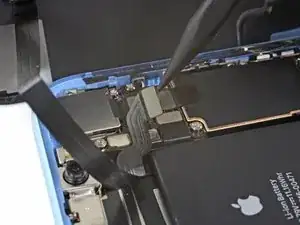
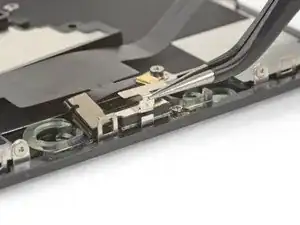
    • Com a ponta pontiaguda de uma espátula, erga o conector do conjunto de sensores dianteiros de seu soquete.

    During testing, make sure your proximity sensor is not on upside down, as it’s easy to connect upside down. Your phone will boot loop if it’s on incorrectly.

    Tristan England -

  23. GIZLarh6sZTr4iYM

    unclear if this is where screen removal ends

    Daniel Maldonado -

    I had the same question, but the answer is yes. Steps 21-30 are removing parts from the original screen that need to be reattached onto the new screen. You are no longer working inside the frame, but on the back of the screen itself.

    amclean78 -

    I apologize for missing these comments initially, but yes that’s correct, the screen is removed now and the rest of the guide goes on to other parts, either in the phone or on the back of the screen. Good luck with the repair!

    Adam O'Camb -

    The alternate method of removing the battery should be highlighted as a standard option. There is so much more work and potential to damage the parts than if you left them in place and carefully with plenty of heat remove the battery. I so wish I had seen this before!

    Martin Kappeyne -

  24. qHD6RTEPKNyYoYZG
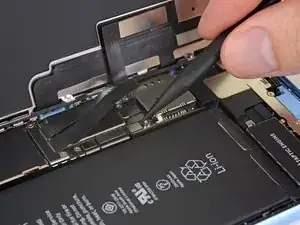
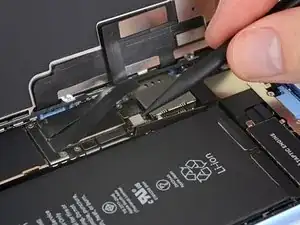
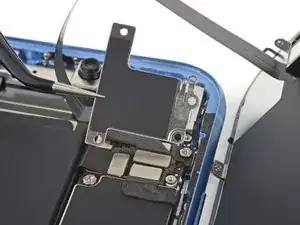
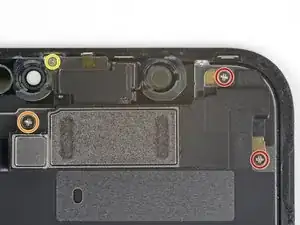
    • Remova os quatro parafusos que prendem o conjunto alto-falante/sensores à parte traseira da tela:

    • Dois parafusos Phillips de 1,6 mm

    • Um parafuso Phillips de 2,3 mm

    • Um parafuso Y000 de 1,2 mm

    Do you really need to do step 21-30, because it says to replace, do it in reverse. Which means you are taking the components off and putting them back on without touching the screen? sorry if this is a dumb question, i’ve never done this before.

    ExplodingRage -

    Good question! It depends on which guide you are completing. If you are replacing the screen, you do need to complete steps 21-30, in order to remove the front assembly and transfer it to your replacement screen. The front assembly contains the Face ID hardware, which is biometrically linked to the logic board.

    Now, if you are completing other guides, you may not need to remove the front assembly. Guides should have the steps slotted in only if they are pertinent to the procedure.

    Arthur Shi -

    I had the same question, but the answer is yes. Steps 21-30 are removing parts from the original screen that need to be reattached onto the new screen. You are no longer working inside the frame, but on the back of the screen itself.

    amclean78 -

    Im reassembling and notice there are no threaded screw holes to secure the speaker/sensor assembly on the new display. no way to secure it at all. Do i not need to secure it?

    Ashley Fitzgerald -

    Hi Ashley,

    There should definitely be screw holes to secure the assembly to the new display. If you purchased the part from iFixit, please contact our customer support, and we will sort things out for you!

    Arthur Shi -

    Same. No screw holes. Now what?

    M Schmidt -

    Please contact our customer support and we will get the issue resolved!

    Arthur Shi -

  25. kGEGOnFcpINUsltv
    kGEGOnFcpINUsltv
    P6mWfcSMimOsbqY4
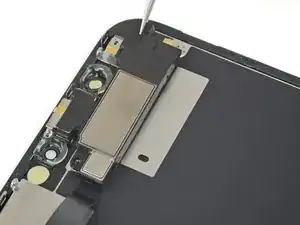
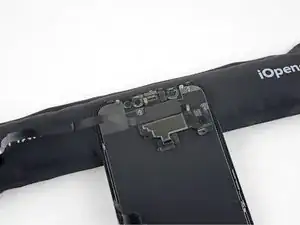
    • Com uma pinça, vire cuidadosamente o conjunto do alto-falante para baixo, afastando-o da borda superior da tela.

    • O alto-falante permanece conectado por meio de um cabo conector flex bem fino. Tenha cuidado para não esticar ou danificar o cabo.

    I don’t understand. It clearly appears that one should stop disassembling after this step. Peeling off the tape here should provide access to the solder connections. Why remove a bunch of other adhered parts? ESD concerns?

    Of course, taking care not to transmit heat to the screen assembly below would be prudent. But it’s unlikely much if any heat would conduct even without using any sort of insulating spacer, assuming one’s soldering technique is acceptable. With a thermal mass that small, overheating the connection is the big concern. Especially since it is lead-free solder.

    (It has a high melting point. If you didn’t already know that, this is definitely not the best project to develop your soldering skills! You can still do it, but should def practice on similar connections until you feel proficient. Lifting a pad or overheating a nearby component are both dangers. Yet, the cost of the part is low enough you could buy two (just in case) and still come out ahead of Apple’s fee. Use flux or you’ll struggle!)

    Ryan Lewis -

    Hey Ryan,

    You are right in that after this step, you could de-solder and replace the earpiece individually, if you choose to do some careful de-soldering and soldering. Alas, not everyone has the background and skill to do so! By instructing users to replace the complete assembly, we bypass the need to solder, and allow a wider audience to successfully complete the repair.

    Arthur Shi -

    When reassembling or placing the whole sensor module on a replacement screen, make sure to gently rock the speaker back into place. There is a rubber gasket lip around the speaker that must be seated all of the way against the screen and speaker grill to function properly. You should feel a gentle click when is goes in. If is not seated correctly it still easily can be screwed in making it difficult to tell if the speaker is in correctly.

    Colin Wylie -

    Hey, I actually ended up accidentally ripping that ribbon off the speaker. What happens now?

    lanize -

    كيف ارفع السماعة الداخلية

    djimé dramé -

    It just came off the whole unit whiteout folding apart the unit. I must say this is the second display change on my phone. The first one was in a repair shop. It was really dusty inside as the repair shop never glued back the display very well.

    Tobi -

  26. PEIZbjIcMKKHg23D
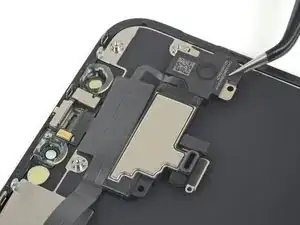
    • Aplique um secador de cabelo, uma pistola de ar quente ou um iOpener aquecido na parte superior frontal do visor por um minuto para amolecer o adesivo que fixa os sensores.

    Review steps 24-29 prior to doing this. Step 27 shows removing ambient sensor. It is attached….barely…to the rest of this assembly. I thought I was being overly cautions, and it still broke. Don’t be afraid to use heat. Do not force. Any resistance, do not force it.. Heat it up and then try. Other than that, sound and camera works fine, and it appears that FaceID works. Not my phone, so I can’t test that part without unlocking customer’s phone. No error messages appeared, so Im assuming all is good. With the touch home button on older models, if touch wouldn’t work, you’d receive a message as soon as you booted the phone up. OK.. That’s enough. Just be careful over the next 5 steps..

    Shawn Bailey -

  27. 42IwK2EfOHLwxpRU
    42IwK2EfOHLwxpRU
    wPrWI5ouRYnHjSRl
    IDYRQPxbHgHrMKoN
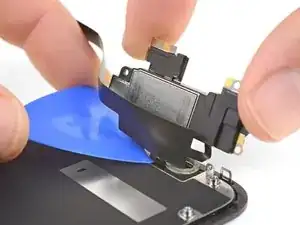
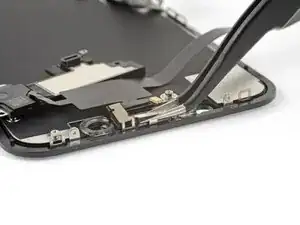
    • Passe cuidadosamente a ponta plana de uma espátula por debaixo do cabo conector flex até chegar abaixo do microfone.

    • Faça movimentos suaves de vai-e-vem para separar o microfone, tomando cuidado para não esticar ou danificar o cabo conector flex.

    • Se necessário, use a ponta pontiaguda da espátula para terminar de separar o microfone de seu entalhe no painel frontal. Se o microfone estiver difícil de separar, aplique mais calor.

  28. AMYOmIAqsVJjD52P
    AMYOmIAqsVJjD52P
    Jkw51QtNpDpxArlK
    WmlMveEBG2MW1pbN
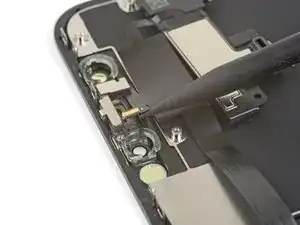
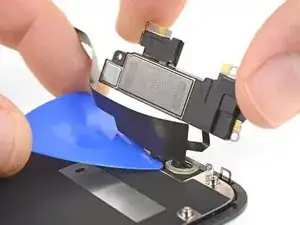
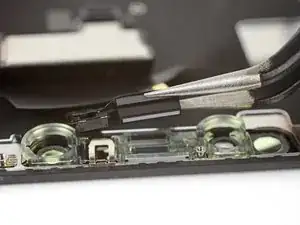
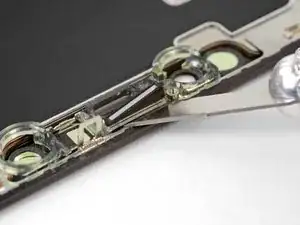
    • Indo da esquerda para a direita, deslize uma palheta de abertura por debaixo do cabo conector flex e por debaixo do módulo do sensor de proximidade + flood illuminator.

    • Faça movimentos de vai-e-vem ligeiros e erga para separar o módulo de seu entalhe no painel dianteiro.

    • Pode ser útil levantar e segurar o alto-falante fora da moldura para liberar acesso. Mas tome cuidado para não puxar o fino cabo conector flex enquanto estiver trabalhando.

    what happens if the metal plate from the sensor separates from the flood illuminator module?

    Yeison rodriguez -

    At this point I thought looking at the image that I was lifting the speaker away and tore off the thin cable completely unaware. Please read and view the next two instruction stages before doing this one and then come back and ensure you keep the speaker very close to the screen as you do it.

    Sally-ann -

  29. A2KNvyVuTGWsvWnB
    A2KNvyVuTGWsvWnB
    sZctEsnflRRkTSUY
    • Com uma pinça, puxe o pequeno suporte para cima, removendo-o do sensor de luz ambiente.

    I tore the ribbon cable that connects to the light sensor, what do I do? will the phone work even if the sensor doesn’t?

    wittyahole - -

    When you are putting this clip on, you can practice without putting the light sensor on it. It takes some practice. I also may not stay on tightly but it's not a big deal.

    J Olin -

    This clip is a nightmare to get back on!

    Ronald -

    I gave up trying to get the clip back on. Appears to function properly without it.

    Paul Chipelo -

    Definitely one for the tweezers in order to get the brackets little sleeve to fit back over the backet/post sticking up

    Jono Official -

  30. HeWLpnVGbVSEnZvv
    HeWLpnVGbVSEnZvv
    pNXCnbhkT2WPLvMM
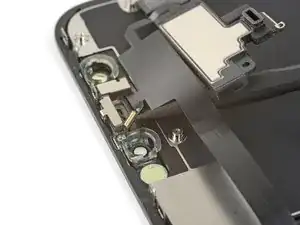
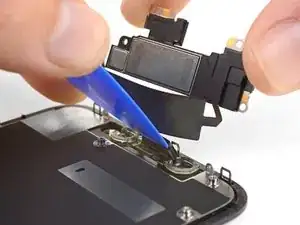
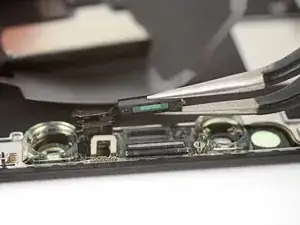
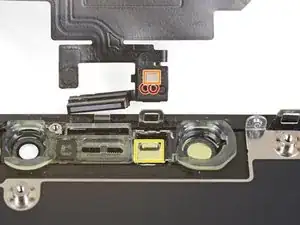
    • Com uma pinça, faça movimentos ligeiros de vai-e-vem no sensor de luz ambiente e retire-o do entalhe na tela.

    • Se o sensor não se soltar após alguns segundos, aplique mais calor e tente novamente.

    • O sensor permanece conectado ao restante do conjunto de sensores por meio de um cabo conector flex muito fino. Tenha cuidado para não esticar ou danificar o cabo.

    On picture two, the thin transparent thread between the sensor and the display is not the “very thin flex cable” they are talking about but just some glue remains. In my case this thread of glue was sticking onto the sensor in the exact same way which made me suspicious at first.

    Konstantin -

    The top part of the ambient light sensor easily breaks off from the bottom part. In that case do not despair. Pry the stuck part from the old display and transfer it to the new display. Put the assembly back together without glue. It should hold together just fine. Usually the auto brightness feature will still work.

    Heiko Quant -

    I broke the flex cable from the light sensor that connects to the rest. Anything I can do?

    Matias Bedoya -

    An dieser Stelle ist es meines Erachtens sinnvoller, den gesamten transparenten Rahmen, der als Arretierung für den Umgebungslichtsensor dient, vom Display abzulösen. Einerseits ist dieser Arretierungsrahmen auch nur am Display verklebt und lässt sich leicht mit etwas Wärme komplett lösen, andrerseits spart man sich das Gefrickel mit dem Sensor und minimiert das Risiko eines Kabelbruchs. Zuguterletzt ist diese Halterung bei diversen Ersatzdisplays ohnehin nicht enthalten.

    Markus Roche -

    I also broke the flex cable when wiggling the light sensor out, it is VERY sensitive

    danno -

  31. BSLlHjKQuoWpIdm1
    BSLlHjKQuoWpIdm1
    toTqIeEIxWRSiNKo
    ArGPbS2ELhX6ZHi6
    • Se você tiver conseguido remover todo o sensor de luz ambiente, conforme mostra a primeira foto, passe para a próxima etapa abaixo.

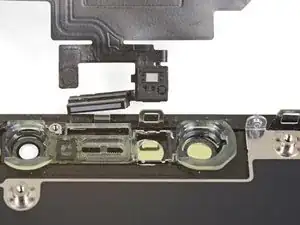
    • Se a tira branca do difusor estiver solta e permanecer integrada na tela, como mostra a segunda foto, você precisará alavancá-la cuidadosamente ao longo da borda superior usando uma lâmina fina ou uma ferramenta de alavanca. A reaplicação de calor pode facilitar um pouco essa tarefa.

    • Durante a remontagem, instale primeiro o difusor na tela, certificando-se de que ele esteja virado para a direção certa (a primeira imagem mostra o lado virado para a frente e a terceira imagem mostra o lado virado para trás).

    • Em seguida, coloque o sensor de luz ambiente na parte superior do difusor. Você precisará segurar o sensor na posição enquanto instala os parafusos que prendem o conjunto alto-falante auricular/sensores. Quando os parafusos estiverem apertados, o sensor permanecerá no lugar e funcionará normalmente.

    so I was able to wiggle the part out and everything came out except the white strip, like a sticker coming off the bottom so my situation isn't displayed in the diagrams is that white strip important? should I remove it and try to adhere it to the bottom of the ambient light sensor?

    Shadowind98 -

  32. FOWFlEvF4mJLpDhC
    FOWFlEvF4mJLpDhC
    fvewlLaGEDVQwZbp
    2Nvy2UQvZTHBNrNo
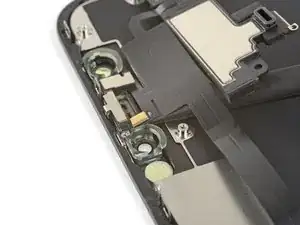
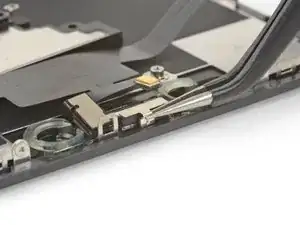
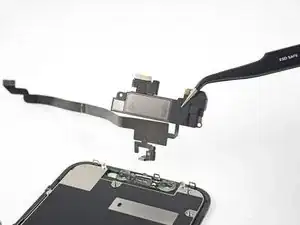
    • Remova o conjunto alto-falante auricular e sensores frontais.

    • Durante a remontagem, verifique a posição do módulo de plástico preto que contém estes componentes:

    • Sensor de proximidade

    • Flood illuminator

    • O módulo deve ser posicionado de modo que esses componentes não sejam obstruídos por nenhum adesivo.

    To replace just the earspeaker, you will have to re-use the the flex assembly which is soldered to the earspeaker…….

    the 2 solder connection are hidden under a tiny piece of thin black tape, on the underside of the speaker.

    Alan Sears -

    forgot to mention to take the clear plastic mold off from the old screen!!

    BKimc -

    Before attaching the sensor module to your replacement screen, ensure there is nothing blocking the earpiece screen on the new screen part. Mine had a mfg defect or something where there was a black foam like film on the outside of the speaker grill that I couldn’t remove with tape or sticky putty. I had to blow through the back of the grill with a computer duster compressed air can. Otherwise the call volume via the earpiece is extremely low, even when turned to max volume.

    Colin Wylie -

    Hey there, if I have an iPhone bit damage and I remove the top speaker and sensor and put it on my other iPhone XR. Will it work? It is original iPhone XR and please let me know

    Nash G Krish -

    The Face ID hardware is paired to the logic board and will not work if you transfer the front sensor assembly. Everything else should work.

    Arthur Shi -

    Are you suposeted to do it backwards when your done

    hewi fewi -

    super gemacht , danke der olli

    schlüppi punkstrumpf -

    The iPhone XR Screen Replacement Kit comes with an adhesive replacement on a blue plastic sheet. I didn’t know what this was and thought it was just protection for the screen during shipping.

    Don’t throw it out - At this step 29 remove the old adhesive using this guide -> Substituição de adesivo de tela para o iPhone

    Don’t be dumb like me.

    Toby BC -

    I would definitely add a step at the end –
    30) Replace the adhesive seal -> iPhone Display Adhesive Replacement.

    Steve Koontz -

    How do I configure True Tone on the new screen?

    Armando -

    You need to use an EEPROM programmer. This will read code from the old screen to the new screen (assuming the replacement screen is of decent quality and supports True Tone programming). Check out YouTube and you will find plenty of information on how to do this. It really should be mentioned in screen replacement guides/videos, that if you just replace the screen without this specialist equipment, the True Tone function is not available. This is the same for all iPhones that have True Tone.

    Mark Affleck -

    i just saw recently where the ear hole in the new display was occluded - needed to drill it out. can see with a microscope - may want to check this before reassembly.

    greg -

    Add a comment: remove blue protective covers from back of screen when installing

    Martin Kappeyne -

    Thanks! I left them on until I got everything hooked up…..so frustrating lol

    ryandlent -

    Removed the big blue one but couldn’t get the little one with what looked like a QR code on it. It goes literally between the 2 cables.

    ryandlent -

    Thanks for the excellent guide! My replacement screen came with no sensor bracket, so I had to remove that from the old screen and remove the earpiece grill from the new screen (because the old grill remained attached to the bracket).

    Goda Choi -

    How did you manage to remove the earpiece grill off of the transparent sensor bracket ? Mine is very stuck and will not come off!

    AlexA -

Conclusão

Compare a sua nova peça de reposição com a peça original - pode ser que você precise transferir componentes remanescentes ou remover suportes adesivos da nova peça antes de instalá-la.

Para a remontagem de seu dispositivo, siga os passos acima na ordem inversa.

Leve o seu lixo eletrônico para um ponto de recolha ou uma recicladora certificada.

O reparo não está indo conforme o planejado? Confira a nossa comunidade de Respostas para obter ajuda na solução de seus problemas.

Adam O'Camb

Membro desde: 11/04/15

220314 Reputação

48 comentários

Man, you guys have the best jobs. You get to take apart electronics and make outstanding repair guides for a living!

[deleted] -

Where I can buy the screen?

Slava Slava -

Hi, you can buy the screen here in our store! Good luck with your repair!

Adam O'Camb -

What about the half dozen other steps of removing the back plate, transferring components and reassembling the device?

Conrad -

We put those steps into a separate guide, since not everyone needs them! If you need the more in-depth version, look here.

Jeff Suovanen -

My screen is replaced, but the small bracket straight from the ambient light sensor (step 26) is broken. Is this or will it become an issue?

hnsclmns -

Has anyone Noticed the LCDs on the X series replacement screens crack very easily or is it more than likely I’m just receiving cheap parts?

Zach Grangroth -

Any idea if you will be selling the iPhone XR Display Assembly Adhesive, Item code: IF408-008? If not, any recommendation for where to get this? Thank you,

J

james tullbane -

@jtullbane It’s available again—not sure why we had the product disabled. Thanks for asking!

Jeff Suovanen -

Thanks for the write up. I just replaced my screen with your kit and I’m unable to use FaceID. I’ve reset it it but I am unable to set it up fresh as the system can’t detect my face during the setup wizard. What is interesting though is that Animoji are correctly projecting my face. Does anyone’s have any tips for further debugging before I take it apart again

Andrew Matheny -

In my experience this is usually a hardware rather than a software issue. Double-check the tips in the final step. Make sure there’s no dust or fingerprints on the Face ID lenses and projector. Make sure nothing was damaged during the repair, particularly those thin flex cables. Reseat the connectors, reassemble, and test again. If all else fails, try reinstalling the old screen and see if you get Face ID back—in theory, a defective coating on the new screen could interfere with the Face ID hardware. Good luck!

Jeff Suovanen -

When you buy the screen, does the necessary screwdrivers come with or do you have to purchase them separately?

Cody Kowalski -

Hi Cody,

If you purchase from iFixit, you have the option of buying either the replacement part by itself, or in a kit with all the necessary tools and adhesives. As of now, we don’t have a kit built for the screen, so you would need to supply your own tools.

Arthur Shi -

what is the small bracket for in step 18?

yhwhelrey0 -

Why caméra icône on the screen is gray

valayrih -

any know what the small bracket is for in step 20, that @iFixit tells us not to lose

Griffin -

Awesome repair guide. I just finished with my screen replacement and am amazed at how relatively simple it was. I only have one critique and that is to add a bit driver to the tools required. I didn’t realize that the ph000 and the y000 were thinner than regular bits so it took a little bit more time for me. All that said I am happy with my repair and thank you guys for the fight for the right to repair. You all are awesome

Eugene Rodriguez -

The adhesive for the XR is only available from the US store but I need to get it in the EU one. Is there a link for it in the EU store not the US one?

chris mccooey -

Does the part you sell have the lcd shield included?

also what is the thermal paste on this model….other sites say “thermal paste pre installed” what does that mean?

mamashannon4u -

Hi! The part we sell is only the LCD panel and digitizer only. It does not have the shield—you will have to transfer the part over. I’m not sure about thermal paste other sites are speaking off…it may be a poor translation to mean screen adhesives?

Arthur Shi -

I have an two iphone xr red, one donor and one to repair, the screen works on the donor vice versa but doesnt work on the other one(touch screen work on bottom half only…) you guys know why?

Antoine RD -

How do I fix my iPhone XR screen? Just the glass part though & I don’t have cutting wire to separate the glass screen from the lcd pls help me

Aleha -

tried it step by step, and my phone won’t cut on..

jj imel -

I am not a seasoned technician by ay stretch of the imagination, though I have tinkered with many things over the years. I followed the guide step by step, and took my sweet time. So far, the phone and all of it’s peripherals work like and look new, face recognition included. I highly recommend the iFixit Mako Driver kit for this project, but I suppose that as long as your tools are of a high quality, you won’t have many if any issues. I used a cheap low wattage heat gun, but after completing this project, I have drawn the conclusion that I really wish that I had the iOpener and am going it order soon. I also could have used a few high quality spudgers and prying/seperator tools. This was a great step by step guide, and I believe that a budding professional could likely take any advice that they can find on iFixit. Excellent work.

Ryan Kennedy -

I recommend buying the magnetic project pad or be well prepared to organize the screws and parts. The screws are tiny, so you might consider a head-mounted magnifier if your vision isn’t perfect. Excited to have this repair under my belt and not have to run to the genius bar for cracked screens any longer.

Jean-Paul Cozzatti Cozzatti -

When you buy a new screen are you buying a new LCD thingy ma bob, or do you have to buy that separately? If it’s all together I should be good to just follow these steps right?

Leah -

Hi Leah!

The LCD is just another term for the screen, so yes, all screen kits should come with it. However, iPhone screen kits get a little confusing. Some kits come with more components pre-installed than others. Our kit currently requires you to transfer the LCD shield from your existing iPhone, so it will require a few additional steps. Here is the proper guide for the part we sell.

Arthur Shi -

Im not an idiot and have done repairs to MacBooks and even replaced batteries on two iPads. I preface what I am about to say with that so if it’s simply user error, I no longer should be allowed to use an iPhone much less repair one.

I am on step 13 and I cannot for the life of me get the screws out for the battery piece. I have no less than 4 iPhone repair kits so that’s a minimum of 4 screwdrivers that should fit. Nope. They aren’t stripped (yet). I don’t know what help you can provide other than confirm that it’s possible that I was multiple kits for iPhone repair that simply don’t have the correct screwdriver gauge needed for an iPhone XR?

Cary Serrano -

Do you need to have the new screen reprogrammed from the old screen to keep true tone?

Jeremy Jett -

Great job. I would like to ask what speaker is it when you voice text? Thank you

Billy Ferguson -

I replaced my screen and lighting connector port assembly and now I dont have Airplay anymore. What did I do wrong and how do I fix that.

Wynand -

Thanks guys!! Helped me a lot!

A nice thing would have been to include removing the plastic “guides” for the earpiece, speaker and cameras. I couldn’t line mine up so I just went without it. Still works perfectly fine but for someone to whom this may be important, would have been a nice inclusion.

All in all, thanks for your help!!

tw1st3d -

Did this today. Happy with the new screen. Most difficult steps 27-29 and of course screwing little screws back. Took 2hrs.

Gary -

This guide helped me execute my screen replacement flawlessly! Thank you!

Mike Ross -

Will Face ID work? Or will it be bricked completely with a replacement screen. Will it work if I clone the data using the chip cloner?

Ethan V -

Hi Ethan,

If you successfully transferred over the front-facing sensor assembly to the new screen, Face ID will work!

Arthur Shi -

Thanks for the write up. Helped me to replace the screen on my partner’s phone.

Neil -

I have to say that I went into this one feeling pretty pessimistic, but figured I could live with a busted phone and an additional $120 for a display as my worst case scenario. So, when I turned it on and everything worked as new? Well howdy doo! These instructions were excellent. THANK YOU!

J Olin -

What kind of screwdriver I need for the 2 screws in the front

colin17harris -

Thank you! I have been using ifixit for years. Repair went great!

fehrfam6 -

Je viens de terminer avec succès le remplacement de l'écran sur iPhone XR selon ce tutoriel très bien fait.

2h30.

La principale difficulté concerne les manipulations de ces microscopiques vis.

Si elles tombent, considérez qu'elles sont perdues. Donc préparez l'environnement de travail en conséquence. ( une serviette de bain sur votre surface de travail afin d'éviter le rebondissement de la vis si elle vous échappe)

merci mille fois a Ifixit et au concepteur de ce auto.

Ricardo -

Just wanted to thank you amazing bunch of people for another perfect guide - you really are a godsend. Your work is much appreciated!

Matt -

Super gute Anleitung. Hat alles problemlos funktioniert. Vielen Dank dafür!!!

Christoph Franke -

Excellent instructions. Worth going at it very slowly, gently applying sufficient heat so things come apart. Took five minutes to get the screen out. The Ifixit kits and sucker puller work well + the magnetic work tray to keep everything contained. Most of all, the right screwdriver tips. I thought I had everything - but not a P000 Y shape! Many of the screws are unbelievable small, and make your fingers and your other tools look like sausages. One thing extra: my new screen came with a protective blue plastic layer on the back. When reassembling, steps 31-30, this needs to come off, otherwise it leave a tag sticking out. For removing all traces of the old glue seal and bedding it a new one, it's worth reading the separate instructions. Quite tricky and you get one shot. When it comes to the final mating of the parts, important to hook in the tangs at the top of the phone and keep some pressure on, to locate the bottom end correctly. Very happy when it all came back and functioning.

Iain Boyd -

Hello, good repair guide. But I feel that it is missing couple more steps to explain how to fit the adhesive of the new screen before to reassemble it all.

I have bought the screen with adhesive in the EU store of iFixit.

Julien Boeuf -

Thanks so much for this excellent guide! Another electronic device saved thanks to a clear and well written iFixit.com guide! Keep up the amazing work!!!

RealityMan -

Thanks so much for this excellent guide!

Javad -

When replacement of a screen is needed due to cracks - does the speaker and sensors still need to be removed? Or skip those steps?

Clive Silva -