Introdução

Este guia de reparo foi criado pela equipe da iFixit e não foi aprovado pelo Google. Saiba mais sobre nossos guias de reparo aqui.

Use este guia para substituir a tela rachada ou quebrada do seu Google Pixel 6 Pro.

A sua nova tela virá com o leitor de impressão digital já conectado. Caso contrário, será necessário reinstalar o leitor de impressão digital original na nova tela de reposição. Se estiver substituindo o leitor de impressão digital, será necessário recalibrar o leitor para manter sua funcionalidade.

Se a moldura estiver deformada, é importante substituí-la para garantir que a nova tela seja montada corretamente e não sofra danos devido a uma pressão irregular.

Se a bateria estiver inchada, tome as devidas precauções. Antes de desmontar o seu dispositivo, descarregue a bateria abaixo de 25%. Isso reduz o risco de um evento térmico perigoso, se a bateria for acidentalmente danificada durante o reparo.

Cuidado: o Pixel 6 contém lasers de classe 1. A desmontagem pode causar uma exposição a emissões invisíveis de laser infravermelho.

A manutenção da resistência à água após o reparo dependerá do quão bem você consegue reaplicar o adesivo, mas o dispositivo perderá a classificação IP (Ingress Protection).

Antes de iniciar esse procedimento, certifique-se de ter um conjunto de adesivos de reposição para o vidro traseiro e a tela.

  1. xGqbgqkw2hRaUsBS
    xGqbgqkw2hRaUsBS
    Ao5wAxq1e3NqOvXb
    • Deixe a bateria descarregar abaixo de 25% antes de iniciar o reparo. Uma bateria carregada pode pegar fogo se for danificada.

    • Desligue totalmente o telefone e desconecte todos os cabos.

    Please, how can I turn it off when screen is broken?

    Thubbe -

    I recommend to read all of the comments given by users. They are very useful and will save time. My battery replacement result was excellent due to the great instructions and comments. I would do it again if necessary.

    Cousin Eddy -

    Is company ke mobile ka lock kaise Tode

    आकाश Bhuriya -

  2. pYtLJZEF5B2LvWeB
    pYtLJZEF5B2LvWeB
    ItQqxYGiYbWkJIa4
    xF2lQOYnyyUbHaO2
    • As próximas três etapas demonstram o Anti-Clamp, uma ferramenta que projetamos para facilitar o procedimento de abertura. Se não estiver usando o Anti-Clamp, pule as três etapas abaixo para um método alternativo.

    • Para obter instruções completas sobre como usar o Anti-Clamp, consulte este guia.

    • Se a sua tela estiver rachada, cubra-a com uma camada de fita adesiva transparente para que a ventosa de sucção possa aderir.

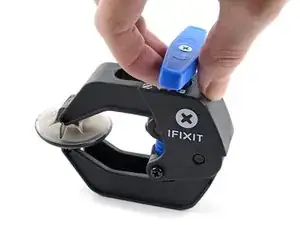
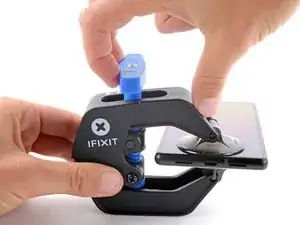
    • Puxe a pega azul para trás para destravar os braços do Anti-Clamp.

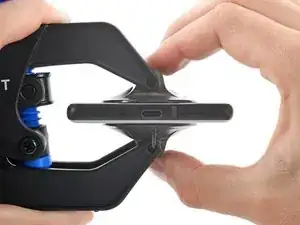
    • Deslize os braços pela borda esquerda ou direita do iPhone.

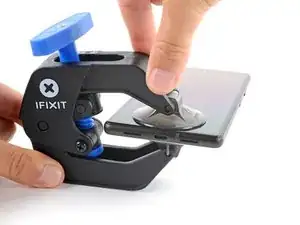
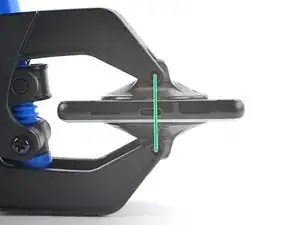
    • Posicione as ventosas próximo à borda inferior do fone - uma pela frente e a outra pela traseira.

    • Aperte as ventosas uma contra a outra para aplicar sucção.

    • Se você achar que a superfície do fone é muito escorregadia para o Anti-Clamp se prender, você pode usar fita para deixar a superfície mais aderente.

  3. 2oNcHoB45uGaxEFB
    2oNcHoB45uGaxEFB
    Uk6q5idSq5oJrUgA
    I4KLIVS3OOLFsZCT
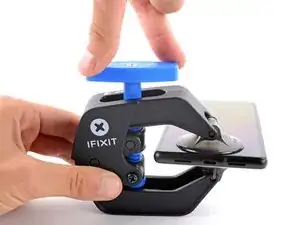
    • Puxe a pega azul para a frente para travar os braços.

    • Gire a pega 360 graus no sentido horário ou até que as ventosas comecem a se esticar.

    • Certifique-se de que as ventosas permaneçam alinhadas uma com a outra. Se elas começarem a ficar desalinhadas, solte um pouco as ventosas e realinhe os braços.

  4. ky3IJRvEhk2KGagK
    ky3IJRvEhk2KGagK
    UiBlY6aXuTlMcmtn
    d12VohF6CPjwXSB1
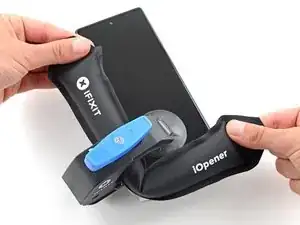
    • Aqueça uma bolsa térmica iOpener e passe-a por entre os braços do Anti-Clamp.

    • Você também pode usar um secador de cabelo ou uma pistola de ar quente - mas calor extremo pode danificar o visor e/ou a bateria interna, portanto, proceda com cuidado.

    • Dobre a bolsa térmica iOpener de modo que ela fique sobre a borda inferior do fone.

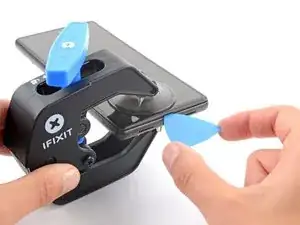
    • Aguarde um minuto para que o adesivo tenha a chance de se soltar e apresentar um vão para a abertura.

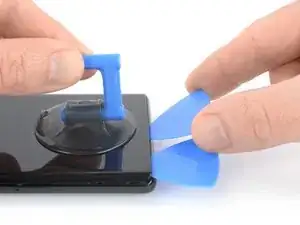
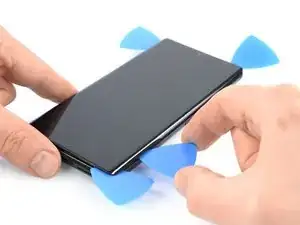
    • Insira uma palheta de abertura sob a tela e a sua moldura de segurança quando o Anti-Clamp formar um vão grande o suficiente.

    • Se o Anti-Clamp não formar espaço suficiente, aplique mais calor na área e gire a pega meia volta no sentido horário.

    • Não gire a pega mais do que meia volta de cada vez e espere um minuto entre cada volta. Deixe que o Anti-Clamp e o tempo façam o trabalho por você.

    • Pule as próximas três etapas.

  5. AJglnb3TZlAVMd2O
    • Aplique a bolsa térmica iOpener aquecida na tela para amolecer o adesivo por baixo. Aplique a bolsa térmica iOpener por ao menos 3 minutos.

    • Um secador de cabelo, uma pistola de ar quente ou uma chapa quente também podem ser usados, mas tenha cuidado para não sobreaquecer o dispositivo.

    Do you think that removing the SIM card, also will be a wise step? I'm pretty sure that heating the SIM card is not a good idea.

    Emil Teofanov -

    The SIM is probably no more sensitive than the rest of the phone.

    ScottMcNay -

    What does "be sure to have replacement adhesives for both the rear glass and the screen." I only had one it didn't mention another one?

    alberte -

    I didn't have the replacement adhesive for rear glass nor the 2 sided tape they talk about when putting it back together. It's Sunday, so I don't expect an answer. I decided to go ahead and work up until that point

    StlrFan -

  6. 5qT1kECvRkyOwMdj
    5qT1kECvRkyOwMdj
    yNlUPqlWLhUnqwEa
    622Y1IVXYBVVFD2s
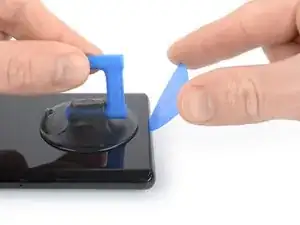
    • Quando você sentir que a tela está quente para se tocar, aplique uma ventosa de sucção na borda inferior da tela.

    • Se a sua tela estiver severamente rachada, cobri-la com uma camada de fita de embalagem transparente poderá ajudar a ventosa de sucção a aderir. Como alternativa, uma fita muito resistente pode ser usada em vez da ventosa de sucção. Se tudo o mais falhar, você pode colar a ventosa de sucção na tela quebrada com supercola.

    • Levante a tela incluindo a sua moldura de segurança com a ventosa de sucção para formar um pequeno vão entre a tela e o conjunto do fone.

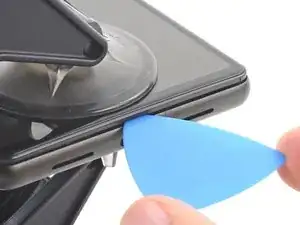
    • Insira uma palheta de abertura no espaço entre a moldura da tela e o conjunto do telefone.

    • Certifique-se de inserir sua palheta de abertura na posição correta para evitar separar a tela de sua estrutura de segurança em vez do conjunto do telefone.

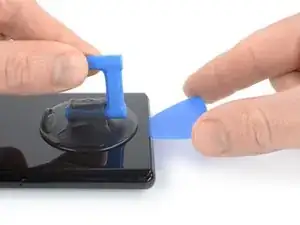
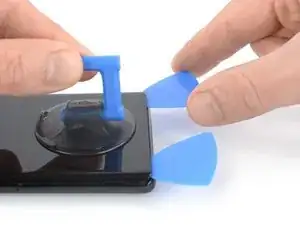
    • Deslize a palheta de abertura para o canto inferior esquerdo da tela para cortar o adesivo.

    • Deixe a palheta de abertura no lugar para evitar que o adesivo volte a selar.

  7. 3iBpMQeeYQZd1N6W
    3iBpMQeeYQZd1N6W
    EF4cafwMyVbQyFeA
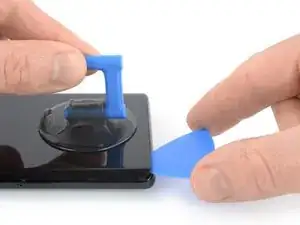
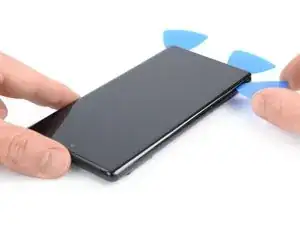
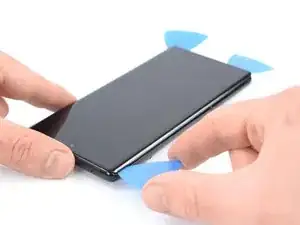
    • Insira uma segunda palheta de abertura na borda inferior e deslize-a até o canto inferior direito da tela para cortar o adesivo.

    • Deixe a palheta de abertura no lugar para evitar que o adesivo volte a selar.

  8. H2V6FPgYSgyNiaXT
    H2V6FPgYSgyNiaXT
    3kcnIWolap1s53OI
    15PB5ccyfLlKWefn
    • A tela do Google Pixel 6 Pro não é mantida no lugar apenas por adesivo, mas também por pequenos clipes de plástico. Se a sua palheta de abertura ficar bloqueada durante o procedimento de remoção da tela, isso significa que você inseriu a palheta muito fundo sob a tela. Insira somente a ponta da palheta de abertura (3 a 4 mm) ao cortar o adesivo da tela.

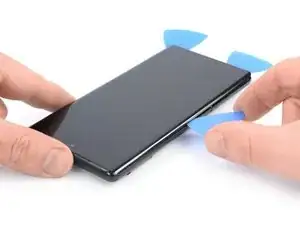
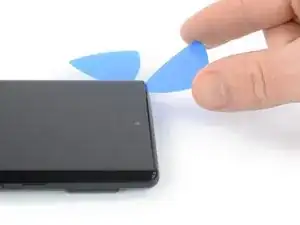
    • Insira uma terceira palheta de abertura abaixo do canto inferior esquerdo da tela.

    • Deslize a palheta de abertura ao longo da borda esquerda da tela para cortar o adesivo.

    • Deixe a palheta de abertura no canto superior esquerdo para evitar que o adesivo volte a selar.

  9. qWybciuriiWRatwM
    qWybciuriiWRatwM
    jIYEmbfvICMX6LXF
    • Se o adesivo ficar difícil de cortar, é provável que tenha esfriado. Use o iOpener ou a pistola de ar quente por 1 a 2 minutos para reaquecê-lo.

    • Ao cortar perto da câmera frontal, insira apenas a ponta da palheta de abertura (2 a 3 mm) para evitar danificar ou manchar a câmera.

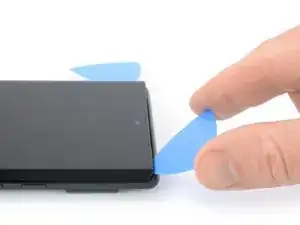
    • Insira uma quarta palheta de abertura no canto superior esquerdo da tela.

    • Deslize a palheta de abertura ao longo da borda superior do telefone para cortar o adesivo.

    • Deixe a palheta de abertura no canto superior direito para evitar que o adesivo volte a selar.

  10. 3u2GucwUJXcX36ik
    3u2GucwUJXcX36ik
    WSpdGRMJq215fHVl
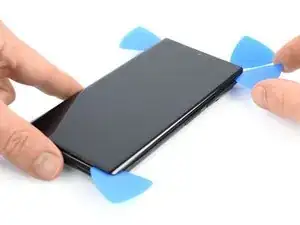
    • Insira uma quinta palheta de abertura e deslize-a ao longo da borda direita do telefone para cortar o adesivo restante.

    • Não tente ainda remover completamente a tela, pois ela ainda está conectada ao conjunto do telefone.

  11. kRiqlurRKwtCBmRE
    kRiqlurRKwtCBmRE
    PtmBApHIHu6ANKT3
    fJXI1KaKDwVhdnnH
    • Evite esticar o cabo da tela durante o procedimento a seguir.

    • Abra cuidadosamente o lado direito da tela para o lado esquerdo do conjunto do telefone, como se estivesse abrindo um livro.

    I don't know if it's an earlier or later design, but I am combining 2 phones (1 crushed glass but operational into the casing of one that quit functioning but has good glass) and on both, the ribbon cable for the LCD is a tiny bit too short to fold out flat like this. If you are working on one like mine, extreme care must be taken while holding the LCD up while simultaneously trying to plug the cable back into that very small recessed socket. Almost like you need 3 hands or robot fingers...

    Stephen P. Thurman -

    I also felt that the cable was too short to fully open like a book, however it is possible that the hinge side of my screen was still pressed in to the adhesive and I did not properly open the screen or I was being overly cautious. Be careful on first approach either way.

    Nick Harris -

    I luckily had a T2 torx that fit the screw on my phone. Be sure you have one handy in case yours is like mine.

    Daniel P deLaureal -

  12. aDmeySbuHVHuNPqR
    • Embora o Pixel 6 Pro use parafusos Torx Plus, as pontas Torx padrão funcionam nele. Certifique-se de aplicar uma força constante para baixo para evitar que não espanar os parafusos.

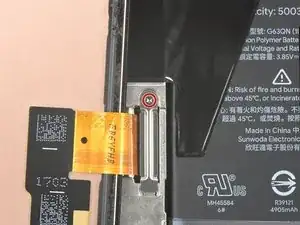
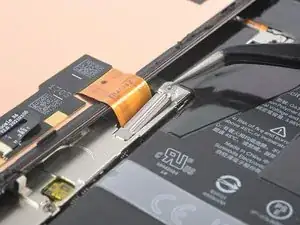
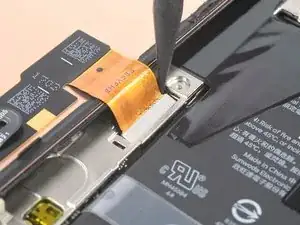
    • Com uma chave Torx T3, remova o parafuso 3IP Torx Plus de 2,0 mm que fixa o suporte metálico do cabo da tela.

    • Durante todo o reparo, rastreie cada um dos parafusos e certifique-se de que eles voltem exatamente para o local de onde vieram.

    I don't know if it's an earlier or later design, but I am combining 2 phones (1 crushed glass but operational into the casing of one that quit functioning but has good glass), and on both, the metal holder plate shown here is simply spring connected and that 2mm screw is instead slightly off to the side as part of the aluminum bracket's screws.

    Stephen P. Thurman -

    Does anyone know the exact dimensions/specifications of this screw? I've misplaced mine and need to find a replacement.

    Alternatively, what are the chances the display cable might come loose if I install the display bracket without screwing it in? I would expect there's not too much clearance between the bracket and the display, so it should still mostly hold in place once the display is installed.

    Chris Gutkowski -

  13. TXCDyVZdVyVArY4w
    TXCDyVZdVyVArY4w
    Wfb1v1Wns3GQc6eP
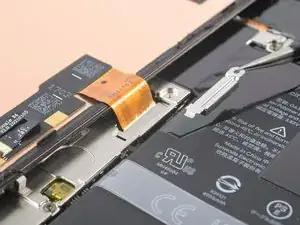
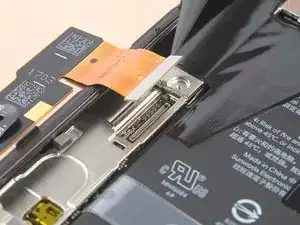
    • Com uma pinça, remova cuidadosamente o suporte metálico que fica na parte superior do conector do cabo da tela.

    • Certifique-se de guardar esse componente para reinstalá-lo durante a remontagem.

  14. XAfcloCj3jgvnZXD
    XAfcloCj3jgvnZXD
    KmYqCLHysrBxjLya
    • Com uma espátula, desconecte o cabo flex da tela, levantando o conector em linha reta do soquete.
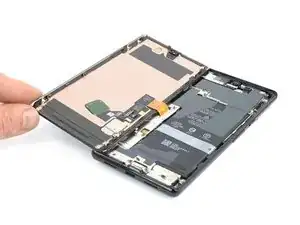
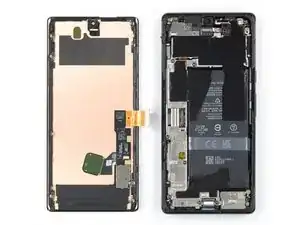
    Reconnecting the display port cable was the longest part of my first repair. It helped when I carefully folded the ribbon connector at each end to get the most length out of it and bent it into the proper shape to hover just right over the small port. I lightly bent the cable back at the base and at the connector end.

    This connector feels delicate, so it definitely made me take my time and be cautious. The snap is unmistakable, but be careful afterward as you're on a short leash again. I folded the new screen closed like a book and snapped it into place easily.

    Nick Harris -

  15. EuFbD1VbsDijAW6O
    • Remova a tela

    • Durante a remontagem:

    • Reconecte a tela e teste o telefone para ter certeza de que está funcionando. Durante o processo de inicialização, a tela passará por uma sequência de calibração. Não toque na tela durante esse processo, pois isso pode resultar em calibração incorreta da tela sensível ao toque. Desligue o telefone novamente e continue a remontagem.

    • Remova o adesivo antigo da tela e limpe a moldura com álcool isopropílico (>90%).

    • Certifique-se de remover todos os revestimentos adesivos da tela de reposição, inclusive a fita que esteja fixando o cabo da tela. Verifique o recesso da câmera selfie e certifique-se de ter removido o revestimento.

    • Consulte este guia se estiver usando adesivos de corte personalizado para seu dispositivo.

    • Consulte este guia se estiver usando um cartão adesivo pré-cortado.

    Before reassembly, clean around the edge of where the screen was, to remove any debris that may have been captured.

    ScottMcNay -

    After reassembly, the fingerprint sensor appears to be a common issue with new screens:

    * Go to https://pixelrepair.withgoogle.com/udfps on a computer.

    * If using Windows, click the help link to install the USB software. After installing, restart the computer and return to https://pixelrepair.withgoogle.com/udfps.

    * Follow the steps given to install the fingerprint calibration software.

    * Restart the phone.

    ScottMcNay -

    "Be sure to remove all adhesive liners from your replacement screen. Check the selfie camera recess and make sure you've removed the liner there."

    A photo with blue highlight square would've been helpful here...also it's very easy to miss this instruction as you'd be on the adhesive page...

    alberte -

    I did take the selfie camera liner this is a bad problem

    Austin Curtis -

    This is very true. I only realized after turning on my phone the next day that the film blocking the front camera is still there. I had to re-open the screen to remove that black film, which was not obvious at all. I only opened the upper half to remove the film, hopefully the adhesive is not compromised too much...

    Esmerando Escoto -

    All went well except for the adhesive. It was simply too small so when Iaid it down it was fine on one side as well as the top and bottom, but the other side required me to pull it over. As it is quite sticky, it bunched up. I cut out part of it and used my own double-sided tape to secure part of it. Otherwise, it was great. Thanks to those who made special note of the cover on the selfie camera window, and the procedure to set up the new fingerprint scanner.

    Arnold Bosman -

    They do not highlight the part that needs to be removed from the new screen, this should be added as the part looks and feels like it is a part of the new screen and removing it could break the new screen. So make sure you remove the selfie screen camera cover even if it looks and feels like there is not one there, it's there.

    Nick Harris -

    I ordered Google Pixel 6 pro- fix kit in IFIXIT. I followed the steps mentioned in the repair guide. During repair the finger print symbol is blinking in the screen. I thought it would get set when i do re calibration as mentioned in repair guide but it did not worked. It displays " Can´t use finger print sensor Visit a repair provider or g.co/pixel/fingerprintunlock". Does anyone have same problem??

    Surendra Reddy Velagala -

    You have to go to that link and you can re calibrate the new finger print scanner by logging into your account and approving it.

    dot Ducky -

    New Finger Print Reader

    Boot into fast boot and connect your pixel to your pc
    On your PC go to pixelrepair.withgoogle.com/udfps
    Follow the Prompts

    dot Ducky -

    For anyone having trouble with the fingerprint sensor after replacing the display: follow the calibration process as @dotducky described. After following the guided calibration process make sure to manually restart the phone after calibration. After the auto-restart (initiated by the calibration process) the fingerprint sensor did not work, but after manually restarting the phone everything worked well.

    Fem Piff -

    Replacement process went smoothly. I reattached the screen after seating the connector. No sign its working. Just black blank screen. However text and notification sounds still coming through. Even receiving calls. etc on que. I know the phone works, just not the screen.

    I figure maybe I didnt seat the connector all the way so I break the adhesive liner (figuring I'll buy another and apply again) and this time I clip in the connector for sure. Still nothing on the screen.


    What can I do? Is the screen defective? 

    If phone is working should I see the display after the connector is seated but the phone still open? Or does the screen need to be seated all the way in the case to turn on? The screen does not display anything in either state by the way...

    As an aside, your instructions are so detailed until the point where the screen needs to connect and seat. It would helpful to get more pointers for this final step...

    Chobby -

    It's so frustrating that paper instructions are not included considering I'm about to pull the screen off my phone. It's also very frustrating that I have to load and read multiple sub instructions in the middle of the main instructions, just include all instructions in one booklet and include the booklet in the kit.

    Jeremiah Miller -

Conclusão

Se possível, ligue o dispositivo e teste o reparo antes de instalar o novo adesivo e vedar novamente.

Para remontar o dispositivo, siga estas instruções na ordem inversa.

A melhor maneira de fixar a nova tela é aplicar uma folha de fita dupla face de corte personalizado na parte de trás da tela.

Leve o seu lixo eletrônico para um ponto de recolha ou uma recicladora certificada.

O reparo não saiu como planejado? Tente soluções de problemas básicas ou peça ajuda à nossa comunidade de Respostas.

Dominik Schnabelrauch

Membro desde: 23/11/16

252795 Reputação

66 comentários

Est-ce possible de changer que e verre brisé

Leroy -

Really wish this had instructions on how to put the screen back on. "reverse order" is not accurate.

Ed Word -

The fingerprint scanner doesn't work. I get a message that I need to visit, but the website doesn't exist. Google has a fingerprint repair tool where you connect your phone and boot into rescue mode, but the program says I can't use it as my phone's firmware is newer than the tool's firmware.


Do a google search to see, there are many others with this issue and a few Google support threads where google acknowledged the issue for over two years but doesn't address the issue other than to say it should be fixed in the future firmware update.


So, now I'm stuck without a fingerprint scanner that I used for all security and banking apps.

kimsballs -

Did you transfer your existing fingerprint scanner from your original screen to the new one ?

Alan Sears -

See my note below; I found a solution for this.
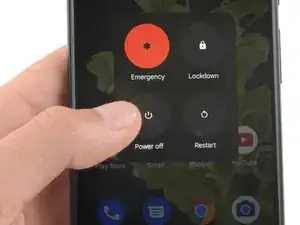
Matt Montero -

These instructions neglect a key point: there is a protective cover over the holepunch camera opening (with the OEM part), and if you don't remove that before installing the screen, you will not be able to take selfies. Some people will consider that a positive, but I'd prefer it not be there.

I was having the same problem that kimsballs mentioned above, but I've solved this for my Pixel 6 Pro, so here's a quick guide... or links to other people's solutions, really.

First, you need to go here, and download the Google USB driver: https://developer.android.com/studio/run...; just get the Zip file and extract it.

CRITICAL: do not use Device Manager to install the file. Locate the .inf file within the extracted folder (mine was titled android_winusb.inf), then right click and select Install. If the Install option is not listed (Win11 doesn't show it at first), click More Options at the bottom of the menu.

Then, go here (MUST use Chrome browser) and follow instructions: https://pixelrepair.withgoogle.com/udfps

Matt Montero -

I tried your method but the but the finger print repair tool doesn't connect to my phone when i enter fast boot mode. I have the USB driver installed, even downloaded Android Studio to make sure I had it, but still no luck.

Cyril Chen -

I also didn't get the finger print repair tool to connect with my phone in fast boot mode. I followed the trouble shooting guild and ended up at this link. I guess I didn't install the driver correctly.

https://developer.android.com/studio/run...

Thomas Elliott -

friends I need help, I bought the original screen that includes the fingerprint reader but when I try to see if it works I get a message saying that: The registration was not completed, the fingerprint sensor cannot be used, consult a repair provider

Diego Rueda -

Diego, I just did this repair. You'll have to download the Android USB driver to a computer https://developer.android.com/studio/run...

CRITICAL: do not use Device Manager to install the file. Locate the .inf file within the extracted folder (mine was titled android_winusb.inf), then right click and select Install. If the Install option is not listed (Win11 doesn't show it at first), click More Options at the bottom of the menu.

Then, go here (MUST use Chrome browser) and follow instructions: https://pixelrepair.withgoogle.com/udfps

I had to reboot my phone twice.

Hope this helps!

Ted Ostrowski -

(1/2) Hello everyone:

The instructions are great until they stop.

1st hurdle: Applying the adhesive. It is simply a thin ring around the entire device. Not patches. I placed it on the phone (not the screen and then carefully peeled back the plastic using the tweezers and then used the spudger to reapproximate any adhesive that got stretched or moved. I then reattached the screen via the cable and replaced the metal piece and screw, then folded the screen over the phone and ran something firm along the entire edge of the phone. I thought I was messing it up, but it all worked out...

Second hurdle: As discussed the fingerprint reader does not work when you first boot up the phone. However, as others mentioned there is a fix. At first I was worried as I only read about this after purchasing the replacement screen, but it was actually very painless. I am not saying anything new that was not mentioned by Matt Montero and Ted Ostrowski. Just confirming that this works.

Bryan Roller -

(2/2)

Download ZIP: https://developer.android.com/studio/run...

Extract All

locate the android_winusb.inf file

Right click --> Install

Then proceed to https://pixelrepair.withgoogle.com/udfps in chrome.

Follow instructions (very clear and fast).

And you will have to reboot the phone (not computer) twice.

The entire process was ~ 75 minutes.

Seems to be working great!

Bryan Roller -

I also want to add - I think my fingerprint reader is working better than originally. It may be a bias from sub-par operation while living with a very damaged screen for 2 weeks, but my biggest overall complaint with the pixel 6 pro is the fingerprint reader failing. I am not sure if it is the hardware, the calibration, or a combination, but I think it works better than it used to.

Bryan Roller -

Hi Everyone I just wanted to give my experience with the finger print sensor recalibration. I just replaced my screen. I was having zero luck on my windows computer even after installing USB driver and then tried on my old Macbook. Neither detected my phone. I then used the USB-C to USB-C cable (that came with my pixel 6 Pro) and connected to my wife's newer macbook (using Chrome - https://pixelrepair.withgoogle.com/udfps ) and it worked immediately, took like 10 seconds and no fussing with drivers. I spent like an hour before I thought to try using another device. If this is an option for you and you are having issues, i'd definitely recommend using a legit cable and attempting the process on an IOS device (using Chrome).

Best of luck.

arialz -

This one worked a treat! Thanks for posting :)

alberte -

A quick extra note about the adhesive. The precut adhesive was a bit of a confusing experience for me, i'd personally recommend ordering an extra or a small tube of adhesive in case you need to patch a spot. I found it was best to place the adhesive down on the phone itself before connecting the screen. I had a few spots where the adhesive didn't line up so I used the spudger to push it into place... So far no problems and everything is working fine now. I placed some books on it for about an hour with the phone off just to try to avoid any separation issues in the future. Overall the process was pretty easy and definitely worth the approx. $120 i saved not taking it into a ubreakifix.

arialz -

Followed these exact instructions with iFixit OEM screen replacement, and the front facing camera no longer works. @mattmontero explained the reason (above):

"These instructions neglect a key point: there is a protective cover over the holepunch camera opening (with the OEM part), and if you don't remove that before installing the screen, you will not be able to take selfies."

It sure would've been nice to have that detail included in the instructions. Now I've got a Pixel 6 Pro with no front-facing camera.

Capt@inKrunk -

I had the same issue...a photo with blue box highlight would be helpful - I have to order another adhesive and do it over :|

alberte -

I followed these instructions and now my phone will not even turn on.

Cheryl -

if I do the fingerprint sensor calibration I will lose my data??

ADEL -

Thank you Diego!!! Your instructions saved me hours of frustration. I would have never figured out the below step as I went right into device manager. Appreciate your help!!!

CRITICAL: do not use Device Manager to install the file. Locate the .inf file within the extracted folder (mine was titled android_winusb.inf), then right click and select Install.

I agree the install instructions should be included. If I didn't read the comments from users, I would be tearing the phone down to remove the cover on the selfie camera and would have wasted the cut out adhesive I paid for.

Jay -

The repair went quite well. Take your time and read the instructions a couple of times before you start AND most importantly the comments. The comments were most helpful in restoring the fingerprint sensor. Thank you @bryanroller

Make sure you take off the protective cover over the front facing camera hole! My kit did have a note on the screen to do that now thankfully.

I used a heat gun to heat up the adhesive. Seemed to work very well. Getting the first opening pick in is a bit tricky - I ended up cracking the screen even further. Once you get that first one started though it goes quite well.

The pre cut adhesive was intimidating at first. It's actually quite easy and forgiving. Set it in place on the phone and use your spudger to move it around and it's all good.

This is the first time I've attempted a repair like this and I must say the kit was well put together and the instructions were pretty good. Someone else mentioned that it would be nice to see the steps on how to put everything back together.

Thanks!

Benjaman Walter -

What do you do if the new screen doesn't turn on?

I can fell the phone vibrating when the power button is pressed, but the screen remains blank.

Christopher Turner -

same thing happened to me, and I had to reseat the cable connecting the screen to the phone. The first time, the phone vibrated but the screen stayed black.

The cover and screw went back in even though the cable was not fully seated in the socket, or was possibly off to the side. I was concerned b/c instructions said not to touch screen during first power on, and I thought the screen might turn on when the cable was reconnected, but it did not - maybe the phone turned itself back off since no screen was attached?

Once I reseated the cable the screen turned on when the phone vibrated, then I turned it off and sealed it back up. If you already closed up the phone, you might be able to warm it up, slice the adhesive, and pull the screen back off to get to the cable and reseat it. Not sure if the adhesive would restick, but it is pretty sticky, so worth a shot, or maybe someone can suggest something else besides ordering another OEM adhesive.

John Kalas -

I had the same problem. I then disconnected the battery and reconnected and the phone started.

danielbauer -

I was able to successfully change my screen, but I would not have been able to complete without reading others' comments.

The ribbon cable bounced out of the socket as soon as I removed the torx screw, so be careful not to lose the screw in the process. Be sure to snap the cable back into the socket securely before screwing the cover back on with the torx screw - I thought I had it in place the first time, and the cover and screw went back together, but the screen did not work until I reseated the cable.

I am sure my phone is no longer water resistant b/c I had issues with the adhesive stretching, sticking off center, the plastic getting underneath it, etc, but I still got enough of it in close enough to the right places to keep the screen on, and it looks fine.

Definitely remove the cover on the inside of the screen over the selfie camera before installing the screen. Install the driver to be able to complete the fingerprint calibration, then restart the phone a couple of times for it to start working.

John Kalas -

Thanks everyone for their comments! I've implemented your experiences with the selfie camera cover into the guide.

Arthur Shi -

help i downloaded the google zip file and extracted the usb driver but the android inf file isnt showing up what am i doing wrong

Alexandra Mayoral -

when you have trouble with your fingerprint reader use this https://piunikaweb.com/2022/10/04/pixel-... I spent 3 hours trying to figure this out and it is the only way that I was able to get my fingerprint sensor to work. also, you do not need to reset your phone if you do it this way just restart after installing the software.

David Hedoesit -

Any idea where to get the OEM parts for a reasonable price in EU? The replacemant parts havent been available for a long time here

Cagri Ürkmez -

Ok. So if I were to purchase only the actual screen for my 6 Pro, how do I remove the parts attached to the inner side of the screen? I'm guessing they are one or more of the following... Integrated Fingerprint Reader, Amoled Display, OLED Digitizer, and Display something- looks like I wrote dunes. Because I can buy the screen only, without anything attached to to it, like just a piece of curved glass that is the correct fit, but have zero idea how to remove all that from the old broken piece of glass that is my screen and then reattach all that to a new beautiful uncracked all the heck screen. Thanks!

Karen Holcomb -

After failing to do a battery replacement on my samsung s10+ from ifixit I was worried about trying again but I just did the screen from this guide as well as a battery while I was in there and it seems to have worked great! Thanks so much! The fingerprint reader worked by clicking the link in the last step in this article -- just realize that you have to restart the phone a couple times for it to work.

Sean Roth -

Btw, it sounds like my loadspeaker is malfunctioning after the repair. Has anyone else had this issue? I wonder if it's just some rubbing alcohol that needs to dry up.

Sean Roth -

I have just fixed my phone! I'm so excited about that! I always thought that phone fixing is extremely difficult and I won't manage this before. Well here I am. I'm just having problems with fingerprint scanner calibrating/ In the fast boot mode my phone is locked. Can it be the issue?

Ekaterina Astafeva -

Все вийшло! Набір супер, якість інструментів - топ! ***Step 13***- читайте все що вказано!

Pavel Sydorov -

Are the displays from ifixit original? I ordered one from another place and was sent an low quality oled instead of amoled screen that lags and stutters everywhere... Just wondered if the display from here are just like the original one..

Juan Ramos -

Thanks to all, everything went well. I repaired a screen on a samsung some years ago, successfully, but when the screen got wet in the rain, the phone died. Obviously, the waterproofing failed, so with this phone, I'm going to buy a waterproof case.

Peter Hutting -

after a while, I found out that the microphone doesn't work. I can't use duolingo, for example, and the phone app works only using speakerphone. There are apparently two microphones, the top one seems OK, I believe it is the bottom one which has the problem. I'm thinking that I may have got some adhesive in the wrong place down on the bottom left, and wondering whether I should reopen it and look, or just leave it alone and live with it.

Peter Hutting -

In principle, I liked everything, everything is easy. But unfortunately the screen is defective, there are spots on it that are inside the screen. I'm disappointed ((But everything changes, and setting up the print is easy.

Рагим Тагиев -

After rebooting in Fastboot Mode are you supposed to Start the OS or just connect and run the Pixel Repair? I tried several times with a USB-C to USB-C and USB-A to USB-C and no compatible devices are detected from the https://pixelrepair.withgoogle.com/udfps website

Jasper Mayzik -

I had to install the driver using Windows Device Manager. That was my issue...

Jasper Mayzik -

Do not forget the protective film on the front camera of the new display. We had to disesebly the phone once again to remove it...

Róbert Bartakovič -

Hello. On some websites i read that some replacement displays have written NO CHIP. what is this referring to? is there a chip to move from the old to the new display? greetings

Jacopo Canoa -

Hi

I replaced my screen, but the adhesive tape won't hold my screen in place on the left side. I have tried to put new adhesive tape twice now, without any luck is there anything that I'm doing wrong? Or is there anything else i can do beside changing frame? (It does not look like my frame is bend though). Will it work better with glue instead of tape?

Post

Stian Bakke -

Hat wunderbar funktioniert nach der Anleitung, würde mir aber etwas detailliertere Anweisungen für den Zusammenbau wünschen, habe ziemlich herumgefummelt beim Anschließen des flexkabels, das Wiederaufsetzen des Displays könnte auch etwas genauer beschrieben werden (wie Fest soll man es andrücken, eventuell anwärmen?)

Das Kalibrieren des Fingerprintsensors hat funktioniert, aber erst beim dritten Versuch, also nicht verzagen und mehrmals probieren 😉

Dietmar R. -

The installation went perfectly, although there was a lack of info on how to put it back together it's working fine. Now I can't connect my phone to my computer and I think it's a issue with the port not with the tool, so although I'm stuck without a fingerprint sensor and a bit of lag at the login, I'm glad to have my pixel

Logan T -

I replaced the screen of a Pixel 6 Pro using the ifixit part with a new sensor and got the Fingerprint error as well. When I did the https://pixelrepair.withgoogle.com/udfps reset and rebooted the phone, I still received the error when setting up the fingerprint (first reboot). Apparently there's a second reboot that is needed and then the fingerprint sensor was working normally again with the new sensor. Thank you all for the help here :)

The repair was done on this post date.

Zahir Mohammed -

Me han reemplazado la pantalla y no se ve igual, las imágenes se ven saturadas, es normal o es una pantalla no original ?

Valeria Campaña -

How important is it to turn off the phone before repairing? I can't turn off my phone with the buttons and the screen is not working. Letting the battery drain will take days.

Rick Uijens -

Hi Rick! Go ahead with the repair as best you can. Make sure not to use any metal or conductive tools to disconnect the screen to avoid shorting the socket on the board. After you get the new screen connected, go ahead and power off or restart the phone right away to mitigate any possible software issues.

Clay Eickemeyer -

Send to Mexico?

Luis Saucedo -

Hello! My Pixel 6 Pro multitouch only supports 2 touches instead of 10. But at the same time, the fingerprint works very well and the screen refresh rate is 120 Hz. What could be the problem? Is my display not original? Or is there a problem with the digitizer? How to check the screen for originality without disassembling the phone?

Ramil -

Most likely the screen was replaced with a screen from a different revision. How can I fix the problem with multitouch? Maybe I need to install a driver or replace the configuration file?

Ramil -

I am shocked - I managed to shear the head off the tiny 2.0 mm-long 3IP Torx Plus screw that holds the screen cable down. I really didn't put much force on it. I could have been more careful, but I'm shocked that it was this easy!!! I will have to take it to a professional now :/

Alexander Riccio -

Hmm, now I'm thinking, are there torque specs for screws on these devices?

Alexander Riccio -

Ok, a little bit of googling suggests it's somewhere between 30 and 60 inch ounces...

Alexander Riccio -

Hey, Would it be possible to do this without the picks and anti-clamp. Im thinking to get a suction cup and i have a really nice metal spudger tool?

Cardcraft -

I managed to get the glue stuck perfectly the whole way around the frame of the phone without ANY smudging or adjustment.

ADHESIVE PROCESS

1. Use tweezers to remove all of the old glue

2. Do a DRY alignment of the adhesive strip to SCREEN (not the phone frame) first to ensure you have the adhesive strip the right way around. The cutouts in the blue plastic will align with all of the small silver pins (7-8?) around the perimeter of the screen.

3. Now flip it over and align it to the phone frame.

4. Start peeling the CLEAR plastic away from the little tab that will be near the top of your phone. Only peel about 1 inch of the plastic back so that it is being uniformly pulled down from the top.

5. With only the top edge of the adhesive exposed, slowly align and push the entire width of the top edge into the frame edge at a 45deg angle.

6. Carefully peel the clear plastic and lower to frame sides, slowly working your way to the bottom of phone.

7. Carefully peel blue plastic away - use the tweezers and don't miss any.

Ryan Marr -

Hoping someone can help me. I'm replacing a cracked pixel 6 pro screen. Everything went well until I tried to seat the new screen. It absolutely would not sit right! the old and new screens look virtually identical - back and front, but upon closer inspection, the little seating clips have moved slightly - just enough that that couldn't possibly work.

I haven't been able to find anyone else mentioning it.

Has anyone else seen this change?

Thanks!

Jason Weiler -

Following up. This appears to be a packaging error. The screen was labeled for a Pixel 6 Pro, but it's a Pixel 7 Pro screen. They look very very similar except for the alignment pegs.

Jason Weiler -

I did follow all the steps and when I reboot the phone I got a google screen with weird colors that turn on and off in a endless loop an never reboot. Does anybody know what could be?

Everton The Da Silva -

I replaced my screen back in October and I think my connector might be loose or something. The other day I set my phone down like I normally do, albeit, maybe a bit harder than I should, and the screen when black. I couldn't get it to come back without a reboot. Didn't think much of it. Today, I did the same thing (again, it's normal for me) and saw a flash on the screen. That worried me a bit, so I've been trying to be more careful. But my habit got the better of me and I did it again, which caused the black screen again. I can tell it is still responsive, because I still feel vibrations from using the fingerprint scanner, but nothing shows up. I fixed it with a reboot again, but I might pick up a new screen adhesive, pull off the screen, ensure a solid connection, and put it back. Any suggestions? Anyone have this happen to them too?

Peter Phillips -

BEST quality Google parts. Very very easy install.

Christine Briskey -

my screen was cracked and the touch and fingerprint was unresponsive. I replaced with new unit, screen worked but touch and finger print sensor remained unresponsive. Any ideas?

David Dimovski -

I followed the guide which was quite straight forward, however the finger print pad does not work. What should I do?

Gooders -

It would be useful to have a guide using the tools provided with the screen replacement. For exemple, there is no guitar pick in the kit....

Patrick Périgny -