
Introdução
Este guia de reparo foi criado pela equipe da iFixit e não foi aprovado pelo Google. Saiba mais sobre nossos guias de reparo aqui.
Siga este guia para substituir uma tela quebrada ou rachada de um Pixel 4a.
O painel de tela sem reforço do Pixel 4a é frágil. Preste muita atenção aos avisos no procedimento de abertura se for reutilizar a tela.
-
-
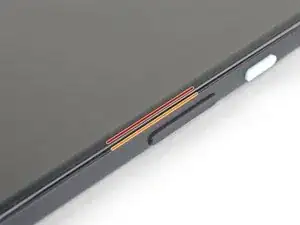
Observe as duas costuras na borda do telefone:
-
Emenda da tela: esta emenda separa a tela do resto do fone. É aqui que você deve fazer alavanca.
-
Emenda da moldura: é aqui que a moldura de plástico e a tampa traseira se tocam. Ela é fixada por meio de parafusos. Não faça alavanca nesta emenda.
-
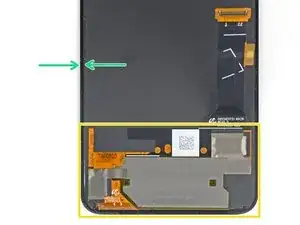
Antes de começar, observe as seguintes áreas da tela:
-
Cabo conector flex da tela: não insira a palheta de abertura a uma profundidade maior do que a instruída ou você corre o risco de danificar esse cabo.
-
Limite do adesivo: fazer alavanca além deste limite estrito sem inclinar a palheta causará danos ao painel OLED.
-
-
-
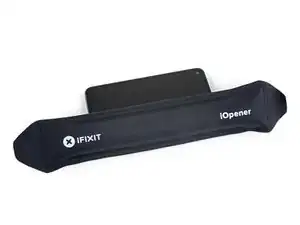
Aplique uma bolsa térmica iOpener aquecida na borda direita do visor por um minuto para amolecer o adesivo.
-
-
-
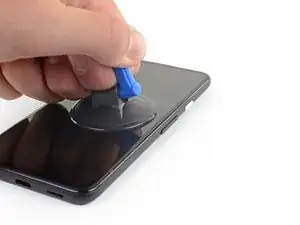
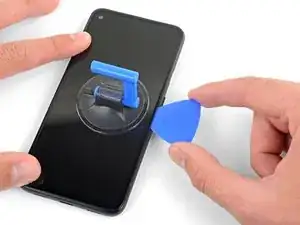
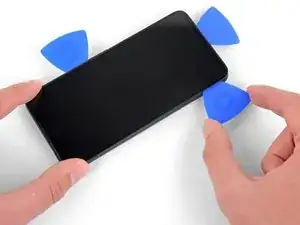
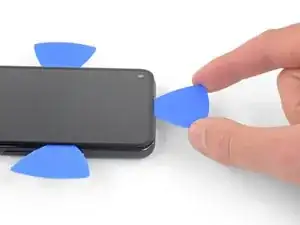
Coloque uma ventosa de sucção o mais próximo possível da borda direita da tela.
-
Levante a ventosa com força e firmeza.
-
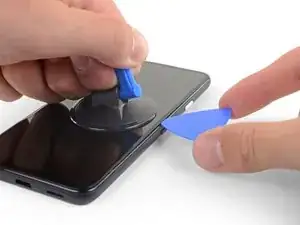
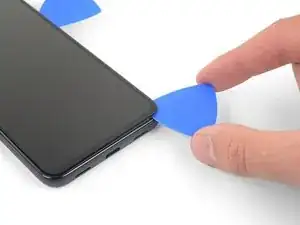
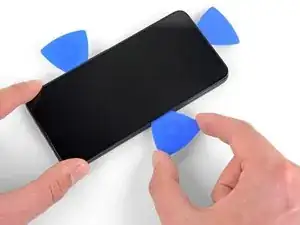
Insira a ponta de uma palheta de abertura na emenda da tela sem exceder 1 mm.
-
-
-
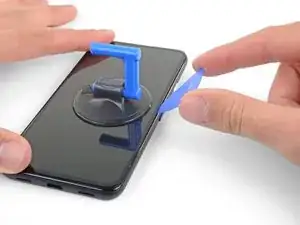
Com a palheta inserida 1 mm no vão, vire a palheta para cima, para deixá-la em um ângulo menor em relação ao fone.
-
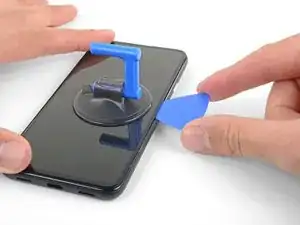
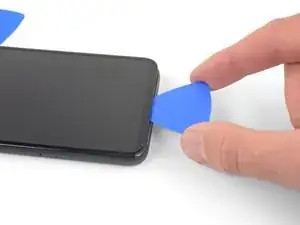
Perfazendo um ângulo obtuso em relação ao fone, empurre cuidadosamente a palheta no vão por uns 6 mm ou 1/4 de polegada. A palheta deve deslizar para dentro abaixo do painel OLED.
-
-
-
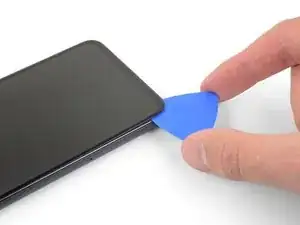
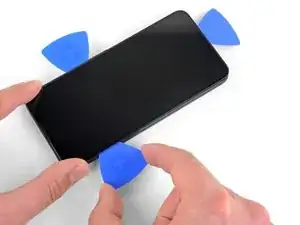
Passe a palheta ao longo da borda direita da tela para cortar o adesivo.
-
Deixe a palheta no canto superior direito para evitar que o adesivo volte a selar.
-
-
-
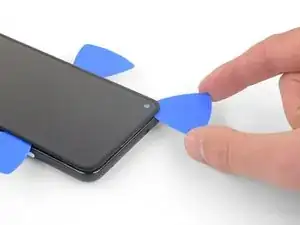
Insira outra palheta de abertura inclinada onde já tenha se formado um vão na borda direita do telefone, para evitar danos ao painel OLED.
-
Deslize a palheta de abertura ao redor da parte inferior do telefone para cortar o adesivo.
-
Deixe a palheta inserida na borda inferior para evitar que o adesivo volte a selar.
-
-
-
Insira outra palheta de abertura inclinada onde já tenha se formado um vão na borda inferior do telefone, para evitar danos ao painel OLED.
-
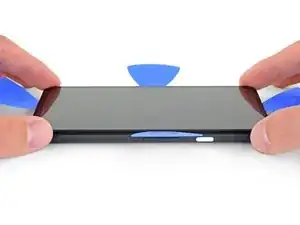
Use a palheta para abrir caminho pela borda esquerda do telefone.
-
Deixe a palheta inserida na borda esquerda do telefone para evitar que o adesivo volte a selar.
-
-
-
Insira outra palheta de abertura inclinada onde já tenha se formado um vão na borda esquerda do telefone, para evitar danos ao painel OLED.
-
Deslize a palheta ao longo da borda superior do telefone para cortar o adesivo.
-
-
-
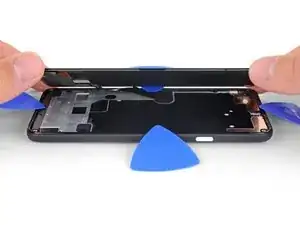
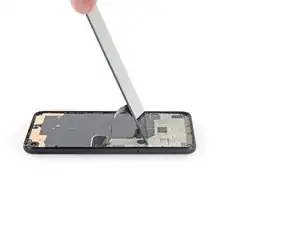
Depois de cortar ao longo do contorno do telefone, levante cuidadosamente a borda direita da tela, abrindo o telefone como um livro.
-
Use uma palheta de abertura para cortar cuidadosamente qualquer adesivo restante.
-
-
-
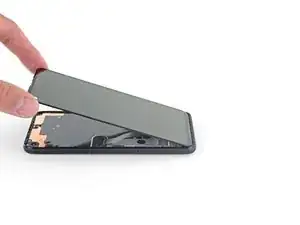
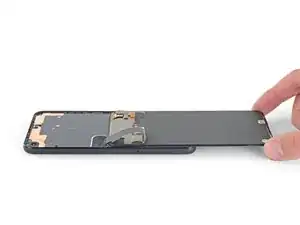
Levante a tela pela borda superior e vire-a por sobre a borda inferior, até que possa apoiá-la com o lado do vidro para baixo.
-
-
-
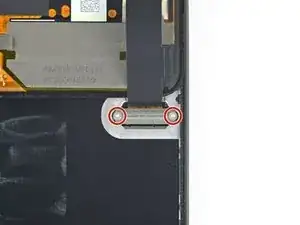
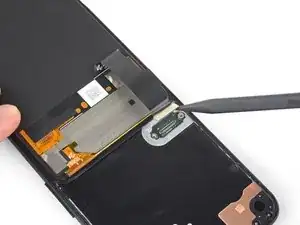
Use uma chave Torx T3 para remover os dois parafusos 2,1 mm que fixam o suporte do conector da tela.
-
-
-
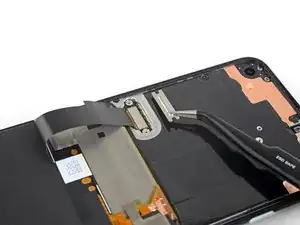
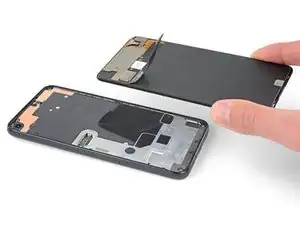
Remova a tela.
-
Compare a tela de reposição com a original. Pode ser que você precise transferir componentes adicionais (como a grelha do alto-falante) para a peça nova.
-
Raspe o adesivo restante do contorno da moldura.
-
Siga este guia se você estiver usando adesivos customizados.
-
Se você estiver usando uma fita dupla face como a fita da Tesa, siga este guia.
-


Compare a sua nova peça de reposição com a peça original — pode ser que você precise transferir componentes remanescentes ou remover suportes adesivos da nova peça antes de instalá-la.
Para a remontagem de seu dispositivo, siga os passos acima na ordem inversa.
Leve o seu lixo eletrônico para um ponto de recolha ou uma recicladora certificada.
O reparo não está indo conforme o planejado? Tente soluções de problemas básicas, ou peça ajuda na nossa comunidade de Respostas.

40 comentários
Where do you recommend that I purchase the Pixel4a screen replacement from? I found these two with Witrigs being cheaper, but not sure if either are reliable high quality screens.
Coll down guys and gals.
1) go below the Display and not between the backcover/middle (see the other comments)
2) just take care about the flex/display cable position (which is iirc about on the middle i.e. 2nd 3rd from the bottom ON THE LEFT side dear OP)
Everything else is just separting the glued on Display from the Phone.
See the other comments
Aleksandar Dejanovic -
Cool down guys and gals.
1) go below the Display and not between the backcover/middle (see the other comments)
2) just take care about the flex/display cable position (which is iirc about on the middle i.e. 2nd 3rd from the bottom ON THE LEFT side dear OP)
Everything else is just separting the glued on Display from the Phone.
See the other comments
Aleksandar Dejanovic -
I've measured it: The cable starts arround 1.4-1.6 cm from the lower half from the bottom on the left side.
So You can cut the bottom left corner and of course the upper left one but for safety's sake, watch out for the camera.
You can go up to 5cm down from the upper left side till You're near the cable.
Aleksandar Dejanovic -
When you say left side, is this your left when the phone screen is facing you?
jaunie -
The third image her shows the back of the screen, not the body of the phone
blueslondon -
I wanted to add yet another warning: Be extremely careful in the lower left edge of the screen!
I tried to be gentle, and inserted the pick very little, but still, after reassembly, my screen remained black (while the rest of the device continued working – if you have USB debugging enabled, you can still use it using the
scrcpytool). There was no visible damage; I suspect that I damaged the ribbon cable in the lower left in an invisible way.A new screen fixed the problem. Still, this increased the cost of repair by ~$100. I think the guide should highlight the danger even more. Please be careful – one guide on YouTube I found afterwards avoids inserting the pick in the lower left corner entirely, and just "wiggles it free".
blinry -
Yes! Wish I would’ve read this. I was very careful and don’t believe I inserted the pick more than 1mm, but still damaged the cable on the lower left corner. I highly recommend not inserting a pick on the bottom edge (especially not the bottom left), and wiggling it loose as the last step to removing the screen.
Chris P. Bacon -