
Introdução
Use este guia para remover ou substituir a placa de metal na face traseira do painel dianteiro do iPhone 6.
Você também pode usar este guia para substituir as seguintes peças:
Ferramentas
-
-
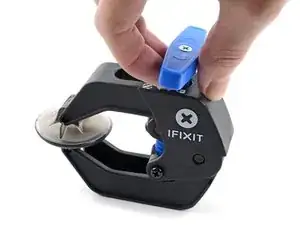
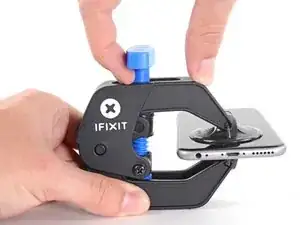
Puxe a pega azul para trás para destravar os braços do Anti-Clamp.
-
Deslize os braços pela borda esquerda ou direita do seu iPhone.
-
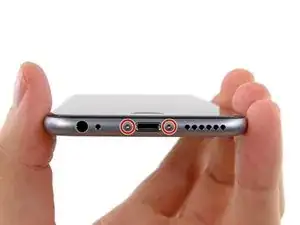
Posicione as ventosas próximo à borda inferior do iPhone, diretamente acima do botão home - uma pela dianteira e a outra pela traseira.
-
Aperte as ventosas uma contra a outra para aplicar sucção na área desejada.
-
-
-
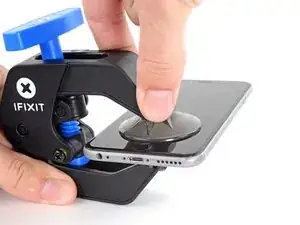
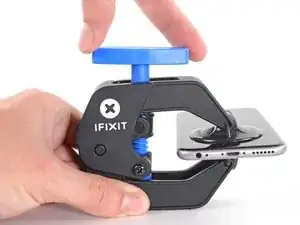
Puxe a pega azul para a frente para travar os braços.
-
Gire a pega 360 graus no sentido horário até que as ventosas comecem a se esticar.
-
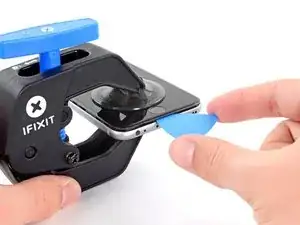
Insira uma palheta de abertura sob a tela quando o Anti-Clamp tiver formado um vão grande o suficiente.
-
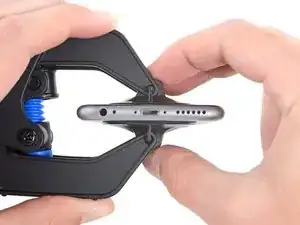
Pule as próximas três etapas.
-
-
-
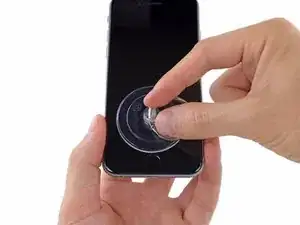
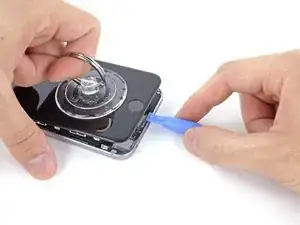
Caso você não tenha uma iSclack, use somente uma ventosa de sucção para levantar o painel dianteiro:
-
Pressione uma ventosa de sucção contra a tela, na área diretamente acima do botão home.
-
-
-
Enquanto pressiona o iPhone para baixo com uma mão, puxe a ventosa de sucção para cima, de modo a separar suavemente o conjunto painel dianteiro da estrutura traseira do dispositivo.
-
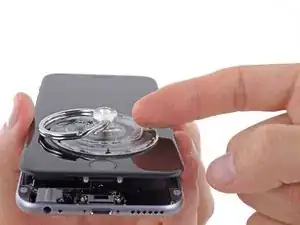
Usando uma ferramenta de abertura de plástico, comece a mover vagarosamente a estrutura traseira do dispositivo para baixo enquanto continua puxando para cima o conjunto do display com a ventosa, até separá-los um do outro.
-
-
-
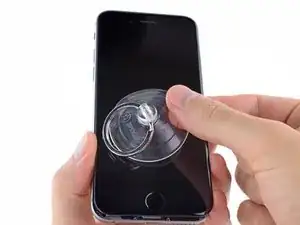
Puxe o bico de plástico para liberar o vácuo da ventosa.
-
Remova a ventosa de sucção do conjunto do display.
-
-
-
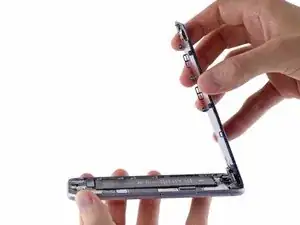
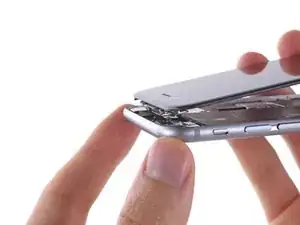
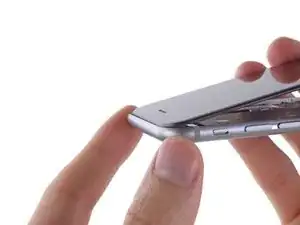
Usando a parte superior do telefone como uma dobradiça, abra o iPhone, pivotando a extremidade do botão home do conjunto painel dianteiro e separando-a da estrutura traseira.
-
-
-
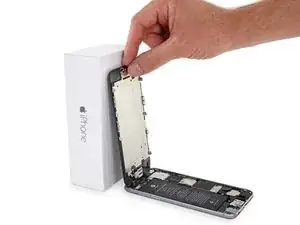
Abra o display a um ângulo de cerca de 90º e apoie-o em algo que o sustente enquanto você está trabalhando no telefone.
-
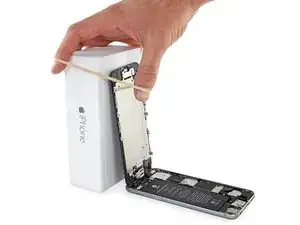
Engate uma faixa de elástico para fixar seguramente o display enquanto você trabalha. Isso previne uma tensão indevida nos cabos do display.
-
-
-
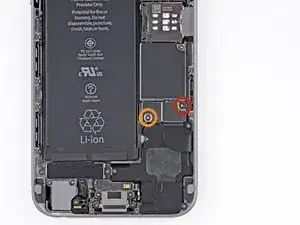
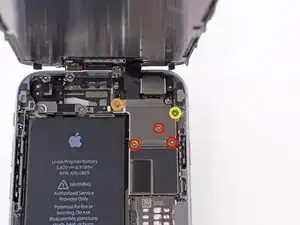
Remova os seguintes parafusos Phillips do tipo #00 do suporte do conector da bateria:
-
Um parafuso de 2,2 mm
-
Um parafuso de 3,2 mm
-
-
-
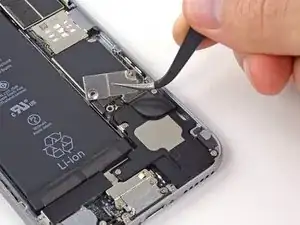
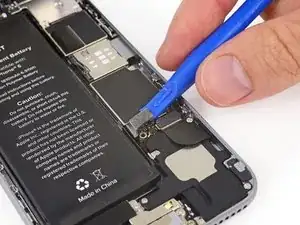
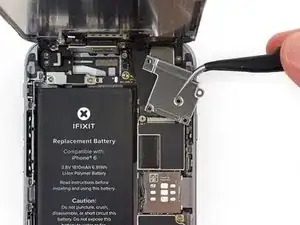
Use uma ferramenta de abertura de plástico para desprender cuidadosamente o conector da bateria do seu soquete na placa lógica.
-
-
-
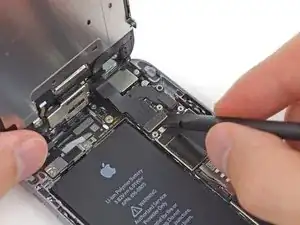
Remova os seguintes cinco parafusos Phillips que seguram o suporte para o cabo do conjunto painel dianteiro:
-
Três parafusos 1,2 mm
-
Um parafuso 1,7 mm
-
Um parafuso 3,1 mm
-
-
-
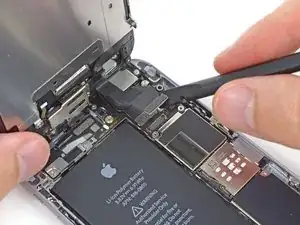
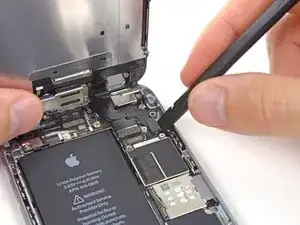
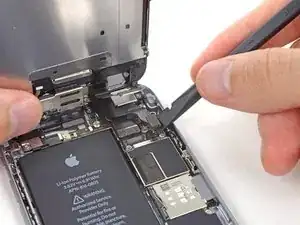
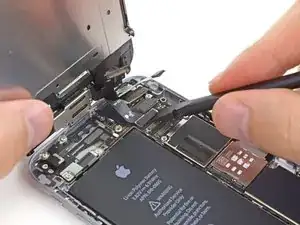
Use a ponta plana de uma espátula para desconectar a câmera frontal e o conector do cabo do sensor.
-
-
-
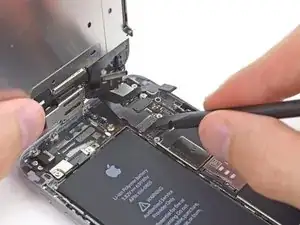
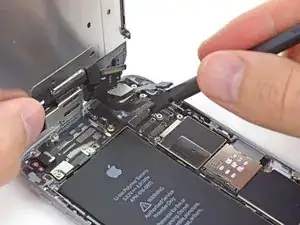
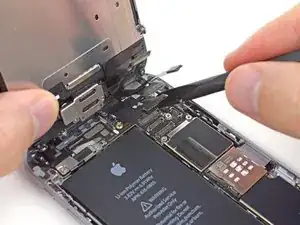
Use a ponta de uma espátula para desconectar o conector do cabo do botão home empurrando-o para cima em sentido contrário ao botão home.
-
-
-
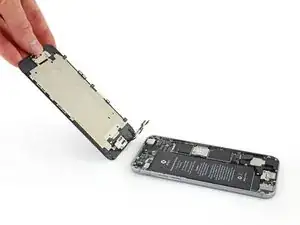
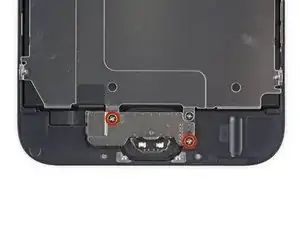
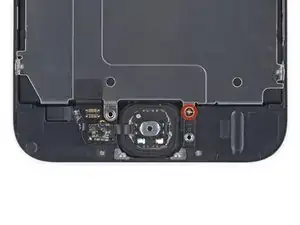
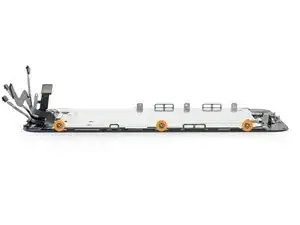
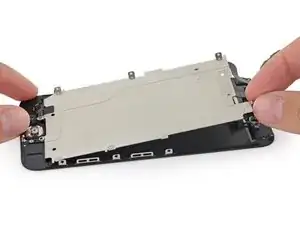
Remova os seguintes parafusos Phillips tipo #00 que seguram a placa protetora do LCD contra o painel dianteiro:
-
Um parafuso de 1,7 mm
-
Seis parafusos de 1,6 mm (três em cada lado)
-
-
-
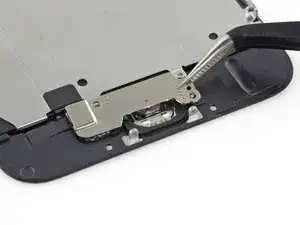
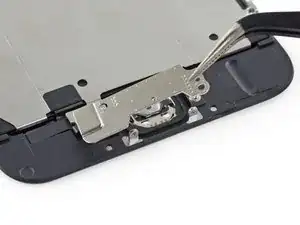
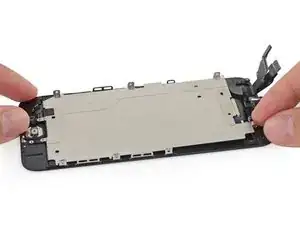
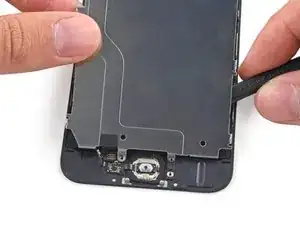
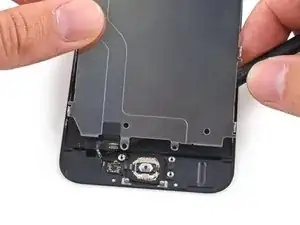
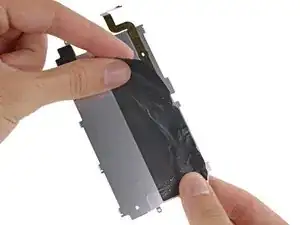
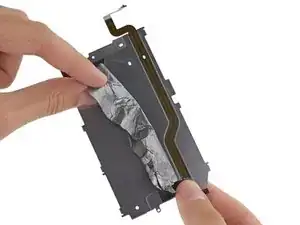
Deslize a ponta de uma espátula por trás da placa protetora para elevar cuidadosamente o cabo do botão home para fora do painel dianteiro.
-
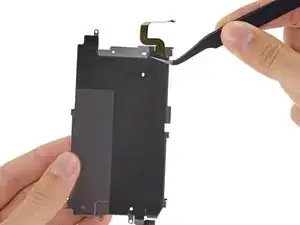
Remova a placa protetora do LCD.
-
-
-
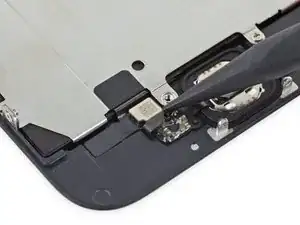
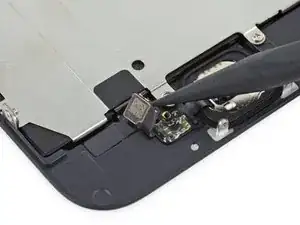
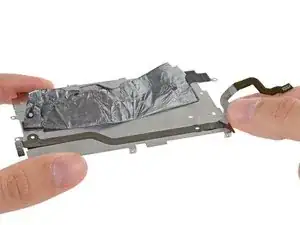
Cuidadosamente, puxe o cabo do botão home para cima, separando-o da cola que o fixa à placa protetora do LCD.
-

Para montar novamente seu dispositivo, siga essas instruções no sentido inverso.

21 comentários
You guys need to make a video on this! Yours are always the best!
gary -
I have this in video.
prfc -
When changing the shield plate do you need to keep the original home button cable ? I don't want to brick the phone. I know you need to keep the original home button but was not sure about shield plate. Also any new news on how to fix the error 53 ? I saw something on you tube but it was in Chinese. I attached the video maybe you can tell what he is doing..
When reconnecting be VERY careful not to over tighten. The connectors on the screen that these 3.6mm Pentalobe screws lock with are notorious for breaking off
Blair Tryba -
what do i do if ive managed to tighten them too hard and now they wont come off?
kristian686 -
Before opening the phone, I gently warmed it using a buckwheat heating pad. This made removal of the adhesive strips (steps 20 to 24) easy.
Howard Bales -
Exactly what I did as well, the gently warming made the adhesive removal work like a charm. The heat as well help to lift the screen easily, no need for the prying tools for me to open te phone.
For the adhesive removal just pull it slowly to the bottom of the phone and keep in under tension.
On reassembly, turn on the phone after getting all connectors back in place to verify all is working fine before putting all screws back in their spot.
Maarten Vergauwen -
Thanks for the suggestion! I heated up a hot/cold pack, and it worked great.
Linda Chandler -
I put mine back together but mine looks very different than this one. Why is it that when I make a call I cannot hear through the ear piece and have to put it on speaker. Also my screen doesn't go black when my face touches it
Bailey Wilson -
Hey Bailey, which repair were you attempting? Is it possible you have a 6s, or maybe a 6 Plus? You may have better luck with faster troubleshooting if you post in our Answer Forum!
Sam Goldheart -
See its a long time ago you had this issue. You can try to remove the cable from front camera/sensor/earpiece from the motherboard port and gently push it back on. All the problems you relate to is thru the same cable. If this dont solve your problem, check if the earpiece is correctly placed onto the polarity poles, and that the proximity sensor is lying right down into the corresponding socket. If something is blocking the sensor, yeah then the screen wont turn on/off when you put it onto your ear.
Kenneth Hilstan -
I see in the preamble that when you replace your logic board, you would lose touch id functionality, so my question is what if you have the homebutton and thus the fingerprint reader for the logic board replacement, would touch id work?
socratesmens -
The guide for the iPhone6 battery replacement needs to be revised. There are a couple of issues.
1) While the battery cover has two screws, they are different lengths. Since they are very small, it can be hard to see the difference (until one tries to screw the smaller one into the longer hole). The video needs to mention this.
2) The application of the adhesive strip if very different from what is mentioned. Also, there is a “one piece plastic” applique, and it is very unforgiving. The video should show this process in more detail.
I believe the attention to this detail would help folks correctly install their iPhone 6 batteries, and with the recent Apple disclosed battery problem, would continue to show that iFixit is very committed to the end-user.
Gary Long -
I felt a bit silly getting stuck at the end of a long repair, unable to screw one of these last screws back in. What worked was gently pinching the phone above and below the screw, to make sure the screen and back were perfectly aligned.
Matt D -
Apple edits posts on their Communities website that link to this fix page justifying as follows:
“We’ve edited your post because following the procedures at the site you provided may lead to damage to the user’s device.”
What is certain is that following Apple Support’s advice of resetting our phones again and again never works whereas this fix works. Apparently Apple does not want people to know that their hardware fails and can be fixed, because then they would need to explain why they don’t offer neither the fixing service nor the fixing advice by directing us to this website.
Brice -
Before you get started, I suggest you confirm you are replacing the correct camera. If you are thinking of a camera, the front is the side of the device with the main lens. On an iPhone this is actually known as the rear facing camera. Once the phone is disassembled your orientation can be distorted and it is not that hard to fail to realize your are replacing the wrong camera. Doh!
William Miller -
I found it very useful to use a magnet sheet when doing these repairs. I use electrical tape or a sharpie to make a grid, and place each micro screw in a separate box on the grid.
I work directly over the magnet sheet, so that if something drops I have a better chance at not losing it.
If you do lose a screw, go over the work area with a fridge magnet. It will pick it up if it hasn’t popped too far away.
Megan Telliano -
I agree. The Magnetic Project Mat makes your project incredibly easier and keeps your screws/parts organized. Here is the link for anyone interested:
Magnetic Project Mat
Cooper -
or some masking tape with sticky side up and the ends folded underneath on a piece of paper, then you can write notes like
“1.4mm for FOO bracket →”
“7x2.3mm for EMI cover, different one by camera →”
The arrows point as appropriate.
If you drop something, put a flashlight on the floor & shine it across the floor — Turn off ceiling & other lights off to maximize the shadow from the flashlight.
Bass Clef -
These screws are tiny, and the first two are the biggest of the lot. Get a magnifying glass or good reader glasses.
Jennifer Porter -
Which torx is this T?
klemenecanze -
The screws are no torx screws they are Apple Pentalobe screws. You need to buy a Pentalobe screwdriver seen above.
Claes -
I have to use the P2 right?
Aman Singh -
The best advice I can give is not to perform this operation over carpet.
Bruce codding -
I'm an amateur, but I was able to replace the parts almost perfectly while looking at this explanation, thank you very much.
irichin.3.26 -
was fairly easy more nerves than anything, one thing one should have on hand is alcohol just in case its needed. also if one doesn’t get the entire tape strips out, use the alcohol like suggested and lift the battery up. Then can grab the remaining tape strips with tweezers and pull it out. Easy to put back together just make sure the connectors are in. The screws are tiny so take your time. I plugged it in and it started charging and it worked. Great to have my 6 back for a trip as I wanted to use it for the camera, also my game phone so nice to have a battery that lasts. Yes having a flat place to put the parts and put them in separate area so they don’t get mixed up. It took about a hour with hunting for a spare bottle of alcohol.
Greg Wischmeyer -
The first step should always to be to backup your phone as there is always a slim chance that even a simple battery replacement may render the phone inoperable and data on it lost.
Jim -
Please do not forget to remove the SIM-Card tray!!
Steffen Albrecht -
I didn’t need to remove my sim card tray when I did my iPhone 6 battery replacement. Why do you suggest to remove it?
Jim -
You dont need to remove sim card while battery replacement
bertan -
Did mine today, with iFixit battery and iFixit tool kit. Did not need suction cup, to open case, as it had partially sprung open on left, as a result of a badly swollen battery. Supported base and screen with a bookend and rubber bands. This kept these parts at a 90 degree angle, so that screen did not need to be removed. IFixit screwdriver tips were perfect fit. Somewhat difficult to remove battery adhesive strips, but slow and steady got it done, after mild heating with hair dryer. Took about 3 minutes to reposition battery connector…just a wee bit tricky, to position correctly. Was careful to place top of screen in place first, and remainder snapped into place with light pressure, and replaced the 2 pentalobe screws.
Will highly recommend iFixit for such a repair. Repair kit and battery, are first rate. I give this an 11, out of 10.?
Len Drasin -