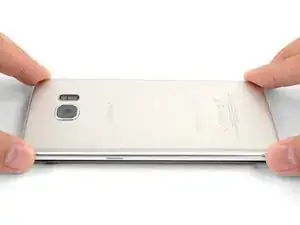
Introdução

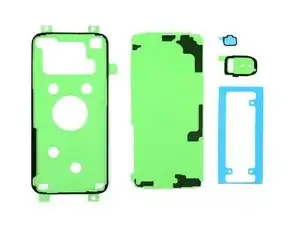
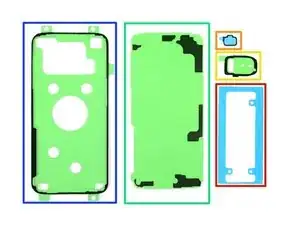
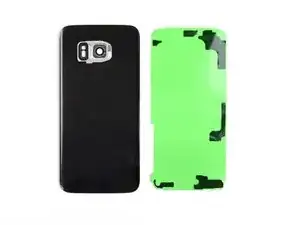
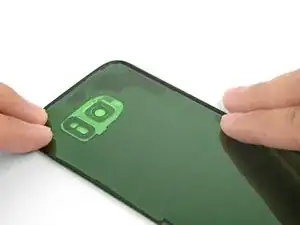
Você não sabe bem o que fazer com todas as tiras adesivas de seu kit para tampa traseira? Você está no lugar certo! Este guia mostra como usar o kit adesivo para tampa traseira para as séries Galaxy S com traseira em vidro (S7 e mais recentes). Ele também inclui instruções sobre como transferir e instalar vários componentes para instalação na traseira, tais como o bisel traseiro e sensor de impressão digital.

Pode ser que você não precise usar todas as tiras adesivas inclusas no kit. Se você estiver transferindo o sensor de impressão digital, pode ser que você precise de um pouco de fita adesiva dupla face.

Para obter uma lista de tiras adesivas para o Galaxy S, vá para este link.

Caso esteja aplicando tiras adesivas como essas, aqui vão algumas dicas:

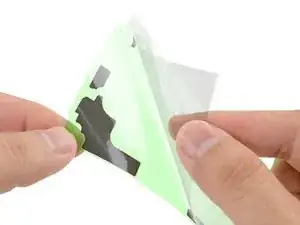
  • Em geral, as tiras adesivas possuem um lado colorido e um lado incolor (em papel ou plástico transparente). O lado incolor determina em qual superfície a tira deve ser aplicada primeiro.
  • Para facilitar a aplicação do adesivo, você pode alinhar uma tira descoberta em sua posição prevista no smartphone e, então, virar uma ponta dela para baixo, a fim de fixá-la em sua posição. Isso lhe permitirá descascar as películas de proteção e descobrir o adesivo sem perder o alinhamento.
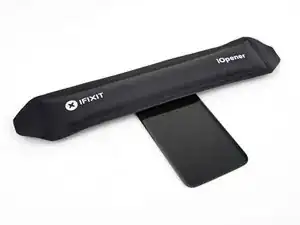
  1. kaEXuRXJdhhedkZe
    • Dependendo do modelo de seu smartphone, pode ser que você não precise executar alguns passos deste guia. Verifique seu kit de adesivos para conferir o que precisa ser feito:

    • Para instalar o adesivo para bateria, vá para este guia.

    • Para transferir e instalar o sensor de impressão digital e o vedante, comece pelo próximo passo.

    • Para transferir e instalar o bisel traseiro, pule até o passo 5.

    • Para instalar o adesivo do suporte para a traseira, pule até o passo 9.

    • Para instalar a borda adesiva para capa traseira, pule até o passo 13.

  2. CJJVWWVp1MGAUpk3
    CJJVWWVp1MGAUpk3
    MJgmXTRQnVa5CSux
    PbQMM4RD6gajkdNW
    • Os três próximos passos mostram como remover e transferir o sensor de impressão digital e seu vedante.

    • Se o sensor de impressão digital e a câmera de seu smartphone estiverem alojados em um único bisel traseiro (como no S9), você pode transferir este bisel sem remover cada uma das peças separadamente.

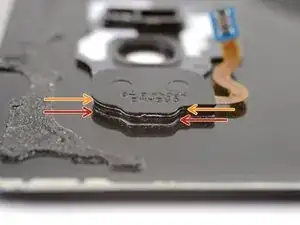
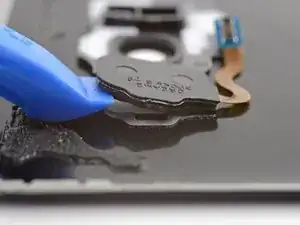
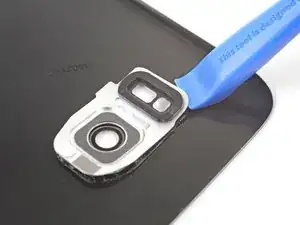
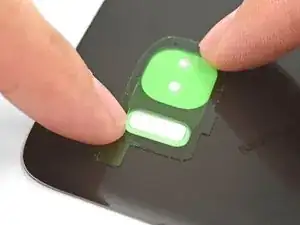
    • Aqueça uma iOpener (bolsa térmica de gel) e deixe-a encostada no sensor de impressão digital por um minuto.

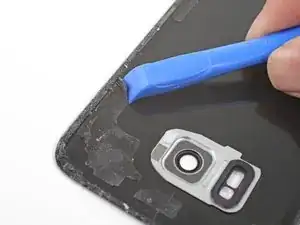
    • Use uma ferramenta de abertura para liberar cuidadosamente o sensor de impressão digital pela fenda inferior, onde ele encosta na capa traseira.

    • Não tente liberar o sensor pela fenda superior, onde se encontra o sulco do vedante do sensor de impressão digital.

  3. OISBEQWuUnN1DS5p
    OISBEQWuUnN1DS5p
    XxXgVlpgmeGJq2BE
    • Caso esteja substituindo somente o sensor de impressão digital e não o vedante do sensor de impressão digital, pule este passo.

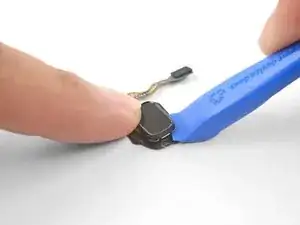
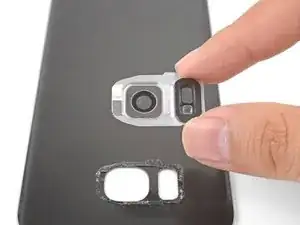
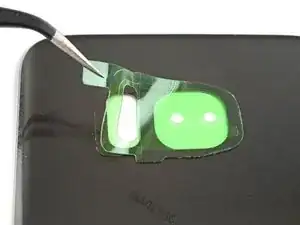
    • Use uma ferramenta de abertura para liberar o sensor de impressão digital de seu vedante.

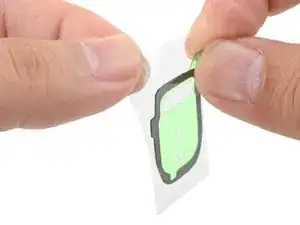
    • Remova a película de proteção em plástico colorido do vedante substituto para descobrir o adesivo.

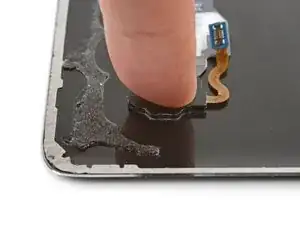
    • Com cuidado, alinhe e deite o sensor de impressão digital no lado pegajoso do vedante.

    • Uma vez alinhado, pressione para baixo com seu dedo para fazer a união adesiva.

  4. W1t2b6AmGoDGDtMM
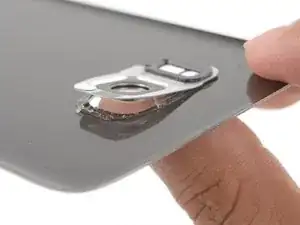
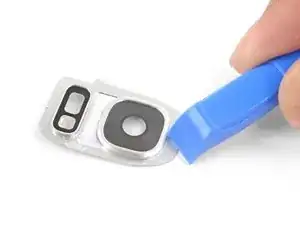
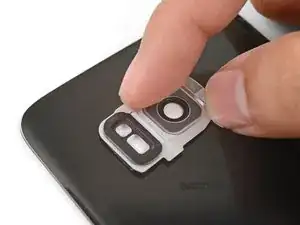
    • Para fixar o sensor de impressão digital na nova tampa traseira, use um adesivo cortado sob medida ou passe na borda do sensor uma fita adesiva dupla face, como a fita da tesa.

    • Alinhe o sensor de impressão digital no recorte da tampa traseira e pressione para baixo com firmeza usando seu dedo para fazer a união adesiva.

    Aligning the fingerprint sensor needs to be in the battery replacement and old back cover installation section

    Marco Hoy -

  5. tYJeFI3F5UXOlDkD
    tYJeFI3F5UXOlDkD
    UxUS2QoTvSKDDYo3
    bYCsHtF4NDOFP3Qt
    • Os quatro passos seguintes mostram como remover e transferir o bisel traseiro. O bisel comporta as câmeras traseiras, o flash e o sensor de impressão digital (em alguns modelos).

    • Aqueça uma iOpener (bolsa térmica de gel) e deixe-a encostada no bisel traseiro por um minuto.

    • Começando pelo lado virado para fora da capa traseira, empurre o bisel para dentro com um dedo, para liberar o bisel do recorte onde se encontra.

    • Não empurre com muita força, ou você poderá empenar o bisel.

    • Como alternativa, você pode fazer alavanca ao redor do bisel usando uma ferramenta de abertura, para liberá-lo do recorte onde se encontra.
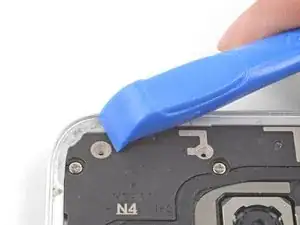
  6. 1cM4jGWLwMIbvTrY
    1cM4jGWLwMIbvTrY
    QCKHIBFC1YQo1FrF
    • Remova o bisel.

    • Use uma ferramenta de abertura e um pouco de álcool isopropílico de alta concentração para remover quaisquer restos de adesivo colados no bisel.

  7. npYPF4a6b3n2TqWU
    npYPF4a6b3n2TqWU
    T5Hm5AZWcULKWXsd
    Etm5ITwyaKBKC6ju
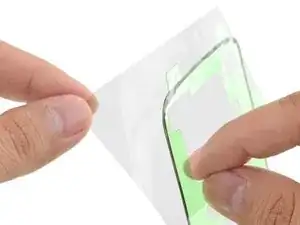
    • Descasque a película de proteção transparente da tira adesiva para o bisel para descobrir o adesivo.

    • Cuidadosamente, alinhe o adesivo ao recorte da capa traseira.

    • Uma vez alinhado, pressione o adesivo fixando-o em sua posição com o dedo.

    • Descasque a película de proteção transparente do adesivo para descobrir a sua superfície.

  8. Z3o1mfITagpSMmCu
    Z3o1mfITagpSMmCu
    dVrS6t5QhhY6INxg
    QuqvqmmSXb1ZNvYE
    • Com cuidado, alinhe e coloque o bisel sobre o adesivo.

    • Aperte a borda do bisel com seus dedos para realizar a união adesiva.

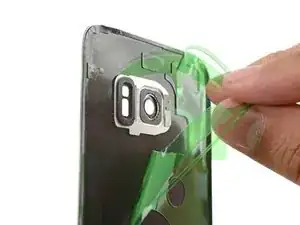
    • Limpe o vidro do bisel com um pano de microfibra.

  9. JbOIn1dFikFbeBpU
    JbOIn1dFikFbeBpU
    XXDjXsPvNCWIeDKC
    uGxr1Q2RYFxLLkAD
    • Os quatro seguintes passos mostram como instalar o(s) adesivo(s) do suporte da capa traseira.

    • Caso esteja substituindo o sensor de impressão digital ou o bisel traseiro, certifique-se de finalizar essas tarefas primeiro.

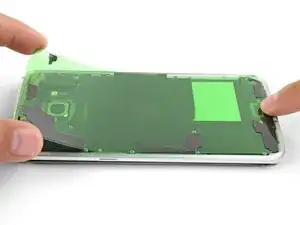
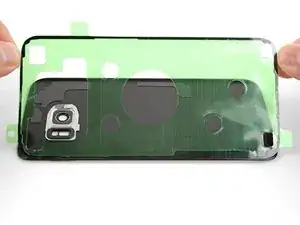
    • Descubra como a tira do suporte está alinhada com as superfícies comparando os contornos da tira adesiva com os restos de adesivo e a estrutura do smartphone.

    • Em geral, o lado do adesivo coberto por uma película protetora de plástico transparente deve colar na tampa traseira, enquanto que o lado coberto por uma película colorida deve colar na estrutura do telefone.

    • Use uma ferramenta de abertura e álcool isopropílico em alta concentração para remover todos os restos de adesivo da estrutura do smartphone.

    • Caso esteja planejando reaproveitar a tampa traseira, remova todos os restos de adesivo dela.

    • Não use ferramentas de metal, pois eles riscam a pintura da capa traseira.

    For my Galaxy S7, it appeared to me there were some minor placement inconsistencies (a millimeter or two) where the Back Cover Support adhesive pads (support strips) were on the backing sheet versus the actual phone. Difficult to know for sure since it is hard to tell where the original pads were after the back cover is pried off. I removed the clear backing to expose the strips and blocks, but placed the clear backing covering 80% of the phone as I transferred one portion of the unconnected adhesive strips at a time where they best appeared to be needed. This falls in the category of tweaking.

    The adhesive sheet for the back cover was 100% accurate.

    William Toperzer -

    Apply heat with iOpener/blower or the isopropyl alcohol on the adhesive you want to remove.

    I did not and noticed I peeled off pieces of the paint coating from the cover glass together with the adhesive.

    Eduard -

    You should be very careful with isopropyl alcohol when removing the glue from the NFC antenna part. I did this on my Galaxy S9 and because the glue is very strong i put on a lot of IPA, and unfortunately it also dissolved the coating that is on top of the NFC antenna or whatever that trace is. So be careful to only get the IPA on the hard plastic and not on this trace with what looks like it's a black sticker on it or any other parts really.

    MarF0x -

  10. xYN2VggWEl2WfSY1
    xYN2VggWEl2WfSY1
    JSPVRgTbaTSrTkQj
    LKKMoywiLFxNygCe
    • Descasque a película transparente da tira adesivo do suporte para descobrir o adesivo.

    • Cuidadosamente, deite a tira com o lado colante virado para cima sobre a estrutura do telefone, tomando cuidado para não tocar na superfície colante.

    • Alinhe a tira adesiva posicionando-a sobre a estrutura do smartphone, de forma que os contornos do adesivo cubram os da estrutura.

    • Caso você tenha suas tiras de suporte pequenas, execute o procedimento para cada uma delas.

    This process of putting the colored plastic with adhesive onto the phone and then sandwiching the back panel on top seemed counter-intuitive so I decided to remove the colored plastic and place the adhesive + clear plastic onto the back of the phone’s guts.

    DON’T BE ME!

    Follow the instructions and save yourself close to an hour of hassle. The adhesive loves the colored plastic way more than the clear.

    Paul Grzelak -

    It actually worked!!!

    Jerry Bodenhamer -

  11. gdWCRpBLqoKchXTq
    gdWCRpBLqoKchXTq
    QTwXDnNjEXlrCoXL
    • Cuidadosamente, abaixe a tampa traseira sobre as tiras de suporte descobertas. Isso garante com que o adesivo seja colocado corretamente na tampa traseira.

    I found it easier to lower the back cover onto the support strips using a suction cup. I felt like this gave me more control over placement and my fingers didn't get in the way on the edges.

    Kevin Mosier -

  12. GlXPADXxBvEfNCYG
    GlXPADXxBvEfNCYG
    OByRdawM5HlfFrKs
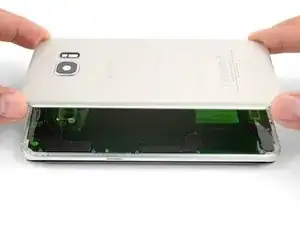
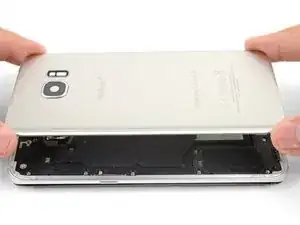
    • Remova a tampa traseira.

    • Com os dedos, pressione o adesivo de suporte firmemente na tampa traseira.

    • Descasque a película protetora colorida para descobrir o adesivo.

  13. jmwGpDtN22HDVGVy
    jmwGpDtN22HDVGVy
    YVwdGvMMviqSiH11
    OSqwdVfE2LsYbOM6
    • Os passos restantes mostram como instalar o adesivo da borda da tampa traseira.

    • Use uma ferramenta de abertura e álcool isopropílico de alta concentração para remover todos os restos de cola da estrutura do smartphone.

    • Caso esteja planejando reaproveitar a tampa traseira, remova todos os restos de adesivo da tampa traseira.

    • Não use ferramentas de metal, pois elas riscam a pintura da capa traseira.

    Be careful with removing adhesive around the NFC Antenna/Charging Coil Assembly. It’s covered in a black wrapping that can look like adhesive. Don’t scratch too hard with the spudger, the wrapping will come off!

    Michael M -

    Scrape and peel the adhesive, using goo gone only after systematically scraping the adhesive as much as possible. The goo gone should only be used to clean up residue once manual scraping has been completed, otherwise the adhesive will become tacky and only scrape off in microscopic layers at a time, which takes forever to remove.

    johnsgoepel -

    Just to point out, before you go too far into this...I have a SS Galaxy S10+ that I replaced the battery using IFIXIT tools, battery and instructions. It all worked out very well. I do have a OtterBox case on the phone, always did. I found when it came time to reseal the rear cover onto the phone, I didn't use any adhesive. The OtterBox case very nicely holds the rear panel and phone together very nicely and you get the added benefit of not having re-apply the adhesive panel. The downside...you'll need to remember that there isn't adhesive holding the back to the phone should you ever remove the OtterBox case.

    Dan Markiewicz -

  14. XZvVYjoIR5cLZ3EN
    XZvVYjoIR5cLZ3EN
    AhLPCOILQ2lLbg1e
    3PIPQOl2snBLaAk1
    • Descasque a película transparente da tira adesiva para a borda, a fim de descobrir o adesivo.

    • Segura a tira por suas abas e alinhe cuidadosamente uma longa ponta do adesivo adhesive à ponta da tampa traseira.

    • Coloque o adesivo sobre a tampa traseira e pressione-o firmemente contra a ela usando os seus dedos.

    • Descasque e remova a película de proteção colorida da tira adesiva para borda, a fim de descobrir o adesivo.

    • Neste momento, a tampa traseira está pronta para ser vedada. Certifique-se de executar um teste funcional em seu smartphone antes de vedar o smartphone.

    (Galaxy S7 kit): I peeled away the clear liner (Step 1), aligned it to the cover edge (Step 2) and pressed it down (Step 3).

    When I peeled off the tabbed "coloured" liner (Step 4), it turned out to be two layers: a clear, tabbed one that came away and a green one consisting of a central part and a thin, outer strip that still covered the adhesive.

    This thin strip had been partially lifted by the removal of the clear tabbed layer, so I started to remove it all. As I slowly and carefully pulled it, it tried to lift the adhesive strip itself off the cover so I held that down with the tweezer points. That still left the main green part in the centre of the case, but that was easily removed.

    However, when I turned the back cover over I saw that where the adhesive strip had lifted slightly it had detached some of the cover's coloured film, leaving it buckled and a bit of a mess.

    Alan Olrog -

    When I tried to pull away the cover strip, the adhesive stuck to it. I also have no idea why the clear liner and green liner are attached to each other.

    Sam Ferguson -

    The pictures don’t match what is received for the Galaxy S8+. It’s also not clear where to attach the perimeter adhesive. On the lip of the back cover or just inside the well area. In addition, after exposing the adhesive (after removing the clear side), no matter how weel you pre-align the position, you can’t count on the adhesive to stick to whichever method questioned above, without some of it not releasing cleanly from the colored backing. Yes. firm pressure was applied before moving a little further down. At times the adhesive stuck so strongly to the colored backing, it stretched the adhesive out of shape.

    I have repaired hundreds of laptops and all in ones, so I understand there are subtleties in a repair, and I found it quite confusing replacing the battery and fingerprint sensor and other necessary parts related to doing that repair with the either inaccurate, outdated, or lack of detail provided (but much needed) in this guide.

    Mark Velasco -

    If you're like most people and the original back glass (S8) cracked upon removal, and you've ordered and received a plastic replacement from iFixit, remove the adhesive that comes on the replacement plastic back panel, and use the adhesive in this kit. The back panel adhesive in this kit is THICC and seems like it would create a much better seal than what comes preinstalled on the replacement back panel.

    johnsgoepel -

  15. TR1XYLsoPq1XspbY
    TR1XYLsoPq1XspbY
    xnfOJuSBiDmRuANZ
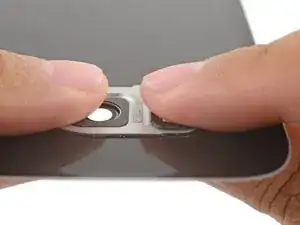
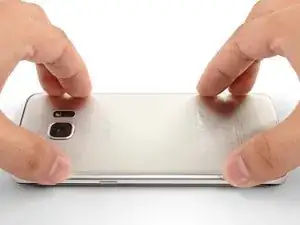
    • Para vedar o smartphone, alinhe e coloque a tampa traseira sobre a estrutura do smartphone.

    • Exerça pressão sobre as bordas do smartphone com os seus dedos.

    • Deixe alguns livros sobre a tampa traseira por meia hora para reforçar a união adesiva.

    I kind of wonder if any of the adhesive is even necessary, depending on what kind of case you have. My case slides over the phone and holds everything in place very securely. Considering that I'll have to replace the battery again at some point, I'm not looking forward to dealing with the adhesive again.

    Ben -

    Great instructions. FYI - when I placed the back on ever so slightly off, I heated up the iOpener and could reposition.

    MB Munns -

Arthur Shi

Membro desde: 03/01/18

326105 Reputação

17 comentários

The flex cable for the fingerprint sensor is so short and delicate that it’s fiendishly difficult to locate and snap in. You only have a very narrow gap between the back cover and the phone, it wants to jump out of position if you misalign at all, and you can’t reach under there with normal size fingers. Not only that, it’s done with the rear cover adhesive in place so if that touches, it sticks.

I got it snapped on, and the flex cable broke at the same moment. So, no fingerprint sensor for me. Also, the new back cover arrived broken. If it was usable, the way to do it IMHO is to attach the flex cable first, then push the fingerprint sensor assembly on to the new back cover adhesive (it goes on from behind), then close the back cover.

WILLIAM SCHIER -

Hey William,

If you bought the back cover from iFixit, please contact our support team here and we will get a replacement sorted out for you!

Arthur Shi -

P.S. I got the battery and cover because the old cover was warped and separated, figured may as well replace the battery in a 2-year-old phone. Turns out, the battery was swollen and huge and it had pushed the back cover open. Not a good situation. So if your back cover is coming off, suspect that battery.

WILLIAM SCHIER -

P.P.S. The fingerprint sensor flex cable connector probably could be manipulated into position with the tweezers from the tool kit and pressed down into place with the plastic screwdriver thingy, Just hover the back cover over it with your third hand (or a helper).

WILLIAM SCHIER -

Will the phone still be water-resistant after this repair?

Shai Toledano -

Hi Shai,

The phone won’t be as water resistant compared to when it is brand new. However, this is true even if you didn’t repair the phone—adhesive seals break down and lose water resistance over time.

Arthur Shi -

There are also WATERPROOF phone covers you can buy. Why just settle for water resistant GLUE?

Ben -

Do you have custom-cut adhesive strips for Samsung galaxy s9+? Can’t find it in store.

Michael Angelo Merza -

Hi Michael,

We are currently in the process of sourcing the adhesive. Please check back in the future!

Arthur Shi -

after replacement, camera pictures are blurry. Was there a liner in the camera area that I should have peeled off separately ?

tds -

Easy enough guide to follow. Thank you!

Michael -

where i can buy the adhesive

Abdulrahman Emad -

It’s a little confusing going through the battery removal for the Samsung S10+ and then being sent to the Samsung S10 installation process instead of the Samsung S10+ install. Although moderately intuitive, it would be nice to have a specific article for a specific phone that identifies the actual process with the physical parts involved since The S10 and the S10+ are not the same back covers and the same parts involved.

Additionally, the inner wireless connector plate NEEDS to be connected to validate a connection otherwise the battery will not power the phone. This is a Requirement on the S10+.

stevechlopecki -

I need to do the front gasket...is there an article for the front, I'm replacing my screen. Also, my child lost the earpiece mesh, is there something else I can use? Thanks

Kristabell -

I got the S9 battery kit and all of the precut adhesive pieces had been cut backwards. The stiff green/blue plastic was on the wrong side. I had to remove the adhesive pieces entirely and try to use the clear plastic backing as the transfer agent instead of the stiffer, cut plastic pieces. I eventually did get it installed but it took a lot longer than planned.

Alexander Carver -

Galaxy S7: I found the descriptions a bit confusing (for the different devices), but I got it right. I hope it holds now! :-)

The tip about the alcohol and the charging coil and that the alcohol is NOT compatible with the soft plastic parts is extremely important! In my case, some of it dissolved too, so I hope the phone wasn't damaged. Be sure to add it!

LittleFix -

Can someone please share the correct orientation the perimiter adhesive for the 5.1" S7 is? I'm not entirely sure which side is supposed to be at the top and bottom of the phone.

Barack -