Introdução

Many components play a role in a computer's function. The motherboard allows these components to communicate with each other. The motherboard acts as the central hub of communication for all components in a device. If you find that your computer is acting slow, struggling to load, or displays the blue screen of death (BSoD), your motherboard may be faulty. Follow these instructions to replace the motherboard from your device.

Before you begin the repair, make sure that your laptop is powered off and it is unplugged from the charger.

  1. f3OdiOll4UHfKhHg
    f3OdiOll4UHfKhHg
    gDIMJyOtOVHsTsE6
    hhJTnGHOfrqUCfkU
    • Use tweezers to peel the plastic cover off the connector.

    • Use a plastic spudger or your fingernail to pry up the battery connector straight up from the motherboard.

    This does not mention the wire that connects the speakers entwined with the battery nor the screws that hold the battery down. This is not a huge deal, just pointing it out

    José B. -

    Also doesn't mention the 4x screws to remove along the top of the battery

    Wes Baynham -

  2. N4Iqw6RncUIRU1MW
    • Lift the battery out of the frame and remove it from the device.

    Before the next step, I switched to this guide to remove the fans - Lenovo ThinkPad X1 Extreme Fan Replacement

    Wendy Wildshape -

    This guide also does not mention the speakers at all, but they are pretty easy to carefully remove

    Wendy Wildshape -

    Oh also this guide doesn't even mention removing the four screws which hold in the battery! Don't miss those!

    Wendy Wildshape -

    The four screws which hold the battery in place are not all the same, so keep track of which one goes where.

    Wendy Wildshape -

    The original battery had strips of compression foam adhered to the underside, which squish between the battery and the chassis plate. The replacement I got (from here at iFixIt) didn't come with these pieces of foam. So I removed the strips from the original battery and stuck them onto the new part. When I took off the first strip of foam, I ripped it off it's own adhering strip, so I had to glue it onto the new battery. I was more careful removing the other strips, using a metal shim from a fix kit to loosen a corner, and then slowly pulling the whole strip up and off. A razor blade, or even knife, would work fine to get at a corner of the adhesive.

    Nick Novelli -

  3. JANqwSHGN61EMVFh
    JANqwSHGN61EMVFh
    OYNEWmQYnEGsMsrf
    ViEAyAEQ2knAXOkL
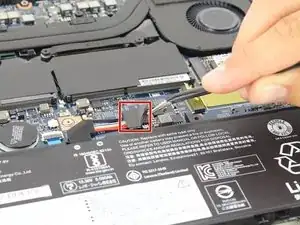
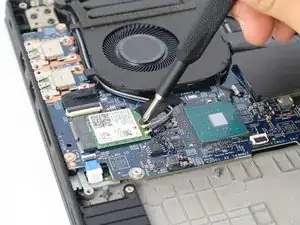
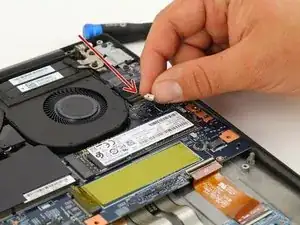
    • Unscrew the 3mm screw holding down the wireless adapter using a Phillips #00 screwdriver.

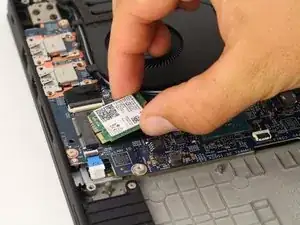
    • Slide the adapter out of its connector.

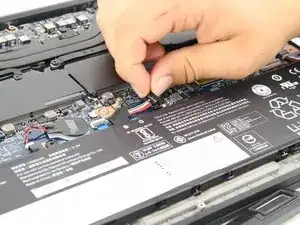
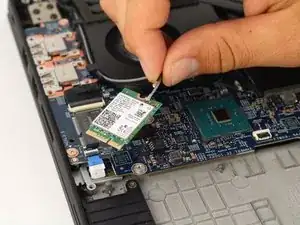
    • Detach the black and gray cables and separate them from the frame of the fan by gently pulling upwards.

    You can leave the wireless card connected and remove it from its socket. Lower risk for some than removing the connectors on the card.

    David Sherrington -

    yeah I found it much easier to leave the wireless card in place and just disconnect the two antennae

    Wendy Wildshape -

  4. fl2YN3dr2OWlwjAD
    fl2YN3dr2OWlwjAD
    Ed1S5usMY5NYKOsB
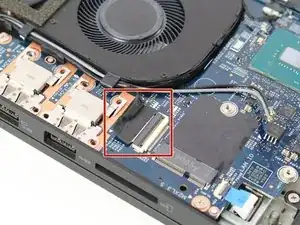
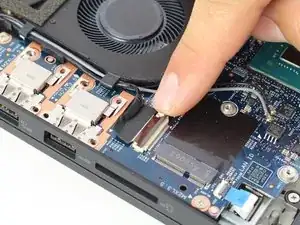
    • Unlatch and remove the cable connecting to the frame of the fan by flipping the thin black tab up.

    • Separate the cable from the frame of the fan.

  5. ZCH4ACDwrnDEWGAN
    ZCH4ACDwrnDEWGAN
    2vN5XKENMUDuNFhr
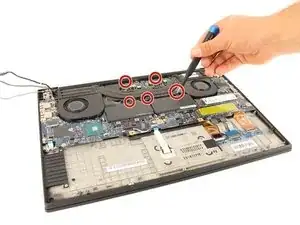
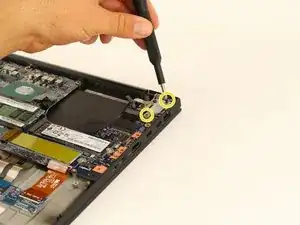
    • Loosen the five screws connecting the fan to the motherboard using a Philips #00 head screwdriver.

    • These screws will not come out and will stay connected to the fan.

    If you are also removing the motherboard, there are two screws near the top of the fan unit that you can remove at this step. In the photo they are already removed.

    Wendy Wildshape -

  6. mmPpTJkBEYUW4OqU
    mmPpTJkBEYUW4OqU
    edBLIyw4dMOokwOp
    SQTTxXyGPk6pbw6q
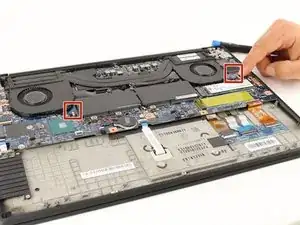
    • Gently disconnect the two cables located on right and left side of the fan.

    • To identify these, they are labeled "FANR1" and FANL2" on the motherboard.

    • Lift the fan up and out and remove it from the device.

    Should you use a thermal paste between the heatsink and the top of the chips?

    John Winner -

  7. IRFHjFStXQQUlIPT
    IRFHjFStXQQUlIPT
    RGC2efModGQFXgv1
    MpelGLplUX2DZB2N
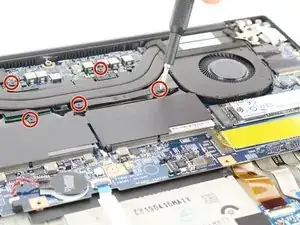
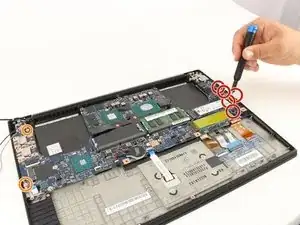
    • Use a Phillips #00 screwdriver to remove the five 4 mm screws below the charging port.

    • Use a Phillips #00 screwdriver to remove the two 3 mm screws.

    • Use a Phillips #00 screwdriver to remove the two 5 mm screws securing a silver plate on the charging port, in the top-right.

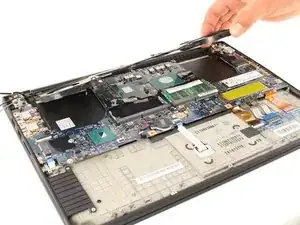
    • Remove the silver plate on top of the charging port.

    There are more screws to remove along the left side of the motherboard. Zoom into the photo and remove all those shown already removed before the photo was taken.

    There are also two more screws to remove on the top edge of the motherboard, at either side of the center section where the processor is.

    David Sherrington -

    What's happened to the fan assemblies between steps 3 and 4? Is there anything tricky about removing them?

    Jim Gillespie -

    See also Lenovo support videos at https://pcsupport.lenovo.com/gb/en/produ...

    Jim Gillespie -

    You don't need to undo the m.2 SSD retaining screws.

    Jim Gillespie -

    All these screws are ph000. Not ph00. I ended up wrecking a screw because of this.

    Wes Baynham -

  8. 3CVjGNgXXZnh4HNv
    3CVjGNgXXZnh4HNv
    jDXnMF1LrKsvEOdt
    6qUZhCKPZEG5XfdI
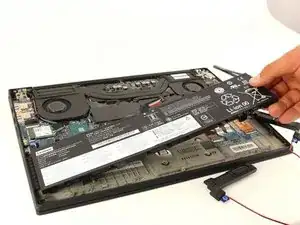
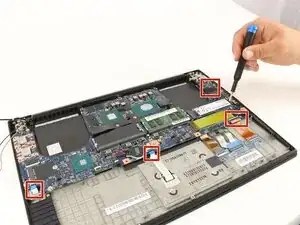
    • Disconnect all the ribbon wires from the motherboard.

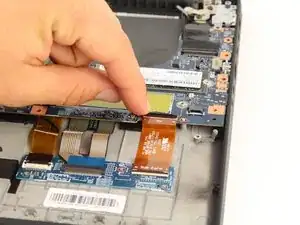
    • All ribbon wires can be disconnected by flipping up the thin black tab at their connection points, and pulling the ribbon out.

    Whats the square chip that was placed on the LHS of the Mother Board and is now hanging off attached to cables?

    Wes Baynham -

    the furthest most right ribbon should be disconnected at the motherboard side, not the "sub card" side as it is adhered to the casing and can't be easily removed

    Wendy Wildshape -

  9. LraISIgZjcNBuIkM
    LraISIgZjcNBuIkM
    1DO3BT32DSDBDblG
    2LqRuRv11TwiMtfP
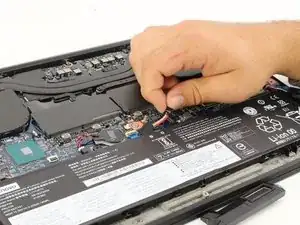
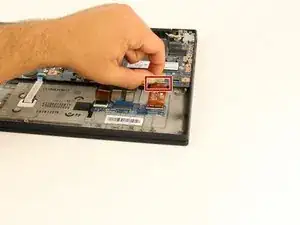
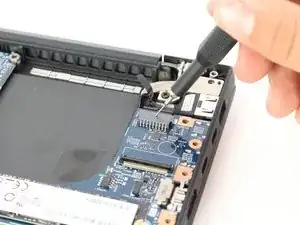
    • Disconnect the black attachment at the top right corner of the motherboard.

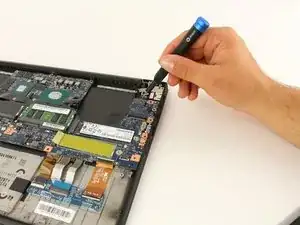
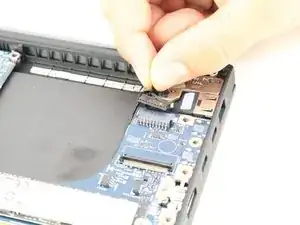
    • Insert the SIM eject bit into the small hole on the top and apply a small amount of pressure to release the clip.

    • While maintaining pressure, gently pull on the wire that is connected to it to remove it.

  10. ZygydqmVSkPlDyTF
    • Gently lift the motherboard out of the computer.

    The motherboard is still attached. There’s two more screws at the top corners of the central section between the fans, and the sides still seem to be attached somehow. I’m not sure to what exactly. The ports maybe? Either way, I can’t get it out.

    Martijn Vos -

    The USB connectors have to be loosened and slid back slightly to clear the opening before allowing the MB to be removed. The screws don't have to be completely removed, just loosened.

    Herman Resto -

Conclusão

To reassemble your device, follow these instructions in reverse order.

Brant Baugher

Membro desde: 10/02/20

172 Reputação

0 comentários