Introdução

Acontece por vezes que um condensador na placa de controle do motor avaria. Isto leva a que o mesmo liberte bastante fumo e um odor desagradavel. Descreve-se aqui como proceder à substituicao das pecas avariadas na placa de controle do motor de uma Kenwood A901D. Será necessário remover algumas soldaduras e voltar a soldar as pecas de substituicao.

Caso nunca o tenhas feito podes seguir o seguinte guia.

  1. Ea1tFTbRFxMNX4BQ
    • Esta velha A901D produzia bastante fumo ao ligar. Tratava-se de um condensador avariado na placa de controle do motor. O mesmo foi substituido juntamente com outras pecas de electronica. trata-se de um "Triac BTA08-600CW", um condensador de bloco 150 nF, um condensador de bloco 470nF e uma resistencia de 150 kOhm - tudo artigos bastante baratos.

    • Remova todas as pecas amovíveis como a tijela ou as varas de misturar.

    • Desligue da corrente!

    Si votre Kenwood semblait avoir un comportement erratique à chaque tour - fort, lent, fort, lent - avant de s'arrêter brusquement, c'est que les charbons sont morts. Allez voir directement plus bas le lien vers l'explication pour les changer.

    E. J. -

    En fait, les charbons sont morts, et le rotor aussi.

    C'est très bien expliqué sur ce document.

    http://bit.ly/Service_KenwoodChef_A901D

    Vous trouverez les charbons pour quelques euros : ce sont des composants normalisés. Et le document ci-dessus indique un coût d'une quarantaine d'euros pour le rotor.

    Enfin une vidéo explicative avec vision du démontage et du remontage est disponible ici : https://youtu.be/h5vmCh-KRw4

    E. J. -

  2. 3EGVJvr4XDSAexmU
    3EGVJvr4XDSAexmU
    HTJfbJxrHaxjY5S1
    • Vire a máquina ao contrário para que a base da máquina fique virada para cima.

    • Remova os dois parafusos do tensor do cabo. Remova o topo branco do tensor.

    • Remova o parafuso do cabo de ligacao à corrente e levante a tampa.

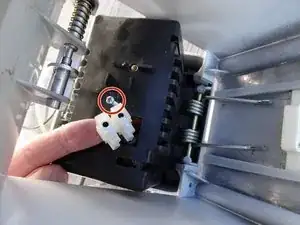
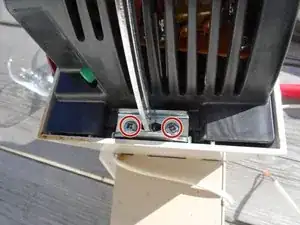
    • Solte os dois parafusos da caixa de juncao (conector de cabos). remova o cabo electrico e coloque de lado.

  3. MRRKF2ZvehExWbTW
    • Desaperte o parafuso com o qual a caixa de juncao (conector de cabos) está preso à tampa do motor.

    • Passe a caixa de juncao (conector de cabos) pelo buraco na tampa do motor, para que este "caia" para dentro do mesmo.

  4. 4IC4YeGFQihLXO4v
    4IC4YeGFQihLXO4v
    GyXeRYKFVkhOWlfx
    vmsO2SsJK4F5BO1U
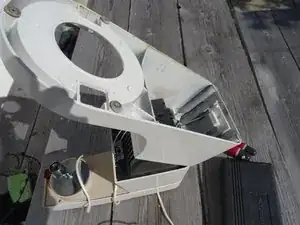
    • Levante/abra o "pé" da máquina.

    • Remova os dois parafusos com os quais a placa de suporte está presa ao "pé" da máquina.

    • Remova a placa de suporte.

  5. tjWWkWHHWROisEyl
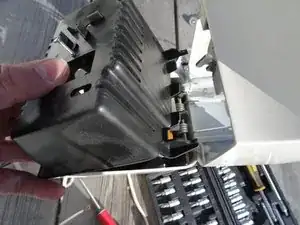
    • Levante a tampa do motor e remova-a. Nota: esta está presa por baixo do eixo/dobradica do "pé".

  6. DAKC3ILUA2oAm4T5
    DAKC3ILUA2oAm4T5
    HBRWweFBZSsvDIFC
    UJAXb2w4s6muKHFQ
    • Aqui temos a placa de controle do motor. Noutros modelos A901 poderá ser diferente. Na maioria das vezes é fácil reconhecer qual o condensador defeituoso. Terá que ser substituído juntamente com outros condensadores e uma resistencia. O Triac é facilmente danificado - subsitua-o também. As pecas necessarias sao bastante baratas.

    • O condensador que liberta o fumo é o condensador de bloco 150nF. Esse e o vizinho condensador 470nF, a resistencia de 150 kOhm e o Triac BTA08-600CW terao que ser substitídos.

    • Se não tiver todas as peças, deve definitivamente substituir os dois condensadores de papel de óleo 100 nF e 150 nF. É melhor usar condensadores MKP, classe X2, pelo menos 275 V. A distância entre os eléctrodos (dimensão da grelha, RM) deve encaixar, dobrando ligeiramente as ligações, se necessário. (por exemplo, se o RM tiver 22 mm em vez de 20).

    • 150nF (RM 20 mm)

    • 470nF (RM 15 mm)

    • 100 nF(RM 20 mm)

    • 150 kOhm

    • Triac BTA08-600CW

    The replacement capacitors must be X2 rated for safety. I would suggest polypropylene for longer life (PP), the originals are oiled paper.

    Tim -

    Bonjour, ou passez commande pour avoir les mêmes dimensions que ceux d'origines ? merci

    150 nF, (RM 20 mm)

    470 nF (RM 15 mm)

    100 nF (RM 20 mm)

    150 kOhm

    Triac BTA08-600CW

    Damiano -

  7. n5jIPlp4FFOnq1RG
    • Aqui está uma imagem dos dois condensadores de óleo de papel. Partem-se mais facilmente, as fendas da habitação. Substituí-los por tipos mais modernos de MKP.

  8. XcHCHX3qMBdNOYnH
    • Remova os dois parafusos de ajuste. Remova as molas e as presilhas dos parafusos.

    • O regulador de velocidade é uma peca fina: no final do eixo do motor há um íman (magneto). Este induz uma bobina na placa de controle com intensidades diferentes consoante a distancia. A distancia pode ser ajustada com os parafusos de ajuste e o botao regulador grande. Este ajuste mantém a rotacao constante mesmo que a resistencia seja grande.

  9. WLxrWYM3FPWNMXNF
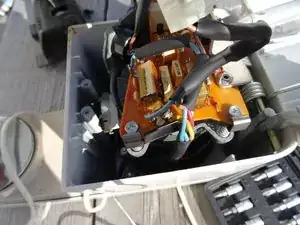
    • Remova a o sensor de seguranca de temperatura do seu suporte.

    • Com um ferro de soldar, remova a soldadura do cabo no interruptor.

    • Puxe com cuidado a placa de controle.

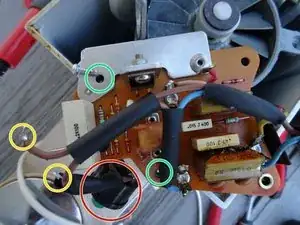
    • Remova os dois parafusos com os quais a placa de controle está presa ao seu suporte.

    Beim Auslöten am Ein/Aus-Schalter habe ich leider einen Kontakt mit herausgezogen. Kann mir jemand Sagen wo ich den Ersatzschlalter bekomme?

    Patrick -

  10. KbRZLoO45ApFAxgc
    KbRZLoO45ApFAxgc
    v2WEdHsSMaUwiv5a
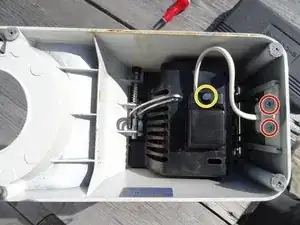
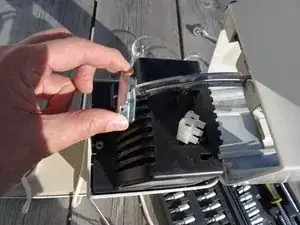
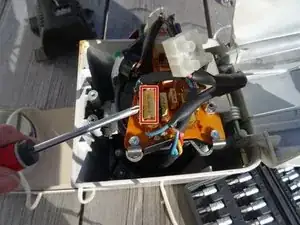
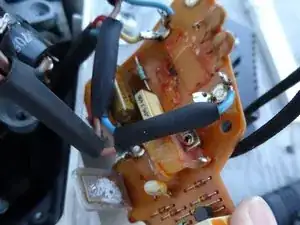
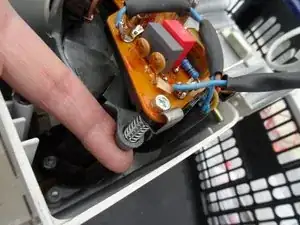
    • Na figura 1, três das quatro pecas foram já "des-soldadas". O Triac está aparafusado - preste atencao à pasta de conducao térmica. Nota: coloque um pouco de pasta de conducao térmica no Triac de substituicao antes de o re-aparafusar.

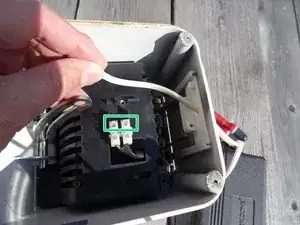
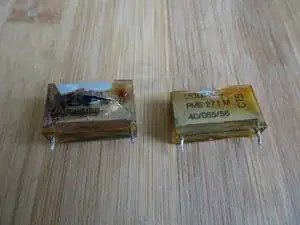
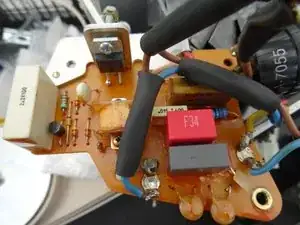
    • Na figura 2, as pecas substitutas já estáo soldadas. Os novos condensadores têm um forma ligeiramente diferente dos originais.

    Hello. I have replaced all the components as per your awesome step by step guide but when switched on, the motor is erratic and I see there is a spark from the black component under the red cable. The black component is not visible on the pics. I would really love to identify that component please. Thank you again.

    Ashik Moorley -

    Sorry, I am not sure which part that could be. Hmm. Can you post a picture?

    VauWeh -

    Hi, I do have a picture but it does not allow me to post. Its a A901D model. The component can not be seen on any of the pics and its not the triac. Its next to the last block capacitor (the one, you didnt replace or name), its a small thin, black cylinder. I am sorry about the bad description. If you can give me your email, I can forward you the picture. I really appreciate the assistance.

    Ashik Moorley -

    OK, I hope I can identify that part, but currently don't have an A901D. My email is za311(replace by at sign)lehrer.uni-karlruhe.de

    VauWeh -

    Could it be a 901 as seen here? In this case there is no PCB and the components are soldered “flying". The component under the red cable (in a 901) is the triac.

    VauWeh -

    Thank you so much. I have sent an email.

    Ashik Moorley -

    it did not go through - my is ashik.moorley(at sign here)gmail.com

    Ashik Moorley -

  11. DkPSNCNCGPtdoCQt
    • Colocar o sensor de seguranca de temperatura. O interruptor tem que ser soldado ainda.

  12. dEBpnPYyZiumQHDM
    dEBpnPYyZiumQHDM
    xZMBSuA4pchBXLXg
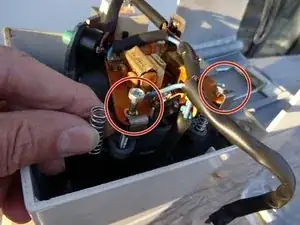
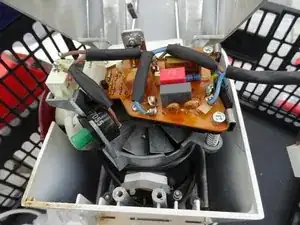
    • Tudo pronto para voltar a fechar. O interruptor está soldado, os parafusos de ajuste na posicao certa e a placa de controlo aparafusada ao suporte com os dois parafusos.

    • Preste atencao, que a cavilha no suporte da placa de controle terá que encaixar na reentrância do botao de regulacao. Caso o botao de regulacao tenha sido rodado durante a desmontagem, voltar a por na posicao certa. A placa terá que ter uma pequena folga senao mais tarde a máquina nao funciona.

  13. ttftQICDqUcUMYFY
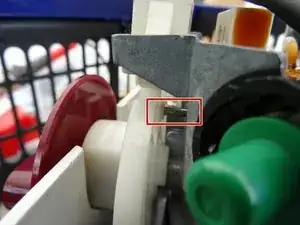
    • Como ajustar o selector de velocidade:

    • Aperte ambos os parafusos até que os mesmo se sintam com o dedo no lado oposto. Depois, aperte mais duas voltas.

    • Coloque o selector de velocidade no mínimo.

    • Atencao: corrente elétrica, nao tocar!

    • Conecte o cabo de corrente.

    • A máquina deverá correr lentamente. A rotacao certa para esta posicao será de 60 rotacoes por minuto.

    • Regule as rotacoes ao apertar/desapertar ambos os parafusos de ajuste, até obter a rotacao certa.

    • Desligar o cabo da corrente e voltar a montar a máquina. Siga os passos anteriores no sentido contrário.

    Excellent work of You! Thanks!Have a very old Kenwood Chef A901D. Sometimes it works normal than it switches to max speed and stays runing fast. Rotating the speed control to max does not hear any speed increase, maybe a little bit. Than removing power waiting longer it lets start run normal. Sometimes i can change the speed and than it switches spontaneously to max speed again. Think maybe the thyristor plays crazy….. i could imagine to replace but not the whole electronic stuff. Or is this the speed measurement sending wrong signals to thyristor?

    Marek Oses -

    The repair is quite simple, I would replace all of the specified parts, they are inexpensive. Good luck!

    VauWeh -

    Did the thyristor change solve the problem? Because I’m experiencing the same issues, however I just soldered in a new one and it’s still there. Always Max Speed. Not matter the distance of the plate.

    Meistershand -

    Hallo, auf der LP-Elekronik ist eine Spule eingelötet, die für die Drehzahlkontrolle verantwortlich ist. Die Spule hat einen Unterbruch und ist defekt. Kann mir jemand den Induktivitätswert in H, oder den Widerstand nennen? Vielleicht finde ich ein Bauteilehersteller, aber ich muss die Werte angeben können. Vielen Dank im Voraus.

    M. Fischer

    Matfis -

    Hab die Spule extra ausgelötet und in den China-Komponententester gesteckt:

    28,5 Ohm und 6,1mH

    Leonard Penzer -

    Hello, my sister's mixer "went bang when running" and stopped. The run capacitor had exploded so I changed all 5 items as described here but mixer still not working. Tested exposed wiring with meter and all seems ok. Unable to check 3 motor windings as I don't know where they go. Any suggestions what I can do next? I noticed what looks like a "klixon" on motor top housing but seems to only have 1 pink wire running to it but can't easily check this due to poor access. Is this pink wire the same as runs with the other red & blue wires to the motor through a pvc sheath? Is the other wire from the klixon running through the motor housing to windings? I'd really appreciate some advice as the mixer is old but very little used. Thank you very much, Jim Crewdson. (jimcrewdson@hotmail.com)

    Jim Crewdson -

    Mega vielen Dank 😁👍

    Steck Reinhard -

    Thank you so much for the excellent advice & pictures I found a blown capacitor & another was damaged when the first exploded. I changed all 4 of them. Adjusting the speed is another matter however. Still it's working great now & I'll just will not take it up to max. Thanks a million.

    Mario Monreal

    Mario Monreal -

Conclusão

Para voltar a montar a Kenwood A901D, basta seguir os passos no sentido contrário.

VauWeh

Membro desde: 19/10/15

312812 Reputação

53 comentários

I need help. I changed the capacitors ,the resostor snd the triac, but the motor will not start. i have supply on the pink wire too. after some time the motor starts and stops. checked all the diodes found ok except one which i have changed. any ideas what i need to check? brushes ok too. can you please send me on jusmar1@hotmail.com

qoxra -

Hi,

To detect the issue:

you should

1- Try to shrot the main switch and the main thermo protection.

2- Try to bypass the dimmer circuit. by removing the triac from the circuit. Then short MT1 and MT2 place of the triac.

go to my instructables and find out the schematic.

https://www.instructables.com/id/Kenwood...

Regards,

SoubhiF -

@SoubhiF: Your guide ist great! Thank you for sharing.

VauWeh -

Excellent instructions and it all worked for me and saved our old Kenwood. Bought it back in 1988 now working perfectly after replacing the Diode, 2x Capacitors and resistors with the motor brushes. well done and thank you. Mike Baggot 26/04/2020

Mike Baggot -

I'm lucky I could help ! Greetings from Germany.

VauWeh -

Excellent instructions. I appreciated the details about setting up the speed control again. A clever induction mechanism!

Andrew May -

Thank you for your excellent guide. Was easy to follow and have my Kenwood back up and running.

The only glitch is the speed setting - it seems to intermittently go straight to full speed and often then does not respond to the speed control knob, and occasionally if turned back to the lowest setting will respond to the knob once more. Are you aware of which component is at fault here?

Reece van Buren -

Look for the second picture in step 11. Are you sure, that the pin on the support of the circuit board is engaged in the guide rail on the knob (marked by the red rectangle in the second picture). If you turn the knob, you must watch the circuit board to move up and down a few millimeters!

VauWeh -

Thanks for the reply @vauweh, yes, the pin is properly in the guide rail and moving the board as described.

Reece van Buren -

Hmmm. Perhaps the circuit diagram here, step 9, helps. The transistor might have an issue ? The magnet? Good luck!

VauWeh -

@vauweh the diagram somewhat escapes me unfortunately. I've replaced the 0.15uF (which blew) and 0.1uF capacitors and the triac. Still the same issue. I've recorded a video of the issue for reference if that is any further help. I've also checked the resistance of the resistors which seem OK, is there a chance that they need replacing too? Could the other capacitors also be a potential cause?

https://1drv.ms/v/s!Aqc9HhNSfzeYg9AWozlm...

Reece van Buren -

Strange, I never saw this before, a diagnosis without seeing it difficult. The induction magnet might be loose/broken? Perhaps buying an old used device, like this one, and replacing the parts would be the better solution?

VauWeh -

First of all many thanks for this great instruction. Unfortunately my Kenwood (Model: 907d) broke down yesterday with a lot of smoke. Now I need your help to identify the defective parts (see images). Beside the defective capacitor (0,1 µF) probably the resistor and the diac should be replaced. Unfortunately I can't see the colour coding exactly. According to SoubhiS' circuit diagram for the models A902/A904 it is a 56 Ohm resistor (green, blue, black, silver). In my case the two middle colors are not visible anymore, the last one is definitely not silver, more like brown or gold. Do you think it's a 56 Ohm resistor with a smaller tolerance or could it have a completely different value? Right above the resistor is the diac, which I should probably replace too. Can you tell me what value it has? Last but not least: The capacitor on the opposite side (2.2J100) also looks a bit bloated, which part can I replace it with? Thanks for your help!

https://imgur.com/9jFQ6ZB

https://imgur.com/tXZvOzE

Julian -

First: I never worked on a 907D, so I might be wrong!

The most important part, which can be broken, is the triac BTA08-600CW, not the diac. If you want to replace the diac, use a DB3. The capacitor might be the 2.2uF, but I'm not sure. And yes, I don't expect a big difference between 901 and 907, so replace the resistor with 56 Ohm. (The resistor between diac and gate of the triac). The parts, which normally are broken are two capacitors and the triac, as sold e.g. here.

Try it, all parts are cheap. Good luck!

VauWeh -

Great explanation, on my machine the capacitors had failed, was particularly helped out by the part covering setting up the spring loaded speed adjustment screws. Thanks a million. Jack, Neu Seeland

Jacques van selm -

Great that I could help - so far away. Greetings from europe!

VauWeh -

Bei mir waren die beiden Entstörkondensatoren 0,1u und 0,15u sowie der direkt danebenliegende Widerstand 56Ohm defekt.

Merci für die Anleitung!

Richard Hegg -

Hello,

many thanx for this guide, it was easy to fix the Kenwood. But, I tried to regulate the Speed and destroyed the ring magnet. can you maybe tell me the size of this Magnet, or a store where I can order it? it broke in a lot of single parts, so I cannot measurements the size anymore. And I don’t wanna push this great Machine in the trash cause a small magnet.

Many Thanks in advance

Frank Bauer -

Oh oh. This ist a very special art, sorry I don’ t know a place to buy. Perhaps here? Ask them, good luck.

VauWeh -

I took a look there, I doesn't´t look this good. I know where to buy all forms and types of magnet, but I need the size. Maybee someone here read my comment and can measure it for me.

Trotzdem vielen Dank für den Link

Frank Bauer -

Maybe that's the best dealer: https://kenwoodchefrestore.co.uk

VauWeh -

Many Thanks for the Link, I´ll take a look

Frank Bauer -

Die Anleitung ist perfekt !!! wir hatten schon zwar darüber kommuniziert ich ging aber der Anleitung meines Bruders (E-Ing) erst nach und habe , ziemlich fürchterlich alle Lötstellen nachgelötet. Dann hat der Mixer mehrere Male sehr gut funktioniert aber bei zwei letzten Malen hat sich die Maschine erst 10-20 Sekunden nach dem zuschalten in Bewegung gesetzt. Jetzt tut sich nichts mehr …… Habe schon nach Kenwood A901 Leiterplatte PCB Kpl 230V gesucht aber die war nur aufgelistet als nicht verfügbar.

Sollte ich nach Ihrer Anleitung die Teile austauschen? Gibt es irgendwo solche Leiterplatte zu kaufen?

Marek Oses -

Ich würde tatsächlich erst mal die genannten Teile austauschen, sind nicht teuer. Oben gab es noch Rückmeldungen, dass die Induktionsspule kaputt war. Aber grundsätzlich ist es eine sehr unkomplizierte Platine und unkomplizierte Teile. Das Schaltbild ist im obigen Beitrag von soubhiF . Viel Glück.

VauWeh -

Thanks a lot!!! Will try to repair it . Hopefully will not damage everything …. Have to order first a proper soldering iron as the old one does not work properly. All the best and stay healthy !

Marek Oses -

Have replaced the parts as recommended, Than I connected the 220 V current and have tried to start the motor, unfortunately without any success. e Motor did not start to work. Taking the wires away I have got a slight e stroke, the condensers seem to work?

Now I do not know what I should do. Is there any procedure to check If the control board needs some further repair? May I connect the motor directly to power to see if the motor still works or it will be dangerous for the connected control board?

You are also showing that the induction device may have a problem. Do you have the type of this Part?

i have purchased this very old Kenwood for 30€ and that What I am doing is more for fun in this stupid corona time as for a real need. I could also bring the parts to a professional shop for repair but in this case it would be more effective to buy a new one….

With best regards, Happy Eastern and stay healthy!

Marek

Marek Oses -

Sorry, too difficult to say without sitting in front of the machine. Hmm, perhaps you can get another A901D or a used PCB? Does Souhib's diagram help? According to Leonhard Penzer’s post the coil has 28,5 Ohms and 6,1mH.

VauWeh -

Having not working Kenwood mixer I have prepared the baguette dough by my hands. It was 25 minutes of really heavy work but the result was much better as with the mixer - the most probably reason is that making the dough by hands the erecting gluten layers are not getting damaged and are keeping the structure. Anyhow the baguettes are much better , close to perfect!

Having a standard kitchen oven i could put only three baguettes of 300 g each. This for 20-25 minutes at 250 C….. So preparation of 12 baguettes has consumed together 6 hours (many steps) work and a lot of electrical energy …..

Most probably in normal, non corona, times I would not do electrical repairs and bakery studies but it was so interesting!

Thanks a lot! And the life of the Kenwood Chef is still not finished - my brother as electro engineer should be capable to check the electrical issues. Thanks and stay healthy!

Marek Oses -

Hi, I would like to share with you the findings made by my brother. The electronic control card with the replaced items accordingly to your advices works perfectly !!! The issue is that the motor was really overloaded and is damaged in high degree …… most probably it was the last dough preparing process as the body of the mixer was really warm but I did not switch off having in mind the switch which should switch down but did not…..

the motor wiring is partially dark, the coal elements are glued with the plastic casing. After some repairs He could start the motor but it was not running .

so now I am stopping the further repairs, had a lot of fun playing with this old machine for 30 €, have learned a lot.

and my hands are better than the mixer so I will continue with the baguettes and finish my involvement in the electronic issues. It was a lot of fun, thank you so much for the so helpful cooperation! All the best!

.

Marek Oses -

Thank you very much for your report, I loved to hear your story. Hope the next Kenwood will do better, this are great machines. Have a good time with your bread, would like to taste it.

VauWeh -

Thank you thank you thank you!

I purchased an old km210 on ebay, it worked…. until i made a sponge cake…. after a couple of minutes… smoke and a loud bang! the reset button had been triggered…too late.

The board is very very similar to the one above and i was able to get the parts and complete the repairs…. i am back in business!

This unit is for the cottage as i have “newer” km210 that i have been using for years … and a lot of attachments for it, now i can use the attachments between both of them.

However, the “newer” unit, has some speed issues… after a while, sometimes, it goes full speed and i can only unplug the unit to stop it. I turn it off, plug it back, and it is “normal” again…

Soon, i will need to tackle this issue :)

Thank you,

André F.

andre fontaine -

Excellent guide, well done! But can you make a copy of the circuit diagram for the A901E available please. Also where can I buy the 0.1microfarad (100nf) 285vac capacitor which has blown?

Regards Alan

Agent 006 -

As Soubhif wrote in his first post:

https://www.instructables.com/Kenwood-Ch...

The 901 is nearly the same. Concerning the capacitor: depends from your country. This is a very common type and you can easily buy it at any store for electronics or even at amazon/ebay.

VauWeh -

Very useful instructions. Great to have my very old Kenwood working again. Thank you.

Just one question: Do you know if the old capacitors (from 1980) are likely to contain PCBs?

Ferg McCulloch

Borderbiker -

Good question, I don't know - but I don't think so.

VauWeh -

Hey! Yesterday my Kenwood Major 230 started smelling like as it was burnt. I need your help! I don't know where to find the components to repair my beloved machine, so many years working insanely well.... I link a photo and lets see if you can help me! i want to repair it for christmas so i can bring it to my mother again... Contact me at iraventos7@gmail.com or at discord if you have at Nachete Stalone#4210

https://imgur.com/a/BAOB2wF

https://imgur.com/a/gURDVc8

Please, help me! I really would like to repair this little machine but the fact that is so old is doing this almost impossible. I still dont't know how i found this site...

Nacho Raventos -

Bonjour,

Avez-vous un tutoriel pour démonter la boite de vitesses de cet appareil ?

Cordialement.

franswafix -

La boite der vitesses de Kenwood sont très similaires. Consultez ce tutorial: Disassembling Kenwood Chef A701A Gearbox and Orbital Mixer assembly

VauWeh -

Bonjour, j'ai terminé et " réussi" à voir si ça va tenir , les composant reçu était trop court , souder limite en tirant un peu , une après midi pour réaliser le travail , un grand merci à ceux qui créer ces tutos , rené

Damiano -

Thank you very much for this great guide.. Great job explaining in details. Saved my mom's kenwood Chef.
My mom thanks you ♥

M. G. -

Thumbs up, greetings to mom. Did you replace the feet, (for better ventilation) so it does not happen again?

VauWeh -

Hi there.

I replaced all caps, resistors and triac. It no longer smells but will only run at high speed, even when the coil pins are on the verge of scraping the magnet.

Did anyone have to change anything else?

Classic Fan -

But the distance between the coil and magnet is variable when you turn the knob?

VauWeh -

Je viens de changer 2 kits sur 2 Kenwood 901 métal … après remontage plus rien ne fonctionne

Vallon -

Après changement sur 2 Kenwood 901 des charbons , triac , résistances et condensateurs , ils ne fonctionnent plus tu tout . Avez vous une explication et surtout une solution ( coûts des kits 40 euros tout de même pour simplement retrouver le régulateur de vitesse … merci …… avallo@gmail.com

Vallon -

Le moteur fonctionnait-il avant ? Est-ce que seul le régulateur de vitesse était défectueux? Vous avez remarqué que la tige du bouton rotatif doit glisser dans le rail. La plaque doit pouvoir se déplacer vers le haut et vers le bas.

VauWeh -

I am constantly amazed at the iFixit community! I have done many repairs of Apple gear from iFixit guides, and when our 30-year-old Kenwood mixer started smoking and making a very unhappy sound and I half-jokingly thought, "I wonder if iFixit has guide for that?" Not really thinking it would - and then here it was! Fantastically clear, well photographed, and thorough. Thank you, thank you , thank you!

Simon Wells -

@simonwells1393 Thank you for your kind words. Did you replace the feet, (for better ventilation) so it does not happen again? Greetings from germany.

VauWeh -

My Kenwood works again and I want to thank for these great instructions.

One capacitator and the Triac were burnt. I spent quite some time researching the solution and then finding the replacement parts.

Now that everything was ready on my workbench, the repair itself took two hours straight. I replaced the three capaciators and the Triac. I did not replace any resistors, because none appeared to be burnt.

Unsoldering was done with a 100W electric soldering gun. The soldering iron I usually use for electronics, did not heat the solder joints enough.

Again, thank you so much!

alter einstein -

Glad to hear that, I am really happy about every device that is kept alive for a long time. These machines are worth the effort.

And: did you replace the feet for better ventilation? ;-)

VauWeh -

Worked perfectly, thanks! If anyone has a spare top back cover in brown, it would make my day! (I'm also looking for the insert/logo holder of the power knob ).

Texandre -

Worked perfectly, thanks! If anyone has a spare top back cover in brown, it would make my day! (I'm also looking for the insert/logo holder of the power knob ).

Texandre -

Merci pour votre tuto! Mon Kenwood de 1985 est réparé!

Thank you for your excellent guide. Was easy to follow and have my Kenwood back up and running.

Patrice DACHY -