Introdução
The following guide is based on Dammit Jeff's video 'Spotify Bricked the Car Thing, So I hacekd Mine', along with the incredible work of Bishopdynamics, and with direct help from ItsRiprod on Github, and information from the Car Thing Wiki.
A Brief History of Car Thing
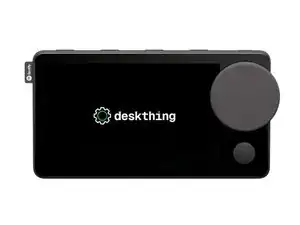
Spotify's Car Thing was a specialized device created for Spotify Premium users with older vehicles without CarPlay or Android Auto to provide easy access to their favorite music and podcasts while driving.
Originally announced in May 2019, Car Thing was ultimately discontinued in July 2022. Then in May 2024, Spotify announced that the device would stop functioning on December 9, 2024.
It was discovered that the Car Thing’s hardware could be made open to custom firmware, extending its lifespan beyond Spotify’s ecosystem. By installing this firmware, users can prolong the Car Thing’s operational life, preventing it from becoming e-waste. This guide shows how to install the firmware even after the device’s official deactivation.
Tools Needed
- A computer with internet access (You'll need to be using either Chrome, Chromium, or the Edge web browser).
- A USB-C-to-C or USB-A-to-C cable for the Car Thing's USB-C port
-
-
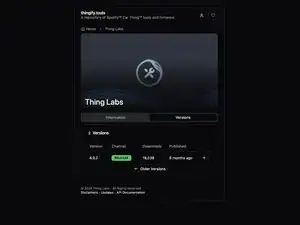
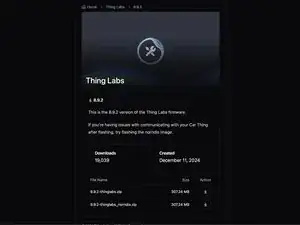
On your computer navigate to thingify.tools and select the right arrow for the latest release. Download the file x.x.x-thinglabs.zip.
-
Extract your downloaded zip file into an accessible location.
-
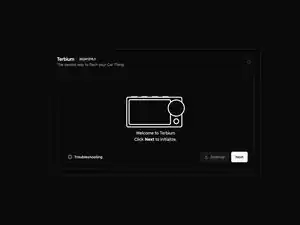
Once your file has been extracted navigate to the Terbium web tool.
-
-
-
Once you have the tools installed you'll need to enter Car Thing's USB mode.
-
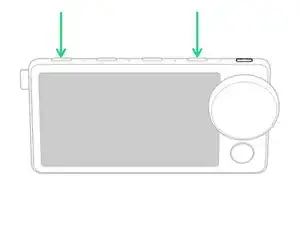
Disconnect your Car Thing from your computer, and hold buttons 1 and 4 (As shown in the photo to the left). Plug in your deivce while holding the two buttons.
-
Wait a few seconds, and if the screen does not turn on, then you've successfully entered the Boot Mode, and can release the buttons.
-
From here you'll need to jump to your specific operating system as the instructions are operating system specific.
-
-
-
-
-
-
In Windows, open Windows PowerShell as Admin and send the command irm https://driver.terbium.app/get | iex and select the Done button
-
A popup should appear in terbium tool with your device listed as GX-CHIP. Select the device and then click the Connect button.
-
Once your device is connected, select the Restore Local Folder button, and navigate to the thingify.tools you extracted, and select Open.
-
Select the Select button to start the flashing process.
-
-
-
-
Once you've connected your Desk Thing is connected your Mac in boot mode select the Done button.
-
A popup should appear in terbium tool with your device listed as GX-CHIP. Select the device and then click the Connect button.
-
Once your device is connected, select the Restore Local Folder button, and navigate to the thingify.tools you extracted, and select Open.
-
Select the Select button to start the flashing process.
-
-
-
-
Once you've connected your Desk Thing is connected your Linux machine in boot mode select the Done button.
-
A popup should appear in terbium tool with your device listed as GX-CHIP. Select the device and then click the Connect button.
-
Once your device is connected, select the Restore Local Folder button, and navigate to the thingify.tools you extracted, and select Open.
-
Select the Select button to start the flashing process.
-
-
-
-
The last thing you'll need to do is download the DeskThing desktop server application to download community made apps. Simply download the installer for your computer from the DeskThing.App/Releases Webpage.
-
Once the app is installed, open the app and navigate to Clients.
-
A new setup process will appear. Select Skip Setup to use the default settings.
-


Congratulations! You have sucessfully flashed custom firmware onto your Car Thing, and by extension have liberated your device from becoming E-Waste.
You can install additional Apps onto your new DeskThing with Thing Labs or the Community app.
Additional Information
5 comentários
Excellent tutorial! It is very clear and to the point while still providing enough information to help you if you get stuck!
Great work
Riprod -
Had to try several times and switch the to a newer USB-C cable/port but it's flashing now....thank you!!
Thank you, this worked out great for me, I do have an AMD 5900 and current drivers, I had to flash it twice before it fully worked the tutorial was great!