Introdução

If your PlayStation 2 Slim (model SCPH-70012) struggles to read discs, skips during gameplay, or displays "Disc Read Error" messages, the issue is often caused by a misaligned disc drive or weakened laser. This guide will show you how to open the PS2 Slim, clean and align the disc drive, and carefully adjust the laser potentiometer to restore reliable disc reading.

The laser assembly in the PS2 Slim reads both CD and DVD media, and over time, its alignment or resistance values can drift, causing poor reading performance. Cleaning and adjusting these components can significantly extend the life of your console without replacing any parts.

Before you begin, unplug all cables and ensure the console is powered off. Handle internal parts gently, especially ribbon cables and the laser lens, as they are delicate and easily damaged. Avoid touching the lens directly, and work slowly when adjusting the potentiometer since over-turning it can permanently damage the laser.

This repair requires only basic tools and careful attention to small components. No soldering or advanced electronics work is needed.

By following this guide, you'll be able to fix disc read errors, improve load times, and extend the lifespan of your PlayStation 2 Slim.

  1. u2ZyeyBeHfS3PHT3
    • Before beginning, unplug the power cable, AV cables, and any controllers or memory cards.

    • Flip the console upright and check the label to confirm your model is SCPH-70012.

    • Never open the console while it's connected to power.

  2. SbAko3MpDDtvKqsJ
    SbAko3MpDDtvKqsJ
    ERTZHU5S4LZEGeB2
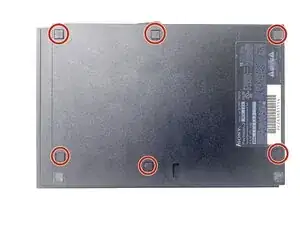
    • Turn the console upside down so the ports face you.

    • Keep the console oriented the same way throughout the repair to avoid confusion when reassembling.

    • Use a small flathead screwdriver or spudger to carefully pry up the six square screw covers on the bottom panel.

    • Set the covers aside in order.

  3. Jrkgq1xfHuX31GyM
    • Use a Phillips #1 screwdriver to remove the six 4.0 mm screws from the bottom shell.

    • Keep screws grouped by location to make reassembly easier.

  4. 4HCbOq3iIbs5IuRY
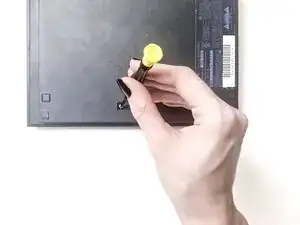
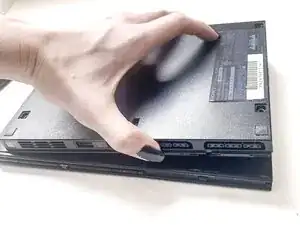
    • Use an opening tool to gently separate the top cover from the base.

    • Start from the front edge near the controller ports and work the opening tool around the perimeter of the device to release the clips that hold the top and bottom together.

    • Work slowly, there are parts along the edge that can break if forced.

  5. efWXTeQBm6ySRJFi
    efWXTeQBm6ySRJFi
    hpcNBScO5EQZHIwJ
    • Avoid touching the laser lens or any ribbon cables.

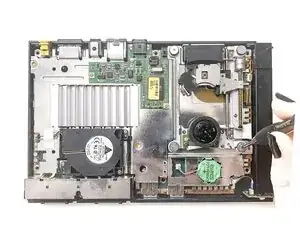
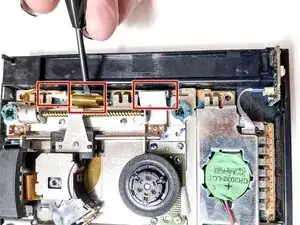
    • Dip a cotton swab in isopropyl alcohol and gently clean the right-hand guide rail and sled track.

    • Wipe away any old grease or dust buildup to allow the laser sled to move properly.

    • Avoid letting alcohol drip onto the laser lens or nearby circuit boards.

  6. uFXdIRKqoSvEEOma
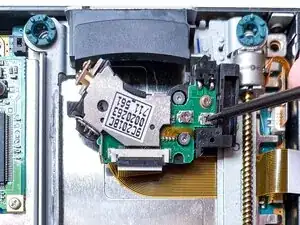
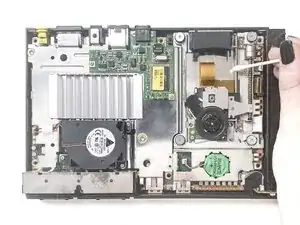
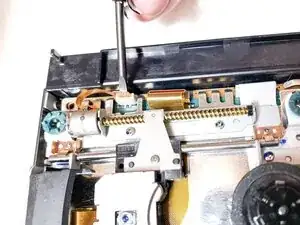
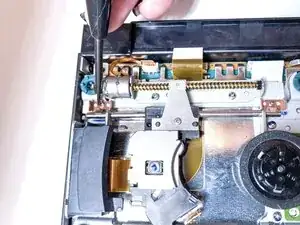
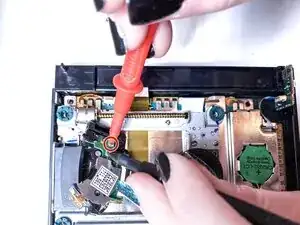
    • Carefully rotate the worm gear at the top-right of the disc drive to move the laser sled to the middle of its travel range.

    • This position gives you better access for alignment and cleaning.

    • Don't force the gear - it should move smoothly.

  7. IQc2AQIrBwxH2Nsy
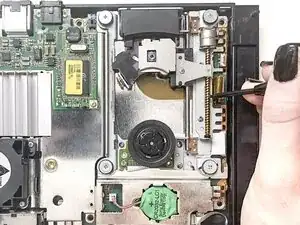
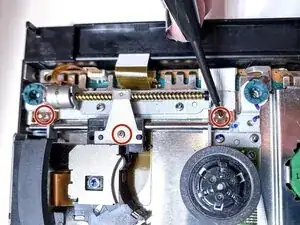
    • Use a fine tip marker to mark each of the four silver posts around the spindle motor. These posts, secured by 4.0 mm screws, control the disc drive's tilt and height.

    • Turn one post just a few degrees at a time to slightly change disc height or tilt.

    • Test the console after each small change until discs read consistently.

    • Over-adjusting can cause the disc to scrape or fail to spin. Work slowly and record each change.

    • Small adjustments (less than a full degree) can make a big difference in disc balance.

  8. T22HhXrdNmXgYW2D
    T22HhXrdNmXgYW2D
    5QvTQcRPutPuTCXG
    WLpXE3xmCPQjIWKY
    • Use a spudger to disconnect the ribbon cables from the board.

    • Refer to the guide, Recognizing and Disconnecting Cable Connectors, for details on how to disconnect a range of connectors

    • Avoid touching the board with your fingers or metal tools, as this can damage sensitive components.

  9. UEAiP1QEBuloT62f
    UEAiP1QEBuloT62f
    IoMMDdaEIdveVZ3h
    T6P5Nq16JmYsb4Jb
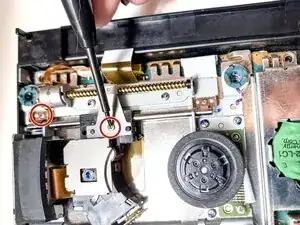
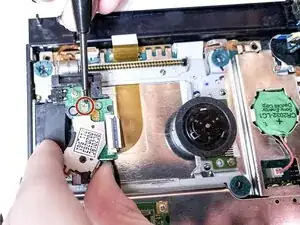
    • Use a Phillips #00 screwdriver to remove the three screws securing the laser sled and guide rail in place.

    • Start with the right side screw, then move to the left as shown in the photos.

    • Keep each screw in order, they differ slightly in length.

  10. ZIsJQkPStUFtU2Wx
    ZIsJQkPStUFtU2Wx
    PqQp5fsFW5Uc1asR
    • Lift the entire laser assembly carefully by its metal frame.

    • Hold the unit by the metal frame and avoid touching the lens or ribbon cable.

    • The laser should pivot slightly as it comes free from the guide rail.

    • The ribbon cable underneath is still connected - don't pull too high or twist the assembly.

  11. kZUySiCtELNEZyTg
    kZUySiCtELNEZyTg
    Y3ya6GoO1Klmcr6o
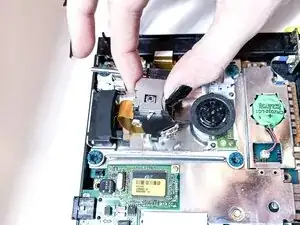
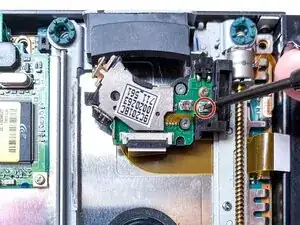
    • Lift the laser assembly a few millimeters to see the two small laser potentiometers on the green circuit board.

    • The lift dial controls the CD laser, and the right dial controls the DVD laser.

    • To avoid damaging the board, don't touch it with your fingers or metal tools.

    • These components are delicate. Don't adjust them yet, just note their locations and orientation for the next step.

  12. tGCR1QEB1YLPAdEG
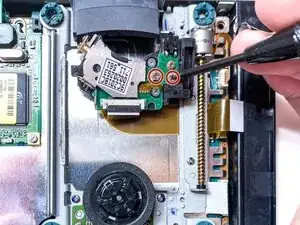
    • Use a multimeter to measure the resistance across the outer and middle terminals of the DVD potentiometer.

    • Record the original reading (in kΩ or Ω) before making any changes.

    • This baseline ensures you can return to the factory settings if needed.

    • Be sure the console is unplugged and the multimeter is set to the correct resistance range.

  13. 1hfmJ5idGDJfRuIX
    • Use a precision flathead screwdriver to turn the DVD potentiometer clockwise by no more than 1-2 degrees.

    • This reduces resistance and slightly increases laser power for improved disc reading.

    • Over adjusting can shorten the laser's lifespan or burn it out. Make small changes and test after each adjustment before continuing.

    • The left pot adjusts the CD laser; the right one adjusts the DVD laser.

    • After reassembly, plug in the console and test it using several discs (PS2, PS1, and DVD). You should notice smoother spin up and disc recognition on the Browser screen.

    • If the console still struggles to read discs, double-check the ribbon connection and alignment posts before making further adjustments to the potentiometer. Avoid additional turns unless absolutely necessary.

Conclusão

To reassemble your device, follow these instructions in reverse order.

Isabelle Applebee

Membro desde: 22/09/25

217 Reputação

0 comentários