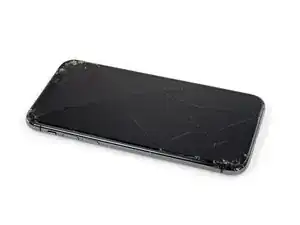
Introdução

iPhone batteries are rated to hold 80% of their capacity for up to 500 charge cycles, which lasts roughly 18-24 months for most users. After that, your iPhone may need to be charged far more frequently, and iOS may warn you that performance is affected (in other words, your phone will run slower). Use this guide to replace your battery and restore your iPhone 13 mini to like-new performance.

If your battery is swollen, take appropriate precautions.

Note: On iOS 17.6 and earlier, your iPhone may display a warning about the “genuineness” of the battery after the repair, even when using original Apple parts. If your iPhone functions normally, you can safely ignore the warning. On iOS 18 and newer, authenticate your new battery using Apple's Repair Assistant.

You’ll need replacement adhesive to reattach components when reassembling the device.

  1. ByiiAO26RDQLNDGS
    ByiiAO26RDQLNDGS
    BdJkXeHW4RxNU42g
    • For your safety, discharge the battery below 25% before disassembling your phone. This reduces the risk of a dangerous thermal event if the battery is accidentally damaged during the repair. If your battery is swollen, take appropriate precautions.

    • Power off your iPhone before beginning disassembly.

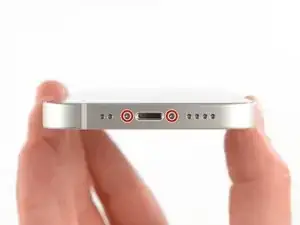
    • Remove the two 6.8 mm-long pentalobe P2 screws at the bottom edge of the iPhone.

    • Opening the iPhone's display will compromise its waterproof seals. Have replacement seals ready before you proceed past this step, or take care to avoid liquid exposure if you reassemble your iPhone without replacing the seals.

  2. 6UPwoloGBO4tmVoS
    6UPwoloGBO4tmVoS
    BmSYPJmOy6dbHipF
    3EOdQPAGOmiuhoKU
    • If inserted too far, an opening pick can damage your device. Follow this step to mark your pick and prevent damage.

    • Measure 3 mm from the tip and mark the opening pick with a permanent marker.

    • You can also mark the other corners of the pick with different measurements.

    • Alternatively, tape a coin to a pick 3 mm from the tip.

    • Apple sells an Adhesive Cutter tool for cutting the display adhesive safely in their Self Repair Store.

    Got to step 2 and realized the fix kit doesn't include an opening pick! Looks like a guitar pick, and I have those lying around. Is that expected? Looks like the pick is used in many steps below. There's a little blue crowbar that isn't mentioned in the instructions. Perhaps that replaces the opening pick?

    Sloan Looney -

    Hi! I can't see which guide you were using when writing this comment. Can you reply here with which guide and fix kit you used?

    Clay Eickemeyer -

    I see you posted this in Meta. I hope it's resolved soon! In the meantime, a guitar pick may work well enough for your repair.

    Clay Eickemeyer -

    what fix kit?

    Meow Purr -

    Super late reply to original post but my pick was with the replacement screen and not the tools kit.

    Nichol Augustus -

    My fix kit didn't include an opening pick either

    WILLIAM HARRIS -

    Make sure you check inside the black boxes after emptying them. My pick was stuck inside one of the boxes.

    AndyF -

    My AliExpress refurbished screen came with a pick that has a coin-like circle that pops out, so no modification was necessary

    Gijs Leegwater -

    the picture shows 3 cm but the description says 3 mm's. Which one is it?

    John Pena -

    That is a misunderstanding. It is a ruler with a scale for cm, it shows 0.3 cm, i.e. 3 mm.

    VauWeh -

    Oh, come ON!

    Big Ed -

    It will ALWAYS be millimeters on a phone, but this step is ridiculous, skip it!

    Leif DeWolf -

    @leifdewolf I wouldn't skip it for a first repair.

    Gabriel-Science -

    It's not an Ifixit KIT if it doesn't include everything. You'll need to order the opening pic separately. Or head to Walmart like myself and look for guitar pics. Hopefully, this will work just as well.

    Jaleeljb97@icloud.com -

    No pick in mine as well. It’s really not clear that you have to order this separately when ordering an IPhone SE 202/2022 screen repair kit. Is this the case?

    Jackson Castiglione -

    Frustrated, I ordered a compact package where everything was encapsulated. Useless suction tools could not separate the screen. If it is unable to decouple the screen, then why sucking suction tools you have provided.

    Shourob Datta -

    For my kit the triangle pick was stuck inside the box with the screen not with the other tools maybe it's also there for you

    Henry Scheibehenne -

    Y’all are getting far, FAR too detailed with some of this stuff…. Measuring and marking the pick that you won’t actually use to open the device?!? lol that’s kinda funny. Just heat it up, grab a spudger, and the back just pops right off! The iFixit tech need to stick to the KISS method more often, you know KEEP IT SIMPLE STUPID!!! Like l, for reals, I’ve been doing this stuff for YEARS and using iFixit guides regularly and this is just ridiculous at this point!

    Leif DeWolf -

    Will the phone still work if the sensor assembly on the back of the screen is damaged?

    Mutshidzi Rambau -

    I don't have a pick, but how much better are these picks than an old credit card for opening an iPhone 13 mini?

    mike eng -

    an old credit card will do that job, although you'll have to pull a little bit more if the credit card is thicker than the picks, just again, be careful and don't insert it that far

    Russ Torrez -

    The pick in my iFixIt kit was packed with the battery, not with the rest of the toolkit.

    Tony Houlihan -

    Many of these comments are PURE GOLD. Seriously y’all, if you’re not sure if it should be 3mm or 3cm or whether you could find and use an alternative pick, mending an IPhone really isn’t for you. Find a responsible adult and get back to doing something simpler…

    Alasdair Cameron -

    indeed!!!! I agreee!!!

    Lonnie -

    I bought the kit of five just in case. I used two and marking them at 3mm was definitely helpful.

    Megolina -

    Funktioniert super. Habe vorher sicherheitshalber den Akku abgesteckt.

    Lukas D -

  3. pvyofbGR6QDZLwuT
    pvyofbGR6QDZLwuT
    uHpIXSCwsv5aX6k2
    qDfr6bv6XxVSWXYb
    • If your iPhone has a cracked screen, keep further breakage contained and prevent bodily harm during your repair by taping over the glass.

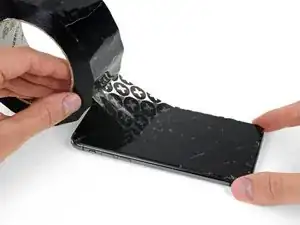
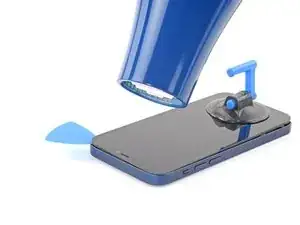
    • Lay overlapping strips of clear packing tape over the iPhone's screenuntil the whole face is covered.

    • Wear safety glasses to protect your eyes from any glass shaken free during the repair.

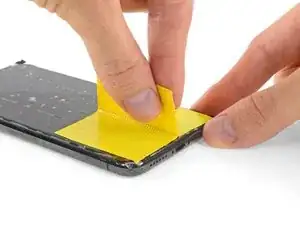
    • If you can't get the suction cup to stick in the next few steps, fold a strong piece of tape (such as duct tape) into a handle and lift the screen with that instead.

    • If all else fails, you can superglue the suction cup to the screen.

    Yes, tape to cover the cracks. Guess what also loses adhesion when you apply heat to it,&&^&^$^ tape.

    dylan brune -

  4. nomKPGPYQmVXKkY4
    nomKPGPYQmVXKkY4
    u2VWMGNpSNEWhWhn
    wdIbZZ2ZcndTbHWn
    • The next three steps demonstrate the Anti-Clamp, a tool we designed to make the opening procedure easier. If you aren't using the Anti-Clamp, skip down three steps for an alternate method.

    • For complete instructions on how to use the Anti-Clamp, check out this guide.

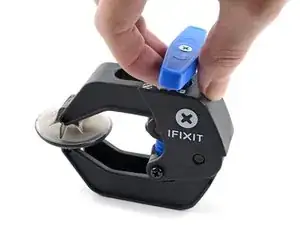
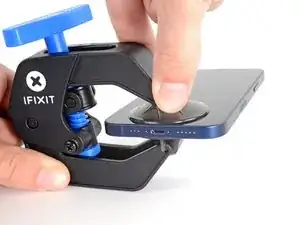
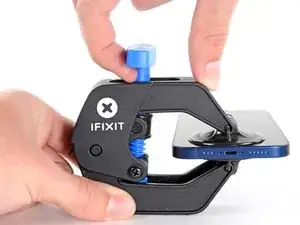
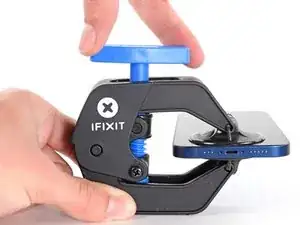
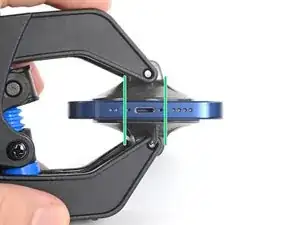
    • Pull the blue handle backwards to unlock the Anti-Clamp's arms.

    • Slide the arms over either the left or right edge of your iPhone.

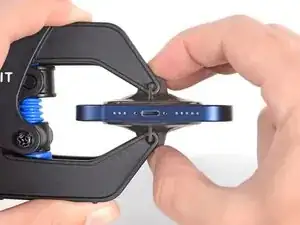
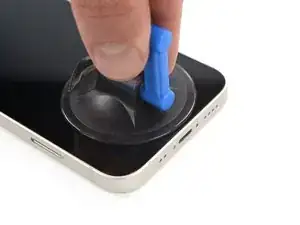
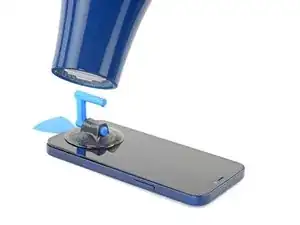
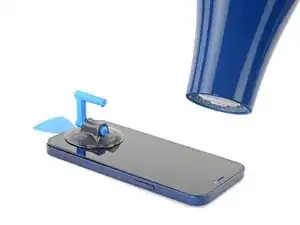
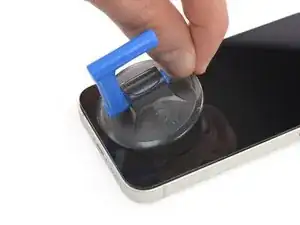
    • Position the suction cups near the bottom edge of the iPhone—one on the front, and one on the back.

    • Squeeze the cups together to apply suction to the desired area.

    • If you find that the surface of your iPhone is too slippery for the Anti-Clamp to hold onto, you can use tape to create a grippier surface.

  5. QAZAG12HZt4ymkfM
    QAZAG12HZt4ymkfM
    hqqQq1tU46iiXLQv
    XG1WOiVw4haPnbZL
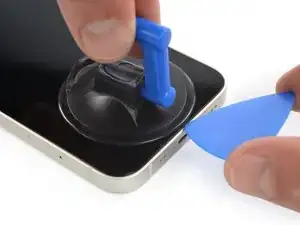
    • Pull the blue handle forwards to lock the arms.

    • Turn the handle clockwise 360 degrees or until the cups start to stretch.

    • Make sure the suction cups remain aligned with each other. If they begin to slip out of alignment, loosen the suction cups slightly and realign the arms.

  6. QImf2HMVTecJsNYY
    QImf2HMVTecJsNYY
    PdUh3NIj6JOFRBEW
    x1dkLGaMEDFJ2MaR
    • Support your iPhone on something sturdy such as a hardcover book so it rests hands-free and parallel to the ground; this makes it easier to work with in the following steps.

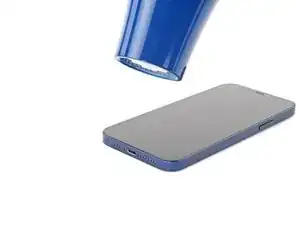
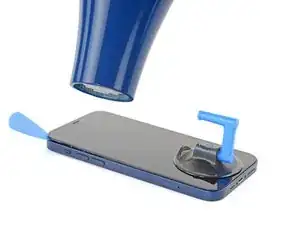
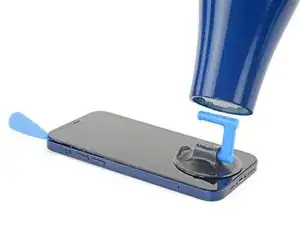
    • Use a hair dryer to heat along the bottom edge of the iPhone. The screen should feel slightly too hot to touch.

    • For complete instructions on how to use a hair dryer, check out this guide.

    • Wait one minute to give the adhesive a chance to release and present an opening gap.

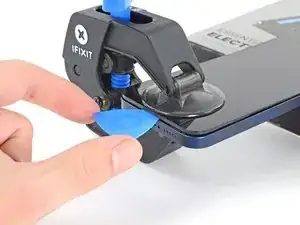
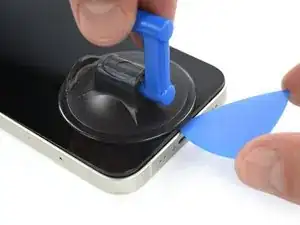
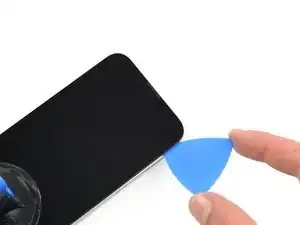
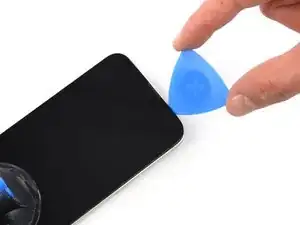
    • Insert an opening pick under the screen's plastic bezel when the Anti-Clamp creates a large enough gap.

    • If the Anti-Clamp doesn't create a sufficient gap, apply more heat to the area and rotate the handle a quarter turn.

    • Don't crank more than a quarter turn at a time, and wait one minute between turns. Let the Anti-Clamp and time do the work for you.

    • Skip the next three steps.

    Make sure as you are prying the screen that the thickness of the screen looks like it does in the picture. Be very careful to slice the adhesive between the bezel and the device not between the screen and the bezel as I did.

    Reed -

    i shouldve bought this tool... now i ripped the cable to the screen cuz the screen came off easier than i thought. now i gotta buy a new screen lol since i was just trying to replace the back shell...

    Hayabusa 530 -

    Same problem as noted above. The screen separated from the bezel and I couldn't tell until it wouldn't fold open as described. So, make sure the thickness at the separation is NOT just that of the glass screen. It should also include the surrounding metal plate, the "bezel". You can tell by comparing yours to the photo.

    Locke Wilson -

    Noted as above, didn't realize there is a metal assembly that should come off with the screen until I got to a point where it didnt look like the guide or the video.

    Vishal Mansuria -

    ほかの方も記載している通り、ピックをさす際に細心の注意が必要です。有機elのパネル自体の張り合わせが強くないため誤って差し込んでしまうと簡単に壊れてしまいます。有機elパネルは高価なため安価な液晶スクリーンにグレードダウンすることになってしまいました(t_t)

    aosiro -

  7. DXVJqMSTNoNsgZmT
    • Use a hair dryer or a heat gun to heat the bottom edge of the iPhone for 90 seconds or until the screen is slightly too hot to touch.

    • Never leave your hair dryer in one spot for an extended period of time.

  8. gc1DbP6iqYjfWshi
    • If you're using a single suction handle, apply it to the bottom edge of the phone, as close to the edge as possible.

  9. e1dK1xEJxTfcVLKq
    e1dK1xEJxTfcVLKq
    VPQXZHseIw6MBrKx
    6nnBtHV1qYbWeVbN
    • Pull up on the suction cup with firm, constant pressure to create a slight gap between the screen and the frame.

    • Insert an opening pick into the gap under the screen's plastic bezel.

    • Make sure to insert the pick between the plastic bezel and the metal frame. If you insert the pick between the glass screen and the plastic bezel, you'll damage your screen.

    • The watertight adhesive holding the screen in place is very strong; creating this initial gap takes a significant amount of force. If you're having a hard time opening a gap, apply more heat, and gently rock the screen up and down to weaken the adhesive until you create enough of a gap to insert your tool.

    Take care on this step: it's possible to delaminate the glass from the frame holding the screen and vital components together. If you're not aware, you could continue working away (as I did) delaminating the entire glass from the frame only to discover you've messed up. The entire assembly is about 1mm thick and visually looks like two layers (as shown in the last photo here).

    Brent L -

    I broke my screen here. There is a seam in between the glass and the components. Don’t stick your pick in there or it will break. Stick it below the black bezel

    ecwskier -

    As with Brent above, I managed to separate the glass from the frame. Didn't realise until I was at step 18 below. Everything felt fine and looked unbroken until it was too late. So; the glass / screen could be 2x as thick as you think.

    David Wall -

    I’m grateful for the words of caution. I really had to take my time on this step. Actually had to reheat the phone multiple times without any success. Then I tried using an alcohol wipe along the edge of the phone, squeezing the wipe to allow some of the alcohol down along the edges. That was the magic touch that finally let the adhesive loose. Patience is the word.

    wade walters -

    I was doing the heating - pulling process but at a certain point, the screen cracked. Now I can't pull anymore and my screen is destroyed even though it can still work. I don't really know how to repair this...

    matthieu tremblay -

    Even though I read the comments, I crashed the screen. I inserted the plectrum carefully and instantly slipped between the screen and its board. I might have not heated the device enough as I used the iOpener.

    I would highly appreciate a better instruction here and a closer zoom on the removed screen.

    sbb -

    I too delaminated the glass from its surrounding plastic bezel, even after reading all the comments. I highly recommend finding a video of this process. The screen/bezel unit is held together by an adhesive gasket- just like the bezel-to-frame adhesive. So it seemed I was doing the exact right thing. The plastic bezel includes retention structures for the top sensors and lens cavities, so when I got that far I realized something was wrong. If you're like- but wait what are all these structures you're referencing- then find a video. It would be great if ifixit would produce or link such a video, and/or better macro photos.

    Michael Szetela -

    Another broken screen here, just happened about ten minutes ago so I believe my memory is still fresh - when pulling on the suction cup to create a gap on the bottom edge, I believe the only gap that appeared was the one that was behind the glass. I don't believe I "created" the gap by inserting my pick in the wrong place, the gap was there when I pulled on the suction cup. So right now I'm not sure how I could have avoided this. Maybe by heating it up more?

    goblazers -

    Did the same thing as many people here. I did not insert the pick deep enough and accidentally cracked the screen by getting in between the glass and the screen itself.

    Albert Svendsen -

  10. ZEWwUd1VKFpLNHnH
    ZEWwUd1VKFpLNHnH
    vxW4gGTiscfcZjjd
    • Use a hair dryer to heat the right edge of the iPhone (the edge with the power button) for 90 seconds or until the screen is slightly too hot to touch.

  11. utIUPTVOaPOp1Ifx
    utIUPTVOaPOp1Ifx
    O3sVLQxU3UtCbveS
    JyIfEVAZUhSNvJaA
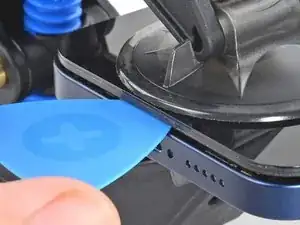
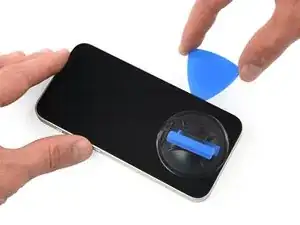
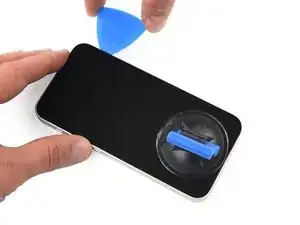
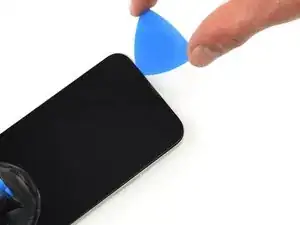
    • Slide the opening pick around the bottom right corner and along the right edge of the iPhone, slicing through the adhesive holding the display in place.

    • Don't insert your pick more than 3 mm, and don't force it through unheated sections of adhesive, or it may slip and damage internal components.

    • Leave the pick in the top right corner before continuing.

    This procedure cracked my screen. Do not move too fast with the pick, and make sure to heat it before hand. Not sure what else can be done to prevent a cracked screen here

    Kristo Jorgenson -

    cracked my screen to. The pleck sliped cause I was to afraid to damage something intern so it sliped out and cracked the display.

    Tariguz -

  12. 3YUMT2CHgElg5VOQ
    • Use a hair dryer to heat the top edge of the iPhone for 90 seconds or until the screen is slightly too hot to touch.

  13. ZCG5NVqdocby1GPW
    ZCG5NVqdocby1GPW
    OMva3FZdafurBsCc
    FhZtShTebyNBx4BB
    • Slide the opening pick around the top right corner of the iPhone to separate the top adhesive.

    • Don't insert your pick more than 3 mm, as you may damage the top sensors.

    • Leave the pick in the top left corner before continuing.

  14. xO2l2HZJc1muXP11
    xO2l2HZJc1muXP11
    C5gwyDhXaAymJMeD
    • Use a hair dryer to heat the left edge of the iPhone for 90 seconds or until the screen is slightly too hot to touch.

    iPhone 13Mini H.S. a cette étape .

    Macé -

  15. LeorCMl1FMcbETas
    • There are delicate cables along the left edge of your iPhone. Don't insert your pick here, as you may damage the cables.

    Wo ist die "linke Seite"? (Blick auf das Display?) Was bedeuten die roten Quadrate auf dem Bild vom geöffneten Gerät? Zur Orientierung wäre es passend, die Lage der Lautstärke + bzw. - Tasten anzugeben.

    anyone nobody -

    Yes, they mean the “left side” as if you’re looking at the display (which is already removed in this photo, of course). If you enlarge the photo, you can just barely see the two volume buttons protruding out slightly from the edge (as well as the ringer-off/mute switch just above them).

    I’m not sure what the red squares are indicating either. Maybe they’re showing something relevant to another repair guide where they use the same photo…

    (Probably terrible Google translation):

    (Wahrscheinlich eine schlechte Google-Übersetzung): Ja, sie meinen die „linke Seite“, als ob man auf das Display schaut (das auf diesem Foto natürlich bereits entfernt ist). Wenn man das Foto vergrößert, kann man die beiden Lautstärketasten, die leicht aus dem Rand herausragen, gerade noch erkennen (sowie den Klingelton-Aus-/Stummschalter direkt darüber).

    Ich bin mir auch nicht sicher, was die roten Quadrate bedeuten. Vielleicht zeigen sie etwas Relevantes für eine andere Reparaturanleitung, in der dasselbe Foto verwendet wird …

    Chris -

    Immediately ripped left cable here. Have done iFixIt repairs many times. Very disappointed!!

    Seth Kaplan -

  16. yFckTkxJQV1LwVUA
    yFckTkxJQV1LwVUA
    DrfwXaAUvrJ3qpBH
    • Insert a second opening pick in the bottom left corner of the iPhone.

    • Twist both picks simultaneously until the left edge clips release.

    • Apply the twisting force gradually.

    • If you're having trouble separating the adhesive, reheat the left edge.

    In my opinion, twisting the picks is setting yourself up for disaster. Done too hard, even slowly, and the potential energy buildup in the display at the clips could send the display flying fast enough to rip the cables you’re trying to protect. Unfortunately there is no real good way that I know to open the left side. I managed with only slight difficulty to open it by sliding the puck as you would on the other edges, but being very careful to do it slowly, paying particular attention to how deep the pick is inserted and how far up from the bottom to slide before getting too close to the cable. You can slightly lift the screen enough to see where the cable is so as not to damage it. When you’ve slid the pick close enough that you don’t feel safe sliding it any more there should be enough of a leading gap that you should be able to put another pick in in front of the first on the other side of where the cable is. Once you do that the last clip is right there around mid way up from the bottom of the phone.

    Thousand Sunny -

  17. A6WHmMQGKB6oxNDa
    • Pull on the small nub on the suction cup to remove it from the front panel.

  18. GLQiEdBCG6FcV6lm
    GLQiEdBCG6FcV6lm
    3YqSYNiGN2RQrZrM
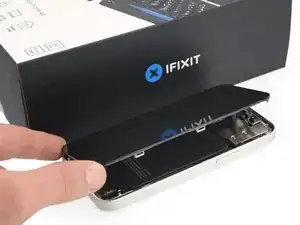
    • Rotate your iPhone so the right edge faces you.

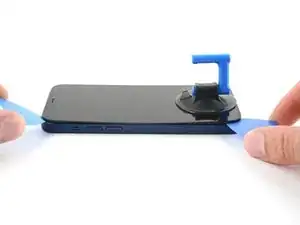
    • Open the iPhone by swinging the display up from the right side, like the front cover of a book.

    • Don't try to fully separate the display yet, as several fragile ribbon cables still connect it to the iPhone's logic board.

    • Lean the display against something to keep it propped up while you're working on the phone.

    • During reassembly, lay the display in position, align the clips along the top edge, and carefully press the top edge into place before snapping the rest of the display down. If it doesn't click easily into place, check the condition of the clips around the perimeter of the display and make sure they aren't bent.

    Frame of the screen ripped apart from the rest, I was using hot air gun with my newly acquired Anti-Clamp tm

    Jobas -

  19. KLe2YjWtRXUQG5kV
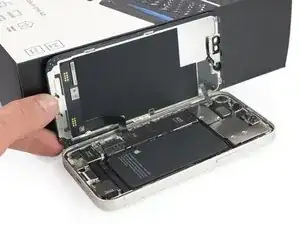
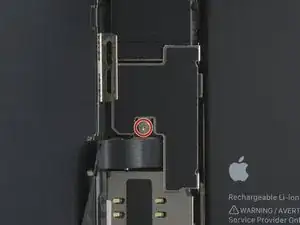
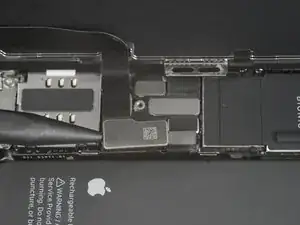
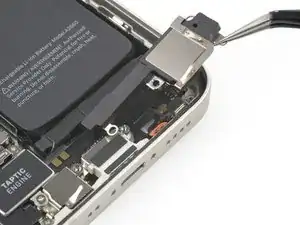
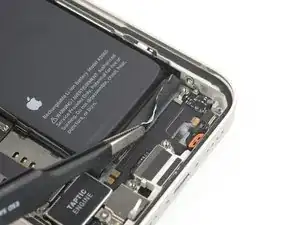
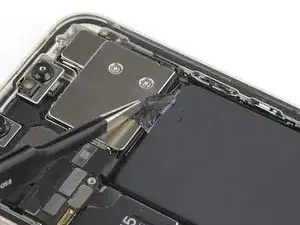
    • Remove the 1.2 mm-long Y000 screw securing the battery and display connector cover.

    • Throughout this repair, keep track of each screw and make sure it goes back exactly where it came from to avoid damaging your iPhone.

    • During reassembly, this is a good point to power on your iPhone and test all functions before you seal the display in place. Be sure to power your iPhone back down completely before you continue working.

    나사가 1개 밖에 보이지 않는데 왜 나사 2개를 풀라고 하는 거죠?

    hello world -

  20. 1x34KdU3TWSITTSQ
    1x34KdU3TWSITTSQ
    ETBGNqNgchaTVWlp
    • Use a pair of tweezers to remove the battery and display connector cover.

    This cover has an almost hinge like catch. If the cover is still laying flat you should apply lateral motion toward the battery, taking extra care to not damage the battery connection ribbon.

    James -

    thanks, that was excactly my problem!

    lucas -

  21. 1cTopM5GU6iPMVQW
    1cTopM5GU6iPMVQW
    VYeTVBm1VKJCyQXf
    Or3clFmSofBrikGt
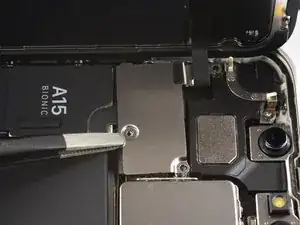
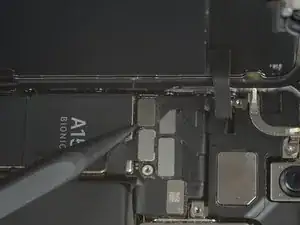
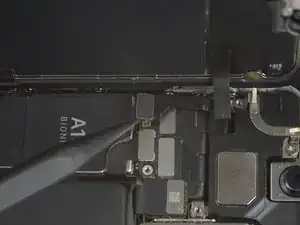
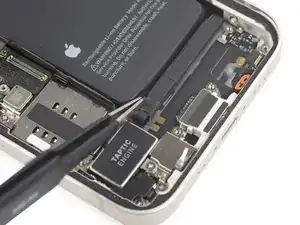
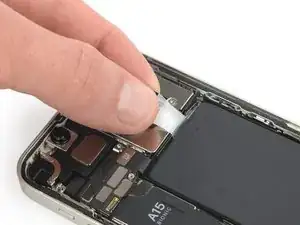
    • Use a spudger to pry the battery and OLED panel cable connectors up from their sockets on the logic board.

    • Try not to damage the black silicone seal surrounding this and other board connections. These seals provide extra protection against water and dust intrusion.

    • Bend the connector slightly away from the logic board to prevent it from accidentally making contact with the socket and providing power to the phone during your repair.

    • To re-attach press connectors like this one, carefully align and press down on one side until it clicks into place, then repeat on the other side. Do not press down on the middle. If the connector is misaligned, the pins can bend, causing permanent damage.

  22. KQyxRhIYUbApWJvY
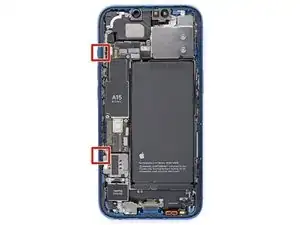
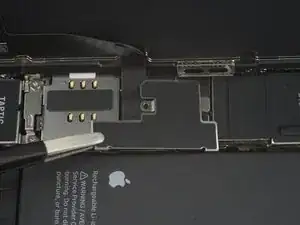
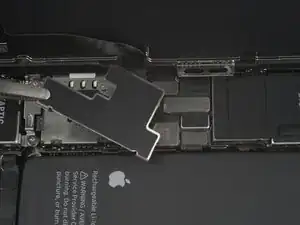
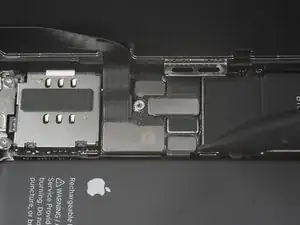
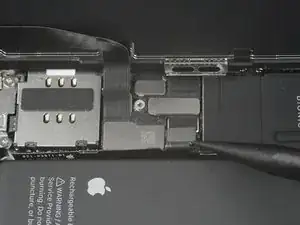
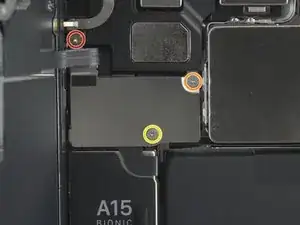
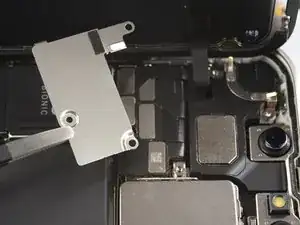
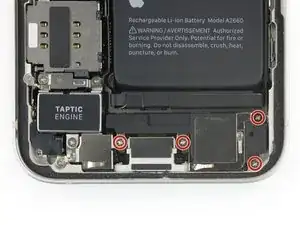
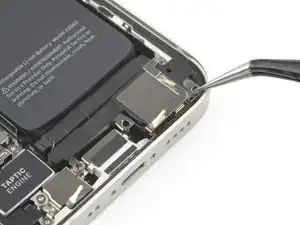
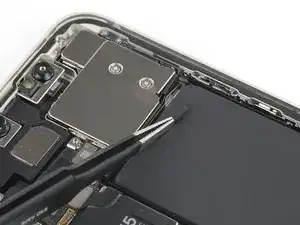
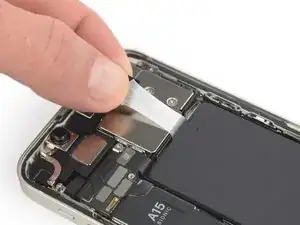
    • Remove the three screws (securing the front sensor assembly cover):

    • One PH000 1.4 mm-long screw

    • One Y000 1.8 mm-long screw

    • One Y000 1.2 mm-long screw

    Please fix your kit! You ship a PH000, but in the video you show a PH00 (and that’s what it is)

    Connor Luckett -

    This needs to be a PH00 as previous comment mentioned. The wrong bit was included in my kit. Thankful I had the right one in a spare kit from previous repairs.

    Creuzy -

  23. mwAAonIRqIkdFXKh
    mwAAonIRqIkdFXKh
    5EygfgGy65MRBPVO
    • Use a pair of tweezers to remove the front sensor assembly connector cover.

  24. CplKT1Q5CQOMY3Lq
    CplKT1Q5CQOMY3Lq
    vDM1rHsmmTLRHHkX
    • Use a spudger to disconnect the front sensor assembly cable connector.

    Mist…. Flachkabel von Frontsensoreinheit abgerissen…. Oh Mann. Was nun? Beim öffnen trennte sich der Rahmen vom Display. Dieser war sehr fest mit dem Gehäuse verklebt … Funktioniert das Display auch ohne Frontsensor? Klar, dann ohne Face ID.

    Sonst noch ein Tipp von den Experten?

    Harald Schober -

    Soweit ich weiß funktioniert es auch ohne, aber da könnten noch mehr Funktionen betroffen sein als nur Face ID. Wenn du es sowieso schon offen hast, wäre es vielleicht am besten, doch gleich auch ein neues Kabel reinzumachen: https://de.ifixit.com/Anleitung/iPhone+1....

    Sandra Hiller -

  25. nPES1VHYtBE5fqV1
  26. 1WCCP1cQLOV2jZMJ
    • Remove the four 1.5 mm-long Phillips screws securing the speaker.

    The Philips bit that was shipped with the kit broke here after only unscrewing one other screw, the top right screw for the speaker assembly was stuck. I barely managed to get the other two out and back in, but since it was stuck, and the bit broken, and since I couldn’t find any of my many other bit kits having just moved and all, I was forced to proceed without the speaker removed. Though all the release tabs on the battery broke because of that, the battery came out easily enough with some isopropyl.

    Thousand Sunny -

    Please fix this to say PH00 bit.

    Creuzy -

  27. PAwrDTPbsGUn5n5T
    PAwrDTPbsGUn5n5T
    bZP4L3DFviCgPMxa
    • Use a pair of tweezers to remove the speaker.

  28. prHVMtPQG6TlElcu
    prHVMtPQG6TlElcu
    v2lYMjVBBrkmDKQs
    • The battery is secured to the rear case with three pieces of stretch-release adhesive—two on the bottom edge of the battery, and one on the top edge.

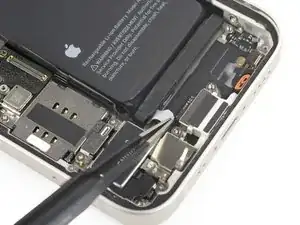
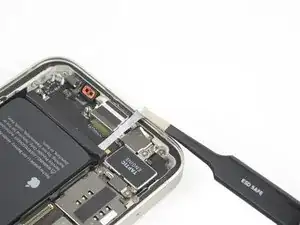
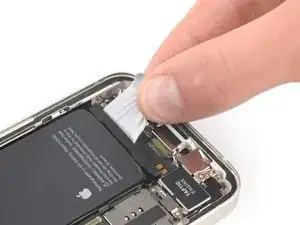
    • Peel down the first battery adhesive pull-tab to un-stick it from the bottom edge of the battery.

    • Don't jab the battery with any sharp tools. A punctured battery may leak dangerous chemicals or catch fire.

  29. NgJySNXmMmU1ayXA
    NgJySNXmMmU1ayXA
    IR4See5LOWxSuaHB
    UmucVlwoE3wOdqkN
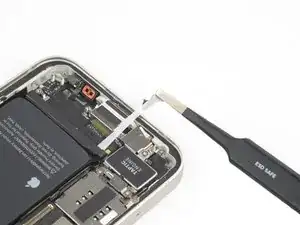
    • Grab the first pull-tab with a pair of tweezers or your fingers and slowly pull it away from the battery, toward the bottom of the iPhone 13 mini.

    • Pull hard enough to maintain tension on the strip, but don't force it. Give it plenty of time to stretch and un-stick from under the battery.

    • Don't press down on the battery. Hold the iPhone firmly by its sides.

    • Keep the strip flat and unwrinkled. Try to pull evenly on the whole strip, rather than pulling mainly in the middle or on one side.

    • Pull at a low angle so the strip doesn't snag on the edge of the battery.

    • If the adhesive strip breaks off, try to retrieve it using your fingers or blunt tweezers, and continue pulling—but do not pry under the battery.

    • If any of the adhesive strips break off underneath the battery and can't be retrieved, try to remove the other strips, and then proceed as instructed below.

  30. LRQHUWjIJloceCGL
    LRQHUWjIJloceCGL
    X5uP5IDQHQdRetn6
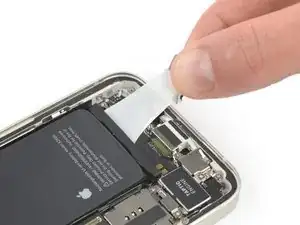
    • Grab the wide pull tab with blunt nose tweezers and slowly pull it away from the battery, toward the bottom of the iPhone.

  31. LGey2ehSaDAZ4UBU
    LGey2ehSaDAZ4UBU
    3MvPsmJjYCJJXyBA
    2JYFybXBr2CkHNUR
    • Grab the second pull-tab with your fingers and pull it away from the battery, toward the bottom of the iPhone.

    • Follow the same procedure as with the previous strip: don't press down on the battery, keep the strip flat and unwrinkled, and pull at a low angle.

    • If the adhesive strip breaks off, try to retrieve it using your fingers or blunt tweezers, and continue pulling—but do not pry under the battery.

    • If the adhesive breaks off underneath the battery and can't be retrieved, continue with the next step.

  32. Om4LyuXpTv3pQ3tC
    Om4LyuXpTv3pQ3tC
    M3E1RBVcGXqlOAok
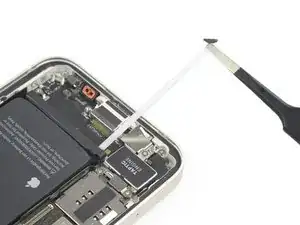
    • Grab the pull tab on the top with tweezers and slowly pull it away from the battery, toward the top of the iPhone.

    Regardless of Battery charge, if compromised in anyway shape or form, you will have sparks and you will toast your battery.

    Evan Williams -

  33. PCUMDNpTZ2sM5XQ3
    PCUMDNpTZ2sM5XQ3
    ScEFjkQPNFyJuGdT
    • Using the same procedure as before, pull the remaining tab to stretch and remove the remaining adhesive strip holding the battery in place. Try not to snag the adhesive on anything.

    • If the adhesive breaks off underneath the battery and can't be retrieved, apply a few drops of high concentration (over 90%) isopropyl alcohol under the edge of the battery in the area of the broken adhesive strip(s).

    • Wait about one minute for the alcohol solution to weaken the adhesive.

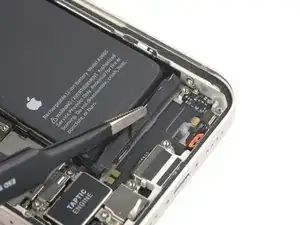
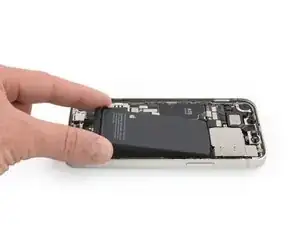
    • Use the flat end of a spudger to gently lift the battery.
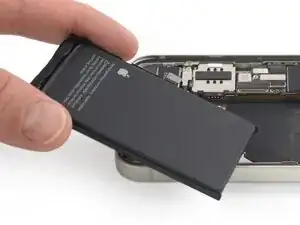
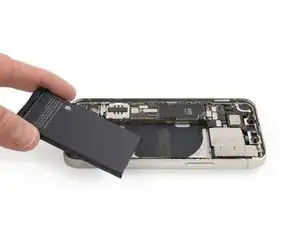
    • Don't try to forcefully lever the battery out. If needed, apply a few more drops of alcohol to further weaken the adhesive. Never deform or puncture the battery with your pry tool.

  34. nO1yZDvI6qIanKL6
    nO1yZDvI6qIanKL6
    dkanq24IOneNXKU3
    • Remove the battery.

    • If there's any alcohol solution remaining in the phone, carefully wipe it off or allow it to air dry before installing your new battery.

    • Use this guide to install new battery adhesive strips.

    • Perform a force restart after reassembly. This can prevent several issues and simplify troubleshooting.

    Or, just pay a professional repair shop to replace your battery - cost $100.

    Michael Owen -

Conclusão

If possible, turn on your device and test your repair before installing new adhesive and resealing.

Secure the new battery with pre-cut adhesive or double-sided adhesive tape. In order to position it correctly, apply the new adhesive into the device at the places where the old adhesive was located, not directly onto the battery. Press the new battery firmly into place.

To reassemble your device, follow the above steps in reverse order. Apply new adhesive where necessary after cleaning the relevant areas with isopropyl alcohol (>90%).

After your repair, depending on the replacement part, you may be able to calibrate it using Apple's Repair Assistant, available as of iOS 18. Update your device, navigate to Settings General About Parts & Service History, tap Restart & Finish Repair, and follow the onscreen prompts.

For optimal performance, after completing this guide, calibrate your newly installed battery.

Take your e-waste to an R2 or e-Stewards certified recycler.

Repair didn’t go as planned? Try some basic troubleshooting, or ask our iPhone 13 mini Answers community for help.

Adriana Zwink

Membro desde: 18/12/19

64390 Reputação

32 comentários

Schade, dass Apple die Reparatur von Iphones nicht mehr kostengünstig zulässt. Das wird die Gebrauchtmarktpreise und somit den Wert der Handys stark verringern...

Mike B. -

Does this repair disable the ability to view the current charge percentage of the battery in the top right of the screen?

James Bender -

No, but it will take a few charge cycles to get an accurate reading. iPhone will re-learn what 100% is, based on how the battery behaves. It is recommended that your run your phone for a couple of COMPLETE charge cycles:

1. Charge it to 100%.

2. Leave on charger for an additional hour.

3. Don’t charge your phone again until it is below 5% (ideally, until empty).

4. Repeat once.

This gets you back to accurate reading, sooner. More importantly, it’ll extend the life of the battery.

Also do this if you haven’t used your phone in a while (a couple of months or more).

Read more about this by looking up: priming a lithium battery.

Last note: do not leave a lithium powered device on its charger all day or 24/7. (Laptops, phones,etc.). It’s bad for the battery and will greatly reduce its life.

This is why, when you charge your iPhone overnight, on a regular basis: iPhone will charge to 80%, then finish the charge in the morning. Batteries degrade/deteriorate faster at 100%.

Emmanuel Bouys -

Das Glas hat sich leider bei mir von dem Display gelöst... Jetzt ist es kaputt.

Es wurde keine große Kraft aufgewendet, man hätte ruhig hier warnen können, bzw. irgendwie auf etwas hinweisen können um dies zu verhindern..

Stefan -

Hallo liebes ifixit Team,

leider habe ich auch am 25.12.2023 mein iPhone 13 mini in den Himmel geschickt. Als der Spalt nach dem Erwärmen und dem Zug am Saugnapf größer wurde, dachte ich jipppiiiii es klappt, allerdings bin ich mit dem Werkzeug leider zwischen Glas und Elektronik gekommen und habe somit das Display gefetzt.

Ein Hinweis, wie dick ungefähr das Display samt Elektronik ist, wäre hier sehr hilfreich gewesen.

Eure Anleitung ist top, allerdings merkt man erst zu spät, dass sich Realität und Foto eurer Anleitung nicht decken. Dann ist es zu spät und das Display ist defekt.

Viele Grüße

Christian

Christian Ide -

Hat super geklappt. Schließe mich den Vorrednern an: Ein Hinweis bzgl. des auf dem Display aufgeklebten Rahmen (der auch am oberen Lautsprecher und den Kameras fest verbaut ist), würde auf diesen sensiblen Bereich und der Möglichkeit etwas zu zerstören geholfen.

phrankme -

My iPhone 13 mini doesn't look like this inside. The earpiece grille is not a part of the screen and the screen connector is on the top edge, not the side. I think this guide caused me to break my phone. I am very upset.

frustrated -

I have an iPhone 13 mini that will not turn on with a new battery, but turns on just fine with the old battery. I've tried 2 different batteries now and the first one wouldn't charge and always showed 1%. The 2nd battery doesn't turn on at all.

Vista7814 -

Ich kann Christian in dieser Kommentarspalte nur zustimmen.

Liebes Team, es gehört wirklich eine rote Warnmeldung an den Schritt, wenn das Display mit dem Plektron gelöst wird. Es passiert leicht (so wie mir leider auch), dass man versehentlich zwischen Displayglas und Displayelektronikeinheit kommt und so das Display zerstört. Dies könnte man verhindern, wenn nochmals mit roter Schrift auf die "Dicke" der abgelösten Displayeinheit hingewiesen wird.

(ENG)Dear team, there really should be a red warning message on the crotch when the display is detached with the pick. It's easy (as unfortunately happened to me) to accidentally get between the display glass and the display electronics unit and destroy the display. This could be prevented if the ‘thickness’ of the detached display unit was indicated again in red lettering.

Arne -

Hallo, er wäre schön, diese Anleitung als .pdf laden zu können.

Hier auf dem IPad ist die Schrift doch sehr klein. Ausgedruckt könnte der gerade notwendige

Arbeitsschritt in beliebiger Schriftgröße neben dem Reparaturfall liegen.

Andreas -

Kommentar mit Wusch nach .pdf bitte entfernen! Habe den Download gefunden.

Andreas -

So does just replacing the battery work? Or do I have remove a part from the old battery and solder it to the new battery for it to work ?

Liz -

The cable of the battery is longer than the original i’d say 3mm or so. this caused a problem of connection with the mother board, I had to press the battery down and put pressure on the cable for it to enter, thankfully it worked but this isn’t good!

majd makarem -

Das mit dem Bildschirm muss man tatsächlich aktualisieren, auf dem Foto wird leiter genau der Fehler dargestellt der von meiner Vorredner beschrieben wurde. Ansonsten konnte ich meine Batterie gut Tauschen.

Andreas Gross -

Now going to an Apple Store... I am joining the group of other people damaging their screen because it's not mentioned how thick the screen assembly vs. only the glass is. I've repaired things before and that's something that should definitely be mentioned in the instructions. Very disappointed.

Eric R -

Excellent guide, was able to do this repair with no issues having no previous iPhone repair experience.

nevets1912 -

The guide needs to be updated, it needs better photos and emphasis showing the risk of removing the top glass over the screen, which was quite natural to do when you see a gap while pulling the screen. If you don't remove the whole screen frame, you will end up removing the glass of the screen and this will kill your screen, a €50 repair becomes a way more complicated €250 repair (if you get a OLED replacement part... or you can make you phone worse with the LCD one).

R4f4 -

I deleted my previous comment, wherein I expressed my disappointment that the screen glass separated from the thick surround with the clips that hold the screen assembly to the phone. This guide should be updated to reflect how fragile the bond is between the screen glass and the thick plastic surround, and to be careful not to pull the screen away from that component. The adhesive seal is unusually strong (which this guide states), and as such it can be stronger than the bond between the two critical screen components. Mostly, I'm disappointed in Apple for this error. I proceeded with the battery replacement and installed a new adhesive seal. My screen, particularly on the top-left corner and down the left edge, doesn't sit down completely with a good seal due to the separation described. But that's another repair for another day.

fleming42 -

Yup, another customer that had to buy a new screen after performing this repair. It is absolutely not clear enough from the instructions how deep the screen bevel sits. Using suction removed the screen glass from the bevel without raising the bevel above the lip of the rear body. Even reading the many comments does not convey the delicacy of the screen separation. Considering how many people have this issue, it is unfortunate that ifixit has not included better pictures and video for this sequence of steps. Pretty disappointed, I would've been better off taking it to a third party repair shop, as it is the cost is turning out to be 2x the cost of a paid repair. I recommend against doing this repair yourself unless you are specifically experienced in repair on this model.

Michael Szetela -

🚨🚨🚨 Ich kann mich nur den ganzen anderen Kommentaren hier anschließen 🚨🚨🚨
Ich habe hier auch der Anleitung blind vertraut, und eigentlich habe ich Reparaturerfahrung. Außer in einem kleinen Absatz in rot (der viel zu inflationär gebraucht wird) wird aber nicht ausdrücklich genug davor gewarnt, dass man mit dem Plektrum unter den Plastikrahmen kommen muss. Als es hieß "nicht das Glas sondern das Metall" bin ich erstmal vom klassichen Problem ausgegangen, dass man das Panelglas löst. Beim iPhone ist es aber so dass auf dem Panel-Assembly nochmal ein Plastikrahmen mit Metallclips verklebt ist. Durch das erhitzen löst sich als erstes der Kleber zu diesem Plastikrahmen, und mit dem Saugnapf hebt man nur das Panel von diesem Plastikrahmen, und man kommt zwangsläufig mit dem Plektrum hierdrunter, und macht das Display kaputt.
Ich hätte mir gewünscht, dass hier deutlich gewarnt wird. Außerdem wüsste ich ehrlich gesagt gar nicht, wie man erhitzen soll, dass man mit dem Saugnapf nicht diesen Rahmen löst.

AAskari -

Do you have recommendations on how to find a high-quality replacement battery in the case that the iFixIt brand battery is not an option? By that, I mean the cost of the iFixIt battery plus shipping is about US$128, which is US$23 more than the Apple Store charges to do a battery replacement. There are some vendors who sell replacement batteries at the local centro de tecnología for US$20, but I do not know how to evaluate their quality.

Quinn -

I'm another victim of this tutorial. I just noticed at the right moment the screen bevels. However, I did separate most of them anyway. I fixed my error in the end. However, as a result of overheating I broke the OLED screen... There's green line now. This is so bad of the tutorial.

Usserrrr -

Hello, is the a15 chip overheating after powering in normal? should it go away once i run the Apple repair assistant ?

Carmen L -

I just ran into the very same issue as many others in this thread, in which I mistakenly separated the display glass from its electronic component thanks to the poor writing and photos in this guide. The photos aren't even of an iPhone 13 mini, which has the earpiece at the very top of the display glass and rather than in the centre of the "notch". I should've known better, but I'm also extremely disappointed in a guide that I thought I could trust was created specifically for the mentioned device. Sad.

Ryan Carteret -

Your iFixit Opening Picks are way too thick to open this hell of an iPhone. I suggest you set the tutorial as hardcore (this is the 15th iPhone I open, and the first that breaks).

Khetheb -

Broke my screen and touch... sucks, seen a gap when lifting the screen and thought it was it, but the screen seperated from the frame.

Big D Wizz -

Hello, I would like to draw everybody's attention on a contradictory info released on this site. On the battery replacement guide for iphone 13 mini there is a note at the very beginning stating that by using the repair assistant built-in function it will be possibile to install the iFixit battery and reset the iphone to like-new working conditions. However, after having done the repair and not being able to activate the assistant repair finish repair procedure I went back to iFixit iBot and asked exactly the question "will assistant repair work in phone 13 mini with an iFixit replacement battery?" and got a very precise answer "No, the Repair Assistant will not work with an iFixit replacement battery for the iPhone 13 mini." If that had been clearly said at the beginning, I might have chosen to buy an original part instead of the iFixit replacement part. I find this message and guide really deceptive as far as the "final like-new working conditions" is concerned. Kind Regards. Adriano

Adriano Ceccarelli -

Thanks for clarifying. That is indeed deceptive as hell.

Jani Pestana -

Broken screen after attempting this repair. I had removed multiple screens from older iphones, but my similar approach was apparently not careful enough and I ended up separating the screen from the frame. I applied heat to the front of the phone on the bottom edge, pulled up with a suction cup, and the gap that appeared looked like it was ok, when in fact it was the gap between screen and frame.

Now looking at reddit for "iphone 13 mini disassembly screen delamination frame" shows many comments about the extreme care needed when heating up the phone prior to attempting to lift the screen with suction. One even advised against heating from the front screen, as it may cause the adhesive between the screen and frame to loosen (which might have caused my failure) rather than the frame and the body underneath. Another recommended against using any heat at all and just applied alcohol.

I thought ifixit was the only place I needed to check before doing this repair, but should have checked elsewhere first.

goblazers -

For me, the flex cable of the replacement battery is too long. That is a major issue on such a small delicate phone.

Jani Pestana -

Count me another victim of this inadequate repair guide. I guess I'm replacing with an inferior screen, but in hindsight I'd rather have short battery life and OLED.

Ben Guiles -

You've marked the 1.4mm screw as PH000, but thats a JIS screw

Andrew Cassidy -