Introdução
Prerequisite-only guide to remove the lower support bracket in an iMac 27" 2017.
Ferramentas
-
-
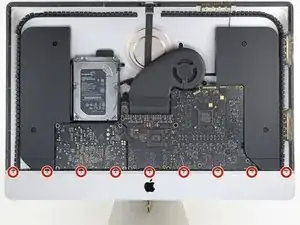
Use a Phillips screwdriver to remove the nine 3.2 mm screws securing the support bracket.
-
You may need to peel up the display adhesive lining the bottom edge of the iMac enclosure to access the screws.
-
-
-
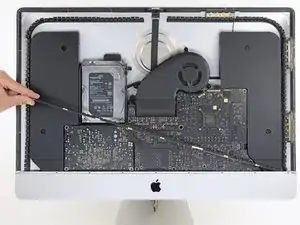
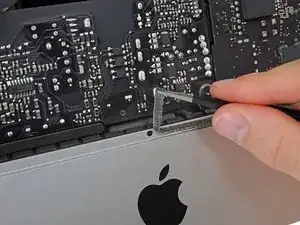
Remove the lower support bracket (a.k.a. "chin strap") from the iMac enclosure.
-
Position the bracket diagonally.
-
Secure the rightmost screw enough to hold the bracket in place; keep it loose for now so the bracket can pivot.
-
Swing the left side of the bracket down until it sits horizontally in its original position.
-
Starting with the leftmost screw, install and tighten the remaining screws.
-

Conclusão
To reassemble your device, follow these instructions in reverse order.

These are new steps from when I did this on my late 2015 retina iMac so I believe step 25 and 26 are optional (you can cope without doing it).
Amuseme -
I did not find it necessary to remove these screws and this bar
James Orwin -
I lost these 8 during the reassemble. The manual tells I need eight 3.2mm screws.
Can anyone help to clarify what screws I need. I don't really understand this size. Is this M2x3mm?
Daniel -
If you are replacing the SSD, I highly recommend removing this support bracket as doing so will make removing internal components much easier, and helps to minimise damage to any parts.
Not removing the support bracket does not save you any time.
It is very easy to reinstall this support bracket.
If you are worried about losing the screws, put them in a ziploc plastic bag.
Ray -