Introdução

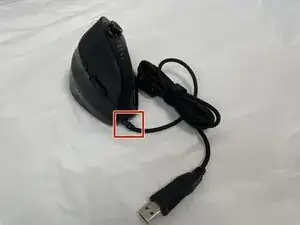
Is your mouse having connection issues? This guide will help you determine whether the problem is caused by an external USB connection or internal wiring damage.

You’ll start by testing the USB cable to rule out port or connector issues, then move inside the mouse to inspect and repair the internal wiring.

This guide begins with checking if the USB works by connecting it to a device, but the mouse should remain disconnected throughout the rest of the process.

  1. rRyixsJmDkMDaK6P
    rRyixsJmDkMDaK6P
    snNj2CYpRoSWOApo
    ZPOgjXdNJOBW4P1V
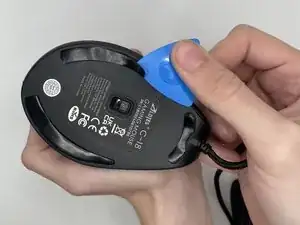
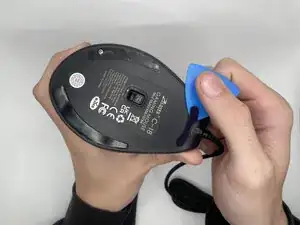
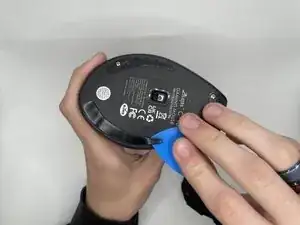
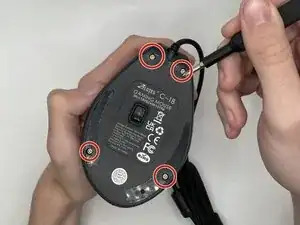
    • Use an opening pick to gently pry off the mouse feet and stickers on the bottom of the mouse to expose four hidden screws.

    • Keep the feet to reattach later, or replace them with new ones (spare pads are usually included).

  2. maTisbn2YQSGvgVK
    • Using a Phillips #0 screwdriver to remove the four 9 mm-long screws on the bottom of the mouse.

  3. qTMSu5YeUPabJdsL
    qTMSu5YeUPabJdsL
    AUdOBoDxot1lhx2Q
    jfQTJLOCHWWQ4VlL
    • Carefully separate the top and bottom casing—DO NOT PULL QUICKLY, as ribbon cables connect both halves.

    • The ribbon cable connectors have small plastic locking tabs that hold them in place.

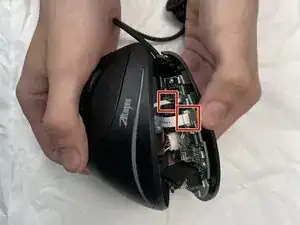
    • Using a spudger, carefully lift the locking tab by gently alternating pressure on each side until it’s in the unlocked position

    • Do not remove the tab completely, as it is attached to the connector.

    • Detach the ribbon cables by gently pulling them straight (perpendicularly) away from the motherboard.

    • You should not need much force — if you do, the tab may not be fully unlocked.

    • When reattaching, insert the cable back into its socket and press the locking tab down into place using the flat end of the spudger.

  4. yZ1ASRv5w3gHWc4L
    yZ1ASRv5w3gHWc4L
    XsAedjqmeNoaoWFF
    • Double-check that your connector cable is properly connected to your device. If there is still an issue, try connecting to a different USB port to find out if the issue could be the port or the cable itself.

    • Ensure you check the wire itself for any damage that would require a replacement.

  5. roVRCrrp3mYVdF1G
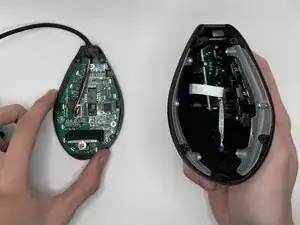
    • Remove the plastic cable bracket found in the front of the mouse.

    • When reassembling, ensure the flat edge of the plastic bracket is facing towards the front of the mouse and the small nubs are on top.

    • Lift the cable to remove it from its groove.

  6. YNu3LYDgRxpUMa2V
    YNu3LYDgRxpUMa2V
    XnEkRRZcyuxuuFZl
    VAp2PFvUXmA5CqYA
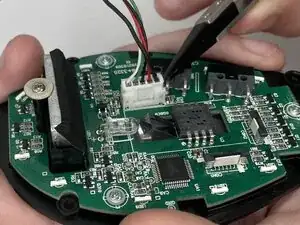
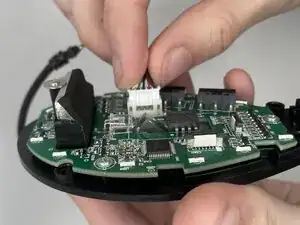
    • Find the 5-pin connector attached to the motherboard, which is located in the middle of the motherboard next to the laser.

    • Use the point of the reverse tweezer to alternate pressure on each side until the connector is out of its socket.

    • Do not pull-on wires too hard, as this could damage them. This process might take time but ensure you are patient.

    • Once connecting it back to its socket for the reassembly, use the tip of the reverse tweezer to gently push it down.

    • Ensure you are not pushing down on the wires.

Conclusão

To reassemble your device, follow the above steps in reverse order.
Take your e-waste to an R2 or e-Stewards certified recycler.
Repair didn’t go as planned? Try some basic troubleshooting or ask our Answers community for help.

Stephanie Jardines

Membro desde: 10/09/25

293 Reputação

0 comentários