Introdução
A stalled ice maker in your Whirlpool side-by-side often traces back to broken wires inside the freezer door hinge harness. Instead of buying a new door, this guide walks you through diagnosing the fault, splicing, and protecting the wire so your refrigerator can make and dispense ice again.
-
-
Press the control panel to verify water dispenses but ice and certain buttons do not respond.
-
-
-
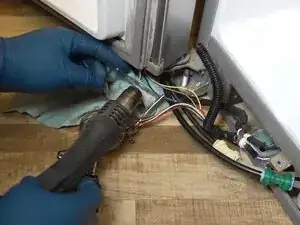
Open the freezer door and locate the black wire trunk beneath the hinge between the freezer and refrigerator doors.
-
If the loom shows cracked insulation or exposed conductors the harness is likely at fault.
-
-
-
Remove frozen food and swing both doors fully open for clearance.
-
Extract the two downward-facing Phillips screws securing the lower hinge cover.
-
Flex the plastic cover edges inward and pull the cover off to expose the harness block.
-
-
-
Evaluate workspace and decide whether to lift the door off the bottom hinge or leave it installed.
-
-
-
Peel back the black rubber sleeve from the harness without cutting the wires.
-
Use side snips to remove the grey plastic edge that previously sliced the conductors.
-
-
-
Arrange a hot air gun, wire strippers, side snips, helping hands stand and heat-shrink solder seal connectors.
-
Obtain 3–6 inch lengths of 14 AWG and 18 AWG wire for extensions.
-
-
-
Cut each broken conductor back to clean copper ends.
-
Slide the correct connector onto one side before removing about ½ inch of insulation from both ends.
-
Measure and insert a matching gauge extension wire to relieve strain on the hinge area.
-
-
-
Cross the stripped ends near the jackets and wrap the right lead around the left one-third of its length.
-
Wrap the left lead around the right to complete a western union splice.
-
-
-
Center the solder band of the connector over the splice.
-
Apply consistent hot air, focusing on the solder until it flows and the tubing fully shrinks.
-
-
-
Repeat the splice and heat process for every damaged wire, matching connector color to wire size.
-
Use the helping hands stand to hold joints steady so both hands remain free for the heat gun.
-
-
-
Slide continuous heat-shrink tubing or a split sleeve over the repaired bundle for abrasion protection.
-
-
-
Refit the hinge cover, reinstall the two screws and close the doors.
-
Restore power and operate the dispenser to confirm the auger turns and ice production resumes.
-
-
-
If the icemaker still fails, remove the control board cover and inspect both PCB sides for burn marks or blown components.
-
Your refrigerator should resume reliable ice production. Periodically inspect the hinge area to be sure the new loom or tape remains intact and the door movement no longer strains the wiring.
