Introdução

Use este guia para substituir o display e sua estrutura do seu smartphone modelo Huawei Mate 9.

  1. Y1tRRdIZpVAQ2Tai
    Y1tRRdIZpVAQ2Tai
    vIbtJURVjavtm2dB
    • Primeiramente, desligue o seu smartphone e remova a bandeja do cartão SIM.

  2. NFcYVCIDyg55UOVv
    NFcYVCIDyg55UOVv
    NASkAIeHoBiIDOhC
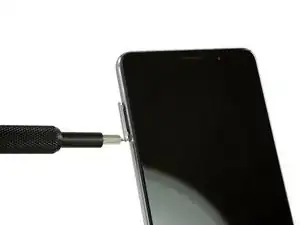
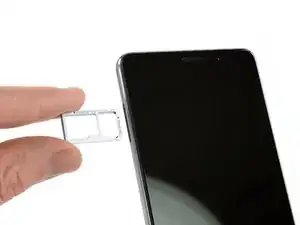
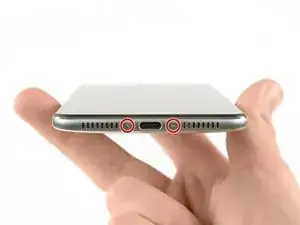
    • Remova ambos os paraufos na parte inferior com uma chave Torx T2.

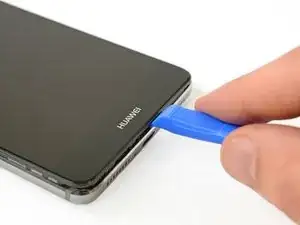
    • Use um abridor de plástico para penetrar entre o display e a estrutura. Abra o smartphone fazendo alavanca cuidadosamente e liberando o display junto com todas as peças do chassi.

    • Ainda não abra o smartphone completamente. O cabo do sensor de impressão digital ainda está conectado com a tampa traseira.

  3. KqeWUSnXAaEGC3QV
    KqeWUSnXAaEGC3QV
    jCcEnAK3XGeRnVyg
    • Virando o conjunto solto para o lado direito, abra o smartphone.

    • Desconecte o cabo do sensor de impressão digital com uma espátula.

  4. FurdDZWcVXUOhBX5
    • Destaque cuidadosamente o adesivo de plástico que segura os dois cabos à bateria.

  5. VwCZOQVUGdidtoww
    • Remova o indicador adesivo de contato com água e o parafuso Phillips tipo #00 que se encontra abaixo dele e que segura o suporte de cabo em sua posição.

  6. hXxpmXVjKFQ4YWcv
    • Remova o suporte de cabo.

  7. OMRvxenMDZO4ZWJl
    OMRvxenMDZO4ZWJl
    dRfsNLgRZfvHKX2K
    iDCbEmKOYCdQ2PiK
    • Use uma espátula para desconectar o interconector, a bateria e o cabo flex do display.

  8. m5TtxJPifNsq1OoB
    m5TtxJPifNsq1OoB
    S5aD1NRXJtbyhNIU
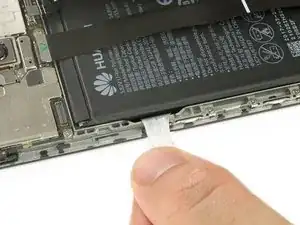
    • Destaque a tira adesiva que está posicionada abaixo da bateria puxando-a firmemente e em ângulo plano.

    • Se a tira rasgar, segure-a e gire com as pontas da pinça algumas vezes e então continue.

  9. 4SxXuBGPwbNo1qnV
    4SxXuBGPwbNo1qnV
    eHXuGpugFk4kdf6m
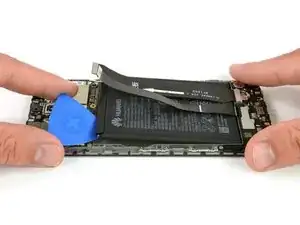
    • Se a bateria não estiver liberada, use uma palheta para fazer alavanca debaixo da bateria e liberá-la do adesivo restante.
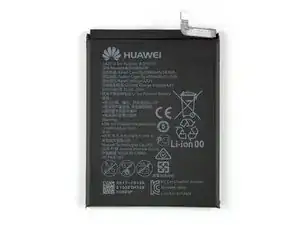
    • Remova a bateria.

    • Ao montar novamente seu smartphone, reponha o adesivo antigo com fita adesiva dupla face ou adesivopré-cortado.

    • Jamais reinstale uma bateria que tenha sido empenada ou danificada durante a remoção.

    Vorsicht bei diesem Schritt!

    Der Akku ist in der unteren Hälfte mit sehr gut klebendem Tape gesichert! Ein massives Hebeln zerstört den Akku (Akku knickt und Zellen bekommen einen Kurzschluss)!

    Hebelt ihn wie auf dem Bild, oben etwas hoch damit ihr mit einer alten EC oder Kreditkarte o.ä. unter den Akku kommt und damit das Tape langsam wegdrücken könnt.

    Tobias Hannemann -

    Der Klebstoff an der Unterseite des Akkus hielt diesen bei meinem Gerät ziemlich fest und ließ sich trotz zweimaligem langen Auflegen des 30 Sekunden in der Mikrowelle erwärmten Opening-Pick-Gel-Kissens nur mühevoll lösen. Ohne Gefahr zu laufen, dabei den Chassis-Rahmen mit dem darunter befindlichen Display zu verbiegen und dieses zu beschädigen, half mir die Kante des Spudgers, den Akku Millimeter um Millimeter vom Klebstoff allmählich zu lösen. Ein stabiler dünner Plastikspachtel könnte dabei besonders hilfreich sein. Das alte Akku-Kissen riss beim lösen aus dem Chassis-Rahmen und entzündetes Gas des Lithium-Ionen-Gemisches entwich unter leichtem Funkensprühen. Es ist also Vorsicht geboten sowohl beim Entfernen, bei der späteren Aufbewahrung und der Entsorgen des alten, in meinem Falle beschädigten Akkus.

    Angesichts dieses Umstandes und dass es nicht einfach war, das Gerät zu öffnen (Schritt 2), stufe ich den gesamten Vorgang des Akkutausches eher als moderat bis schwierig ein!

    Nemo Outis -

  10. NGlXq65qETIC6yJb
    NGlXq65qETIC6yJb
    DNJUMVPGhZ1KKYTg
    Y2OMQSLR3NxGHBVB
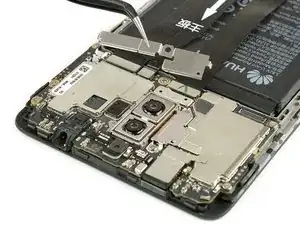
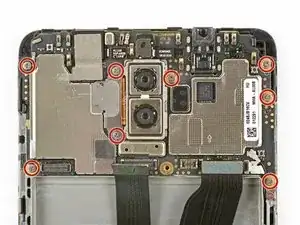
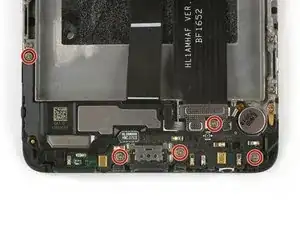
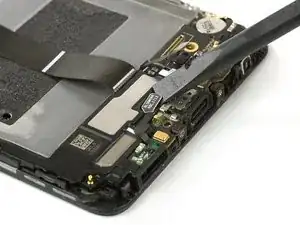
    • Remova os oito parafusos Phillips tamanho 00 que fixam a placa-mãe em sua posição.

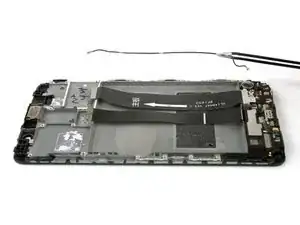
    • Desplugue o cabo da antena com uma pinça.

    • Depois de remover todos os parafusos, ainda há pequenos grampos que seguram a placa-mãe em sua posição. Não quebre eles enquanto os remove, mas empurre-os um pouco para o lado para facilitar o trabalho de remoção.

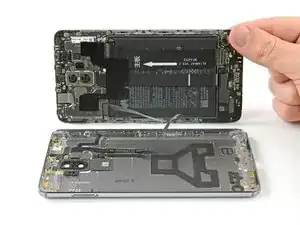
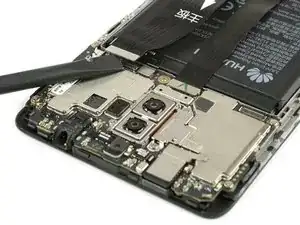
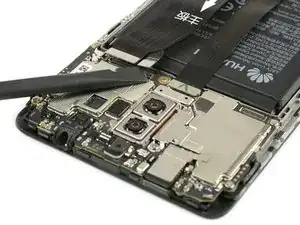
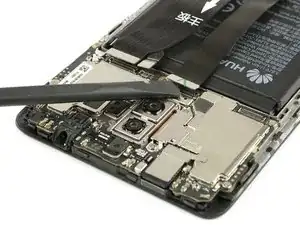
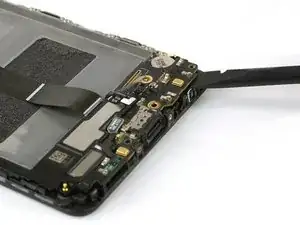
    • Utilize uma espátula para levantar cuidadosamente a placa-mãe, incluindo todos os componentes, segurando nela e remova-a.

    “there are still small clamps” since you've been able to pull the motherboard out, maybe you could be a little more specific with where these clamps are and which way they should move to allow mb removal?

    Tallis Macaulay -

  11. S2j6sMkvk6DuvoZW
    S2j6sMkvk6DuvoZW
    KEwPjRa2FTbMT5e2
    YGLOQB6byneWKUhK
    • Remova o alto-falante auricular.

    • Tome cuidade para não vergar os conectores metálicos.

    • Desconecte o cabo da antena e remova-o cuidadosamente.

    This picture shows “remove the earpiece speaker” with the speaker already removed. How do you get tweezers under it?

    Tallis Macaulay -

    The answer is, wegdge it up from the side of the speaker.

    Why is that not included in the instructions?

    Tallis Macaulay -

  12. gQytQRttkwPRGiN6
    gQytQRttkwPRGiN6
    63mbDnM1BRlobbWT
    WpFjrYK2xM2hIaOF
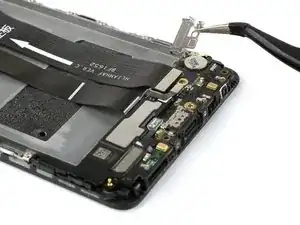
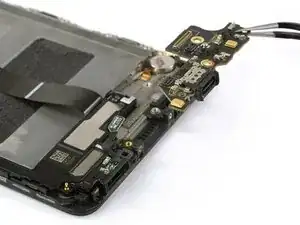
    • Mova para baixo a parte inferior de seu smartphone e remova os quatro parafusos Phillips tamanho 00.

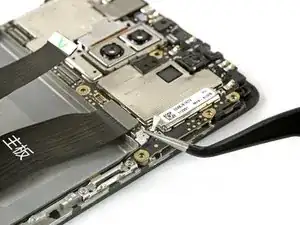
    • Remova a blindagem metálica que cobre a conexão do cabo flex da placa-mãe.

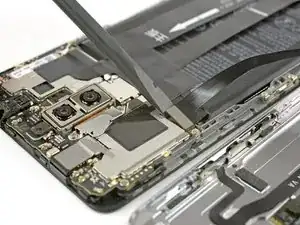
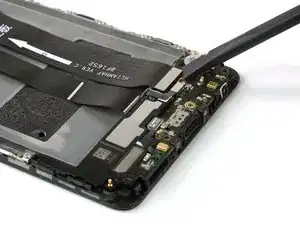
    • Utilize uma espátula para desplugar o cabo flex da placa-mãe e remova-o.

  13. ejTvmFCLCHlgCyeU
    ejTvmFCLCHlgCyeU
    M2TAkriIERPCJoPx
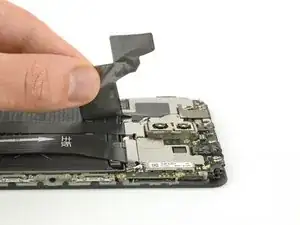
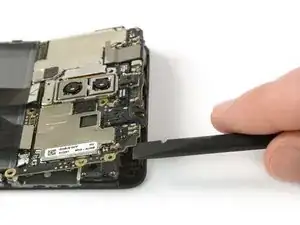
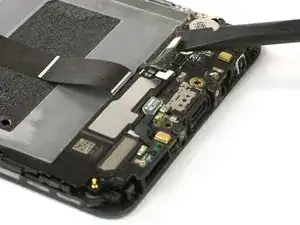
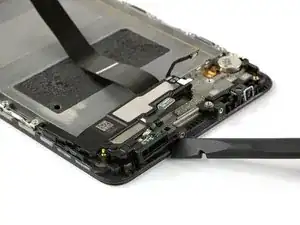
    • Utilize uma espátula para desfazer a conexão do cabo flex do alto-falante e da porta de carregamento com a placa de expansão.

  14. OZGlW1XQtdrTgHAx
    OZGlW1XQtdrTgHAx
    HCYsqYdhsbWDrbAm
    • Utilize uma espátula para cuidadosamente fazer alavanca na placa de expansão e remova-a. Não quebre os pequenos grampos que fixam a placa de expansão, mas empurre-os um pouco para o lado para facilitar o trabalho de remoção.

  15. otKZuAZ6mySRa4kW
    otKZuAZ6mySRa4kW
    ZaAqyatWsdkiSGPj
    TVIpRlTWdSNBVPXO
    • Utilize uma espátula para remover o alto-falante e a porta de carregamento. Existe um adesivo debaixo e a unidade pode estar levemente pegajosa.

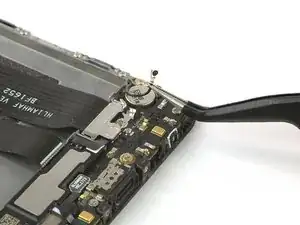
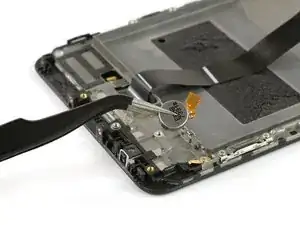
    • Utilize uma pinça para soltar o motor de vibração colado e remova-o.

    • Se você estiver sofrendo para remover o alto-falante ou o motor vibrador, você pode usar uma bolsa térmica iOpener para soltar a cola e tente novamente.

    • Antes de montá-la, verifique se a peça nova precisa de algum componente que precisa ser transferido da peça que está sendo substituída.

    • Ao montar novamente seu smartphone, reponha a cola velha com a faixa dupla face ou faixas adesivas pré-cortadas.

    Nicht die Schraube links an diesem Board vergessen!

    Jakob Dobberow -

    Hier fehlt das lösen einer Schraube, links in der Verlängerung der Lautsprecher mit Ladebuchse ist ein Loch zu sehen, dort sitzt noch eine Schraube.

    Michael Bröstl -

Conclusão

Para montar novamente o seu dispositivo, siga essas instruções na ordem inversa. Antes de montá-lo novamente, verifique se a nova peça não precisa de algum componente da peça que está sendo substituída.

Dominik Schnabelrauch

Membro desde: 23/11/16

252795 Reputação

5 comentários

why take out the battery??

JPBrokenIT -

Hi JPBrokenIT,

this is a guide for the full display assembly. This means you’ll exchange the display including the whole mid frame for a new one. If you’re going to leave the battery in its place. You need a new one for your spare part. If you don’t want to buy a new battery, you’ll need to transfer it from the old mid frame with display, to the new one. If you want to exchange the display without the mid frame, you need to follow this guide - Huawei Mate 9 Display Replacement

Dominik Schnabelrauch -

Hi guys, just a small Thing, but you missed to mention one additional screw which holds the Speaker unit on top of the “arm” to the left. Anyway, very good and helpful guide. Christian

Chris V -

Hi Chris V,

thanks for mentioning. I made the correction.

Dominik Schnabelrauch -

I was stuck at step 2. I could not pry open the case, not even a tiny gap, and the plastic opening tool broke. The assembly and case were attached so tight. I even tried to use a flat metal screw driver to try to get an “entering point”. But the case was so well snugged onto the assembly. Maybe Huawei put some glue during assembling process. I halted the repairing. At least the phone is now still functioning with a broken screen.

Sky Land -