Introdução

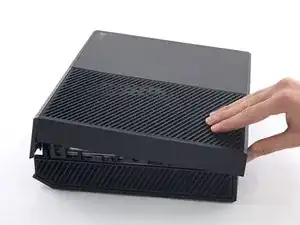
Se a sua ventoinha estiver fazendo ruídos ou não estiver funcionando, siga este guia para removê-la e fazer a manutenção ou substitui-la.
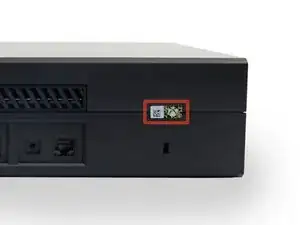
  1. fFCGnAVFSWO6MSIo

    In the United States the Magnuson-Moss Warranty Act of 1975 is a Federal Law that states that stickers and clauses are illegal. It says you can open your electronics without voiding the warranty, regardless of what language of that warranty says.

    Dustin D'Amour -

    Stickers are illegal!?

    Brandon -

    For anyone concerned, if you apply heat with a blow dryer or heat gun you can carefully remove the sticker without damaging it, making it impossible to know that the sticker was ever removed.

    Kelton Stewart -

    All the immature comments aside, thank you Dustin for sharing the information.

    Wade -

    xbox를 열기 위해서 이러한 위조방지 테이프를 자르거나 떼어내야 합니다. 하지만 걱정 마세요. 여러분이 무언가 직접적으로 망가트리지 않는한 ms는 보증을 취소하지 않습니다.

    승대/SeungDae 정/Jeong -

  2. TSL4QNCOtv534Yqk
    TSL4QNCOtv534Yqk
    nCL6Av6fkN1uQMAu
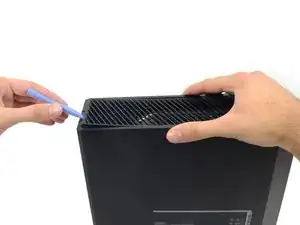
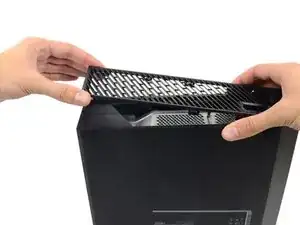
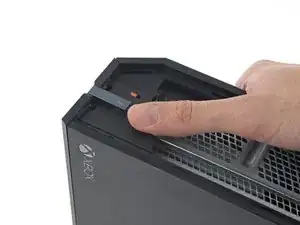
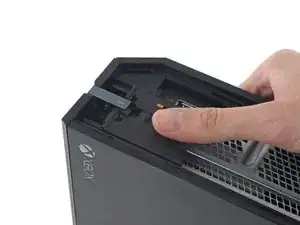
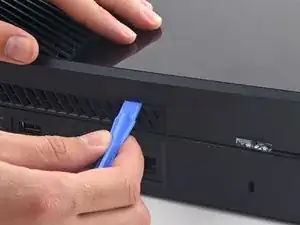
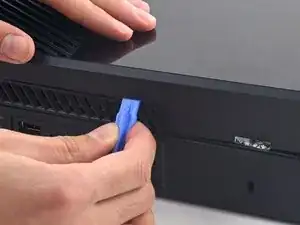
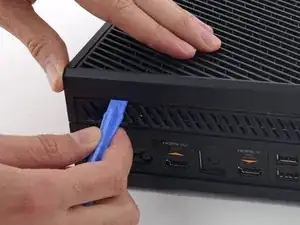
    • Com uma ferramenta de abertura de plástico, faça alavanca e remova a grelha de plástico que circunda a porta USB lateral.

    • A grelha é muito flexível e está fixada por clipes de plástico fracos - comece fazendo alavanca pela traseira e remova-a.

    - 플라스틱 오프닝 도구를 애용해서 측면 usb 포트를 둘러싼 통풍구를 들어올려 분리하세요.

    - 이 통풍구는 무척 유연하며 연약한 플라스틱 클립으로 고정되어 있습니다. 뒤쪽에서부터 들어올려 분리하고 떼어냅니다.

    승대/SeungDae 정/Jeong -

  3. BLMgn4Ddrlxat2SY
    BLMgn4Ddrlxat2SY
    KaRwhVrrZiGkLdCK
    • Existe uma pequena lingueta de plástico que reforça o canto dianteiro do Xbox.

    • Deslize a lingueta em linha reta para trás e remova-a.

    Do u sell that plastic tag I need it

    Brandon -

    Here is What's Stated in Step-3 : (There is a small plastic tab that reinforces the front corner of the Xbox.) Actually, the "Tab" is NOT SMALL at all. See the Picture: The "TAB" is the Piece that this Person has their Thumb on, is the Tab that you NEED TO SLIDE TOWARDS THE "REAR" of the Unit. You will be able to tell How this Large Tab Holds the Top and the Bottom Case Covers together. Take Note how to Replace this tab back where it Belongs, when you are putting the Case Covers back together. Hope that this comment will help you. 6-29-2017

    B.L. Spence -

    - xbox의 전면 모서리를 지지하는 작은 플라스틱 탭이 있습니다.

    - 뒤쪽으로 똑바로 밀어서 제거하세요.

    승대/SeungDae 정/Jeong -

    What is this small tab referred to as?

    What is it called i need to order one.

    James Lipsey -

  4. DmSmGaCLJiWlvSFm
    DmSmGaCLJiWlvSFm
    SSs6u5TVjnYrJyRo
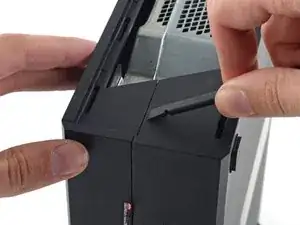
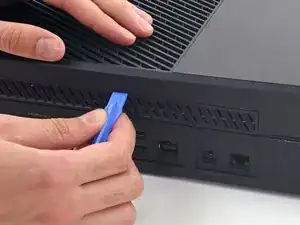
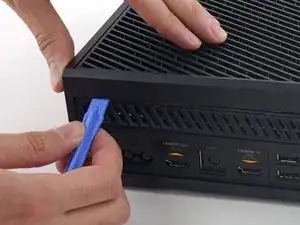
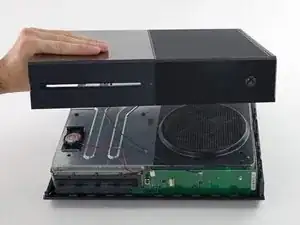
    • Introduza a ponta plana de uma espátula entre as estruturas superior e inferir, onde elas se encontram na traseira da abertura lateral da grelha.

    • Existe um clipe de plástico robusto conectando as duas metades da estrutura (o primeiro de muitos), portanto você vai precisar usar muita força.

    • Deixe a espátula no lugar até você abrir a estrutura completamente. Os clipes são muito flexíveis e podem fazer a estrutura se fechar enquanto você está trabalhando.

    prying does not work. my spudger is causing damage. my soft. plastic. spudger. and the %#*@ thing does not move. this is a common issue with the instructions on this site. you write instructions like you assume people have extensive repair experience. describe the plastic tab. add detail. because simply prying WILL damage the case. hire a %#*@ writer. cause you guys do not know how to precisely convey important detail. constant problem with tech companies actually. no writers.

    Kevin Michaels -

    - 벗겨낸 통풍구쪽부터 상판과 하판 사이의 틈으로 spudger의 평평한 끝을 밀어넣습니다.

    - 플라스틱 클립들이 꽤 강하기 때문에 생각보다 강한 힘을 사용해야 합니다.

    - 케이스를 완전히 열 때까지 spudger를 계속 끼워두세요. 클립이 강해서 작업도중 다시 닫힐 수도 있습니다.

    승대/SeungDae 정/Jeong -

    it would be very very nice that the part, that you sell, will Fix. This an ols Tutorial. The new opening tools that you sell, will not help anything, cause there is no flat sign on the side. you link these tools at this tutorial, but never tested, if the new tools work. so i tell this you, no they dont fit. Thanks for nothing.

    Zeroslammer -

    I ve made it this far with only a Lego membership card and a flimsier amusement park card (I'm a big year old)

    Shadow Killz -

    I had to use a 1/32nd flathead screw driver. In the corner to get it started push the top joint of the case down and up will simultaneously pulling up and down to seperate the seam. You will need a 3rd hand to insert the 1/32nd flathead and pry up to get the case started.

    I had a virgin never opened xbox day one og so that might be why I had to do it this way.

    KSI AZZAZLE -

    even the wikihow instructions are better

    Ethan Banks -

    It’s easier if you push the top empty area part of the plastic with your finger, and stick the spudger about 3/4” (2 cm) away from the back of the xbox and start prying. You have to do this because that is the only spot where there are no clips in the way. If you do any less or more distance, the clips are in the way, and you’ll never be able to pry open the Xbox because the tool can’t get in.

    Saul Torres -

    A youtube video I found explains this step better. You are meant to pull up on one half and push down on the other, this separates the two halves. Then use a spudger on the rear of the console to separate the clip right under the warranty sticker, then move down the back of the console to the other clips

    Zachary Avery -

    I found it easier to pull apart the pieces from the seam, pull the left side (the side on the upper half of the Xbox) down, while pulling the right side up (The side on the lower half of the xbox).

    Satyr -

  5. ogjOrFJJcnxckrPw
    ogjOrFJJcnxckrPw
    JcHGErqMBV2dtooS
    • A interface entre as estruturas superior e inferior é fixa por vários clipes ao longo da traseira e da lateral restante do Xbox.

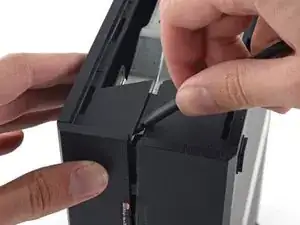
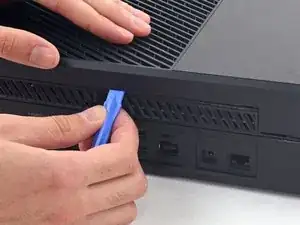
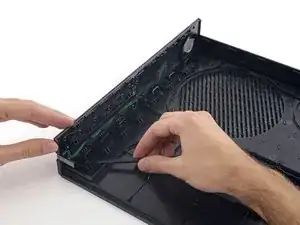
    • Introduza uma ferramenta de abertura de plástico entre as estruturas superior e inferior para separar o clipe acima da grelha traseira.

    - 상판과 하판 사이에 끼인 후면 단자판은 여러개의 클립으로 고정되어 있습니다.

    - 플라스틱 오프닝 도구로 후면 통풍구의 클립들을 분리하세요.

    승대/SeungDae 정/Jeong -

  6. WhqL5lXoOtd5OkSa
    WhqL5lXoOtd5OkSa
    a5dTIdSMJqCQ6NHL
    • Continue passando a ferramenta pela traseira do Xbox e destacando clipes.

    • Certifique-se de que a espátula fique na sua posição travada - mesmo se a estrutura abrir o suficiente para a espátula escapar, os clipes restantes são flexíveis e podem fazer com que a estrutura feche completamente. Deixe a espátula no vão para preservar o seu progresso.

    - 후면을 따라서 계속 클립을 들어서 분리하세요.

    - spudger가 제대로 꽂혀 있는지 중간중간 확인하세요. spudger가 빠질정도로 케이스가 분리 되더라도 남은 클립들이 매우 탄력적이라서 방심하면 도로 닫히기 십상입니다. 원활한 진행을 위해 spudger가 잘 꽂혀서 사이를 벌리도록 유지하세요.

    승대/SeungDae 정/Jeong -

  7. v5JQjSLJyhE3W2hY
    v5JQjSLJyhE3W2hY
    CAl1npTqiKdrFpqG
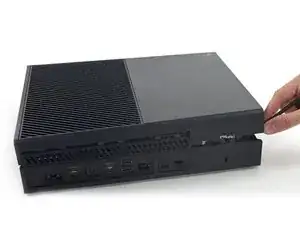
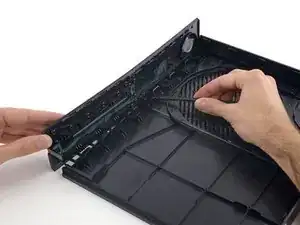
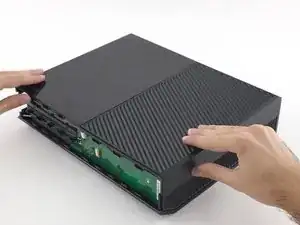
    • Continue destacando clipes. Pode ser útil deslizar com a ferramenta de abertura de plástico pelos clipes.

    • Quando você chegar à borda oposta da estrutura traseira, a estrutura superior deve estar pronta para ser solta. Se não, passe a sua ferramenta pelo canto e destaque os clipes ao longo da lateral sem a porta USB.

    - 클립들을 계속해서 분리합니다. 클립들을 가로질러 플라스틱 오프닝 도구를 주욱 미는 것이 도움이 될수도 있습니다.

    - 후방 케이스를 따라 분리하면 상판이 열릴 기미가 보여야 합니다. 만약 열릴 기미가 보이지 않는다면 모서리부터 플라스틱 오프닝 도구로 분리를 시작하고 usb포트가 없는 쪽을 따라서 클립 분리를 다시 시도하세요.

    승대/SeungDae 정/Jeong -

  8. Bc1SKUHI3FWBknsV
    Bc1SKUHI3FWBknsV
    VkjRDdLoOFC4P3LT
    bxFDQqHFvjiMAqOl
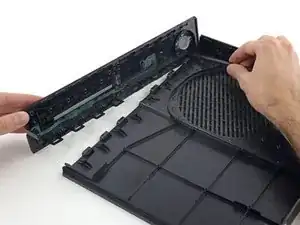
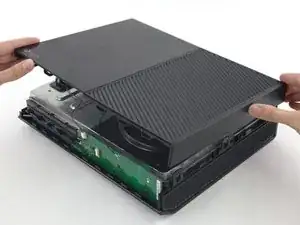
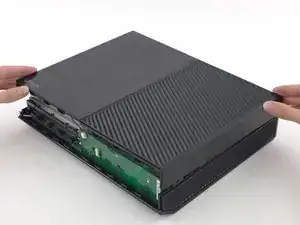
    • Começando pela espátula que você deixou na fenda, faça alavanca na estrutura superior para liberar os últimos poucos clipes.

    • Com uma ferramenta de abertura de plástico, destaque aqueles clipes mais resistentes que não foram liberados.

    • Ainda não tente remover a estrutura superior, pois ela ainda está conectada pelo cabo do botão do painel dianteiro.

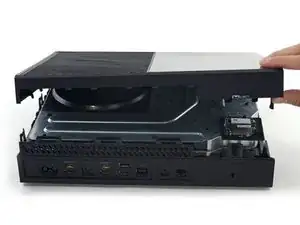
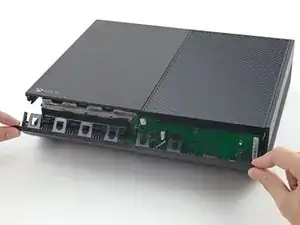
    • Erga a estrutura superior ligeiramente e mova-a para abrir acesso à placa do painel dianteiro.

    I got confused here. I couldn’t unclip the front panel at all. I found out that if I open the case like a clamshell (or a book, with the front being the spine of the book) I popped right off easily.

    Omar Ramos -

    Yeah, I saw your comment afterwards but this is exactly what I ended up doing as well. just a note for anyone reading this be careful of the flex cable as it does seem to put a questionable amount of strain on it when you open it in this manner.

    Graham Holt -

    "Lift the upper case slightly and shift it" isn't descriptive enough for this step. Also, pictures of actually getting the front panel loose would be really helpful.

    John Poyhonen -

    I tried fixing my Xbox one faceplate because for some reason, and when I took it off my cable stopped working. Even after repair so now I either use a disc to turn it on or my controller.

    DiceMman -

  9. sQaX6NR2yUNmcpZE
    sQaX6NR2yUNmcpZE
    5idQPgXXOnPUgTuE
    JpmqCQgvktBT6IZW
    • O cabo do botão dianteiro tem um conector ZIF único - preste atenção nos próximos poucos passos para desconectá-lo seguramente.

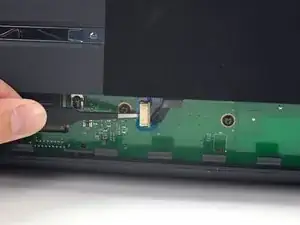
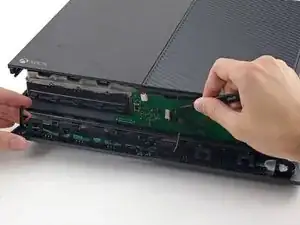
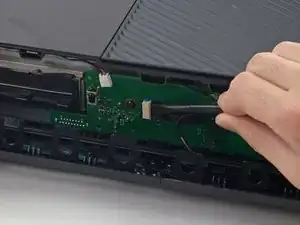
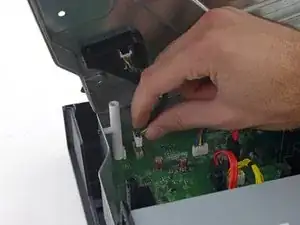
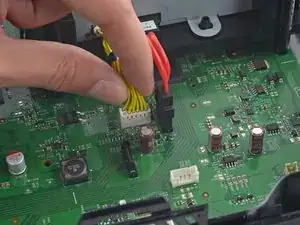
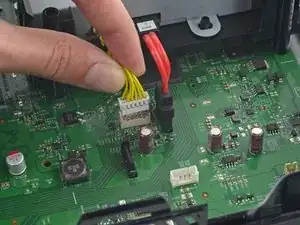
    • Com uma pinça, erga o retentor de plástico azul acima do conector branco na placa.

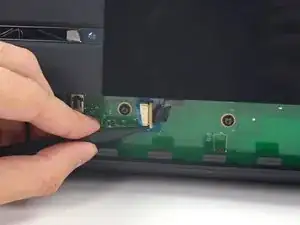
    • Com a ponta pontiaguda de uma espátula, empurre a trava do conector na direção do cabo para destravá-la.

    I recently took my Xbox one apart to clean it and for some reason it's on for a couple minutes then it cuts off

    Ali -

    Or anyone else who has this problem or reads this on this thread, which is not the correct thread for this question by the way, here is a link to the forum for that. It could be any of a number of issues including overheating, Portland elation, or infestation, among others.

    Xbox One turns on then turns off after a few minutes

    Rooster Blue -

    Is there somewhere that I can buy a replacement zif connector

    Black Light -

  10. AHFqUGqKrLOvs6Mw
    AHFqUGqKrLOvs6Mw
    UKFO6I2mNG5CuVx1
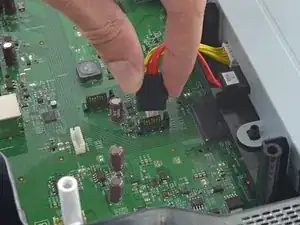
    • Com uma pinça, puxe o cabo em linha reta, afastando-o do conector na placa.

    • Remova a estrutura superior.

    I broke that peice that white connector peice what can I do?

    devinthomason -

    Looks like you need a replacement front sensor board

    chris.pallatina -

  11. 2FCYpEe2HZMronDK
    2FCYpEe2HZMronDK
    jg6d6lTGcEVZjWCq
    6LxAZJy1HGaIBKUj
    • Os 4 próximos passos são instruções para a remontagem. Pule eles para continuar com a desmontagem.

    • Com a ponta plana de uma espátula, libere os clipes que fixa o painel dianteiro na estrutura superior.

    • Remova o painel dianteiro do resto da estrutura superior.

  12. kANCmbqNSW4gTaKm
    kANCmbqNSW4gTaKm
    fJSHsP4srEitpBI1
    rXaw12h6dMmByhSk
    • Substitua a parte superior da estrutura superior.

    • Alinhe os clipes e pressione firmemente para realocá-los ao redor da estrutura.

  13. mlcHYVINYhfQhGKJ
    mlcHYVINYhfQhGKJ
    lVXM56UFy2OiQAuD
    4K2KXjxGnI2JJOCH
    • Apoie o painel dianteiro próximo à dianteira do Xbox.

    • Com uma pinça, substitua o cabo do botão dianteiro em seu soquete ZIF.

    • Com a ponta plana de uma espátula, empurre a trava do ZIF para a esquerda para fixar o cabo.

    My Xbox stopped working after this thanks

    nathan jackson -

    Mine did as well, its possible it may be the same reason. For me I had to unplug and plug it back in a few times and then clean off the contacts with isopropyl alcohol. Seems simple but if you haven’t already, I would try it.

    Alex Pascone -

  14. Iesh2ypKDM2MNTFi
    Iesh2ypKDM2MNTFi
    AKpcaAwyYcAC5k6H
    xOdLB1rAhB1shyVI
    • A borda inferior do painel dianteiro possui ganchos de plástico que se engatam em ganchos de plástico na borda dianteira da estrutura inferior.

    • Com o painel dianteiro formando um ângulo de 45 graus, proceda com o engate dos seus ganchos de plástico com aqueles na estrutura inferior.

    • Empurre a parte superior do painel dianteiro contra o Xbox, como se estivesse fechando uma caixa de correios. Pressione firmemente, de forma que os clipes que fixam o painel dianteiro na estrutura superior engatem com segurança.

    Thanks, chief - you saved my leisure time tonight

    Jordan Hunt -

  15. LQkgBcyYCwXArnom
    LQkgBcyYCwXArnom
    gWBVBocWb1NkHPXS
    IK1GfZDHgomdP6Am
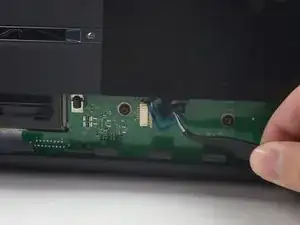
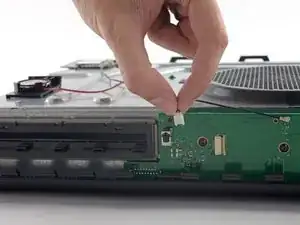
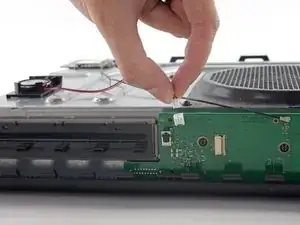
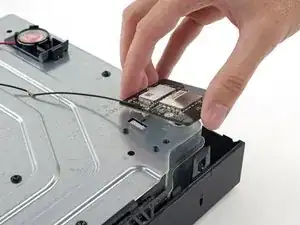
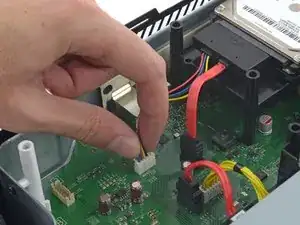
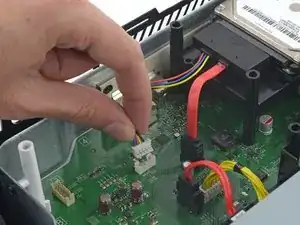
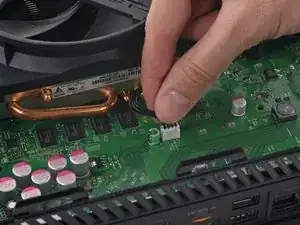
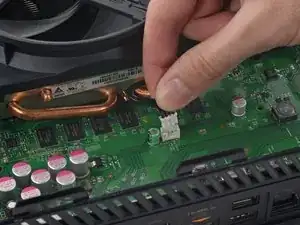
    • Gentilmente, puxe para cima o conector do cabo do alto-falante para desconectá-lo da placa do painel dianteiro.

    • Tenha cuidado para puxar o conector do cabo, e não o conector na placa. Ele é muito frágil e pode ser que você o remova completamente da placa.

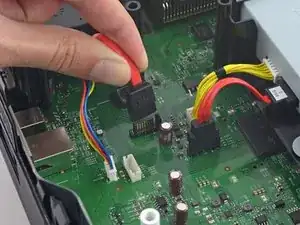
    • Com a ponta plana de uma espátula, desconecte o cabo da antena da placa no painel dianteiro.

    If this connector is broken off, will that prevent the control panel to not work at all and NOT turn on? Is there a fix or work around IF this connector is broken off?

    Michael Eh -

  16. utZcNKWNa2TR5jcM
    utZcNKWNa2TR5jcM
    UKGjtWqMYPZnANKg
    VV1kMmQXDuLBoYUn
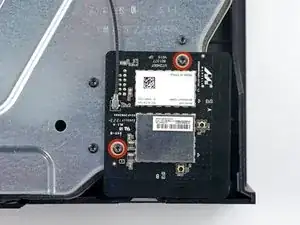
    • Remova os dois parafusos Torx T8 de 9,5 mm da placa de Wi-Fi.

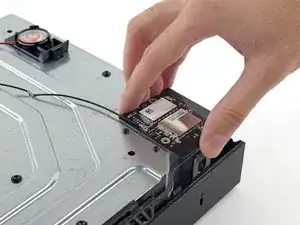
    • Erga a placa de Wi-Fi em linha reta de seu soquete na estrutura metálica superior.

    • Deixando no lugar o cabo da antena da placa de Wi-Fi, mova a placa de Wi-Fi para o lado, para expor o parafuso com a marca "C3" que estava abaixo dela.

    When reassembling- put the outer ones on first to secure the port to the metal. Then putting the wi-fi board into the port will be easy

    Nate Ennis -

    Will a cracked WiFi Board affect network connectivity?

    Kyle Webb -

    The T9 fit but was a tad big, for me the T8 worked fine

    Saul Torres -

    Where can i get a T9

    Wyatt Kyker [STUDENT] -

  17. hdHUGHWFaRvYVGhS
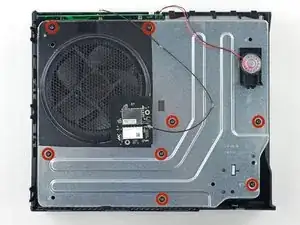
    • Remova os oito parafusos Torx T10 de 65 mm da parte superior da estrutura metálica superior.

    Two of the 8 were stripped even before attempting to remove….ugggh

    Michael Massaro -

  18. VWMbtpnPxeXNBkVr
    VWMbtpnPxeXNBkVr
    dePENJIUnbGQohoU
    • Erga, mas não remova, a estrutura metálica superior.

    • O cabo de interconexão da placa de Wi-Fi conecta a estrutura metálica superior à placa-mãe.

    If I need if Fix-It board

    Ramontoby13 Toby -

  19. rhjLPwOefpXlZN1d
    rhjLPwOefpXlZN1d
    RNCLEQRZGWR2dUfP
    • Desconecte o cabo de interconexão da placa de Wi-Fi da placa-mãe.

    • Remova a estrutura metálica superior.

    This connector may be exceptionally difficult to remove, and it is not strictly necessary for the replacement of the hard drive if you are careful.

    Rowan -

    Gave up on trying to unplug this and took out the 3 torx screw that was mounting the black connector on the other end 😈 way easier

    Justin Tang -

  20. 2bWQsTEPYDH3QytG
    2bWQsTEPYDH3QytG
    nRRFBst3KIYl6jqC
    foCoe4KPsNpjYa4E
    • Desconecte os cabos de energia e de dados do disco rígido SATA da placa-mãe.

    I found that it is not necessary to take out the hard drive in order to remove the front panel module. If you can lift the whole metal enclosure a little to get to the right most torx screw, then you do not need to move the hard drive.

    Taiji Saotome -

    Thanks for letting us know about when the open day is going to be. Will make sure get my work completed by rushmyessay before the day so I can attend it in peace.

    shuaib ahmd -

  21. Wwcs4BNWEjGDZaHT
    • Erga e remova a bandeja do disco rígido do Xbox.

  22. xYnovXjomBHPZO1G
    xYnovXjomBHPZO1G
    GmEDkZityGAY5wIv
    wXVRaIuE6HVDEX3x
    • Desconecte os cabos de energia da unidade óptica e de dados do SATA da placa-mãe.

    I their a way to replace the motherboard pins the piece that connects to the hard drive, part on the motherboard that connects to HD

    Frosted Flakes -

  23. SVVTEqfLpq1BkoSf
    • Remova o conjunto da unidade óptica do Xbox.

  24. HpEUMQdUIugRcoYZ
    HpEUMQdUIugRcoYZ
    2ekBwDpbyTWke5Zv
    • Desconecte o cabo da ventoinha da placa-mãe.

    What happens if you pull the pins out of the white piece in accident?

    Alex Etchison -

    There are some locks on this connector for me. I had to use a straight pin from a cork board to press them in as a gently rocked the connector back and forth to remove this.

    Jared Zier -

  25. 4wFaJUCfM6kISgre
    4wFaJUCfM6kISgre
    FKKPBwBOkW2ewmqi
    • A ventoinha está fixada no dissipador de calor por quatro clipes de plástico robustos. Fazendo alavanca nos dois clipes expostos e removendo-os de sua canaleta no dissipador de calor, você poderá levantar a ventoinha para fora do dissipador de calor.

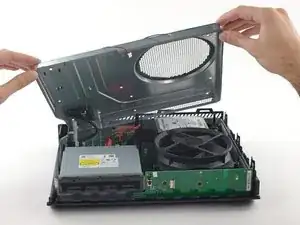
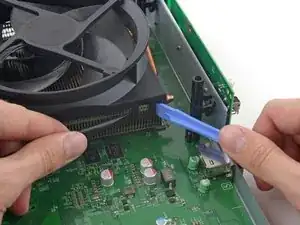
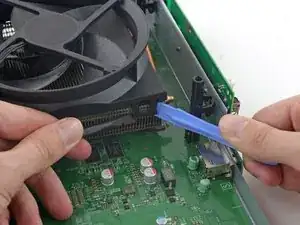
    • Com uma espátula e uma ferramenta de abertura de plástico, faça alavanca gentilmente e uniformemente no clipe direito, removendo-o de sua canaleta no dissipador de calor.

    • Tenha cuidado para não exercer pressão para baixo sobre a placa-mãe, ou para puxar o dissipador de calor para cima e contra a placa-mãe.

  26. M2pA2mJM5HTbWQAI
    M2pA2mJM5HTbWQAI
    aOXwEPrBGrRSH1x4
    IpvQTAGWYWxjgoog
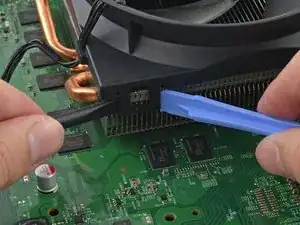
    • Repita o procedimento para o clipe esquerdo. Mais uma vez, usando uma combinação de espátula e ferramenta de abertura de plástico, puxe uniformemente o clipe de plástico para cima e para fora de sua canaleta no dissipador de calor.

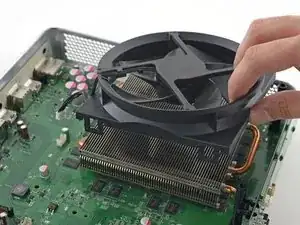
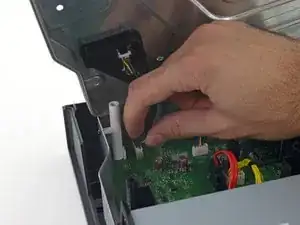
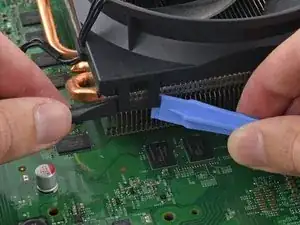
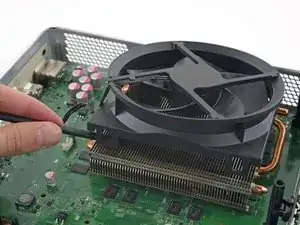
    • Quando houver um vão grande o suficiente entre a ventoinha e o dissipador de calor, introduza a espátula entre os dois e faça alavanca para remover a ventoinha.

  27. bRNRFJHrrl5k5EyP
    bRNRFJHrrl5k5EyP
    B6QxkREi5qwTC4Ao
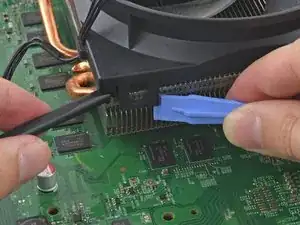
    • Com a espátula introduzida, faça alavanca na ventoinha do dissipador de calor.

    • Remova a ventoinha do dissipador de calor.

Conclusão

Para a remontagem de seu dispositivo, siga essas instruções na ordem inversa.

Andrew Optimus Goldheart

Membro desde: 17/10/09

513641 Reputação

13 comentários

As a device repair tech of a 3rd party store, I have found this be quite easy and profitable for my store to make money. Thanks to these guides, I can now start working on video game consoles.

jonathon saygidia -

My fan is making a weird clicking noise everytime I turn on my Xbox One. Does anyone know how to fix this.

Tammy Privizzino -

I have a quick question so after I remove the fan then what I do

Serenity Turner -

So i dropped my xbox one ans now everytime i try to play a game my xbox will make a sound with the fan to say its loading then it will shut down .. what is it i can ro fix this problem

Chelsea -

I have this same issue. It turns on for a second then powers down. Only thing is fan wants to start spinning after it powers down.

Steven Prichnick -

What happens when one of the plastic clips on the fan breaks. Can the console still run properly or no?

Jayden Horton -

Hi Jayden, the console should still run properly, but the fan won’t sit as secure against the heat sink as it should be. This might not make any difference at all, or the fan might vibrate because it’s not quite as sturdy.

Adam O'Camb -

puedo usar Cualquier ventilador O debe Ser un Ventilador especifico

jorge wellington -

I purchased this new fan for a Xbox One. I received an XBox fan labeled for XBox S Fan - New. The part had one clip broken and was obviously not new from the dirt covering it. Very unsatisfied with this product.

Patrick Eames -

These instructions were perfect. Made an intimidating job easy to follow and complete. I had a working fan back in my Xbox in about an hour. Thanks to the author of this guide and thanks to the guys who made this website for such an incredible resource.

Ryan McGarry -

Anybody have success with a quieter aftermarket fan?

Gurt -

Thanks for the guide. It was pretty straight forward and gave all the advice I needed.

Tim Mitchell -

Mohu použít tento ventilator na z box one s? Děkuji za odpověď.

Pavel Soukal -