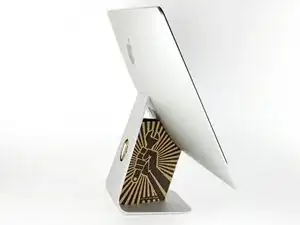
Introdução

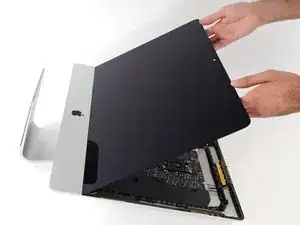
A remoção da tela do iMac do final de 21,5" requer cortar o adesivo com uma ferramenta de abertura especial para o iMac.

  1. SrDNTSYqyhGMRNDC
    • Com a dobradiça podendo se mover livremente, o iMac fica instável, o que torna o trabalho difícil. Os reparos ficam mais rápidos e fáceis com um suporte de reparos para iMac, mas podem ser executados sem ele.

    • Se estiver usando o suporte de reparo de papelão da iFixit, siga estas instruções de montagem para instalá-lo.

    • Antes de começar os trabalhos no seu iMac: Tire o computador da tomada e pressione segurando o botão de liga/desliga por dez segundos para descarregar os condensadores da fonte de alimentação de energia.

    • Tenha muito cuidado para não tocar nos terminais do condensador ou nas juntas de solda expostas na parte traseira da fonte de alimentação. Somente segure a placa pelas bordas.

    The wedge is an extremely tight fit for this model. I was worried that the amount of force needed to use it as shown might damage the stand, so I used it with the long side down instead. It worked fine that way and didn’t need anywhere near as much force to insert.

    roberttrevellyan -

    Here’s a good YouTube vid on upgrading the RAM: Can a Normal Person Upgrade the RAM in the 2017 21.5" iMac?

    DanJ -

    Here are a couple tips from me:

    1) Expose the adhesive to extreme temperatures. I did this by transporting my iMac in my car, screen-down on a piece of cardboard on a cold February morning (in Chicago). When I went to pick up the iMac, the screen practically fell off the chassis. I would have been distraught by this if I hadn’t already planned this replacement. So it was a happy accident.

    2) Remember to expell the residual power from the power supply by pushing the power button while the iMac is unplugged. This does NOT guarantee it’s safe to touch, but when I accidentally brushed the solder and exposed capacitors, I didn’t get shocked.

    jerrid_foiles -

    Instead of using the wedge, I placed the iMac faced up with the top side (web cam) facing me while I ran the pizza roller around. It worked out great!

    Sam Fung -

    “All iMacs also come with a traditional hard drive” mine doesn’t!! it’s HDD bay is completely empty, no SATA cable or anything. I guess I’ll have to upgrade the PCIe SSD instead.

    Chris Hughes -

    There is no replacement glass for this model, it is part of the LCD and impossible to remove or replace- the entire LCD has to be replaced unfortunately if the glass is cracked or damaged. You will have to Google search for a replacement. Also be careful with some of the lock tight tork screws as I broke one of my screw mounts taking one out.

    Phil Tesone -

    I used this service wedge but also found it a very tight fit. The same stabilization can be achieved by using a big rolled up towel.

    Ernst -

    While this is a good instruction guide, I recommend to also look at OWC’s instruction video about drive installation, before starting the exercise. Those install videos are very detailed and useful.

    Ernst -

    Main advice: TAKE YOUR TIME with the pizza roller.

    Make several passes, until you really feel like there's no more sticker in the way. Stay away from the camera though (approx. 1inch / 2.5cm on both sides). This will reduce the work left with the plastic card. Adhesive is really on the edge of the screen so there is absolutely no need to go any further than the recommended 1cm / 3/8inch depth.

    Where are the sensitive parts?

    Facing your iMac, imagine you're looking at a watch. There are antennas on 1, 2 and 4 o'clock. Do not insert any metal piece there (nor anywhere else, btw). Other than that AND the screen cables underneath the camera, not much danger.

    Froggy Manny -

    OWC hard drive instalation video: https://www.youtube.com/watch?v=9GrteBJ9...

    vrino -

    It's a pity iFixit UK use UPS as their shipping agent. I still have not received my upgrade kit. UPS is one of the worst shipping/courier companies operating. They're a complete disaster!!

    Roger Hawkins -

  2. QPZ14vf5mNSObPx1
    QPZ14vf5mNSObPx1
    1KAQXZNy65Y1ferW
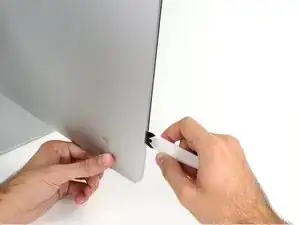
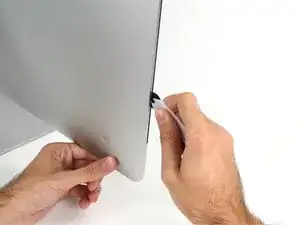
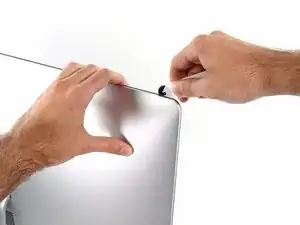
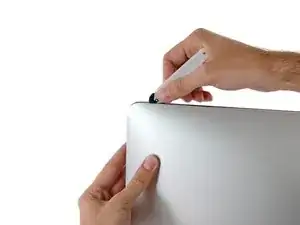
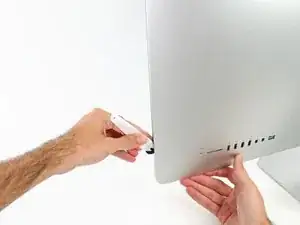
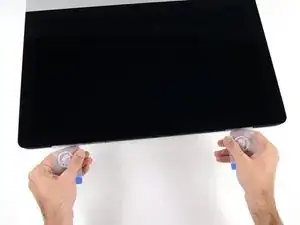
    • Começando pelo lado esquerdo da tela, próximo ao botão de liga/desliga, introduza a ferramenta de abertura para iMac no vão entre o painel de vidro e o invólucro traseiro.

    • O eixo da ferramenta de abertura para iMac evita que você introduza muito para dentro a roda. Se estiver usando uma ferramenta diferente, não introduza mais do que 9,5 mm dentro da tela. Caso contrário, você corre o risco de romper os cabos da antena e causar sérios danos.

    Don’t get too worried about starting exactly where the picture says. The glue is stronger in some parts so just start wherever is easier and then work slowly and patiently around in the direction shown.

    Richard Cook -

    As this guide doesn’t cover replacing the adhesive strips, I found referring to the following was useful (noting that it’s not for the same model of iMac, so the modification they mention wasn’t necessary): iMac Intel 21.5" EMC 2544 Adhesive Strips Replacement

    Alan Digby -

    It is very easy to crack the glass in front of the LCD during this step. I used the guitar pick, maybe it was too thick… crack is just on the frame but anyway it is disappointing :(

    Nikolay -

    This part of the exercise should be done with extreme patience. I took my sweet time with the opening tool, rolling it through the entire panel and enclosure gap over and over again, until I was very sure no parts were sticking together anymore. And when I thought I was I done, I decided to do it over again.

    Ernst -

    You can "warm up" the adhesive before try to cut it with the tool using a hair dryer. Heat the edges for about a minute, keep moving it so you don't cause stress in the glass. Also the above note.. use the tool and then the cards. Do not use a guitar pick or other objects as the thickness will cause you to break the front glass, which is a bonded part of the display (expensive).

    Carl Schultz -

    Merci pour ce conseil

    Nicolas Bry -

  3. SdaoaCo1EmiD4NqV
    SdaoaCo1EmiD4NqV
    eOsvYmvle2iDrZvZ
    LS2Bi6uDXDmSSIOJ
    • Use a ferramenta como um cortador de pizza - empurre-a por toda a extensão do vão e ela cortará o ponto central do adesivo de espuma.

    • Lembre-se de empurrar constantemente o punho atrás da roda cortante. Se você puxar, a roda pode escapar do punho.

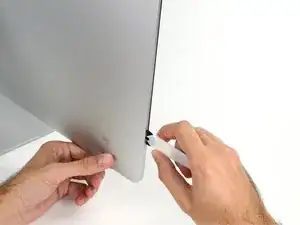
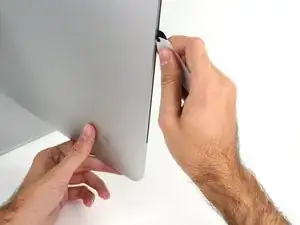
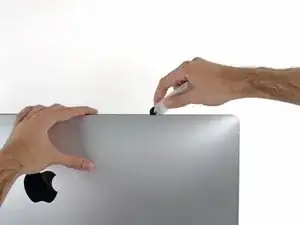
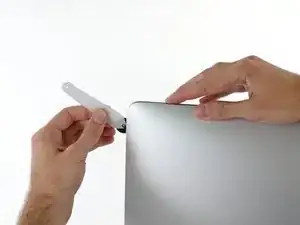
    • Passe a ferramenta por toda a extensão da lateral esquerda da tela.

    Erreur de traduction: "de bas en haut" et non de" haut en bas" sur le côté gauche de l'écran

    Moreau -

    If re-opening a screen that was opened and re-attached using iFixit’s adhesive strips, I would strongly recommend heating it first with an iOpener, heat gun or hair dryer. 20 minutes after attaching with the iFixit adhesive I tried to open it again with the pizza slicer to fix something and cracked the screen on the left-hand side.

    plasticpool -

  4. r1eMkSSjJdpmWr1B
    r1eMkSSjJdpmWr1B
    d6iAMVdqVUdnvYnD
    PsnDnjYNWucTLycx
    • Continue passando a ferramenta para cima, virando no canto esquerdo superior.

    Ne pincez pas l’écran avec l’autre main. Vous exercez une pression inutile sur le verre et empêchez la roulette de couper le joint.

    phfoglia -

  5. sZNVaGR3f2vruyLS
    sZNVaGR3f2vruyLS
    HDO3QbYuc4krqwHX
    • Corte o adesivo da parte esquerda superior da tela.

  6. vSKcLcMFSZoPp6Gp
    vSKcLcMFSZoPp6Gp
    uiuQPD3lViaQODlB
    • Continue na parte superior da tela.

    • Você precisa passar a ferramenta algumas vezes para trás e para a frente onde já cortou adesivo, para garantir que tenha soltado o máximo possível de adesivo.

    In this step can I cut along the display without make any damage to the front camera?

    arisnordico -

    Hi! Actually - there is no need to cut the tape around the camera area - there is no tape to cut at all! And so, the way go is easy - just pass 10 mm to the left and to the right from camera and start cutting!

    P.S. Just did the whole procedure to replace a RAM and to add SSD on PSIe an hour ago! Seems to be different reading the instructions... you know - 2/10 and so on. But it's really not that hard, trust me. I'll give it 5/10.

    P.P.S. By the way there is one trick to pass the difficult steps. Any action which requires pulling smth (motherboard, speaker, power supply unit) from the narrow crack (or should i say - slit?) at the bottom of your Imac is really not so easy.

    And the trick is to first remove a thin metal stripe with some kind of insulation on it which held by 5 small (very small!!) screws at the bottom of your Imac. After you done it - it's easy to pull everything! Pay attention to the fact that one of this 5 screws at the center are more shortly than others.

    dv1977 -

    I did all steps like this manuell but now the Display wont work only some colered strips are to see! Whats happend??

    Can anybody help me ? Maybe the connector cable is broken?

    djfanta -

    Check both connectors, probably one of them not seated well

    pzhivulin -

    You can add a SATA SSD if you already have a PCIe SSD Factory?

    kaserlik -

    If you're changing cracked EMC 2638 display to new assembly, there's two more steps:

    Step 24: Use the tip of a spudger to flip up the metal retaining bracket on the display data cable.

    Carefully pull the display data cable from its socket on the display assembly.

    Step 25: Use the tip of a spudger to unplug bracket of the thermal sensor small cable near display data cable.

    Carefully remove scotch tape covering thermal sensor. Using iSesamo or flat tip of the spudger carefully peel the thermal sensor away.

    pzhivulin -

    omg - forgot to switch the termal sensor from the old display...

    now fan runs like crazy...

    Andrei Balotescu -

    The key thing is to never put any force on the opening tool when working through the tape. Just roll it back and forth with ease.

    Ernst -

  7. eDPbRqQfKjS4oUnZ
    eDPbRqQfKjS4oUnZ
    qm5g46NqRXJjxaVm
    krs4wdofACqDD6Ju
    • Passe a ferramenta pelo canto superior direito da tela.

  8. 3c3b2XusJDWQekW6
    3c3b2XusJDWQekW6
    NGOHPeVZ52OQCRWQ
    • Role a ferramenta para baixo, por toda a extensão da lateral direita da tela.

  9. SAgRGwk3lGGO3ZCH
    SAgRGwk3lGGO3ZCH
    1DLPSpBELT2mxJok
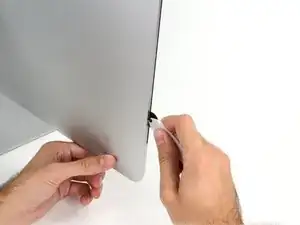
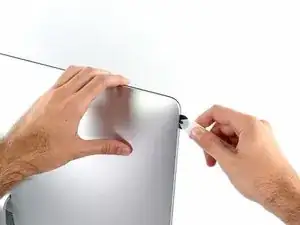
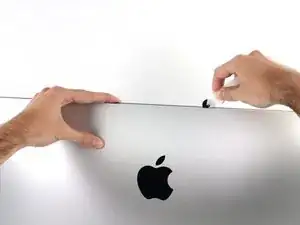
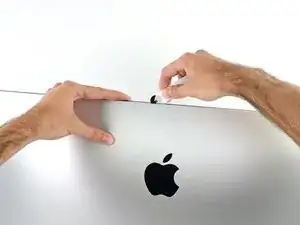
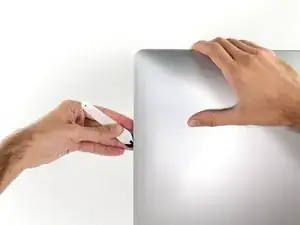
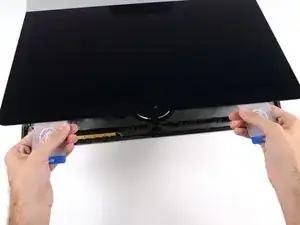
    • Finalize empurrando a ferramenta de abertura para a parte inferior na lateral direita da tela.

    • A esta altura, você pode passar a ferramenta por toda a tela, voltando no sentido inverso, para garantir que tenha cortado o máximo possível de adesivo.

    Yes, do it many times to loosen the adhesive.

    Noah Ralston -

    Would be good data to show the 3 areas (wifi antennas where the "tape" is larger and covers them. The rest of the "tape" is 1.4" and easy. Also after removing the display, be sure to remove the old "tape" from both the display and the rubber parts of the case. Use the spudger to start an end and it should pull off easily. Careful on the baackside of the display as you can scratch off the black paint/covering.

    Carl Schultz -

  10. HVK2HNgts1D53wOs
    HVK2HNgts1D53wOs
    QrZMXcap4the5yXk
    hZXQgXJhIoKTxBwH
    • Ainda que a ferramenta de abertura já tenha cortado a maior parte do adesivo, a tela ainda estará levemente colada na estrutura. Será necessário usar um cartão de plástico para soltar o resto desse adesivo.

    • Coloque o iMac numa mesa com a tela virada para cima.

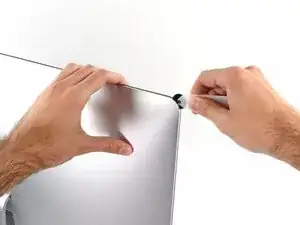
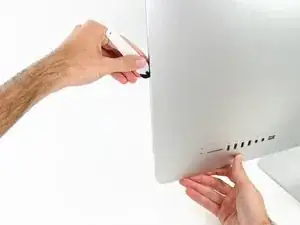
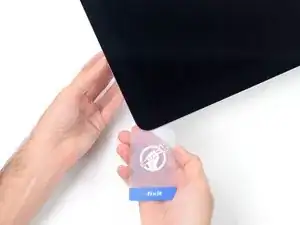
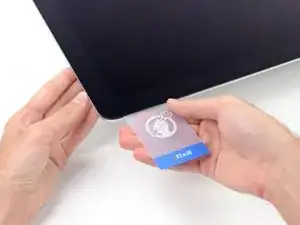
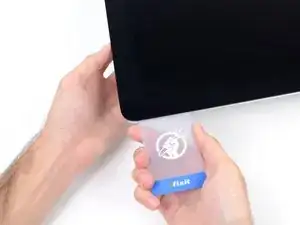
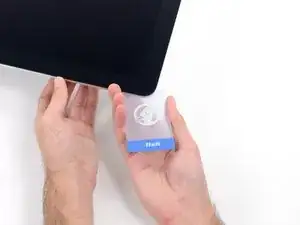
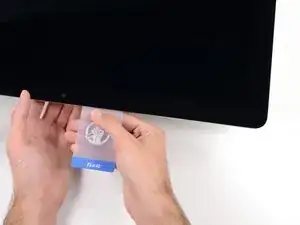
    • Começando pelo canto direito superior do iMac, force um cartão de plástico por entre a tela e a moldura.

    • Tenha cuidado para não introduzir o cartão de plástico mais do que 9,5 mm, caso contrário você danificará componentes internos.

    this step is extremely important NOT to stick in the cards too far….. doing so, you risk a 600 euro replacement as I experienced………

    Edgar Broekema -

    I drew a 3/8” line on my cards with a marker first.

    Max Romano -

    I’m reading this on the EU store, please change all measurements to cm/mm.

    Morgana Devina -

    @ifixit The next batch of cards you create should have a line printed on the card 3/8” in from the edges. Would make a nice reference.

    Richard Giratd -

    Here’s where OWC provides glass removal suction cups, which is a better solution than plastic cards.

    The suction cups help to easily lift the glass panel, without risking the damaging of any internal wiring that the plastic cards could cause.

    Ernst -

    Better to remove stand wedge at this point? Can’t see from pics

    derekrobinson -

  11. wUjiMGtv2IpkNB5p
    wUjiMGtv2IpkNB5p
    LncJQeQQOAvg3CMA
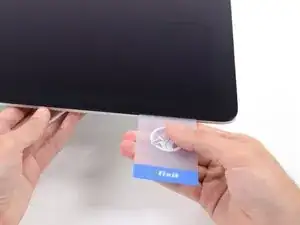
    • Com um movimento leve, vire o cartão lateralmente, para formar um espaço entre a tela e a moldura.

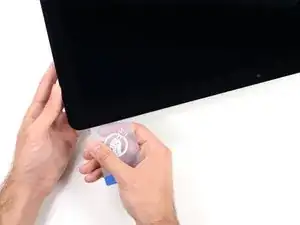
    • Mova lentamente e tenha cuidado para não tensionar demais o vidro da tela, você só precisa fazer um vão de aproximadamente 6,3 mm.

    This part must be done very carefully or you can damage the flat cable from display, despite it was under a iron cover.

    Cassio Machado -

  12. qmVJHqIxctiuCbE5
    qmVJHqIxctiuCbE5
    6PF3COgq44osRMSX
    1nZLqZWsCa1xRTOR
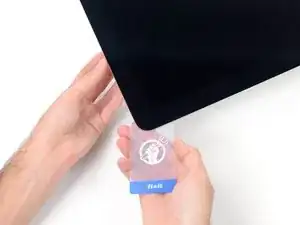
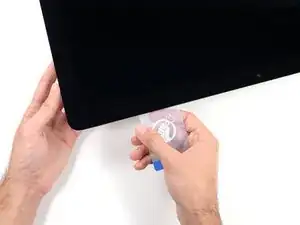
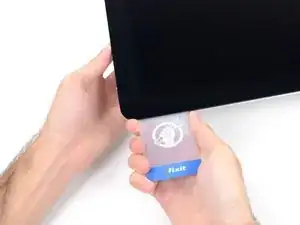
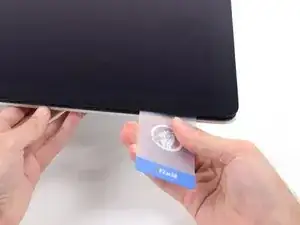
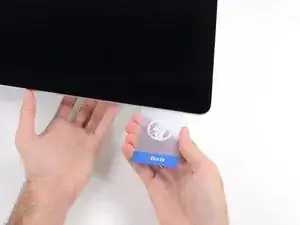
    • Passe o cartão em direção ao centro da tela, para cortar todo adesivo restante na extensão do canto direito superior do iMac.

    • Pare de cortar antes da câmera iSight neste passo, caso contrário você pode danificá-la.

    You don't need to do it like this, simply open the iMac bendidng the LCD completely and use the pizza cutter to remove the adhesive.

    Felix -

    Using glass removal suction cups will avoid running this risk of damaging the camera (or any wiring).

    Ernst -

  13. pwG3JFqqfxxQXLID
    pwG3JFqqfxxQXLID
    wKv4nNrdklsj61AD
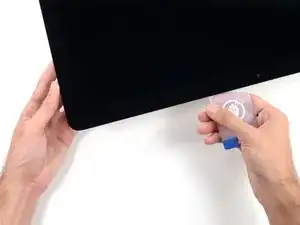
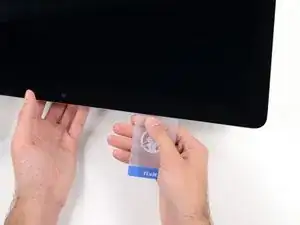
    • Force o cartão novamente no canto direito superior e deixe-o ali para evitar que o adesivo cole novamente.

  14. B1l4C4H1WK3CwfsH
    B1l4C4H1WK3CwfsH
    5gnKwfWW1K2gnkAY
    dU3V1S5PiPpZoiRX
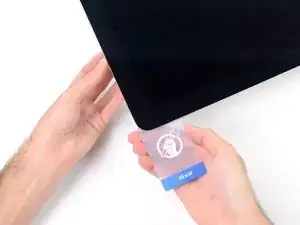
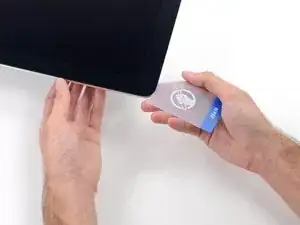
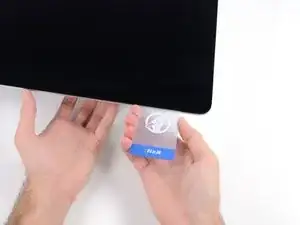
    • Introduza um segundo cartão de plástico no vão, por entre a tela e a moldura, perto do canto esquerdo superior do iMac.

  15. 1eeYyLOXUgoVdMcU
    1eeYyLOXUgoVdMcU
    XNwnBG1I3otkGVaj
    • Com um movimento leve, vire o cartão para cima, aumentando ligeiramente o espaço entre a tela e a moldura.

    • Como na outra lateral, vire lentamente para permitir que o adesivo se rompa e tenha cuidado para não tensionar demais o vidro da tela.

  16. 1AtMSKY35dfSoyov
    1AtMSKY35dfSoyov
    eYI56QJhkhMLdtyx
    oVDneBvJQXNCvQpC
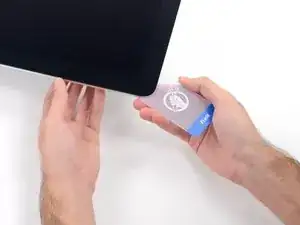
    • Passe o cartão de plástico na direção do centro, parando novamente um pouco antes da câmera iSight.

  17. KlhOFUANthUfPZrW
    KlhOFUANthUfPZrW
    KGDDBwLWXguRGlso
    • Force o cartão de volta no canto esquerdo superior.

  18. xXVPepFcNBfFlYLm
    xXVPepFcNBfFlYLm
    mJWDXXcMCnL6OwqX
    lGcKi3n1DVFdANJw
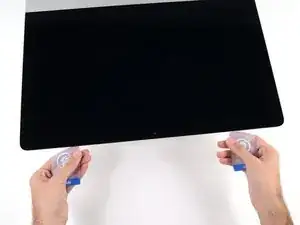
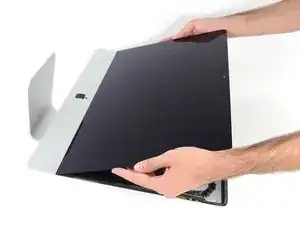
    • Com ambos os cartões de plástico introduzidos próximo aos cantos, como mostra a foto, vire cuidadosamente os cartões lateralmente para aumentar o vão entre a tela e a estrutura.

    • Se em algumas partes o adesivo ainda estiver colando e não puder ser separado, pare de fazer movimentos de vai-e-vem e use um dos cartões para cortar o adesivo restante.

    • Comece a erguer a parte superior da tela para fora da moldura.

    • Erga a tela somente umas poucas polegadas - os cabos de dados e de alimentação da tela ainda estão ligados à placa lógica.

  19. coWtr2k1cFvjti6u
    coWtr2k1cFvjti6u
    bRPraRvEkFJQYPsa
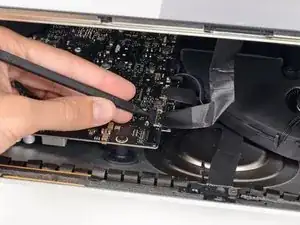
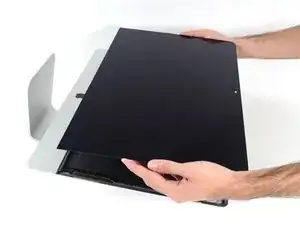
    • Enquanto segura a tela com uma mão, use a outra mão para desconectar o cabo de alimentação da tela.

    • Erga a tela o suficiente para facilitar o acesso ao conector, mas não tanto que os cabos fiquem estendidos e as suas conexões sejam danificadas (umas 8").

    Pulling the display power cable by the wires makes me nervous..

    bstaud -

    I had a small flight light ready so I could see. Follow the directions - don’t blindly pull.

    Noah Ralston -

    Head lamp gives you the best hands free view!

    Macrepair SF -

    bstaud - The display power cable has two squeezable levers on each end of the cable’s width.

    Squeeze the left lever with your thumb while you simultaneously squeeze the right lever with your

    index finger, and gently pull the cable straight back and out, and the cable comes out very easily.

    Ted Horodynsky -

    When reassembling, make sure you get a “click” confirmation that both the levers have locked AND the pins have seated on this connector. I was treated to a black screen upon startup, and had to re-cut my newly installed adhesive strips to get back in to firm up this connection. Better would be power up with the bottom adhesive in place, screen resting in place and held on top with blue painter tape to confirm connections, THEN pull off screen-side adhesive tape covers for final re-bonding.

    Robert McKillip -

    Can someone post a link to actually purchase these cables?

    Jay Hernandez -

    E-bay had one for me

    Roger -

  20. LhWm4T3JEHaeoZ2T
    LhWm4T3JEHaeoZ2T
    ECPoWhXZOD5MLhud
    IygsgjxXB6iFOWJW
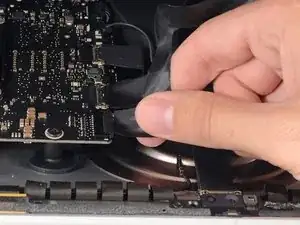
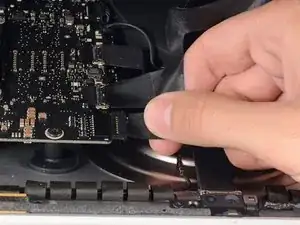
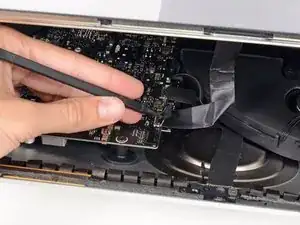
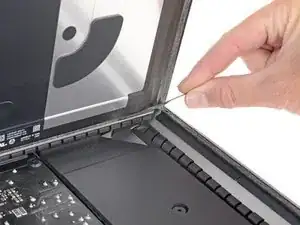
    • Com a ponta pontiaguda de uma espátula, vire para cima o suporte metálico com trava do cabo de dados da tela.

    • Cuidadosamente, puxe o cabo de dados da tela de seu soquete na placa lógica.

    • Certifique-se de puxar em linha reta o conector do cabo de dados da tela para fora do soquete.

    Sure could use a magnified picture of this connector and socket, especially the first time you go in. And it is the most critical step of the whole operation — bung it up and we’re toast.

    bstaud -

    Hi bstaud! If you hover over the image you can click on the magnifying glass and get a large image of any guide photo. Hope that helps!

    Sam Goldheart -

    To clarify, the connector pulls out in the plane of the logic card, not perpendicular.

    David Thompson -

    el flex de repuesto es el 923-0281 ?? muchas gracias

    AstroDe_NaCl -

  21. ZTsCHu1PYMxnNnAh
    ZTsCHu1PYMxnNnAh
    gXnKWlBSo3bKuaYE
    • Erga a tela até ela quase alcançar uma posição vertical.

    • A esta altura, ainda há uma tira de adesivo na extensão da parte inferior da tela, que segurará a tela à moldura, fazendo as vezes de uma dobradiça. Você pode soltar este adesivo erguendo e baixando a tela por algumas vezes.

    Where can I find a replacement display for my iMac?

    Braydon Boyce -

    iFixit has listings for replacements. Go to the Parts section

    jerrid_foiles -

  22. TIige1vsos1ZnDdf
    TIige1vsos1ZnDdf
    oEAncm6HFbxC4YjI
    vkY1aYLiuPjDtHgT
    • Tenha muito cuidado para não tocar nos terminais do condensador ou nas juntas de solda expostas na parte traseira da fonte de alimentação (no quadrado vermelho).

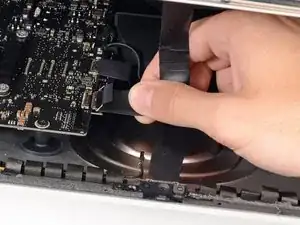
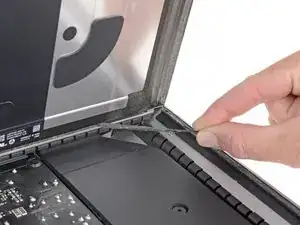
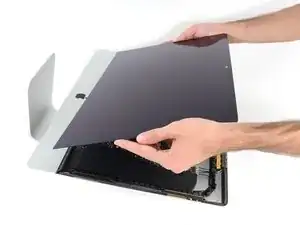
    • Agarre a pequena tira na extremidade de uma das fitas adesivas da tela na borda inferior e puxe o adesivo na direção da parte superior do iMac para removê-lo.

    • Repita esse passo com a outra faixa adesiva e remova-a.

    • Se uma das tiras adesivas se romper antes de ser removida, use um cartão plástico para cortar o adesivo restante.

    Cutting through this extra adhesive on the bottom took a bit more effort than the step and picture implied (to me). Unlike the other edges, here don't be afraid to really push the card in there to break the seal, there's nothing behind that adhesive that is breakable.

    phil -

    cutting through the adhesive is unnecessary if it's not been opened before (outside of an apple store) there will be a tab at the end of each VHB strip that you can use to simply pull the vhb strips off.

    Rory McKenna -

    YES, exactly the same here. more but more simple.

    Lucio Alves -

    To save a few steps and a bit of time, if you have a helper, they can hold the display at a 90° angle while you unscrew the brackets and remove/replace the hard drive rather than remove the display entirely. Also reduces the likelihood of damaging the display as you remove and handle it.

    marty -

    The proper way to remove the display according to the Macintosh tech manual and videos is as Rory McKenna and Lucio Alves have learned is to pull the tab at the end of each VHB strip until it is off.

    Ben Varela -

    This worked great! look for small left over adhesive on either edge of the bottom of the screen and pull each one towards the center. Screen assembly removes after that with no fuss.

    Miguel Rivas -

    Would Nitrile Gloves help here to avoid getting shocked?

    Thomas Z. -

  23. AuGIfUNivY1BMtep
    AuGIfUNivY1BMtep
    TTXmNVER1RaNAdae
    faxQnwtHCFq2mQfp
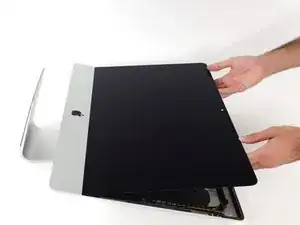
    • Erga a tela da moldura e remova-a do iMac.

    • Pode ser que seja necessário erguê-la lentamente de um lado, para soltar o adesivo restante.

    • Tenha muito cuidado ao manusear a tela, ela é grande, pesada e feita de vidro.

    • Durante a remontagem, vá para o nosso guia de adesivos da tela para instalar o adesivo novo.

Conclusão

Para a remontagem de seu dispositivo, siga essas instruções na ordem inversa.

Sam Goldheart

Membro desde: 19/10/12

476284 Reputação

7 comentários

I just broke mine... when i put inside the master card.... :(((( how to proceed? its a screen not a glass - need to repair whole screen from apple.... i was trying to put ssd drive inside...

Сracks only at the edge in one place and its work but :(((((( how can get in now???

Anushka -

Hi, where can I buy a replacement display for my iMac EMC 2742 (2742 is the same as 2638, I assume?)...Thanks so much!

Cameron -

I put off replacing my hdd with an ssd on my late 2013 iMac because it looked a bit tricky. This guide and an iMac opening tool made the job really strait-forward. Just be gentle and patient and the screen comes off with very little bother. Thanks ifixit!

Giles Tanner -

Used this and the adhesive guide to replace the cracked display on a relative’s 21.5 inch iMac. Thank you, iFixit! These guides and the toolkit I purchased from iFixit years ago have saved me roughly $200.00 vs. having a repair shop do it. I still have a 2008 24inch iMac up and running thanks to this website!

fo4ever -

I used this guide and successfully replaced the stock HDD with a Crucial 1TB SDD MX500 and upgraded the RAM to 16GB, blew out all the internal dust and now it runs beautifully and didn’t have to buy an entirely new iMac.

Jay Hernandez -

Felicitaciones es un muy buen equipo y dará para 10 anos mas. tengo problema porque una parte de la pantalla tiene una franja que no se que paso. si me ayudas te agradezco

Oscar Suarez -

Hay forma de solo cambiar el cristal roto?

EDWING ARIAS -