Introdução

Este guia de reparo foi criado pela equipe da iFixit e não foi aprovado pelo Google. Saiba mais sobre nossos guias de reparo aqui.

Use este guia para substituir a tela do seu Google Pixel 7 Pro.

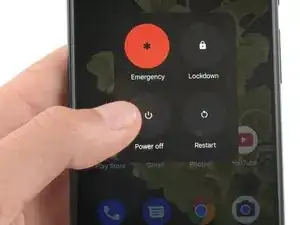
Para sua segurança, descarregue a bateria abaixo de 25% antes de desmontar o telefone. Isso reduz o risco de incêndio se a bateria for acidentalmente danificada durante o reparo. Se sua bateria estiver inchada, tome as devidas precauções.

A sua nova tela deve vir com o leitor de impressão digital já conectado. Caso contrário, será necessário reinstalar o leitor de impressão digital original na nova tela de reposição. Se estiver substituindo o leitor de impressão digital, será necessário recalibrar o leitor para manter sua funcionalidade.

Cuidado: o Pixel 7 Pro contém lasers de classe 1. A desmontagem pode resultar em exposição a emissões invisíveis de laser infravermelho.

A manutenção da resistência à água após o reparo dependerá do quão bem você consegue reaplicar o adesivo, mas o dispositivo perderá a classificação IP (Ingress Protection).

Você precisará de um adesivo de reposição para concluir esse reparo.

  1. pcCOWHCOgiE1OqGw
    pcCOWHCOgiE1OqGw
    jJUWoaZ3KpXfhiPF
    • Deixe a bateria descarregar abaixo de 25% antes de iniciar o reparo. Uma bateria carregada pode pegar fogo se for danificada.

    • Desligue totalmente o telefone e desconecte todos os cabos.

    I am not able to power off. Broken screen does not respond. I have the battery fully discharged but would like to know before beginning my repair if I can plug in the charger to try the screen after replacement to verify all is functioning before reassembly.

    Mary -

    Step 2 is VERY VERY IMPORTANT!!!!!!
    I had to remove the adhesive and take out the plastic from the old screen, which was still on the phone and had to reapply it. It was a nightmare.
    Please DON'T TAKE IT EASY

    Kevin Döring -

    I thought i was careful enough, but got between the display and its frame.

    So, the display is broken now..!!

    The main problem was the battery, which became thicker and caused a big space on the right hand side of the phone.

    Now i have to replace the (expensive) display.

    You really have to be very careful !!

    Benjamin Janzen -

    ..oh, by the way. I just got my new Display. I cannot understand why they do not put the selfadhesive screen sticker within.

    I did not need another repair kit, so i only ordered the part. And now i am wondering why they will not put the sticker within, i mean at that price.

    Benjamin Janzen -

  2. r4cF1OLmMUoCTLb3
    r4cF1OLmMUoCTLb3
    rWVVVxdKliEb2ajr
    GupbaQq5eGmqFscR
    • A tela do Google Pixel 7 Pro é fixada por clipes de plástico e adesivo. Observe o seguinte:

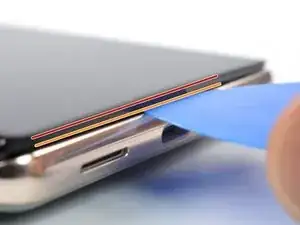
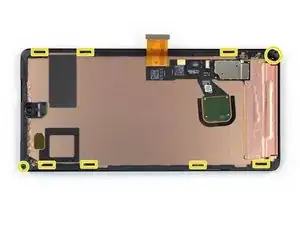
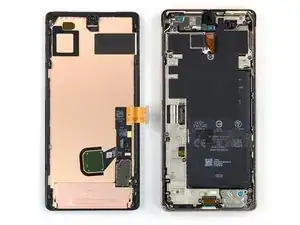
    • Emenda da tela: esta emenda separa a tela do resto do fone. Não separe nesta emenda.

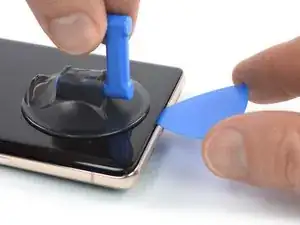
    • Emenda da moldura: aqui é o ponto de encontro entre a moldura de plástico projetado para proteção da tela e a moldura. Ela está fixada por clipes de plástico. É neste ponto que você precisa separar.

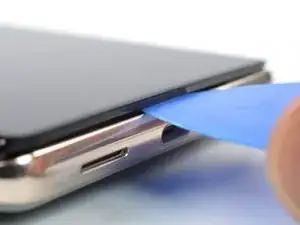
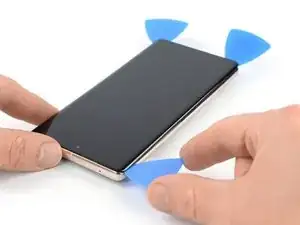
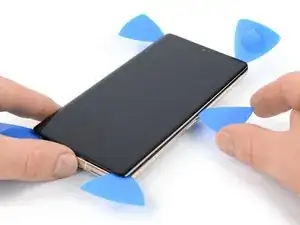
    • Durante o procedimento de remoção, certifique-se de inserir as palhetas de abertura na posição correta para evitar separar a tela de sua estrutura de segurança.

    • Introduza a palheta somente até ~3,5 mm durante o procedimento de remoção para não danificar os componentes internos e não interferir nos clipes de plástico.

    • Há vários clipes de plástico ao redor de toda a tela. Se a palheta de abertura ficar bloqueada durante o procedimento de remoção da tela, é porque a palheta foi inserida muito fundo sob a tela.

    About the paragraph:

    During the removal procedure, make sure to insert your opening picks in the right position to avoid separating the screen from its safety frame.


    It was not clear to me what the safety frame was until I opened the phone; I was careful but while opening the phone I slid a pick between the screen and the frame, and they became separated in one corner, I wonder if this resulted to my screen being damaged after the repair.

    An image that shows what the security frame is would be helpful.

    Eduardo CGZ -

    It is VERY difficult to get an angle into the frame and under the plastic bezel. Since this repair is for a screen, you don't have to worry about damaging it further because you will. I've done dozens of these repairs and have gotten ONE removed without further damage. Just an FYI. I also use 91% alcohol around the edges off the frame as well as heat (I have a hot plate set at 80*c that I lay it on after adding alcohol around the edges, place on hot plate for about 10 minutes, add more alcohol around the edges and then place on hot plate for another 5 minutes).

    Gregg Stanley -

    Thank you so much for the info about the degrees, amount of time, and when to apply alcohol! I really needed this info!!! Hallelujah!!

    Rachel Kelley -

    So what do we do if we DO separate the frame? Is there a way back from this?

    Sean Frisbey -

    Note: MIC DAMAGE - it is very easy to damage the mic when removing the screen. After I followed this tutorial, which is great BTW, and finished the screen replacement, I discovered my mic only works for phone calls. Here is a great post about it: After screem replacement microphone only works for calls

    Samantha H -

  3. AYwHUCCnKa1PMPBk
    AYwHUCCnKa1PMPBk
    yNNd3VhQocdUMaOI
    SCh6OtwmLUCIn5j1
    • As próximas três etapas demonstram o Anti-Clamp, uma ferramenta que projetamos para facilitar o procedimento de abertura. Se não estiver usando o Anti-Clamp, pule três etapas para um método alternativo.

    • Para obter instruções completas sobre como usar o Anti-Clamp, consulte este guia.

    • Se a sua tela estiver rachada, cubra-a com uma camada de fita adesiva transparente para que a ventosa de sucção possa aderir.

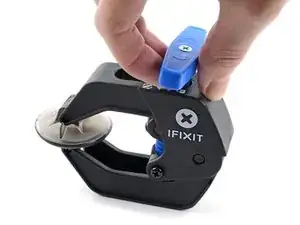
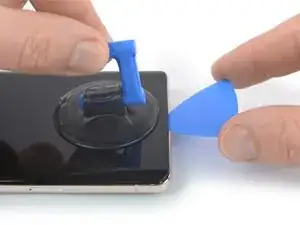
    • Puxe a pega azul para trás para destravar os braços do Anti-Clamp.

    • Deslize os braços pela borda esquerda ou direita do iPhone.

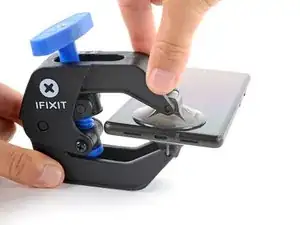
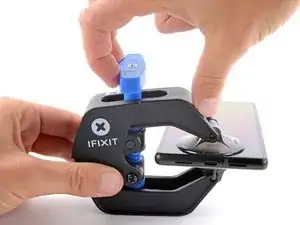
    • Posicione as ventosas próximo à borda inferior do fone - uma pela frente e a outra pela traseira.

    • Aperte as ventosas uma contra a outra para aplicar sucção.

    • Se você achar que a superfície do fone é muito escorregadia para o Anti-Clamp se prender, você pode usar fita para deixar a superfície mais aderente.

    The pixel 7 pro kit does not come with the clamp and may have to be purchased separately

    juji juman -

    was für n müll tolle anleitung wenn im reparaturset nicht alles enthalten ist und man jeden mist extra kaufen muss

    FireCube -

  4. s4bXrPEIrDSclUY1
    s4bXrPEIrDSclUY1
    xOmcoIQRPcMiuOrf
    trhAAYQPS13QxU3X
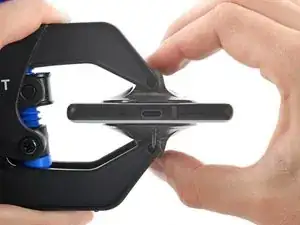
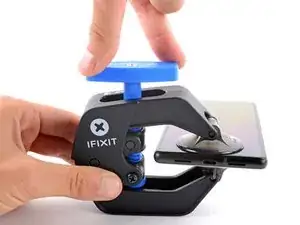
    • Puxe a pega azul para a frente para travar os braços.

    • Gire a pega 360 graus no sentido horário ou até que as ventosas comecem a se esticar.

    • Certifique-se de que as ventosas permaneçam alinhadas uma com a outra. Se elas começarem a ficar desalinhadas, solte um pouco as ventosas e realinhe os braços.

  5. qnrEDsCQlNx3INRF
    qnrEDsCQlNx3INRF
    YdcsV4CGCCD2YxkZ
    HuaYDv3YNjHEvN5X
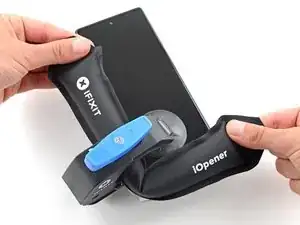
    • Aqueça uma bolsa térmica iOpener e passe-a pelos braços do Anti-Clamp.

    • Você também pode usar um secador de cabelo ou uma pistola de ar quente - mas calor extremo pode danificar o visor e/ou a bateria interna, portanto, proceda com cuidado.

    • Dobre a bolsa térmica iOpener de modo que ela fique sobre a borda inferior do fone.

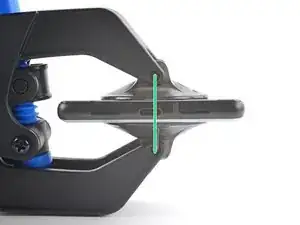
    • Aguarde um minuto para que o adesivo tenha a chance de se soltar e apresentar um vão para a abertura.

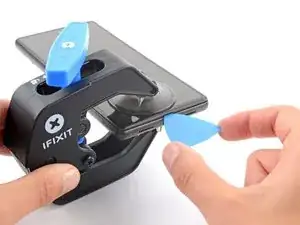
    • Insira uma palheta de abertura sob a moldura da tela quando o Anti-Clamp formar um vão grande o suficiente.

    • Se o Anti-Clamp não formar espaço suficiente, aplique mais calor na área e gire a pega meia volta no sentido horário.

    • Não gire a pega mais do que meia volta de cada vez e espere um minuto entre cada volta. Deixe que o Anti-Clamp e o tempo façam o trabalho por você.

    • Pule as próximas três etapas.

  6. kYIPqvhXCJ1NBLIi
    • Aplique a bolsa térmica iOpener aquecida na tela para amolecer o adesivo por baixo. Aplique a bolsa térmica iOpener por ao menos 3 minutos.

    • Um secador de cabelo, uma pistola de ar quente ou uma chapa quente também podem ser usados, mas tenha cuidado para não sobreaquecer o dispositivo. A borda deve estar ligeiramente quente demais para se tocar.

    Don't forget to remove your screen protector if you haven't already.

    Nathan Yang -

  7. PeNGZEHQUUUXVT1r
    PeNGZEHQUUUXVT1r
    L4JtimoXTuDctFTG
    JIGomFFqcX2UFdaU
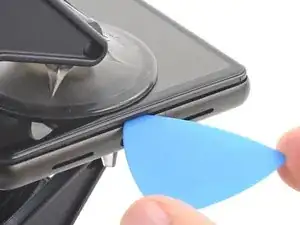
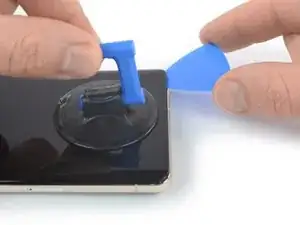
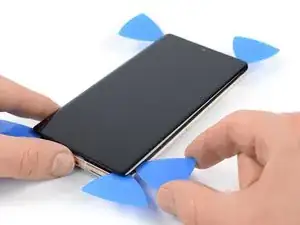
    • Quando você sentir que a tela está quente para se tocar, aplique uma ventosa de sucção na borda inferior da tela.

    • Se a sua tela estiver severamente rachada, cobri-la com uma camada de fita de embalagem transparente poderá ajudar a ventosa de sucção a aderir. Como alternativa, uma fita muito resistente pode ser usada em vez da ventosa de sucção. Se tudo o mais falhar, você pode colar a ventosa de sucção na tela quebrada com supercola.

    • Levante a tela incluindo a sua moldura de segurança com a ventosa de sucção para formar um pequeno vão entre a tela e o conjunto do fone.

    • Dependendo da idade de seu fone, isso pode ser difícil. Se você estiver tendo dificuldade, aplique mais calor na borda inferior e tente novamente.

    • Insira uma palheta de abertura no vão.

    The crack on my screen is along the bottom, on a diagonal. I cannot get the suction cup to lift off the edge. I've tried more heat using a hair dryer, using tape, but nothing seems to work! The phone is only a few months old, could that be the issue? I'm really frustrated after trying multiple times throughout the day today.

    AMB -

    I’m having the same issue unfortunately. I’ve superglued the suction cup and have it under weight. Going to wait 24 hours to see if it helps. Without a proper seal, there’s no way it’s going to lift. I made sure to leave about a half inch gap from the bottom of the phone to try and use the warming pad one more time

    Claudio Sandoval -

    There are white line after one month only!!!

    There are warranty or anything else

    Abdelrhman omar -

    Killed my screen with white strips horizontally simply by minimal bending. No cracks etc. Pity.

    Andrey Los -

  8. WtsW1wWeNrRMUTmr
    WtsW1wWeNrRMUTmr
    IGkvmFQmLJALAeSW
    • Para evitar danos ao seu fone, não introduza a sua palheta mais do que aprox. 2,5 mm, caso contrário você separa o adesivo da tela. Observe as seguintes áreas:

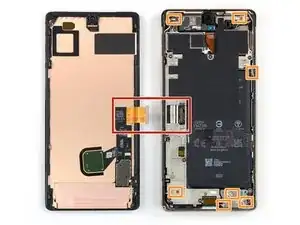
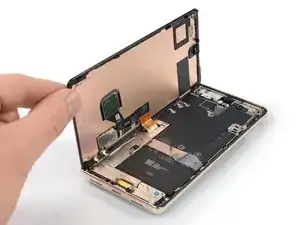
    • O cabo da ela encontra-se um pouco abaixo de meia altura da borda esquerda do fone. Tenha muito cuidado aqui para evitar desgastar o cabo.

    • Há vários contatos de mola em todo perímetro do fone. Tenha muito cuidado nessas áreas para evitar empenar os contatos.

    I noticed some bending in the contact, particularly in the upper half right side. I believe I managed to straighten it out, but now it feels a bit loose. Despite this, I went ahead and fixed the screen over it, and everything seems to be functioning properly. However, I'm somewhat concerned about the implications of this. Should I be concerned about anything?

    FloatBird -

    Same here, the upper half right side. while in the prosses of straightening it out i managed to break it! so now i want to know if my screen will work before i continue and put in, i'm afraid i'll just waste my new screen?

    Cusman Cumar -

    What happen if one spring contact broke ? Like the top right one ?

    Maxime Allard -

    idk, but i broke mine....

    John Hoarau -

  9. omlR6Jkq43Lt3Vp4
    omlR6Jkq43Lt3Vp4
    eaXnOrF2qrKe5EPi
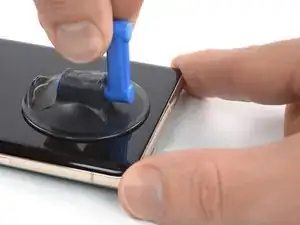
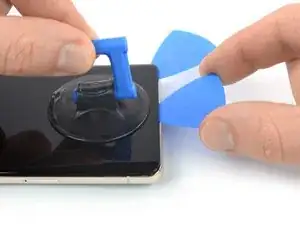
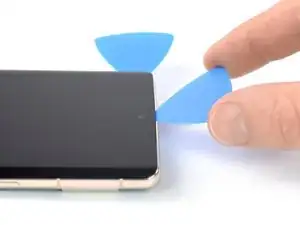
    • Deslize com a palheta de abertura para o cantor direito inferior da tela para cortar o seu adesivo.

    • Deixe a palheta de abertura no local para evitar que o adesivo volte a selar.

    is there any top speaker grill/mesh on Pixel 7 pro?

    Mostafa Kamel -

  10. 4NQTIvBDbIAyxkFV
    4NQTIvBDbIAyxkFV
    yR5ymuvShRAeDLVc
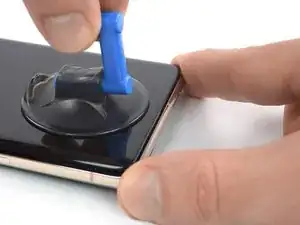
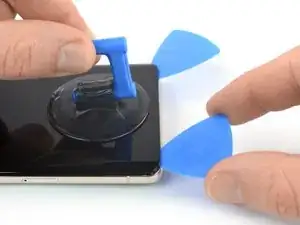
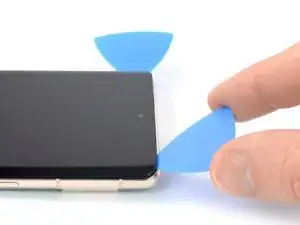
    • Insira uma segunda palheta na borda inferior e deslize-a para o cantor inferior esquerdo da tela para cortar o adesivo.

    • Deixe a palheta de abertura no local para evitar que o adesivo volte a selar.

    • Há um clipe plástico no canto inferior esquerdo que irá bloquear a sua palheta de abertura. Use somente a ponta da palheta de abertura (~1 mm) para abrir caminho ao redor dele.

  11. tArTDTqN2LK6GhId
    tArTDTqN2LK6GhId
    5vMVYYuPuERQHXqy
    JACYuENUqUA5bvoW
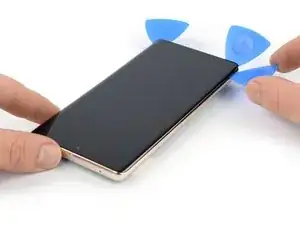
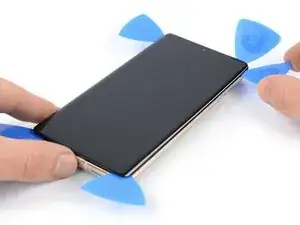
    • Insira uma terceira palheta de abertura abaixo do canto inferior esquerdo da tela.

    • Deslize a palheta de abertura ao longo da borda esquerda da tela para cortar o adesivo e liberar os clipes de plástico.

    • Deixe a palheta de abertura no canto superior esquerdo para evitar que o adesivo volte a selar.

  12. UO6jX5pnbY321YRC
    UO6jX5pnbY321YRC
    5PtIvBbaZ6bIQCI4
    UoguGE13LKwywumV
    • Se o adesivo ficar difícil de cortar, é provável que ele tenha esfriado. Use a sua bolsa térmica iOpener ou uma pistola de ar quente por 1 a 2 minutos para reaquecê-la.

    • Ao passar perto da câmera frontal, insira apenas a ponta da palheta de abertura (~2,5 mm) para evitar danificar ou manchar a câmera.

    • Insira uma quarta palheta de abertura no canto superior esquerdo da tela.

    • Deslize a palheta de abertura ao longo da borda superior do telefone para cortar o adesivo.

    • Deixe a palheta de abertura no canto superior direito para evitar que o adesivo volte a selar.

  13. l5pYkUOOVLpkPl32
    l5pYkUOOVLpkPl32
    VIiGmqFDhmZJ4FWT
    mBm34rSKijkgG25V
    • Insira uma quinta palheta de abertura e deslize-a ao longo da borda direita do telefone para cortar o adesivo restante e liberar os clipes plásticos do lado direito.

    • Não tente ainda remover completamente a tela, pois ela ainda está conectada ao conjunto do telefone por um cabo conector flex.

  14. cyGRQp6UwNmhnB6T
    cyGRQp6UwNmhnB6T
    vCf5HqyX2FKfIAtt
    EbGcFSX5cdP3PrlN
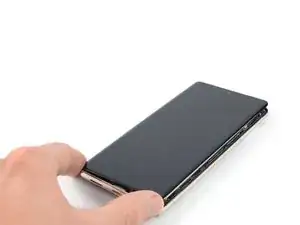
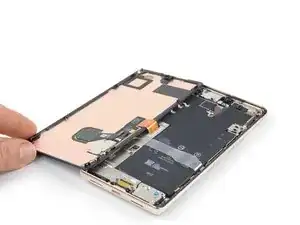
    • Levante a borda direita da tela em direção ao lado esquerdo do dispositivo, como se estivesse abrindo um livro.

    • Não gire a tela no eixo vertical nem a afaste muito da estrutura para evitar esticar ou danificar o cabo conector flex.

    • Coloque a tela com a face para baixo em posição paralela à estrutura.

  15. EqZdPNUuC5LFAgRG
    EqZdPNUuC5LFAgRG
    nIvkgQ5cQZSCZTSV
    • O suporte do cabo da tela está bem preso e requer alguma força para ser liberado.

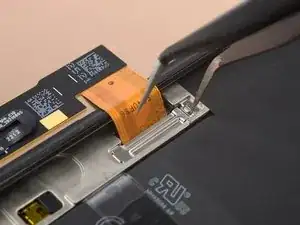
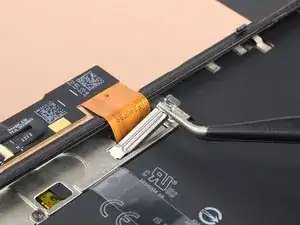
    • Insira um braço de uma pinça na abertura da extremidade superior do suporte do cabo da tela.

    • Empurre o suporte para dentro e puxe para cima para liberá-lo.

    This picture is a bit misleading and I ended up bending my bracket as a result. The picture shows the tweezers inserted in the bend of the bracket. If you insert it where the END of the bracket is, you'll have a much more natural way to remove it without much force! (this is just a little to the right of where it shows in the pictures...

    Edwin R -

    Arrows showing how to move the bracket would be helpful. "Push the bracket inwards" is ambiguous.

    Raphael L -

  16. ZT2CSWdPIEV36jbJ
    ZT2CSWdPIEV36jbJ
    upn1sPjlWOBlBlMw
    G5TJqWF6l1rpJXZ5
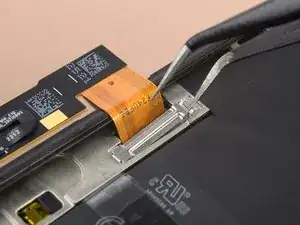
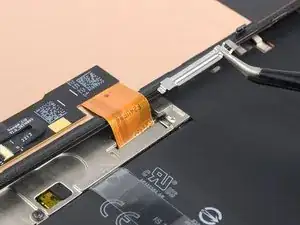
    • Com uma pinça, remova o suporte do cabo da tela, puxando-o por debaixo da estrutura intermediária, na direção da câmera.

  17. hkaumpj4K3uXMnUD
    hkaumpj4K3uXMnUD
    1uXl52GPnG6yFc5W
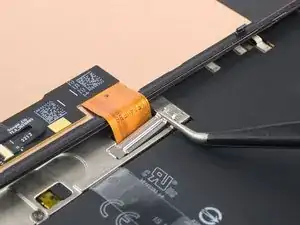
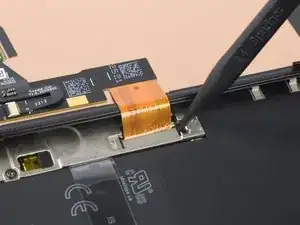
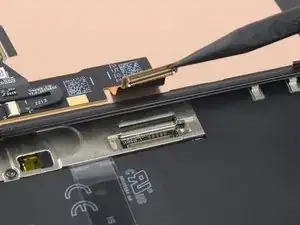
    • Com uma espátula, desconecte o cabo conector flex da tela, levantando em linha reta o conector do soquete.

    • Para reconectar conectores press fit como este, alinhe cuidadosamente e pressione um lado até que ele se encaixe e, em seguida, repita no outro lado. Não pressione no centro do conector. Se o conector estiver desalinhado, os pinos podem ficar tortos, causando danos permanentes.

  18. YKsBagWeomVU2hmX
    YKsBagWeomVU2hmX
    hJwAL1WqKkrHjjwk
    • Remova a tela.

    • Durante a remontagem:

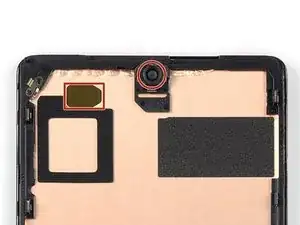
    • Se você trocou a sua tela, verifique o furo da câmera frontal e o entalhe do sensor de sua tela de reposição e remova as películas de proteção restantes.

    • Lembre-se de reinstalar o suporte do cabo do visor.

    • Esta é uma hora boa para testar o seu fone antes de fechá-lo. Conecte temporariamente a sua tela, ligue o seu fone e certifique-se que ele está funcionando como esperado. Antes de continuar com a remontagem, desligue o seu fone e desconecte a tela.

    • Vá para este guia se estiver usando adesivos de corte personalizado para o seu dispositivo.

    • Vá para este guia caso esteja usando uma cartela de adesivos pré-cortados.

    • Se estiver instalando uma tela nova, vá para este guia para calibrar o sensor de impressão digital.

    I just realized none of the screen sellers I found include the finger print flex cable. I am wondering why? If I want take the fingerprint cable out of the original one, is it difficult to do?

    Kellen Wong -

    Why are there no instructions for the reassmbly?

    Alejandro -

    Two simple reasons: one is that you should be able to reverse the steps for reassembly and the second is that snapping one bracket in, putting down the retaining clip and gluing/taping your phone back together should be easy to do once you've gotten everything apart.

    And they did include instructions about calibrating the new screen.

    Jeremy Skrenes -

    Jeremy Skrenes it's definitely not as simple as reversing the steps. There's no mention in here of the contact pins that may be pointing upwards (and shouldn't be), no direction on where adhesive covers are located and need to be removed (especially the black cover over the selfie lens), no mention of if/how long to press the screen on...and the videos on YouTube take varying approaches to several of the steps. Bottom line: if Google is going to offer a repair program through iFixIt, detailed instructions and a video should be part of that program.

    John Cornwell -

    it dose list a lot of what you mentioned in the tutorial for putting on custom adhesive

    Daniel Huebner -

    Don't forget to transplant your old fingerprint reader into the new screen.

    Eduardo CGZ -

    this is the dumbest part of the screen replacement since it comes with one

    Phil Klassen -

    Worked perfectly. Instructions are pretty vague though, would be good to have a video.

    Sarah Oliver -

    I 100% agree!

    Valentyna Kelley -

    Don't forget to transplant your old fingerprint reader into the new screen.

    so this is why my fingerprint reader doesn't work???

    this instructions are absolutely garbage...

    (but thanks for the tip, wish I would have noticed this first)

    kelsey wynns -

    How do you transpant your old fingerprint reader into the new screen?

    Christian Matzen -

    My display is completely dead after restart? I cannot even restart it as I don't see anything. Does anyone has a hint how to rescue the repair?

    Christian Matzen -

    Same here. Please help!

    George -

    same issue after replacing the screen. The phone vibrates but the new screen is completely dead.

    jack nimble -

    Got the same problem here

    Patrick Trump -

    Same issue. I wasn't able to power off the phone when I started the repair, but the battery was dead with the red dead battery. When I reconnected the new display cable, the screen was perfect and showed the red dead battery. I then closed the display, charged the phone and attempted to recalibrate the fingerprint. I don't get any screen display, but the phone is turning on and I can hear the screenshot tone from before. Any help?

    C * -

    Were you able to find a solution to this?

    Jason Schunk -

    Hi, were you able to resolve this or do you have any information about it? Thanks, we look forward to your reply.

    CrisprCas9 -

    Add please to the last step or as a last step:

    Place back the display cable bracket

    I forgot to do that)

    Anton Karpenko -

    Agreed! This happened to me as well!

    Edwin R -

    Me too, and I'm worried about what can happen without it. I hope it does not detach so easily u_u

    Rusty James -

    Good day, how can someone get the schematic for pixel 7 pro…

    The phone was on 20% and the owner try charging it and when he plug it and later come back to check, it noticed that it was off..

    Ozemoya Emmanuel -

    So I disassembled it and bring out the board, wen I plug it on charger to see what current enter it, it show 0.07 and later went back to 0.00 while plug on charger…

    Ozemoya Emmanuel -

    Please also provide the instruction for the fingerprints sensor as if anyone follow this guide they will miss that part.

    Musa -

    I needed to disconnect the battery and push the start button for some seconds. Otherwise the new screen did not start and stayed black. I did break my first screen since I needed to disassemble everything again.

    Patrick Trump -

    In order to remove the fingerprint scan module without damage, you have to be VERY careful. The scanner is a very thin membrane and will crack if you bend it at all. I disengage the connector, then drop 91% alcohol around all four edges of the sensor, place it on a hot plate that's at 80*c for about five minutes, add some more alcohol around the edges and heat it again for another five minutes. Then using a very thin piece of plastic, such as an iPlastix LCD Touch Screen Separation Repair Opening Tool, and wiggle it back and forth around the edges and you can separate it. It's difficult to do, but it can be done. The odds of it working after replacement are low (as they have issues working out of the box) but this is the only way I have found that works.

    Gregg Stanley -

    Microphone isn't working at all after repair.

    adriankmatthews -

    How did you fix this?

    StartTechShift -

    Hola, he podido probar y cambiar la pantalla sin problema, pero cuando iba a sellarla, la pantalla se quedó completamente negra y ahora no se ve nada, y no consigo reiniciar el teléfono ¿alguien sabe qué ha podido ser y cómo puedo solucionarlo? funcionaba antes de cerrarlo, incluso el lector de huellas. Gracias

    Daura Soto -

    指紋認証のキャリブレーションを行う際に、対応した機器が接続されておりませんと表示されます。
    国によって、キャリブレーションツールの提供が前後するのでしょうか?ちなみに日本です。

    暴れミナ -

    キャリブレーションツールのダウンロードページが日本語化されているので、日本でも利用可能だと思います。

    この作業をしたことがないのでアレですが、キャリブレーションツール上で対応した機器が接続されていないと表示されるのであれば、作業に使うPCとPixelの接続が上手く行ってない可能性が高いと思います。

    キャリブレーション作業ガイドなどをみながら確認してみることをお勧めします。

    Servause -

    The instructions should mention removing the protective film from the back of the new screen before installing, otherwise the front facing camera will be covered

    Aliaksei Yankou -

    Together with the replacement screen and the adhesive sheet, there's another sheet with blue protection and some black protective foil, what's that for? Can't find it in description, on pictures or in video.

    Very annoying, when there are more parts, then required in the manual - or when required steps are forgotten in the guides. Gives a massive deduction of points or stars in review!

    Henning Jessen -

    The guide should mention to make sure that all of the connecting pins on the phone are down. Everything was fine until I tried to close it when one of the pins punctured the oleds and now there is a white light streak thorough the phone

    Dom -

    same here. I wish I read your comment beforehand. I have a white line now on my phone.

    Arjaan Peree -

    I have just completed the screen replacement following all the instructions on you site.

    I get an error saying

    "Can't use fingerprint sensor. Visit a repair provider or g/co/pixel/fingerprintunclock"

    The url just takes me to the instructions for setting a fingerprint in memory.

    What do I do Now?

    David Robert Stockford -

    Black cover over selfie lens!!!!!!!!!!!! If you do not take this off you will end up having to remove the screen again!!!! not an easy task to do without breaking your new screen you have just installed. I had to take my phone to a professional to have this done. Luckily only cost me £20.

    David Robert Stockford -

Conclusão

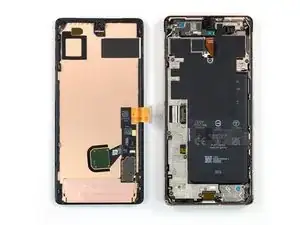
Compare sua nova peça de reposição com a peça original - talvez seja necessário transferir os componentes restantes ou remover os adesivos da nova peça antes de instalá-la.

Para a remontagem de seu dispositivo, siga estas instruções na ordem inversa.

Para realizar um teste de diagnóstico com a ferramenta integrada no Pixel, clique aqui.

Leve o seu lixo eletrônico para um ponto de recolha ou uma recicladora certificada.

O reparo não saiu como planejado? Tente as soluções de problemas básicas ou peça ajuda à nossa comunidade de Respostas sobre o Google Pixel 7 Pro.

Dominik Schnabelrauch

Membro desde: 23/11/16

252795 Reputação

105 comentários

After doing a few of these, using the fingerprint calibration tool is always needed. https://pixelrepair.withgoogle.com/udfps
I think it should be included in the final steps for completeness.

Also, the plastic bracket on the back of the screen usually is more willing to separate from the screen than from the phone chassis. I think this may lead to confusion for some people who may try to install the new screen over the old plastic. Some mention of this would be helpful.

Chip Needham -

All guides say we have to recalibrate the fingerprint sensor after a screen replacement by going here https://pixelrepair.withgoogle.com/udfps

Problem is that this does not work anymore. With a Pixel 7 Pro it says software failed to install. Looking at Android and Google forums is seems a common problem that broke this year. Is there another way to install the fingerprint calibration software on the phone without that link above??

Michael Blake -

I never change any mobile phone parts.

Should I try it?

Tulio Gilberto Silva Junior -

Yes. It worked like a charm. I just followed the steps, and after calibrating the fingerprint sensor, everything was working 100%.

Tulio Gilberto Silva Junior -

Is it possible to replace the fingerprint scanner separately?

Yabsra A -

It's technically possible, but it would be very difficult, since the fingerprint stuff is glued to the back of screen. You might be able to find a shop in China or Singapore that can do such a repair.

Cameron Miller -

As mentioned by @chipneedham , I would recommend adding in a note that the plastic bracket may not have come off with the screen. This tripped me up in my repair and meant I had to reapply the adhesive.

Chris Vella -

I followed the steps and it was excellent. This is my first time repairing a screen and it was so easy. Thanks for the guidance.

Adey Naas -

Is it possible to just replace cracked glass and not the whole screen unit?

p38lightng -

It's extremely difficult, without specialized (expensive) equipment. There is a piano-wire method of separating them, but it requires a lot of experience (many failed attempts) and is often not successful.

Cameron Miller -

After the screen replacement, Finger Print Unlock does not work in Pixel 7 Pro. I tried to delete old fingerprints and when I try to save a new fingerprint, it says time out.

G Registration -

Is water resistance unaffected after a successful repair?

Oluwademilade Akintan -

using authentic sealant it allegedly isn't, but i wouldn't risk it. Officially they do not guarantee it either

Leo Radonjic -

My pixel 7 pro did not go through a calibration process during boot-up after replacing the screen. Now I just have a message on both my lock and home screens stating ‘Fingerprint setup timed out. Can’t use fingerprint sensor. Visit a repair provider or g.co/pixel/fingerprintunlock’

Russ Vick -

I originally sent mine to Google for repair. They upped the repair price after they received it. I opted to do it myself. When I got the screen replaced it had been flashed to some special firmware. I re-flashed it normally and it appeared to be fixed. Then I got this error. Finally, I re-flashed it here and it worked. https://pixelrepair.withgoogle.com/

Dustin Burckhardt -

Do not forget to remove BLACK sticker behind camera hole.

David Bucio -

Arg. I missed this. Front camera is black and face unlock doesn't work. Did you reinstall the screen? It seems kind of flimsy and I'm afraid I'll break it.

Dustin Burckhardt -

I missed this.

Joshua Thomas -

after google boot logo there is no image

K baroud -

Great kit and guide! I was able to replace my screen easily. I had to calibrate my fingerprint sensor via Google, but that was easy too :)

Marizabeth Perez -

from which PC did you do the calibration I tried several times the PC recognizes my pixel when it is turned on but in fastboot it does not recognize it

jj59840 -

If your device isn't recognized while in fastboot, you don't have the proper USB drivers installed. You can get them from the Google pixel support page

Chip Needham -

After taking on this adventure as a complete newbie to this kind of repair I have a couple of suggestions:

- the phone needs to be quite hot to the touch, more like 50 degrees rather than 40 degrees Celsius. Hotter than you'd think for such a delicate device. A tiny bit warmer than your hand isn't enough to loosen the adhesive. The tape tip for my cracked screen worked perfectly!

- the screen ribbon connector is invented to agonize those in the lowest parts of hell, you need so much more force than such a tiny thing should be able to handle, all laws of physics are bypassed by it. You THINK it clicked in, but it was merely a blank and now you have to start over.

- on my pc the fingerprint calibration needed an additional android fastboot driver, then the Google link will work.

All in all a very fun, interesting, but sometimes agonizing evening was spent! Phone is so much more responsive and vibrant without the cracked screen, thank you very much!

Inlandnavigator -

These kits are garbage. Stuff doesn't line up. THere are plastic pieces that don't fit. Waste of money. I followed directions to a tee. The new frame does NOT line up with the screen. There are plastic pegs that have no place to fit. Screen will not fit. WASTE OF TIME

Jason Hopper -

@jasonhopper I think you may have left the bracket in place, it needs to be removed with the old screen. I tried to alert people in my comment above:

"Also, the plastic bracket on the back of the screen usually is more willing to separate from the screen than from the phone chassis. I think this may lead to confusion for some people who may try to install the new screen over the old plastic. Some mention of this would be helpful."

Chip Needham -

Chip. Yes, disappear to be what has happened. Unfortunately now the adhesive is over the bracket and that part will have been destroyed trying to get the bracket off. I think I fix it should send me new adhesive, which means I will have to wait again the instructions are not clear enough here. If I had read your input I probably would have figured it out. Thank you for your response.

Jason Hopper -

READ THE COMMENTS. I ran into literally every issue mentioned in the comments. Definitely the hardest repair I've done and I do this professionally.

Rahsaan B -

I agree. The comments led me to my ultimate problem. The screen delaminated and left the black bracket on the frame. IFIXIT sent me another adhesive and after pulling the frame off and applying the new adhesive the screen went back on just fine. Of course I had to run the fingerprint scan fix from Google. So my screen replacement was a success but I stand by my comments that the guy needs to be more informational with regards to problems you could encounter.

Jason Hopper -

Really? It seems exactly like any other screen replacement

Cameron Miller -

Bon tuto mais comme précédemment conseillé, voici quelques conseils suite à l'installation d'un nouvel écran.

- pour décoller le vieil écran, bien chauffer et bien passer le médiator sous le plastic support de l'écran. Je ne l'ai pas bien fait du coup j'ai juste décollé l'écran mais pas le support plastique collé à l'écran et coller au téléphone. Celui-ci est bien emboîté au téléphone. Heureusement que l'on peut le déboîter, toujours avec le médiator ensuite car sinon impossible de mettre le nouvel écran

- ne pas oublier d'enlever le sticker noir de protection derrière la vitre selfie du nouvel écran

- pas évident de reclipser la nappe du nouvel écran je trouve ! Une fois fait, j'ai vérifié que celui-ci fonctionne bien en allumant le téléphone

- il a fallut recalibrer l'empreinte digitale car il ne fonctionnait pas. Pas de messages, rien. Comme indiqué, j'ai connecté mon telephone au PC, sur une prise USB-A. car le téléphone n'a pas été reconnu en le branchant sur une prise USB-C

Si ça peut aider ! Top Ifixit !

Komanile -

So I received a kit that has two different size blue film parts. One is to apply the new edge adhesive, but no clue (or docs) as to where the other one goes ... The above instructions conveniently skip over applying the adhesive ....

Fred Cassirer -

Bonjour .

Combien ça coûterait faire réparer la vitre interne ? L'écran ne sallume plus

La vitre extérieure ( je ne.parle pas du film collé ) est intacte c'est la vitre en dessous Qui est cassée.

Ferrandeznathalie12@gmail.com

Merci

Nathalie Ferrandez -

+

Directions are missing some extremely important details and my new screen being damaged during installation. It feels like Ifixit is more focused on selling nice tools than making sure that the finer details are covered in the install process. (Admittedly the anti clamp it is an excellent tool, but it did separate the screen from the plastic frame not the phone, but it isn't part of the basic tool kit or the repair kit)

What damaged my new screen was a tiny little contact spring in the bottom right corner that must have been bent in the removal or cleaning process (I think the cleaning cloth while removing the adhesive). Either way bent contact damaged the new screen on install causing a white line to run across the screen. There are several of these small contacts and no mention of them in the instructions. (In my opinion they should be mentioned as the bent contact would have been easy to fix had I been aware of it instead I am either out $206 or stuck with a white line on my screen)

immaterial -

Screen replacement went well, hardest thing for me was reseating the flex. Found this youtube vid helpful. https://www.youtube.com/watch?v=yIiRc97D...

Repair of fingerprint sensor worked fine via https://pixelrepair.withgoogle.com/

Very happy!

Ashley Andersen -

Please can someone explain this step to me: Be sure to remove all adhesive liners from your replacement screen. Check the selfie camera recess and make sure you've removed the liner there.

Keiron -

For the Google/Ifixit screen there is a black liner from the factory covering the selfie camera hole that needs to be removed.

You should be able to see through the back of the screen where the hole for the selfie camera is.

If you flip the screen around and you can't see through the hole, the camera won't be able to either.

Joe -

For me it worked like a charm- except for the fingerprint Calibration software via https://pixelrepair.withgoogle.com/udfps

My Pixel is connected in Fastboot mode, and when I try to start the procedure I get stuck at step 1 "downloading the software"

"Couldn't download the software"

Anyone else facing this issue (or haveing a fix for that?

Marco Reiter -

I've the same error - Does anyone solve this?

Lars Moltke -

I'm getting couldn't install the software, 2nd step on the https://pixelrepair.withgoogle.com/udfps webpage... Does anyone know if your phone device state needs to be unlocked for the software to install? Does it need to be unlocked through your cell carrier?

C * -

Agreed that the guide leaves too much ambiguity. If you're gonna sell the whole repair kit, at least describe what everything that comes in it does. I ignored the unmentioned graphite paper looking sheet. Everything was going ok until after snapping the display back on, there's a white line on the top - likely from one of those annoying metal pieces that stick up inside the device. Convenient that iFixIt will sell you a genuine part and kit but only write up half a guide just telling you to reverse the steps (what adhesive would I remove when reversing them? Pictures of replacing parts would be great too. It's just a lazily written guide.) and not give precautions to common issues. I want an anal and detailed repair guide so I can feel confident in it, not another blasé guide. Also shame on Google for putting those pins there - it all feels very anti right to repair making it harder to fix a broken display.

Nick Cipriani -

I agree with you and @immaterial . The pins should definitely be in the guide. The part costs 200 dollars and pushing thise pins down can avoid a whole lot of damage. Had to do this twice because of such a small issue. It should definitely be added to the guide.

Mohammed Aadeel Bobat -

Incomplete guide. I had to check youtube to learn to remove the blue stickers from the display itself. I had to check other sources multiple of times to ensure my screen replacement goes smoothly. Extremely disappointed at this guide. Could be better written.
The linked adhesive installation guide IS NOT FOR THIS PHONE. IT's for generic phones. Check youtube for proper installation guide. This guide is useless.

rcolbeck -

I think the guide was pretty helpful. A little intuition will go a long way, though.

Cameron Miller -

Did you see the black sticker on the selfie (inside) remove it prior to installing the screen. Check youtube guides. This guide is useless.
Check: https://www.youtube.com/watch?v=yIiRc97D...

rcolbeck -

Followed the instructions very carefully, and it was going well, too well. The guide mentions plastic clips but my picks were doing it with almost no resistance. Well, that's because I managed to cut between the digitizer and the glass, so the glass popped off first. then I had to cut under the digitizer to get that off. I thought that was the end of it, and I started cleaning. There was a glaring lack of adhesive while cleaning and something felt off. It took me a while to get the ribbon cable on. I put the cable bracket back in, then applied the adhesive. Everything was going smoothly, until I tried to pop the screen on. It physically was incapable of fitting. Well, after ~45 minutes trying to figure out where I went wrong, I discovered that the plastic bracket attached to the back of the digitizer was still glued onto the phone. After peeling it off, it all made sense. Adhesive was unsalvagable though, now I have to wait for more to come in, ughhhhh. I wish the guide made that more clear.

Matthew M -

Does this display fits in made in China model or made in Vietnam model ?

saran -

To recalibrate fingerprint scanner, use the link but keep the hone in fastboot mode not rescue mode, worked a charm

Yousuf Bhikha -

My Google pixel 7 pro display was damaged and I tried changing the display 3,4 time but Everytime there will be a white line on the side from top to bottom. Can you help .

Shibin Boby -

I have the same problem

Rome Gabe -

Those the item include the fingerprint?

Edgar Jiménez -

Easy repair, but remember to remove the plastic frame from the old screen, if they spit disassemble.
And then my fingerprint scanner doesn't work after replacement of screen, and the calibration tool doesn't work.
I'm getting a 'Couldn't install the software' when I try to install the calibration software. I then tried to reinstall Android but the fingerprint scanner still doesn't work. :(
Running Android 13.

Lars Moltke -

For me, it was the internet security software (zscaler) on the work laptop that caused the error. The site itself worked, only the download ran into above error. Took me a while to figure it out ;)

Marco Reiter -

I've seen multiple reports that you need to run the fingerpirnt calibration tool TWICE. https://pixelrepair.withgoogle.com/udfps

This was my case too. Ran once, didn't work, ran again, and then it works. Good luck!

Jedadiah Ashford -

Did anyone else end up with a proximity sensor that doesn't work after install? I think mine is defective. I also have a black round spot on the LCD near the camera. Reaching out to support for help...

Jedadiah Ashford -

I contacted Google Support, asking them why the calibration tool doesn't work, and I got this answer:

I’ve checked my resources and we do not recommend running a recalibration tool on your device as this may further complicate the issue. Recalibration tools are designed to fix specific problems, but they can also cause new problems if they are not used correctly. In your case, there is a chance that running a recalibration tool could damage your device or make the problem worse.

What they then did offer me was a warranty repair, even that I told them than I did the screen replacement myself:

You can rest assured that the repair of your device will be free of charge since you purchased the parts of your device from our authorized partner iFixit. This is because we have a partnership with iFixit, which means that they offer a warranty on all of the parts that they sell.

So this is what I'll do.

Lars Moltke -

Did Google repair fix the calibration for you? Did you send it to them?

C * -

That's awesome!

Cameron Miller -

I disassembled my phone and when I plug the new screen in the phone fails to boot and displays the google boot screen with messed up colors. It will then continue to boot over and over. I switched back to my damaged screen and it works like it did before. Is this a lemon part?

mrsetiman -

I had a very similar issue, the old one plugged it in works, but the new one doesn't do anything :-( keep going back and forth and I am able to reproduce that every time. Contacted support will update this comment later.

Alberto Martin -

Before install make sure you received the correct screen! Pixel 6 Pro screens are being incorrectly packaged and labeled as Pixel 7 pros. I was shipped a 6 pro screen and was only able to tell after finding this video (https://www.youtube.com/watch?v=MhvvNaFK...). You will be able to tell since the proximity sensor window and alignment tabs will be slightly different (skip to 7:00 minutes in to the video above to see the differences).

Dave K. -

finger print not working as yet. replaced screen for pixel 7 pro yesterday. Else worked fine

arslan nadeem -

You should really mention how important it is to pay attention to the earpiece speaker grill, I didn't and since it's so tiny I didn't even notice until the screen was permanently glued on again that I don't have a speaker grill up there anymore

Mattis -

me neither :(

Leo Radonjic -

just replaced my screen, no images just green, yellow, & red pixels.

James -

Received my replacement screen today and did the job under 30 minutes thanks to this guide. Thank you guys so much for this guide and especially iFixit for providing us with the original parts. Everything went smoothly and the fingerprint sensor works great after the calibration.

Amix -

Works like a charm, I had worries concerning the accuracy of my sealant placement skills, but there were no issues. Fingerprint scanner doesn't work until you calibrate it using Google website, entire process takes a minute and you only have to click "confirm" twice. AFTER THAT YOU HAVE TO RESTART THE PHONE and it will work. Also remember to remove the selfie camera hole protector on the screen or you will only be able to take pitch dark selfies

Leo Radonjic -

I agree, the backing plastic could be cut a bit more precise by the factory, to ensure better alignment.

Cameron Miller -

Not very easy but very doable as a first timer replacing a phone screen follow this link as reference https://www.youtube.com/watch?v=yIiRc97D... very helpful.

NOTE: I also encounter the plastic bracket issue where you cannot identify if its part of the old screen that's why you have to check or compare the image from the guide.

Abel Go -

Was there really a cover on the front camera glass of the new display?

I haven't seen it and now the front camera shows only black....

Update: didn't know I can see more comments here when I'm logged in, otherwise I would have read the comments about the black front camera cover ;-(

Michael Tansella -

Another important point is to do manual reboot after fingerprint calibration, otherwise it doesn't work.

Michael Tansella -

I just did a test before I put adhesive on and its just a black screen. I was unable to power my phone off before repair and have been unable to tell how much battery is left. I tried my best to let it die this week but i have no control of my device since it broke and desperately need it to work again ASAP. Is it mandatory that it reboots? Please help!

Tyler -

Same here :(

Pedro Santiesteban -

I managed to fix my screen, back to normal, no experience here. However, right after finishing the steps, the main cameras would not run and only showed a black screen (tele, main, wide). This did not seem to affect the front-facing camera. I restarted the phone (about three times, plus the two you need to get the fingerprint sensor recalibrated), forced-stopped the camera app and erased the cache and data on the app, and these would still not work. Did my research online, did not find any previously reported issue, and after a while and recharging the phone, the cameras started to work normally. I panicked for a while, but before re-opening the phone again to see if something was wrong with the cameras, and then ruining the replaced screen in the process (and the adhesive), try everything and charge the phone and wait for it to work.

sebastianroco -

Super conseil de réparation j’ai changer mon écran en une petite heure tout en suivant bien les instructions.

Merci pour tout je suis super content

EMMANUEL CLEMENT -

Une fois le remplacement effectué, un message "impossible d'utiliser le lecteur d'empreinte digitale" apparait et le logo de l'empreinte digitale "grésille" ou "clignote" comme s'il y a avait un faux contact. J'ai essayé de vérifier derrière l'écran que les connecteurs soient bien fixés, il ne semblait pas y avoir de problème.

Izecson -

Install was super easy. Best quality parts for any Google.

Christine Briskey -

So glad I did this. Replacing the screen was much cheaper compared to buying a brand new phone. It was a struggle to get the screen off where it was cracked at the edge, but the repair was still completed in less than an hour. The fingerprint reader calibration is a must because it will not work unless you do it. For an amateur, this was seamless. Highly recommend if you have a broken screen.

David Hall -

Hacen envios a México

gildardo rivera -

don't forget to take the small cover off the front camera lens or you then have to carefully take it all back off...

Scott Marriott -

The screen is replaced but no touch inputs are recognized. I can't use any touch inputs even after using the calibrating tool for the fingerprint sensor. I can't use my phone, I am stuck at the pin screen

Thomas Strecker -

Make sure screen connected is properly seated. Careful not to crease or damage the flat cable when installing everything.

Cameron Miller -

For some reason my front facing camera wont work and the proximity sensor (screen stays lit during calls) doesn't either after I did this install. Has anyone else had this happen? I did get my fingerprint scanner to work that wasn't an issue.

pedrovargas83 -

I have a problem, my screen randomly stops working after replacement, the only way I can get it to work is going inside again and disconnecting and reconnecting the screeen, I dont think it is a loose cable, It has happened too many times now.

fernando troya -

Get in touch with iFixit Customer Support to get a screen replacement, it may be faulty. That's just from the top of my head....it can be anything, unfortunately.

StartTechShift -

I had the same problem. In fact, if you're like me, you have the vibration right away but the screen remains black. In fact, you have to hold down the button for at least 30 seconds even if the phone vibrated right away. After 30 seconds, release the button and the screen should light up.

Lionel -

That's a problem on many Pixel 7 Pros, even without prior screen replacement. Probably happens if you apply pressure to the front of the screen, on the left side, about midway between top and bottom of the screen, right? That's caused by a wire shorting short somewhere around battery cable or antenna cable, if I recall correctly.

Cameron Miller -

Why replace display without disconnecting the battery? Is there a reason for this?

Daniel -

Full replacement went well. Screen was working fine. I went to press the adhesive on and now the screen will not turn on. Phone is on and I can feel it buzzing when I click the power button. Any thoughts?

Matt Mar -

Damaged screen connector or LCD ribbon cable?

Cameron Miller -

Was there a cover in front camera location? Cannot see picture front front camera :(

Sandyb -

Yes, there was a tiny black sticker on the camera hole. I removed it before installing the new screen. It was mentioned in the earlier comments.

Jatin -

Did anyone experience a defective bottom microphone after screen replacement? Thank you

StartTechShift -

No. Completely unrelated.

Cameron Miller -

Hey guys, I had an issue with the fingerprint sensor. I tried everything mentioned in the posts, but nothing worked. In the end, my fix was simple: I unplugged the fingerprint sensor from the LCD and plugged it back in, and that solved the problem.

THESKY -

How did you "unplug the fingerprint sensor from the LCD"? The fingerprint sensor is glued onto the back of the LCD.

Cameron Miller -

I used this to replace my phone screen a few months ago and everything went very well. I was able to get the finger print reader unlocked and working as well without any issue. Everything is holding together well after a few months of use and even after being dropped (it was in a case). I was pleased with how good these instructions were and how well the replacement process went for me.

Kori MacCara -

This was my first smartphone screen repair. And i replaced the battery too. Everything went great! IFixedit! The only difficulty i had was removing the old battery. I wound up heating with a hair dryer and prying it out. The tool that worked best for this is an old golf ball divot tool.

Lloyd B -

Please the screen i got has no frame is it advisable to use the frame on the old one for my pixel 6 Pro

Obed Osei -

I just did all the steps, it went fairly well, had some trouble with the cable and bracket, but manage to get it.

Still a good thing i read the comment about the plastic thing tho.

I booted the phone and the screen worked. However, it doesnt detect any pressure and i'm not talking about the fingerprint, just touch screen to put my nip in. any advice ?

ps : i use calyxOS but doesnt seem to be a trouble

max -

I cannot get the new screen to clip back into place! the tabs seem to line up, but there's some other connections that do not. particularly a stud in the top right corner of the screen.

frankwhite8536 -

Hi, if i do not want to use the fingerprint, do I still need to buy a screen with fingerprint sensor?

Btw. I used a hot water bottle to warm up the phone, which worked perfectly.

OOT -

warning, remove the cover over the front facing lens

Andrew Phillips -

this is not helpful becuase i fix it doesnt show us where all the screws need to be in when we are done

Lame alerte -