Introdução

Use este guia para substituir a tampa traseira do seu Steam Deck ou para removê-la para reparos adicionais.

Lembre-se: siga os procedimentos gerais de segurança de descarga eletrostática (ESD) ao reparar seu dispositivo.

***Observação: as faces dos botões traseiros (L4, R4, L5 e R5) fazem parte da tampa traseira e não podem ser removidas separadamente.

A Valve adverte que a remoção da tampa traseira pode enfraquecer a integridade estrutural do Steam Deck.

  1. vQyR3PAE4HOMSLAZ
    vQyR3PAE4HOMSLAZ
    aIKAs5r3P3bY2iTE
    hD1USYJCkAbkluud
    • Ligue o Steam Deck e deixe a bateria descarregar abaixo de 25% antes de iniciar os reparos, pois uma bateria de polímero de íons de lítio carregada pode ser perigosa se for perfurada acidentalmente.

    • Como precaução adicional, a Valve recomenda colocar o Steam Deck no modo de armazenamento de bateria no BIOS antes de iniciar qualquer reparo interno. Leia como fazer isso aqui.

    • Desligue o Steam Deck e desconecte todos os cabos.

    • Se você tiver um cartão microSD instalado, certifique-se de removê-lo antes de abrir o Steam Deck. Se você tentar remover a tampa traseira com o cartão ainda instalado, ele pode partir-se ao meio.

    • Durante o reparo, às vezes pode ser útil colocar o Steam Deck virado para baixo em seu estojo para proteger os analógicos e evitar oscilações.

  2. bpUGGPG32OkLXnC4
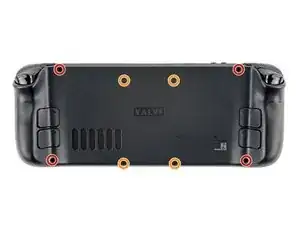
    • Com uma chave Phillips, remova os oito parafusos que seguram a tampa traseira:

    • Quatro parafusos de rosca grossa 9,5 mm

    • Quatro parafusos de rosca fina 5,8 mm

    • Apesar das normas, as chaves Phillips podem variar de tamanho e formato - duas chaves rotuladas como sendo do mesmo tamanho podem se encaixar de forma diferente no mesmo parafuso. Use o tamanho que encaixe melhor na cabeça do parafuso.

    • Durante esse reparo, rastreie cada um dos parafusos e certifique-se de que ele retorne exatamente ao local daonde veio, para evitar danos ao seu Steam Deck.

    there should be a picture of the SD card slot at the start of every Steam Deck teardown. i know the note is there but i generally use the pictures to guide me and forgetting to remove the SD card is a very critical step

    Nathan Barrow -

    I agree, I just broke mine...

    Camille B -

    What is the the #1 philips used for? Only the #0 is mentioned in the instructions.

    Christopher Martin -

    I wish they would specify which size to use for which screws.

    Mark D -

    I found it easiest to use a PH1 for the red screws, and PH0 for the rest (including the internals.)

    Chris Clawson -

    Be careful you can strip the screws take your time

    I use PH00 bit

    jaybush74 -

    My last one did. I'm so mad honestly

    kyuuchat -

    I used the PH1 bit for this. You can use smaller bits but ideally there should be no play of the bit in the screw head.

    Charles Semple -

    are there playstation replacements (circle,square,cross,triangle)

    Deór -

    I used the ifixit tools and used the 00 size for the screws on the back.

    Luis B -

    I've completed the guide and found it very helpful!

    I think somewhere in this part it would be helpful to name the size of the correct Phillips driver to use:

    Use a Phillips driver to remove the eight screws securing the back cover:

    Four 9.5 mm screws

    Four 5.8 mm screws

    Maynard -

    I used the PH1 for the 9.5mm screws and PH00 for the 5.8mm screws. The PH0 wanted to strip one of the small ones.

    Pol Llovet -

    FYI - 512gb version has blue threadlocker on the Orange screws.

    Kyle -

    Just a point for knowledge sake, the Four 5.8mm screws on this step are factory installed with a version of locktite. Not sure why but there will be slight resistance when removing the first time.

    Derek Schmidlin -

    Stripped two of the 5.8mm screws, feel pretty dumb, now I'm stuck at step 2 of 43 :|

    Yareyous -

    The screw bit that came with my fix kit just stripped the screws of my steam deck. I guess I should've just sent it in...

    Randy Jackson -

    Model 1030 SteamDeck uses Torque #6 (CR-V T6) 5.0mm for all 8 screws making it far less likely to damage the screw heads.

    seaniepie -

    Model 1030 is the OLED version, which we have separate guides for! See here: Steam Deck OLED

    Carsten Frauenheim -

    the steamdeck that I purchased in April 2025 no longer uses phillips for the rear panel screws, but instead uses a Torx T6H driver

    Kevin James -

    Do you have an LCD or OLED model?

    Carsten Frauenheim -

    One of the coarse screws just snapped on me im so !#^&@@ rn

    Eggs Benedict -

    I was very apprehensive about this step, but I did it without stripping the screws.

    First, I tried to remove a first view with my PH0 screwdriver but it slipped. I didn't insist and I took my PH00. This time, It adhered better, but the screws are very tight.

    With my left hand, I pressed the screwdriver down very firmly, to apply strong downward pressure. And, with my right inch and index, I started turning the body of the screwdriver gently. Then the screw starts to rotate a bit.

    When reassembling, be careful not to overtighten them (especially the longer ones). As soon as the screws stop turning, stop immediately. Use only the force of your fingers to gauge if it's tight enough.

    Estève Y -

    Model with the black motherboard cover.

    I used a J1 screw bit - I think this is a JIS PH1 - it's the one which fitted the screws with absolutely ZERO wiggle, super tight.

    Took it very slow and careful, no problems at all.

    bbmatt -

  3. 6jtVcFtMGa5ZMqcF
    6jtVcFtMGa5ZMqcF
    Ux5LEj3JfJlkmQMQ
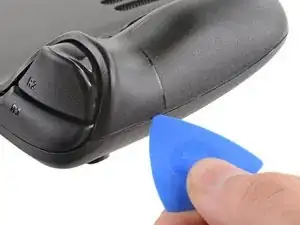
    • Insira uma palheta de abertura no vão fino entre tampa traseira e invólucro frontal, ao longo da borda do lado direito.

    • Se estiver tendo dificuldade para inserir a palheta na costura lateral, tente começando pela borda alongada superior ou inferior e, em seguida, deslize a palheta em direção a uma das laterais.

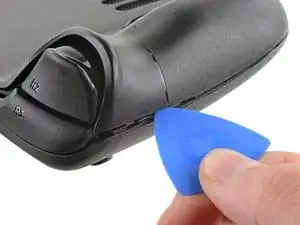
    • Faça alavanca na tampa traseira para liberá-la dos clipes que a seguram.

    I found it easiest to start this process at the top of the device near the fan exit.

    Peter Lindberg -

    second that and inserting the pick in the bottom middle and sliding the pick to each side

    Sub -

    I also found the top near the fan exit to be easier

    Travis Patton -

    Thank you for this tip, it definitely was easy starting at the top instead of by the bumper/triggers. After I opened the top I did the bottom and then it was way easier to gently open the sides. be very careful and go slowly to make sure that none of the clips are damaged

    Luis B -

    this as suggested above:

    1. open the top

    2. open the bottom

    3.gently open the sides

    austrasier -

    same; i pried from the top of the screen area. I was unable to find an opening on the side

    Dennis Wu -

    I also started from the middle of the deck and worked my way out since I couldn't get a grip with the pick on the deck's side grips. Since this is a common step for pretty much all guides for opening the deck I think it's also worth noting that you should be careful not to bend the trims/seams where the front and back covers meet with the pick. When I first opened my deck you can definitely see where I nudged the pick in between the covers since I was probably using too much force on the pick itself.

    Kaleb McKone -

    It would be useful to note here that if you want to insert the little blue triangular iFixit opening picks into the right side along the edge, there isn't actually a gap as the directions say, at least not on newer Decks. You'll be making the initial gap using the pick. Brace it on something because you will need to use enough downward force that you're flexing the pick a bit and it'll probably be digging into the skin of a bare hand. With enough force suddenly it will make a click and go in just a bit, and then you're in business.

    CaptFrost -

    plastic picks didnt work for me but finger males did the job on prying this open

    jacobbagsic -

    I found it easiest to open starting with R1 or L1 buttons and proceeding to the center of the top edge

    Karol Gro -

    This step was the hardest by far. First I didn't find an opening at the sides, and it did take a really long time until I finally got it open... Then, when I had the one side opening open it didn't just pop out, I needed to slide all the way to the other side with the pick and open everything. I guess they made it even more drop resistant.

    Dollique -

    Top left or right - used a guitar pick, took about 60 careful seconds - very easy.

    bbmatt -

  4. 6IvIWWqEXPTqW1XB
    6IvIWWqEXPTqW1XB
    1FxwYDjIGOAOCZT2
    KpIx4YIAZrDH1b5T
    • Quando os clipes desencaixarem em uma das bordas, os demais se desencaixam facilmente.

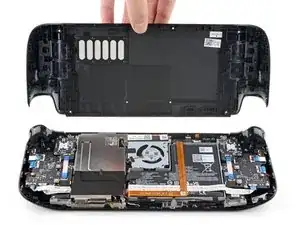
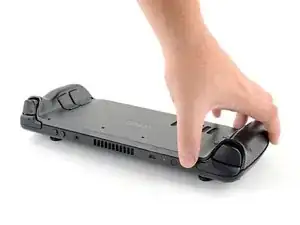
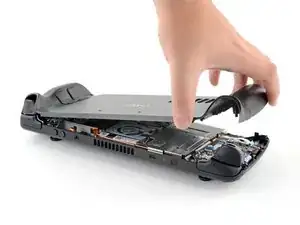
    • Segure a tampa traseira pela abertura que você acabou de formar e puxe-a para cima e afastando-a do dispositivo, para desencaixar as bordas longas.

    • Remova a tampa traseira.

    If you have an SD card, you will want to take it out. I followed the guide and didn't think about the SD card I had inside. When I went to snap the case back on it clapped shut on the exposed SD card, shearing it in half and leaving the bottom half stuck in the SD card slot. I am still endeavoring to get it out.

    Novice -

    you can use the case that comes with the steam deck to support it once the lid is removed

    Luis Barbosa (Armored Saint) -

    You can get the pry pick inserted easier if you start in the gap for the shoulder buttons. A lego brick separator works well here

    Andrew Borsje -

    Just did this repair on my Steamdeck. Was pretty easy and took me less than an hour thanks to this guide. THANK YOU iFixIt!

    Slash Zero -

    The screenshots here of one hand lifting the back cover are ... well, you won't be doing it that way!

    In the previous step, you should've heard some audible little click noises. Once you've heard those, it'll be a combination of picks and maybe thumbnail to gently tug on any side - REALLY gently. It should give very easily. If it doesn't, go back to the previous step until you hear a click.

    I very much doubt you'll be able to just lift this off with one hand like that screenshot!

    bbmatt -

Conclusão

Para a remontagem de seu dispositivo, siga os passos acima na ordem inversa.

Leve o seu lixo eletrônico para um ponto de recolha ou uma recicladora certificada.

O reparo não está indo conforme o planejado? Tente soluções de problemas básicas, ou peça ajuda na nossa comunidade de respostas para o Steam Deck.

Carsten Frauenheim

Membro desde: 10/03/20

160437 Reputação

8 comentários

Alguien sabe donde puedo comprar los 4 tornillos del medio de la tapa trasera, creo que hacen 1,6x5mm ?

La tapa que venden vienen con los tornillos?

Si pueden ser los originales mejor.

Muchas gracias.

israel manzano -

one of my screws stripped what should I do?

Marco Barnes -

Can I use it on OLED steamdeck?

Peace Maker -

Is this backplate also compatible with the OLED model?

kadiroeztel -

For everyone wondering: it is compatible with the OLED model! I just replaced my backplate with this one and it fits perfectly! :)

kadiroeztel -

This helps alot, thanks!

pecel9 -

One of my screws stripped out what do I do. Where can I get new screws

LazKirk -

Here's a quick guide on how to remove a stripped screw: How to Remove a Stripped Screw
Here are Steam Deck back cover screws for sale: Steam Deck LCD Back Plate Screw Set

Best of luck!

Carsten Frauenheim -