
Introdução
Use este guia para remover a bateria colada de seu MacBook Pro. A melhor maneira de fazer isso é com a ajuda de um kit de substituição de bateria da iFixit; o removedor de adesivos líquido do kit dissolverá o adesivo que fixa a bateria, permitindo que você a remova com facilidade. Como alternativa, você pode usar um iOpener para aplicar uma pequena quantidade de calor, com a finalidade de amolecer o adesivo antes de retirar a bateria.
O removedor de adesivos da iFixit é altamente inflamável. Execute esse procedimento em uma área bem ventilada. Não fume nem trabalhe próximo a uma chama aberta durante esse procedimento.
Para minimizar o risco de danos, ligue o MacBook e deixe a bateria descarregar completamente antes de iniciar este procedimento. Uma bateria de íons de lítio carregada pode desencadear um incêndio perigoso, se for acidentalmente perfurada. Se a bateria estiver inchada, tome precauções adicionais.
Observação: o solvente usado para dissolver o adesivo da bateria pode danificar determinados plásticos, como os compartimentos de plástico dos alto-falantes do MacBook Pro. Tome cuidado ao aplicar o solvente.
-
-
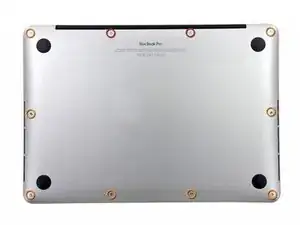
Remova os seguintes dez parafusos que fixam a estrutura traseira à estrutura superior:
-
Dois parafusos P5 Pentalobe de 2,3 mm
-
Oito parafusos P5 Pentalobe de 3,0 mm
-
-
-
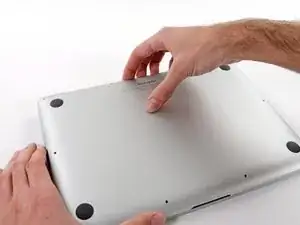
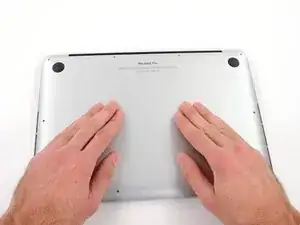
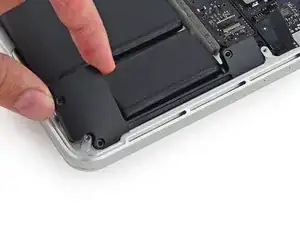
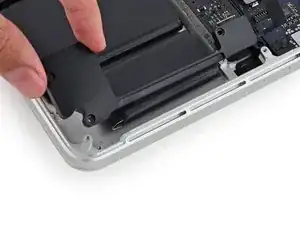
Coloque seus dedos entre a estrutura superior e a estrutura inferior.
-
Puxe cuidadosamente a estrutura inferior, afastando-a da estrutura superior, para removê-la.
-
-
-
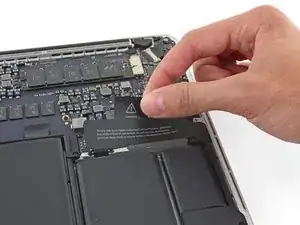
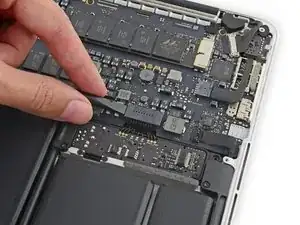
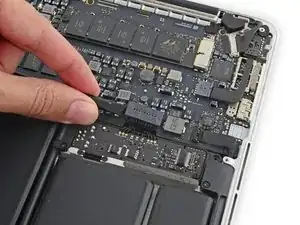
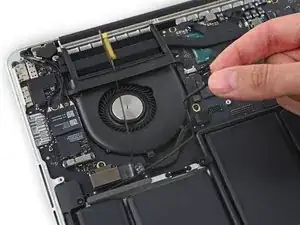
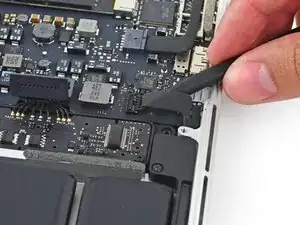
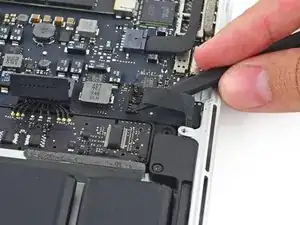
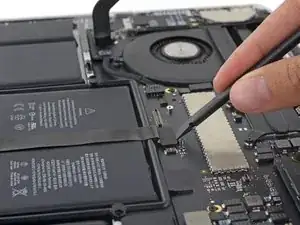
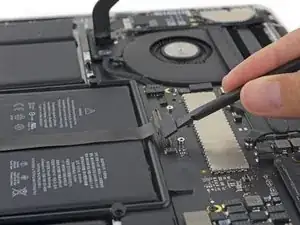
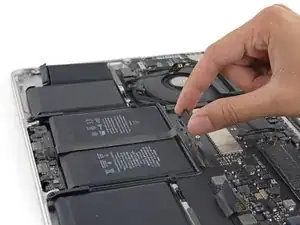
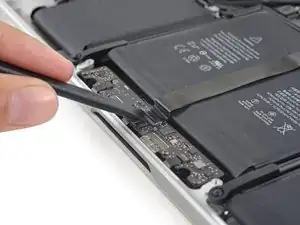
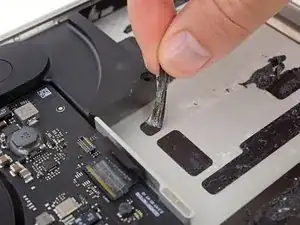
Com a ponta plana de uma espátula, levante o conector da bateria para fora de seu soquete na placa lógica.
-
-
-
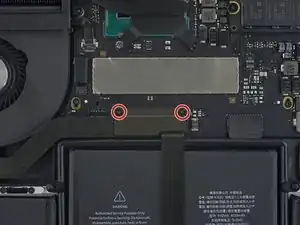
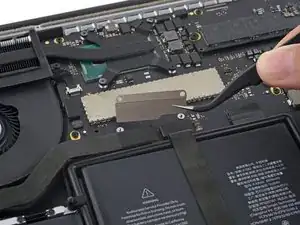
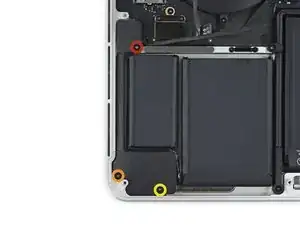
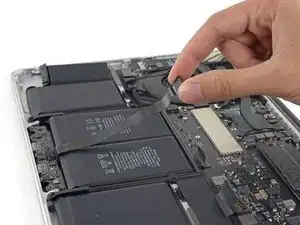
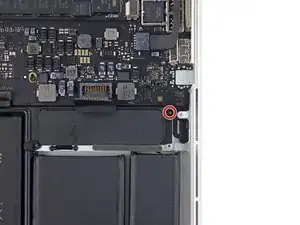
Remova os dois parafusos Torx T5 de 2,1 mm que fixam a extremidade do suporte do cabo da placa de E/S onde fica a placa lógica.
-
Remova o suporte do cabo da placa de E/S.
-
-
-
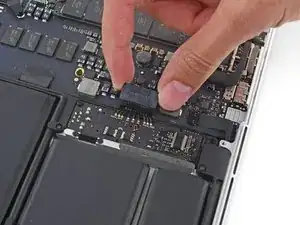
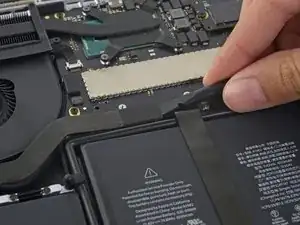
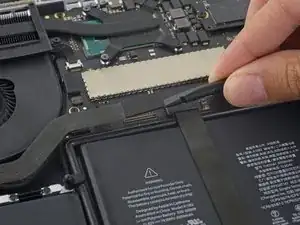
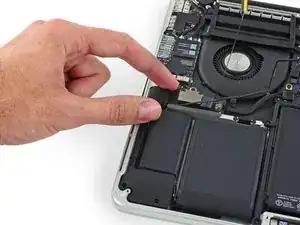
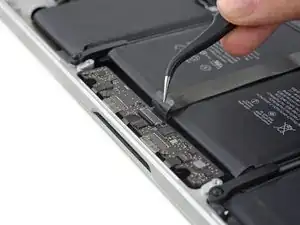
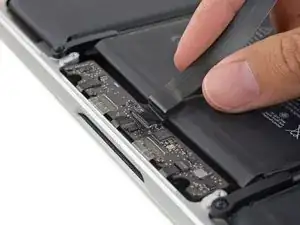
Com a ponta plana de uma espátula, desprenda o conector da placa de E/S de seu soquete na placa lógica.
-
-
-
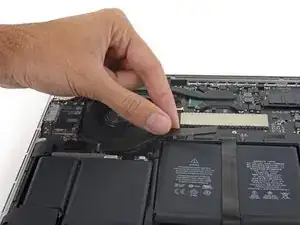
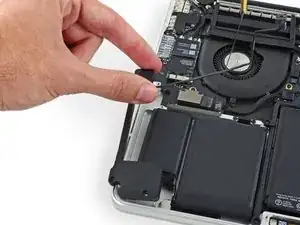
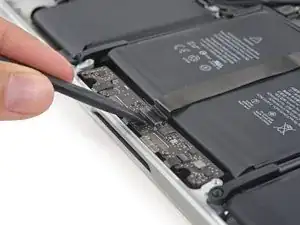
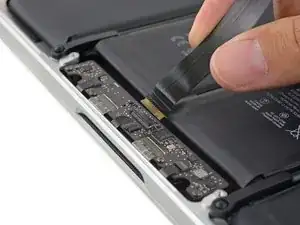
Levante a ponta do cabo da placa de E/S onde fica a placa lógica, puxando-o em linha reta, para dobre-o e tire-o do caminho.
-
-
-
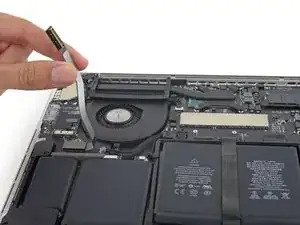
Com cuidado, coloque a ponta de uma espátula sob o cabo do alto-falante direito próximo ao conector e levante-o para fora do soquete na placa lógica.
-
-
-
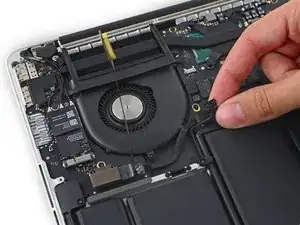
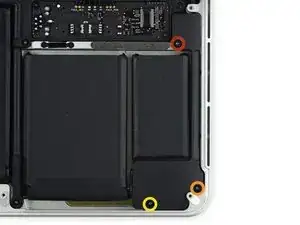
Remova os parafusos a seguir que fixam o alto-falante direito à estrutura superior:
-
Um parafuso Torx T5 de 5,7 mm
-
Um parafuso Torx T5 de 6,5 mm
-
Um parafuso Torx T5 de 3,8 mm
-
-
-
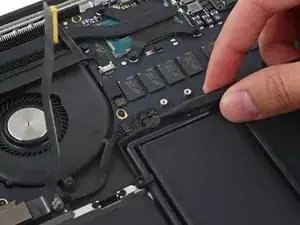
Insira a ponta de uma espátula por debaixo do cabo do alto-falante esquerdo, próximo ao conector, e levante-o, afastando-o do soquete na placa lógica.
-
-
-
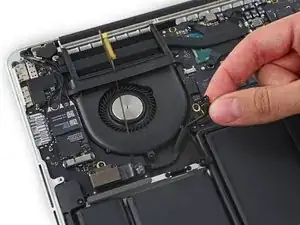
Remova os parafusos a seguir que fixam o alto-falante esquerdo na estrutura superior:
-
Um parafuso Torx T5 de 5,7 mm
-
Um parafuso Torx T5 de 6,5 mm
-
Um parafuso Torx T5 de 3,8 mm
-
-
-
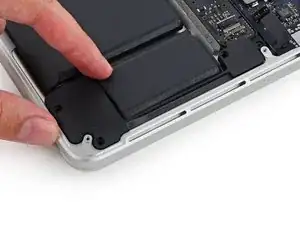
Levante o canto do alto-falante esquerdo e remova-o da estrutura superior contornando a bateria.
-
-
-
Com a ponta plana de uma espátula, retire o conector do trackpad de seu soquete na placa lógica.
-
-
-
Levante o cabo do trackpad, afastando-o da bateria, para separá-lo do adesivo que o prende.
-
-
-
Puxe o cabo do trackpad em linha reta, afastando-o do soquete ZIF na placa de controle do trackpad.
-
-
-
Remova o único parafuso Torx T5 de 3,7 mm que fixa a placa da bateria à estrutura superior.
-
-
-
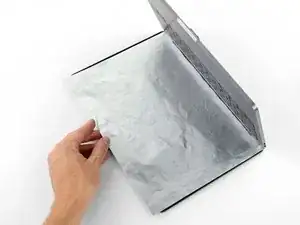
Para proteger a tela, coloque uma folha de papel-alumínio entre a tela e o teclado e deixe-a ali enquanto trabalha.
-
-
-
Como alternativa, se estiver usando o método do iOpener aquecido, pule os três passos a seguir.
-
Use protetor ocular ao manusear e aplicar o removedor de adesivos. (O protetor ocular está incluído em seu kit).
-
Luvas de proteção também estão incluídas em seu kit. Se você estiver preocupado/a com a irritação da pele, calce as luvas agora.
-
-
-
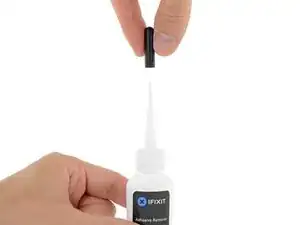
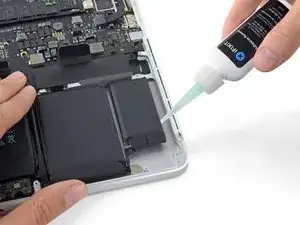
Retire a tampa de borracha preta do frasco do removedor de adesivos.
-
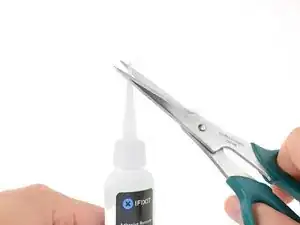
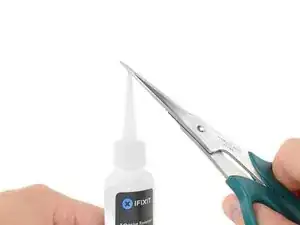
Com uma tesoura, corte a ponta lacrada do aplicador.
-
-
-
Aplique algumas gotas do removedor de adesivos uniformemente sob a borda da célula direita externa da bateria.
-
Aguarde de 2 a 3 minutos para que o removedor de adesivos líquido penetre sob a célula da bateria antes de prosseguir para o próximo passo.
-
-
-
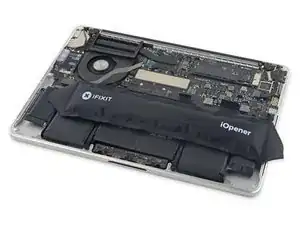
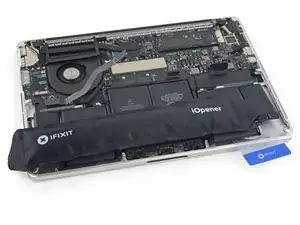
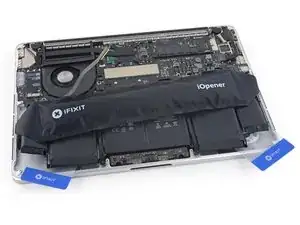
Use o iOpener aquecido para cobrir metade das células mais à direita da bateria.
-
Após cerca de um minuto, reaqueça o iOpener e mova-o para cobrir a outra metade das células mais à direita da bateria.
-
-
-
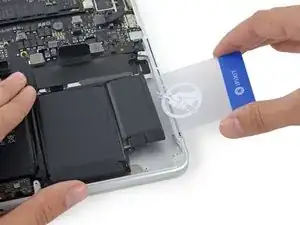
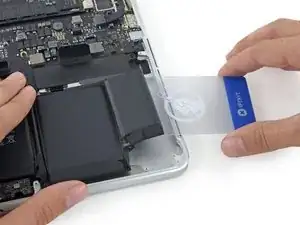
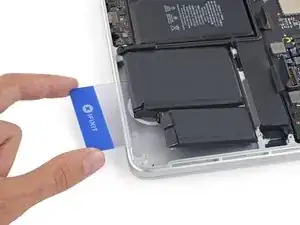
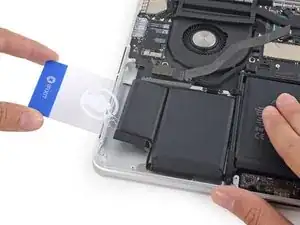
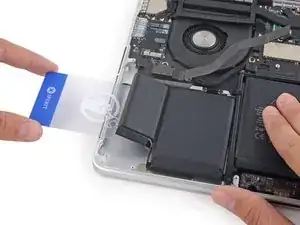
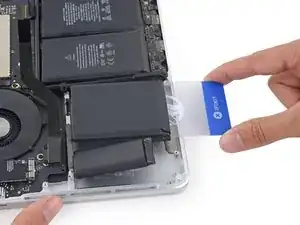
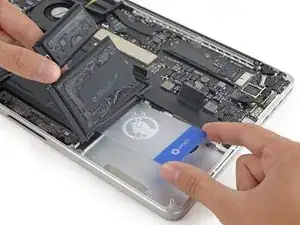
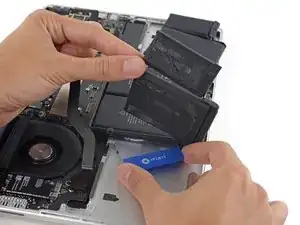
Empurre um cartão plástico entre a célula direita externa de bateria e a estrutura superior, cortando o adesivo entre ambas.
-
Caso use o método do iOpener aquecido, se a bateria oferecer muita resistência, pare e aplique o iOpener para reaquecer a área em que está trabalhando.
-
-
-
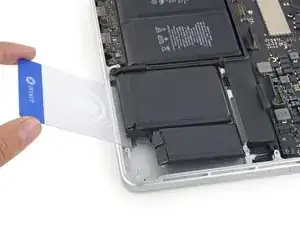
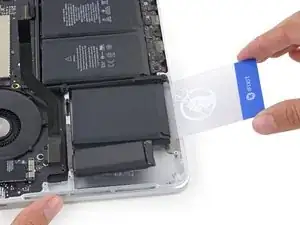
Repita esse procedimento com a célula adjacente da bateria:
-
Aplique uma pequena quantidade de removedor de adesivos líquido sob a célula da bateria e aguarde de 2 a 3 minutos para que ele penetre e amoleça o adesivo.
-
Como alternativa, reaqueça essa área com o iOpener, se necessário.
-
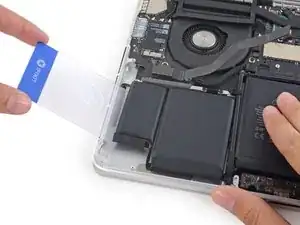
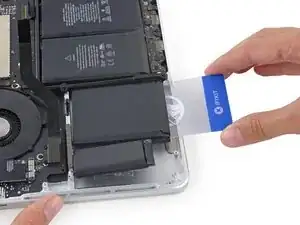
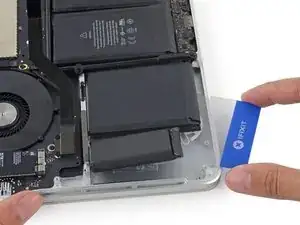
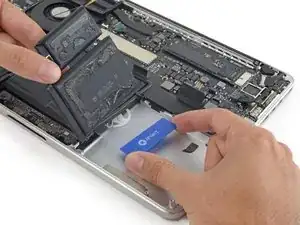
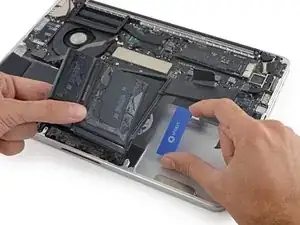
Empurre um cartão de plástico entre a célula da bateria e a estrutura superior e, lentamente, levante a célula para separar todo o adesivo.
-
-
-
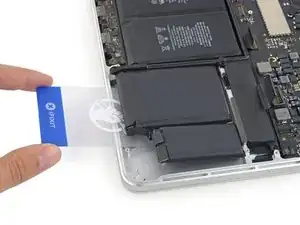
Deixe temporariamente o cartão plástico embaixo das duas células mais à direita da bateria, para evitar que elas voltem a aderir à estrutura superior.
-
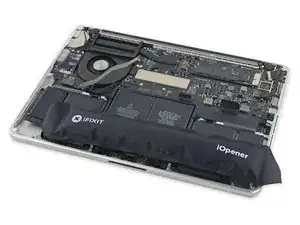
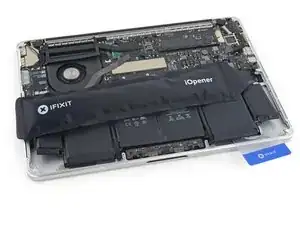
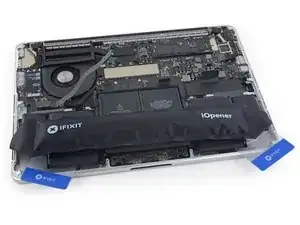
Se estiver usando um iOpener, reaqueça-o e reaplique-o, desta vez nas células mais à esquerda da bateria.
-
-
-
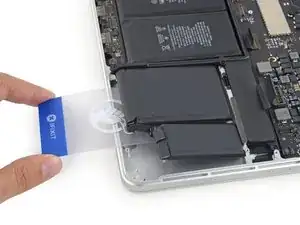
Repita o procedimento acima para separar as duas células mais à esquerda da bateria da estrutura superior.
-
Lembre-se de aplicar uma pequena quantidade de removedor de adesivos em cada célula da bateria e aguardar de 2 a 3 minutos para que ele penetre e amoleça o adesivo.
-
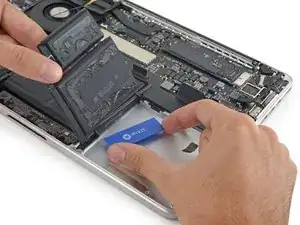
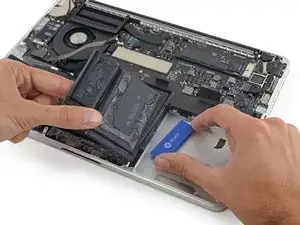
Com um segundo cartão plástico, separe as duas células mais à esquerda da bateria da estrutura superior.
-
-
-
Insira o cartão de plástico entre a segunda célula da bateria mais à esquerda e a estrutura superior para cortar o adesivo que une as duas células e levante a célula da estrutura.
-
-
-
Deixe o segundo cartão no canto entre as duas células da esquerda.
-
Se estiver usando um iOpener, reaqueça-o e aplique-o nas células intermediárias da bateria.
-
Como antes, deixe o iOpener em cada posição por cerca de um minuto, reaquecendo entre elas, para aquecer cada metade das células intermediárias.
-
Nos seguintes passos, você pode usar um terceiro cartão ou o cartão do canto direito. O adesivo do canto direito deve estar seco/frio o suficiente para que as células possam ser facilmente puxadas para cima novamente, se necessário.
-
-
-
Se estiver usando um removedor de adesivos líquido, aplique mais algumas gotas em cada uma das duas células centrais finais.
-
Aguarde de 2 a 3 minutos para que o removedor de adesivos penetre antes de continuar.
-
Com cuidado, dobre as células da bateria mais à direita para fora do caminho e insira um cartão de plástico sob a célula intermediária direita.
-
Empurre o cartão até a metade de seu comprimento para cortar o adesivo que prende a célula da bateria à estrutura.
-
Deixe o cartão no lugar para evitar que o adesivo volte a se selar.
-
-
-
Repita o mesmo procedimento para a última célula restante da bateria.
-
Mantendo as células externas fora do caminho, insira o cartão de plástico aproximadamente até a metade sob a célula intermediária esquerda da bateria, evitando a placa do trackpad.
-
-
-
Volte ao cartão abaixo da célula central direita e vire-o para separar a bateria inteira da estrutura superior.
-
Se não sair com facilidade, talvez seja necessário reaquecer o iOpener e aplicá-lo nas áreas com cola mais resistente e, em seguida, continuar cortando cuidadosamente o adesivo com os cartões plásticos.
-
-
-
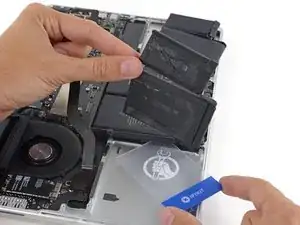
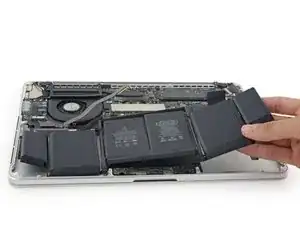
Remova a bateria.
-
Com um pouco de sorte, você pode puxar lentamente cada tira de adesivo com os dedos.
-
Caso contrário, molhe cada parte do adesivo com um pouco de removedor de adesivos por 2 a 3 minutos e, em seguida, raspe-o com uma palheta de abertura ou uma das outras ferramentas do seu kit. Isso pode exigir um pouco de trabalho, portanto seja paciente.
-
Limpe qualquer resíduo de removedor de adesivos e deixe o MacBook Pro secar ao ar livre por alguns minutos.
-
Calibre a bateria instalada: carregue até 100% e deixe carregando-a por mais duas horas. Tire da tomada e use o aparelho normalmente até a bateria descarregar. Quando vir o aviso de bateria fraca, salve o trabalho e deixe o laptop ligado até ele entrar em modo espera (bateria fraca). Aguarde ao menos 5 horas e carregue o laptop ininterruptamente até 100%.
-
Se você notar algum comportamento incomum ou problemas após a instalação da nova bateria, talvez seja necessário redefinir o SMC do seu MacBook Pro.
-


Compare a sua nova peça de reposição com a peça original — pode ser que você precise transferir componentes remanescentes ou remover suportes adesivos da nova peça antes de instalá-la. Por exemplo, algumas baterias de reposição podem ter pequenas pontas de borracha nos quatro cantos da estrutura central que você precisará cortar com cuidado para que a bateria se encaixe corretamente.
Para a remontagem de seu dispositivo, siga os passos acima na ordem inversa.
Leve o seu lixo eletrônico para um ponto de recolha ou uma recicladora certificada.
O reparo não está indo conforme o planejado? Tente soluções de problemas básicas, ou peça ajuda no nosso fórum de Respostas.

183 comentários
is it possible to use MBP early 2015's battery on a late 2013 model?
No, they're different parts.
I wonder the same.
Amazon https://www.amazon.de/EGOWAY-A1493-A1582... claims to work for
Compatible with Laptop Models: Mac Book Pro 11.1 13" Retina A1502 ME864xx/A / ME865xx/A/ ME866xx/A - (Late 2013 Version) Mac Book Pro 13" Retina "Core i5" 2.4 Mac Book Pro 13" Retina "Core i5" 2.6 Mac Book Pro 13" Retina "Core i7" 2.8 MGX72xx/A / MGX82xx/A / MGX92xx/A - (Mid 2014 Version) Mac Book Pro 13" Retina "Core i5" 2.4 Mac Book Pro 13" Retina "Core i5" 2.6 Mac Book Pro 13" Retina "Core i7" 2.8 Compatible with Laptop Models: Mac Book Pro 12.1 13" Retina A1502 MF839xx/A / MF840xx/A/ MF841xx/A/ MF843xx/A - (Early 2015 Version) Mac Book Pro 13" Retina "Core i5" 2.7 Mac Book Pro 13" Retina "Core i5" 2.9 Mac Book Pro 13" Retina "Core i7" 3.1
Martin -
Thanks to this guide I saved my broken MacBook Pro from a coffee spill that killed the battery. It cost me about 30% compared to what it would have cost to have the battery changed at an Apple authorized repair center. It wasn't easy to do, but that just made it all the more satisfying.
One comment: the new battery pack I bought came attached to a thin film which had to be removed. I unfortunately tore off some of the strips of glue attached to the back of the battery cells, before getting the hang of it. No big deal. But if you have to do the same thing: peel slowly.
Fredrik -
After i replace the battery, the new battery is outofsync with osx battery indicator. When the indicator hit the 30% mark the macbook just shutdown completly. How do i syncroniz the new battery with osx?
The tutorial i saw only, tell you to fully charged the battery and let it depleet until the warning message pop up that your battery is low and your mac go into sleep mod. Problem my mac cant go into sleep mod because it thinks that it has 30% left of juice.
Is there any method to change the sleep setting or to force a recalibration?
I would download an application called coconut battery from here: http://www.coconut-flavour.com/coconutba...
This will indicate your battery's current health (I am not sure how accurate it is or how it measures the milliamps/hour) which might help you determine when you need to recharge it. I don't know what else you could do but I'd check the battery's health before anything since it might be causing the problem if it is faulty.
You can try resetting the SMC controller. I had the issue of run away fans and no battery detected, but after a quick reset of the SMC all working correctly.
The process is to turn of the MacBook completely, press and hold: SHIFT, CTRL, ALT and POWER for three-five seconds, then just reboot and see if that helps.
Works for lots of minor issues with clock, sleeping and battery issues.
For all the screws you use the P5 pentalobe screwdriver?
Carlos -
Pentalobe is only for the screws on the bottom cover. The Torx screw driver is for the remainder.
Fredrik -
I never, ever, ever considered using anything but the correct tool on the Pentalobe screws. Too easy to strip and void your warranty (if still in effect), as well as make it almost impossible to get inside later for another upgrade or repair. The Wiha P5 Pentalobe screwdriver fits like a glove and costs only about $11 (a fraction of your drive's price)at Amazon.com. Get it!
marketing -
I followed this exactly and was able to replace my broken trackpad. I did not have to replace the ribbon OR the battery. However I would suggest getting the ribbon since it’s fairly cheap, as for the batteries I was able to do it with a card only. I didn’t use any heat or the liquid but it takes some time. You really have to work the card in there to release the glue. Also you must be very careful not to bend the batteries or damage them, if you do you must replace with new. This took me about 1.5hrs and my computer works like new. Apple cost for this job was around $450, I did it for $120. Big ups to ifixit for this awesome tutorial, tool set and parts!
On a side note, only use quality tools, the cheap ones will break or strip the screws.
Dustin Steward -
Note that the eight 3mm screws have a shoulder under the head, while the two 2.3mm screws are “full thread”, i.e., there is no shoulder under their heads. It’s important to put the two screws with no shoulder at the hinge of the cover.
All ten screws require a P5 Pentalobe screwdriver, preferably with a magnetized tip to help hold and position the screw.
All of the screws have blue “Loctite” thread locker compound on their threads. This is to help prevent the screws from working loose and falling out. Don’t attempt to clean the Loctite from the screws — leave it in place, and it will continue to help prevent the re-inserted screws from working loose.
When replacing the bottom cover, it is a good technique to insert and BEGIN tightening all ten screws BEFORE fully tightening any one screw. After all the screws have been started, then go around and finish tightening all of them. By doing this, you make it easier to feel that each screw has been started properly, and is not “cross-threaded”.
doubleclutch -
This is what I found on my MBP mid-2014 13” Retina. All 10 used the same screwdriver. I didn’t see the blue “loctite” but I also got my computer refurbished.
Evan Shulman -
A good technique for starting to thread the screws when replacing them is to position and align the screw, and with the driver, gently turn the screw in the REMOVAL direction until you feel and hear a slight click. This click happens when the leading thread of the screw drops off of the leading edge of the thread in the hole — this is the point at which the threads are properly positioned for engagement. You can now turn the driver and screw in the TIGHTENING direction. This technique will help prevent accidental “cross-threading” of the screw, which will damage the threads permanently.
Note that this is a useful technique when installing ANY threaded fastener.
doubleclutch -
Yes! I use this technique all the time with any screw that has to fit back into its original hole. I have been doing this for over 50 years and is one of the tips I always give to anyone who I may be advising or working with on some item.
Michael Scheinberg -
Hi peeps,
I have a wifi problem on this MBP 13” early 2015 and was pleasently surprised to find your guide to changing the airport card.
However upon closer inspection it seems that on my MBP (purchased new or so I thought) the 3 antennae seem so have been soldered together at the point where they are clamped to the chassis. I have photos but cannot post here. Can anyone conform that where the 3 antennae wires are held to the chssis by the 2 scew metal support (just before disappearing into the screen hinge), the support is not meant to short the 3 wires together. This makes no sense for 3 seperate antennae wires.
Any advice /close up photos is welcome here.
dom
colonel mustard -
Tip: Use post-it notes to keep track of screws
1. Pack of post it notes
2. Stick screws to the sticky part of the post it note
3. Write on the post it note which step and what kind of screw it is
ibash -
Hi, in order to drain the battery I am running:
yes > /dev/null
in 4 terminals, so the CPU maxes out at almost 99%.
I hope this speeds up the battery draining process.
And the backlight is at maximum brightness :-)
You can see the cpu load in Activity Monitor.
Its draining at 20% per 15 minutes.
Any concerns about draining the battery in this way?
Andre van der Ham -
Something I’ve been curious about, is it possible to upgrade a late 2013 Retina model MacBook Pro, with the improved 16gb ram and i7 processor logic board from the 2015 retina model? I’d be interested to try but not ready to shell out the $500+ to be the first lol
Chat Dawgie -
Without rehashing what others have said, I would highly recommend reading through the steps *and* the comments for each before tackling your replacement for tips. Highlights for me were: only disconnecting what actually needed to be disconnected, rotating the spudger to release the track pad cable, a hair dryer worked perfectly fine, and the pencil outline of the battery before you remove. You got this!
N DesRochers -
Installation of replacement AirPort card was easier than I had expected thanks to this guide. Thank you.
chaslaw -
I use replaced SSD and it was super easy and working great. I can finally upgrade Mac OS with plenty of room to spare and no more low memory alerts. Well worth investment and didn’t have to buy new laptop
Pete James -
It's interesting that this tutorial is rated Moderate even though you need to remove the battery. The battery removal tutorial which is basically the same but with fewer steps is rated Difficult.
Marv Ruona -
when i pulled the screws out i arranged them in the same way they were in. the top 2 middle screws appeared to be shorter than the rest. in order to keep them in place i got a square of packing tape sticky side up, taped both sides down with 2 other pieces of tape. and then put the screws head down in the order i pulled them.
Jason Wade -
Excellent instructions although checking battery and speakers aligned before fixing batteries into place is essential. MacBook good as new!
John Foreman -
I find it helpful to spread a soft, slightly fuzzy cloth (like flannel) over my workspace before doing something with small parts. It keeps screws and things from rolling or bouncing away. A towel might be too plush, though, as a screw might get lost in it.
Richard KeslerWest -
I cannot get the two screws (that are different than the other ones) out and now they’re stripped. Any idea what to do without using a drill?
Honeybee94 -
DO NOT REMOVE SPEAKER CABLES!! The connectors are fragile. Just remove speakers and bend attached cable away from battery. Same for trackpad cable connector at front side. This cable crosses the middle of the battery. Just remove the one connector on the back side - leave front side connector attached and fold cable toward front of computer out of way of battery.
Paul Lebow -
Is there a mistake in the wrench size?
When I did it I used a 1.3mm one.
ちくわちくわ -
The Dutch site fixje.nl says (see under "Welke MacBook Pro A1502 batterij kopen?") that the A1582 battery, which is for the Early 2015 version of the A1502 13-inch MacBook Pro, will fit the Late 2013–Mid 2014 versions of the A1502 13-inch MacBook Pro.
The A5182 battery has a higher capacity (6559 mAh) than the A1493 battery (6330 mAh), which is for the Late 2013–Mid 2014 models.
Can anyone confirm that the Early 2015 battery will actually fit in and work with the earlier A1502 models?
Philip Dygeus -
Just finished the battery replacement for Macbook Pro 13 in Early 2015. Followed the instructions to the letter. Everything went back together perfectly and now waiting for the battery to charge. Very appreciative of the instructions and the tools provided to do this job! Thank you iFixit!!
LOL - now considering replacing the SSD hard drive...
Abraham Wick -
Just at note. My wife cut her finger on one the pentalope screwheads tonight. Several of the screws where loose, but thanks to this guide I could go into my new screwdriver set and pick out a P5 and fasten all the screws. It save a trip to the other side of town. (I knew that my repair set for her previous model - mac pro 2010 - would not work)
Leif Andersen -