Introdução
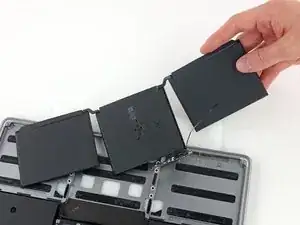
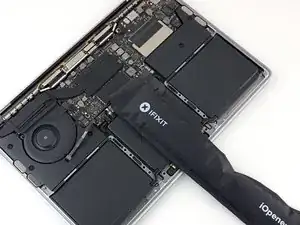
Use este guia para remover com segurança a bateria colada de seu MacBook Pro com a ajuda de um kit iFixit com removedor de adesivos. O removedor de adesivos dissolverá o adesivo que prende a bateria, permitindo que você a remova com facilidade.
O removedor de adesivos da iFixit é inflamável. Execute esse procedimento em uma área bem ventilada. Não fume nem trabalhe nas imediações de uma chama aberta durante este procedimento.
Para minimizar o risco de danos, ligue o MacBook e deixe a bateria descarregar completamente antes de iniciar este procedimento. Uma bateria de íons de lítio carregada pode iniciar um incêndio perigoso e incontrolável, se acidentalmente perfurada. Se a bateria estiver estufada, tome precauções adicionais.
Observação: O solvente usado para dissolver o adesivo da bateria pode danificar alguns plásticos. Siga todas as instruções e tome cuidado ao aplicar o removedor de adesivos.
-
-
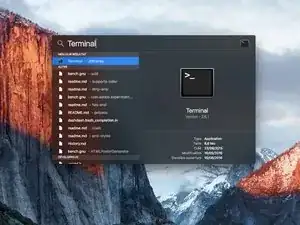
Ligue o Mac e abra o Terminal.
-
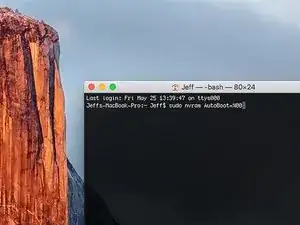
Copie e cole o seguinte comando (ou digite-o de forma exata) no Terminal:
-
sudo nvram AutoBoot=%00
-
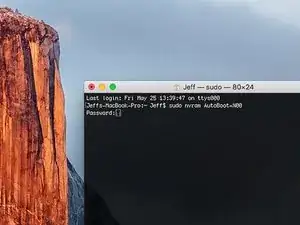
Pressione [return]. Se solicitado, digite sua senha de administrador e pressione [return] novamente. ''Observação: sua tecla Return também pode se chamar ⏎ ou "enter".
-
sudo nvram AutoBoot=%03
-
-
-
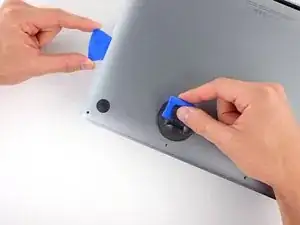
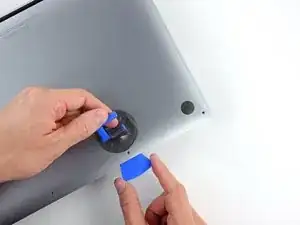
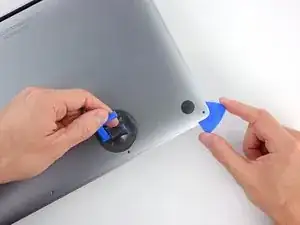
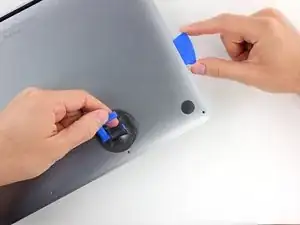
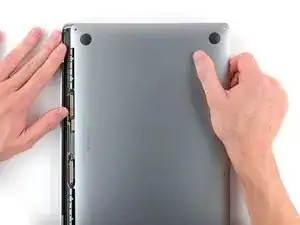
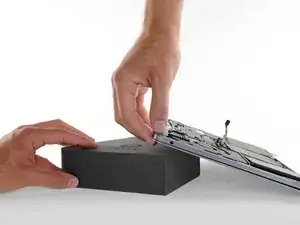
Com uma chave Pentalobe P5, remova os seis parafusos que fixam a estrutura inferior:
-
Dois parafusos de 6,2 mm
-
Dois parafusos de 5,3 mm
-
Dois parafusos de 3,4 mm
-
-
-
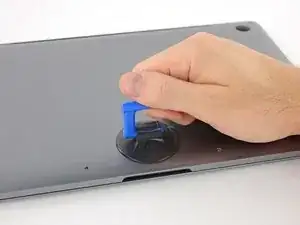
Aplique uma ventosa de sucção na parte de baixo da estrutura, próximo à área central frontal do MacBook Pro.
-
Levante a ventosa de sucção para formar um pequeno vão entre a estrutura inferior e o chassi.
-
-
-
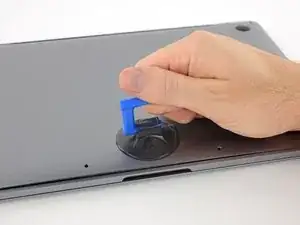
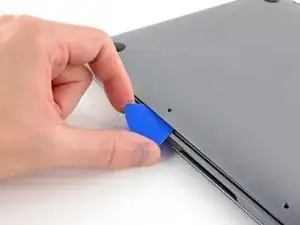
Insira a ponta de uma palheta de abertura no espaço entre a estrutura inferior e o chassi.
-
Passe a palheta de abertura ao redor do canto mais próximo até a metade da lateral da estrutura.
-
-
-
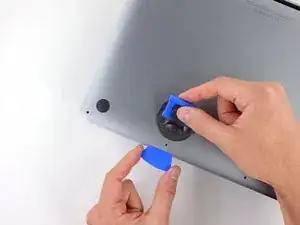
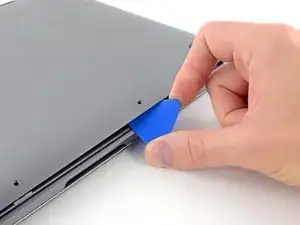
Repita a etapa anterior no lado oposto, passando a palheta de abertura por baixo da estrutura inferior e pela lateral para liberar o segundo clipe.
-
-
-
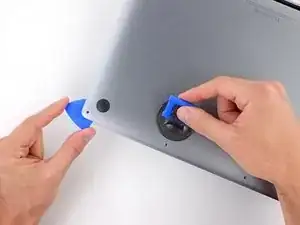
Insira novamente a sua palheta de abertura sob a borda frontal da estrutura inferior, próximo a um dos dois furos mais ao centro.
-
Gire a pinça com firmeza para liberar o terceiro clipe que prende a estrutura inferior ao chassi.
-
Repita esse procedimento próximo ao outro dos dois furos centrais, liberando o quarto clipe.
-
-
-
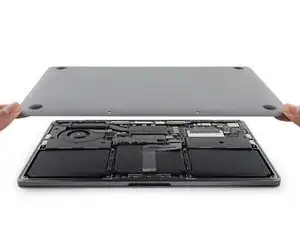
Puxe a estrutura inferior com firmeza em direção à parte frontal do MacBook (afastando-a da área da dobradiça) para separar o último dos clipes que prende a estrutura inferior.
-
-
-
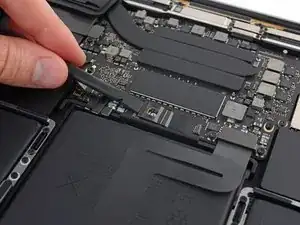
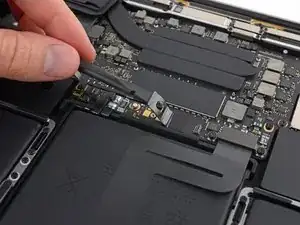
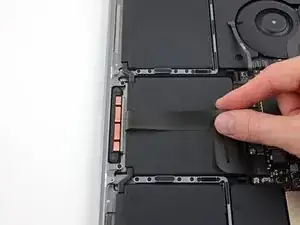
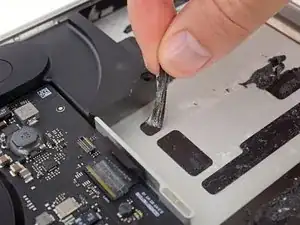
Retire com cuidado o pedaço grande de fita que cobre o conector da bateria, na borda da placa lógica mais próxima da bateria.
-
Remova a fita.
-
-
-
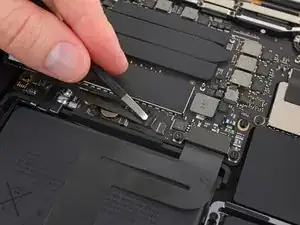
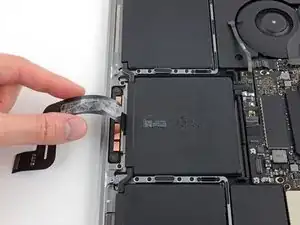
Retire com cuidado o pequeno pedaço de fita que cobre o conector do cabo de dados da placa da bateria.
-
-
-
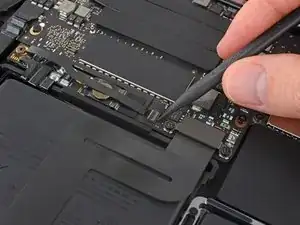
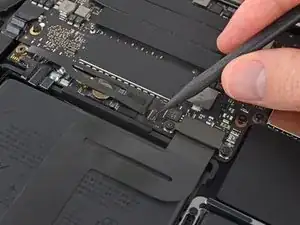
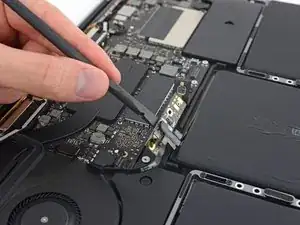
Com a ponta pontiaguda de uma espátula, levante a pequena lingueta preta que prende o cabo em seu conector.
-
-
-
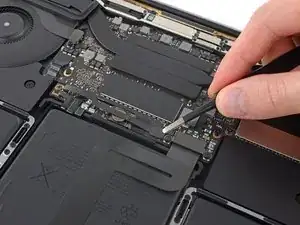
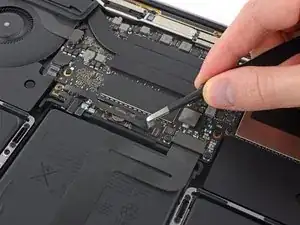
Desconecte o cabo de dados da placa da bateria deslizando-o para fora de seu soquete.
-
Faça um movimento paralelo à placa lógica, na direção do cabo.
-
-
-
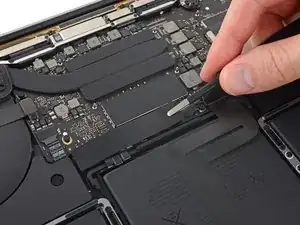
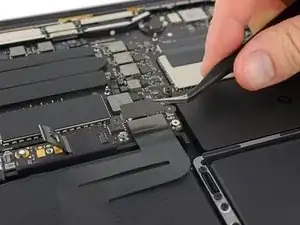
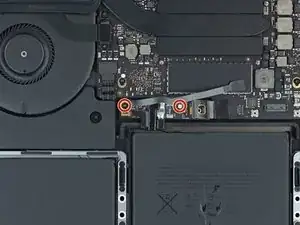
Com uma chave Torx T5, remova o parafuso pancake (de perfil baixo) de 3,7 mm que prende o conector de alimentação da bateria.
-
-
-
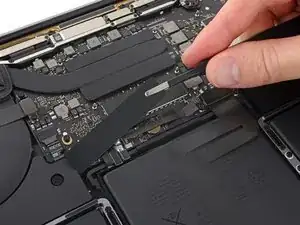
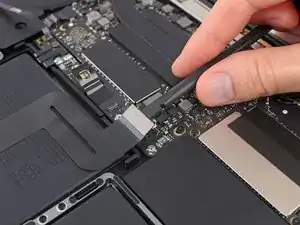
Com uma espátula, levante com cuidado o conector de alimentação da bateria, desconectando-a.
-
Levante o conector a uma altura suficiente para que ele fique separado do soquete. Se ele entrar em contato acidentalmente durante o reparo, o MacBook Pro poderá sofrer danos.
-
-
-
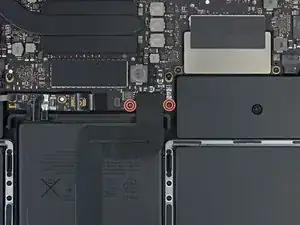
Com uma chave Torx T5, remova os dois parafusos de 2,1 mm que prendem o suporte do conector do cabo do trackpad.
-
-
-
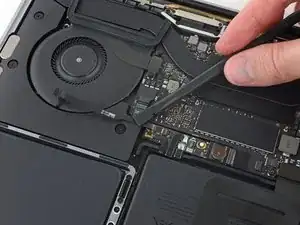
Com uma espátula, desconecte o cabo plano do trackpad, levantando cuidadosamente o conector da placa lógica.
-
-
-
Prepare um iOpener e coloque-o sobre o cabo plano do trackpad por cerca de um minuto, a fim de amolecer o adesivo que prende o cabo plano do trackpad à parte superior da bateria.
-
Se você não tiver um iOpener, use um secador de cabelo para aquecer o cabo. O cabo deve ficar quente, mas não ficar quente demais ao toque. Tenha cuidado para não superaquecer a bateria.
-
-
-
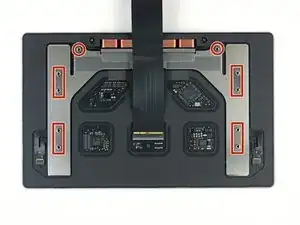
Com uma chave Torx T5, remova os dez parafusos que prendem o conjunto do trackpad:
-
Dois parafusos de 4,3 mm
-
Oito parafusos de 5,8 mm
-
-
-
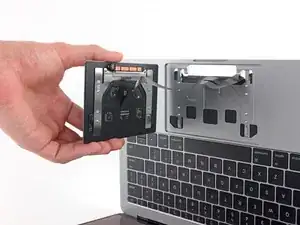
Remova o conjunto do trackpad.
-
Certifique-se de não perder as seis arruelas pequenas (duas circulares e quatro retangulares) que ficam na parte inferior do trackpad.
-
-
-
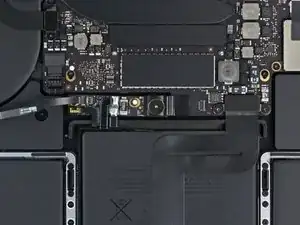
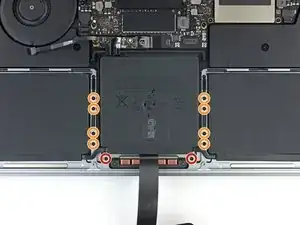
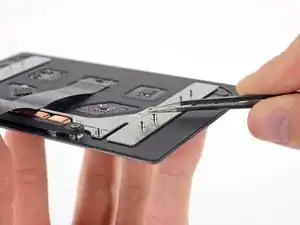
Insira a ponta plana de uma espátula sob a placa da bateria no lado mais próximo da placa lógica.
-
Levante a placa da bateria em um ângulo aproximado de 45 graus. Se necessário, levante o conector de alimentação da bateria para dar mais espaço à placa da bateria.
-
-
-
Para proteger a tela, coloque uma folha de papel-alumínio entre tela e teclado e deixe-a assim enquanto trabalha.
-
Além disso, coloque uma toalha absorvente diretamente sob a área do trackpad para absorver o excesso de removedor de adesivos.
-
-
-
Agora que seu MacBook Pro está totalmente preparado, é hora de se preparar.
-
Use protetor ocular ao manusear e aplicar o removedor de adesivos. O protetor ocular está incluso em seu kit.
-
Não use lentes de contato sem o protetor ocular.
-
Luvas de proteção também estão incluídas em seu kit. Se você se preocupa com a irritação da pele, calce as luvas agora.
-
-
-
Retire a tampa de borracha preta do frasco do removedor de adesivos.
-
Com uma tesoura, corte a ponta lacrada do aplicador.
-
-
-
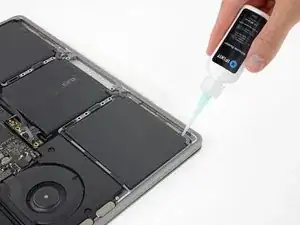
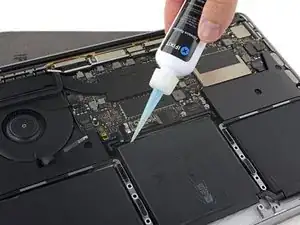
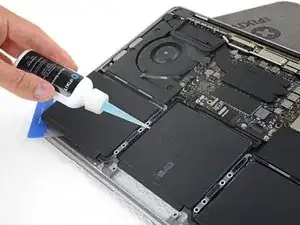
Aplique algumas gotas de removedor de adesivos sob a borda frontal da célula da bateria que fica mais próxima da ventoinha.
-
-
-
Incline a borda frontal do MacBook Pro para cima em um leve ângulo, para que o removedor de adesivos líquido passe por debaixo da célula da bateria.
-
Aguarde de 2 a 3 minutos antes de seguir para o próximo passo, para que o removedor de adesivos líquido tenha tempo de agir.
-
-
-
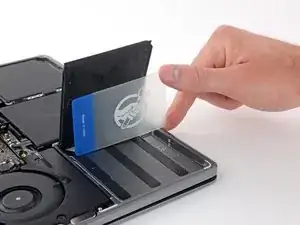
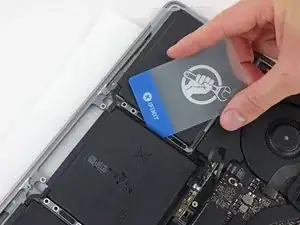
Depois de 2 a 3 minutos, deslize um cartão plástico sob a borda da célula da bateria onde você aplicou o removedor de adesivos.
-
-
-
Com cuidado, enfie mais fundo o cartão sob a célula da bateria, para romper o adesivo que o prende.
-
-
-
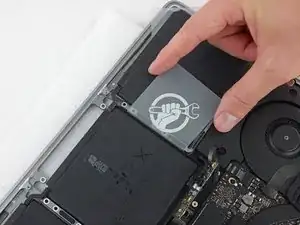
Faça movimentos de vai-e-vem com o cartão para levantar a célula da bateria, até que ela se separe totalmente da estrutura de alumínio.
-
-
-
Repita as seis etapas anteriores para separar a outra célula externa da bateria, no lado oposto.
-
-
-
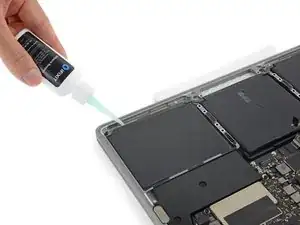
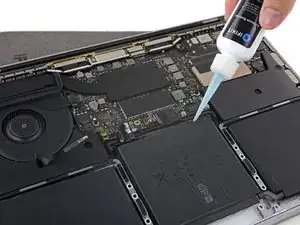
Para separar a célula central da bateria, primeiro levante a borda traseira do MacBook Pro e apoie-o sobre uma bucha de espuma ou um livro, para que o removedor de adesivos escoe da placa lógica.
-
Aplique algumas gotas de removedor de adesivos ao longo da borda traseira da célula da bateria.
-
-
-
Para compensar, aplique mais algumas gotas de removedor de adesivos em cada um dos lados da célula central da bateria.
-
Aguarde de 2 a 3 minutos antes de prosseguir para a próxima etapa.
-
-
-
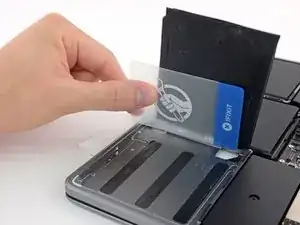
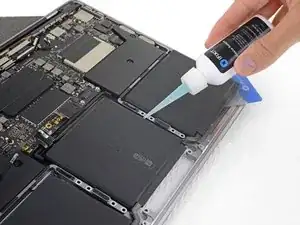
Deslize um cartão plástico sob uma das bordas laterais da célula central da bateria.
-
Pode ser útil fazer movimentos suaves de vai-e-vem com o cartão para abrir um pequeno vão entre a célula da bateria e a estrutura do MacBook Pro.
-
-
-
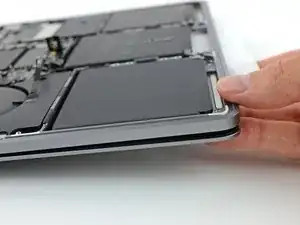
Use o cartão para levantar a célula da bateria até que ela se separe totalmente da estrutura de alumínio.
-
-
-
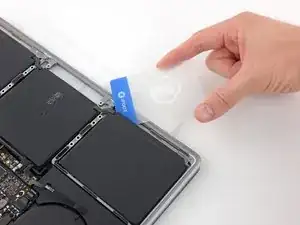
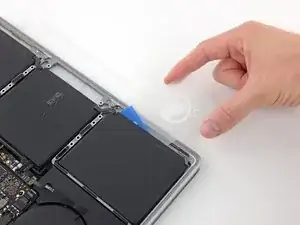
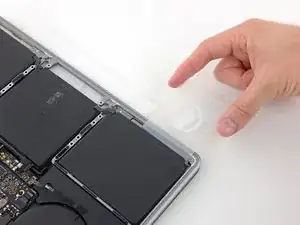
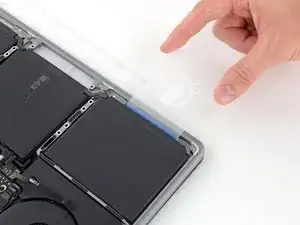
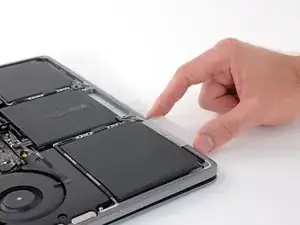
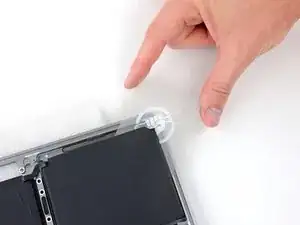
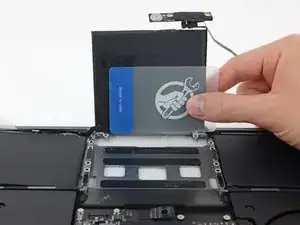
Levante e remova a bateria.
-
Com um pouco de sorte, você pode puxar lentamente cada tira de adesivo com os dedos.
-
Caso contrário, molhe todas as tiras de adesivo com um pouco de removedor de adesivos por 2 a 3 minutos e, em seguida, raspe-as com uma ferramenta de plástico. Isso pode exigir um pouco de trabalho, portanto, seja paciente.
-
Limpe todos os resíduos de removedor de adesivos e deixe o MacBook Pro secar ao ar livre por alguns minutos.
-
Calibre a bateria instalada: carregue a 100% e deixe carregando-a por mais duas horas. Tire da tomada e use o aparelho normalmente até a bateria descarregar. Quando vir o aviso de bateria fraca, salve o trabalho e deixe o laptop ligado até ele entrar em modo espera (bateria fraca). Aguarde ao menos 5 horas e carregue o laptop ininterruptamente até 100%.
-


Compare a sua nova peça de reposição com a peça original - pode ser que você precise transferir componentes remanescentes ou remover suportes adesivos da nova peça antes de instalá-la.
Para a remontagem de seu dispositivo, siga essas instruções na ordem inversa.
Para alcançar uma ótima performance, calibre a sua nova bateria: Carregue a 100% e deixe-a carregando por ao menos duas horas. Então use o aparelho até ele desligar devido a bateria fraca. Finalmente, carregue-o ininterruptamente até 100%.
Leve o seu lixo eletrônico para um ponto de recolha ou uma recicladora certificada.
O reparo não está indo conforme o planejado? Confira a nossa comunidade de Respostas para obter ajuda na solução de seu problema.

39 comentários
Cela peut paraitre impressionnant mais si vous suivez à la lettre ce guide de démontage / remontage, vous y arriverez ! Patience et motivation seront déterminantes !
Make sure when removing the battery with the adhesive and card that the card goes about 2-2.5 cm into the battery (underneath) because there is a cut out in the metal preventing you from pushing underneath the battery thinking it is very strong adhesive when it is not. Also when lining up the battery connector make sure that is lined up and able to fit before making the adhesive stick. One last tip is to make sure the trackpad is aligned before completely screwing in.
All valid great tips
This tip about the cutout in the metal under the battery is very true for the two batteries on the side. Luckily, under the side batteries, the metal is smooth under the corner close to the middle, so I recommend starting with the card there and getting the card far enough under the battery to get past those cutouts before moving it to the side.
Hi,
ich habe den Akku nach dieser Anleitung getauscht, jedoch wird der Akku nicht erkannt…kann mir jemand helfen?
hallo,
hat es sich für dich gelöst? Wenn ja, dann wie?
Ich habe das Macbook-Model A1708? Wüsstest du ob es für dieses Model auch funktioniert?
Gruß
dilber -
Is this step necessary? I can’t perform this step as I am attempting to repair water damage and need to remove logic board & most likely replace the battery.
Macrepair SF -
@mac_medic You definitely don’t want the power coming on while the board is wet. In your case, I think powering on the machine to disable Auto Boot would do more damage than it prevents. I agree, skip this step and be prepared to disconnect the battery quickly if the laptop automatically powers on. Good luck!
Jeff Suovanen -
Thats right! You don't want power running while working on your logic board.
DanJ -
This did not work when running High Sierra.
Kyle B -
Tried this on a 2018 MBP 13” Touchbar (there’s no iFixit guide for this model yet). Need to replace a broken screen.
Luckily I managed to connect to an external screen (Cmd-Down Brightness to switch displays) and enter above command. Seems to work, but there’s another problem with this model - it powers up as soon as any key is pressed……. ffs <gnashes teeth>
Cool_Breeze -
I unscrew the battery first and wrap electrical tape over the logic board battery connector before attempting any repairs to the board. Haven’t had any problems yet and I’ve worked on about 10 of these models already. Also when you open the bottom case use a suction cup at the bottom and pull up then run a plastic spudger along the edges to disconnect the clips. Also only use a plastic spudger on the board. Saw a youtube video from a repair shop and he did not disconnect the power and used all metal tools during the entire process of removing the board. His last step was to disconnect the battery terminal.
Brian -
Is this step necessary if my mac can turn on? Battery fully dead(
Nursat b -
BEFORE YOU START: The included torx head stripped off before I was done (and you might need an additional T4) so stop now and go buy a good one. Also they fail to warn you above to get some blue threadlocker ahead of time.
Jason Sherron -
This command did not work for me and I read that sometime in later 2020 Apple stopped this command from working…any ideas on a work around?
Patrick Machacek -
Not able to do that with damaged screen
richardjgreen -
If you have a damaged screen you can still use a converter from thunderbolt (USB 3) to HDMI and plug your Macbook Pro to your TV as monitor display. Just make sure to chose the right Source (HDMI IN) in your TV. I did it and to make it work I unplug and plug again in my Macbook and so I could disable the Auto boot
Roberto Sanchez Bustos -
Hi. This does not work on 2018 13” MacBook Pro with Touch Bar. I did exactly this to disable auto boot. But when I check by using nvram -p it says: auto-boot true. Am I doing something incorrectly? I did everything step by step. Copied and pasted the sudo command, pressed enter and then entered my password. I have Big Sur 11.1 installed. Is there any other way since I need to replace the screen. Thank you. Adrian
Adrian Vizik -
Hi everyone. This is also a little pointless if you can’t see anything on the screen, and you don’t have a display adapter to USB C to display it. I agree with Brian about removing the back and disconnecting the battery cable before you even think about opening the lid of the MacBook. Applying the insulation tape is also a handy little tip that just makes sure there is no way to discharge from either the board or battery.
Roberto Enrieu -
running `nvram -p | grep 'AutoBoot'` in terminal verifies that it was accepted
result: `AutoBoot %00`
Marek Polák -
Running Big Sur 11.6.7 on a 2019 16" MBP, it's "auto-boot". So it's:
nvram -p | grep 'auto-boot'to display the current state, the default istrue- and then to change it,sudo nvram auto-boot=falsewhich turns it off.Ed Mechem -
This step is completely unnecessary if you follow the guide to disconnect the battery properly. Just put some tape between the battery and logic board connection to prevent it from accidentally touching and therefore powering on the laptop.
Grant Ormsby -
It took me a few tries to make this command work, as I was able to copy and paste the command into Terminal, but could not type in my laptop’s password. I finally typed my password into a text document, copied it (command C), and then pasted it into Terminal and it worked.
tommy404 -
I didn’t do this. Mine never auto-booted before I replaced the battery. Now it does.
hatuxka -
BEFORE YOU DO ANYTHING - CHECK THE BATTERY!
I-fixit sent me a bad battery, which I didn’t realize until it was already install. They sent me a new one, but I wasted hours uninstalling and reinstalled.
Get a volt meter and measure the voltage on the output of the battery pack. If it reads 0 V, SEND IT BACK. It should read over 2 V.
bcardanha -
I've just received my replacement battery and it reads 0,042V between the two main connectors. Do you think it's dead?
peter sussex -
When I did this from Terminal.app within Recovery Mode, the “sudo” was not recognized but I could invoke it without the sudo part. It seems to have been accepted when looking at “nvram -p”
johann beda -
When in Recovery Mode, you already have superuser powers. So you don't need to prefix commands with the sudo command to invoke them with root privileges; you already have them. Do a
pwd(print working directory) after opening Terminal in Recovery Mode, and you'll see that you're in the root user's directory.Ed Mechem -
I received the battery kit for my 2018 MacBook Pro and as per the above comment from bcardanha - Oct 12, 2021, I checked the voltage on the pads marked + and - . It was zero volts so I panicked a bit.
I sent a message on the iFixiT Facebook page and I got no reply. I finally found the customer service email for Ifixit Europe and sent them an email voicing my concern as I was not keen to work for couple of hours just to discover that the battery is faulty. I had an almost instant reply on the email (kudos to them) and they adviced me to go ahead and install the new battery as the voltage measured when battery is not connected is not relevant.
I took a leap of faith and after two hours… the new battery showed 50% charge and everything seems to be working just fine. I am happy it worked.
Mircea Comanici -
After removing the old battery and installing the new battery I powered up the MBP before screwing the bottom on. I discovered the my keyboard would not function. It took a few hours of investigation and frustration that I discovered the track pad power ribbon had become partially dislodged from the trackpad. I was able to see that this through the little machined slot where the battery sat. I had to remove the trackpad to reinsert the power ribbon back into the connector in the trackpad. after reassembling and reinstalling the battery etc the keyboard worked. Just food for thought if your run into the keyboard issue.
Ed Mease -
This should be the default. IMO I tell you to power on - not the lid.
G Sena -
Est ce que cela fonctionne sur un macbook pro 2017 sans touchbar ?
maël muzelet -
Bonjour Maël, oui, ce tutoriel concerne "les MacBook Pro 2016 (et plus récents) et les MacBook Retina 12" 2017 (et plus récents)"
Claire Miesch -
Excellent instructions. I was able to follow and install the new screen. I recommend that you get a good set of tools before you begin. I started with an inexpensive repair kit bought online. The Penta and torx bits failed. I bought an IFIXIT kit with quality bits and I was able to do everything I needed.
Tom Markham -
If you're not running an admin account the sudo command won't work (which honestly, you should not be running admin). Rather than logging in to your admin amount via the OS, in the terminal type "login [admin username]," then the password and you'll be able to do the sudo command as described above. Once you're complete, type "logout [admin username]" and you'll be good to go. Obviously replace [admin username] with whatever the account name for your admin user is.
arichard2401 -
For those unable to complete this step because the screen is too damaged I recommend leaving your macbook on until the battery dies.
Nicholas R Licato -
Just replaced my 2018 15" MBP battery. Running Sonoma.
I found no way to disable AutoBoot (The status can be checked in the Power section of system report).
Anyway, i left my battery completely drain before opening the MBP, and had no issues during the process.
Cédric Bontems -
After sending this command in terminal when I checked what happens if I now open the lid, instead the screen lit slightly up (still black) then a battery symbol showing the charging state showed up.
Now, after replacement of the battery, this is all I get to see.
No reset of NVRAM nor PRAM helped.
Currently the new battery charges (58% atm) and it feels like it‘s mocking me.
webrockers -
I suspected the keyboard or TouchID sensor wouldn’t work, so I went on and checked every connector.
I missed connecting the left TouchID sensor from step 31.
webrockers -
Read the comments section at the bottom of the article before proceeding with the repair. It is unnecessary to remove the logic board. I actually removed the 45mm plastic bar to enable the cables to slip out then in. It is only there to frustrate repairers!
Jack -
I followed the instructions on my old 2017 MacBook Pro A1707 and I have to say these were the clearest and best instructions I have found on the internet for anything, really. I am about to power up the machine, so we'll see. I'm sure if it doesn't work, it something I was careless with - the instructions matched the hardware perfectly. Def impressed.
Michael L -
Hallo
Was macht man wenn das Laptop nicht angeht, soll man dieses Schritt vernachlässigen?
Abdul Salam Shaikh -