Introdução
Use este guia para substituir uma bateria antiga ou com defeito e revitalizar seu MacBook Pro. Se a bateria estiver estufada, tome as devidas precauções.
-
-
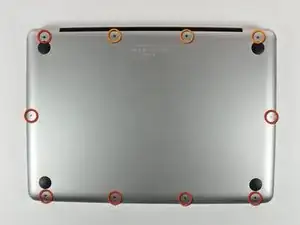
Remova os 10 parafusos a seguir que fixam a estrutura inferior ao MacBook Pro 13" Monobloco:
-
Sete parafusos Phillips de 3 mm.
-
Três parafusos Phillips de 13,5 mm.
-
-
-
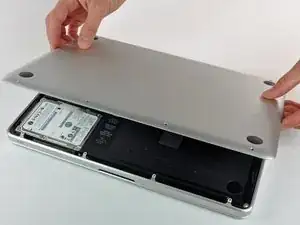
Levante ligeiramente a estrutura inferior e empurre-a em direção à parte traseira do computador para liberar as linguetas de montagem.
-
-
-
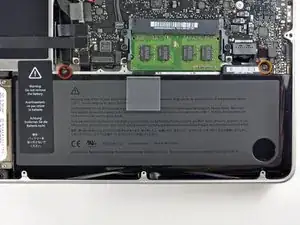
Remova os seguintes parafusos tri-point/tri-wing que prendem a bateria à estrutura superior:
-
Um parafuso tri-point de 5,5 mm.
-
Um parafuso tri-point de 13,5 mm.
-
-
-
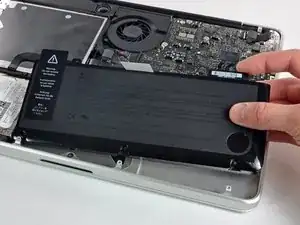
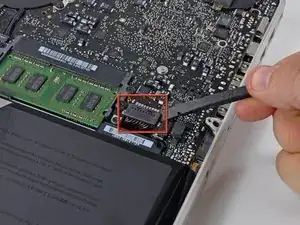
Com a ponta plana de uma espátula, levante o conector da bateria para fora de seu soquete na placa lógica.
-
-
-
Retire a bateria da estrutura superior.
-
Carregue a 100% e deixe carregando-a por mais duas horas. A seguir, tire da tomada e use o aparelho normalmente até a bateria descarregar. Quando vir o aviso de bateria fraca, salve o trabalho e deixe o laptop ligado até ele entrar em modo espera (bateria fraca). Aguarde ao menos 5 horas e carregue o laptop ininterruptamente até 100%.
-
Se você notar algum comportamento incomum ou problemas após a instalação da nova bateria, talvez seja necessário redefinir o SMC do seu MacBook.
-

Para a remontagem de seu dispositivo, siga essas instruções na ordem inversa.

51 comentários
My laptop wouldn't believe the battery was new until I reset the SMC as well ( http://support.apple.com/kb/HT3964 ).
Perfect! I didn't want to wait for the Tri-wing screwdriver to ship, so I gave it a try by wedging a FH 1 in between two of the wings. It worked well to unscrew, but you must be very careful when resetting the screws that hold the battery. If you get them started with your finger (a little pressure with your thumb pushing straight down will get the job done) then you can do a few final turns with the FH 1. If you try to start resetting the screws with the off-center-FH1-workaround, you will strip the screw! Keep the screws centered and don't force anything.
worked like a charm. my old battery had bulged and made it so that the track pad would not click :-( replacing the battery did the trick.
statprof -
Compare the short screws carefully before reinstalling them. The shouldered screws go in the holes on the front edge.
David Kilbridge -
Before I started removing any screws I took a piece of paper and drew the bottom of the laptop and put a piece of double-sided tape in the spot where each screw goes. That way when I took out the screws, I could put them on the tape so I knew exactly which screw went in which spot. I did the same thing for dismantling the inside on another sheet of paper, then a third sheet for the screen after getting the front glass off.
mastover -
I use a similar technique: I print out the iFixit manual for the job, and Scotch-tape down the screws/brackets/cables I remove at each step next to the component descriptions. That way, when I'm reassembling, the bits are taped right next to the photo of where they came from.
adlerpe -
That's exactly what I do for all my repairs! It's the best way to keep track of all of the parts ' original location and to make sure that you don't miss any parts during reassembly.
joyitsjennie -
Great idea and one I use often
Thomas Overstreet -
Excellent idea! Thanks for sharing it here.
Laura Sharkey -
I used a 00 that fit but the screws were very tight so I used a tiny paintbrush with some wd40 on it and put it around the edges of the screws. Worked like a charm
valentinedhdh -
I use a magnetic mat and place the screws in order on that :)
Cary B -
How to tell all screws apart?
Spudgeboy -