Introdução

Use este guia para substituir uma bateria descarregada.

Observação: Se houver uma fina película de plástico na bateria de reposição, não tente removê-la. Ela está colada e tem a função de proteger a bateria enquanto ela estiver dentro do MacBook.

  1. 3bTejPotVlS4MkaI
    • Antes de continuar, desligue o dispositivo, feche a tampa e coloque-o em uma superfície macia com a parte superior voltada para baixo.

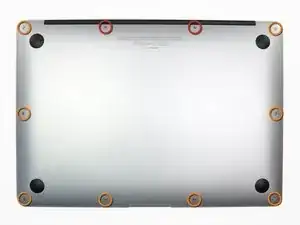
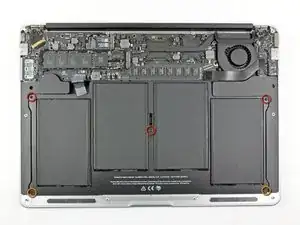
    • Remova os dez parafusos a seguir:

    • Dois parafusos Pentalobe de 5 pontas de 9 mm

    • Oito parafusos Pentalobe de 5 pontas de 2,6 mm

    • A chave especial necessária para remover os oito parafusos Pentalobe de 5 pontas pode ser encontrada aqui.

  2. WwI3rtRnhTEHj54C
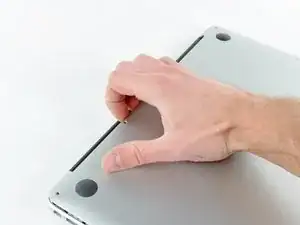
    • Coloque seus dedos entre a tela e a estrutura inferior e puxe para cima para retirar a estrutura inferior do Air.

    • Remova a estrutura inferior e reserve-a.

  3. N4ACcJX3UJrBILst
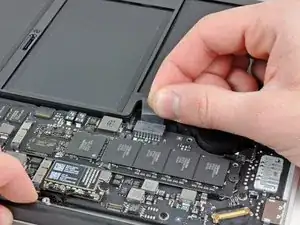
    • Pegue a aba de plástico transparente presa ao conector da bateria e puxe-a em direção à borda frontal do Air para desconectar a bateria da placa lógica.

    • Não levante o conector ao desconectá-lo.

  4. y3TUhCKKYPlT2GMN
    • Remova os cinco parafusos a seguir que prendem a bateria à estrutura superior:

    • Três parafusos Torx T5 de 6,3 mm

    • Dois parafusos Torx T5 de 2,4 mm

  5. Q6nMUHBqq3Ao6jyi
    • Ao manusear a bateria, evite apertar ou tocar as quatro células de polímero de lítio expostas.

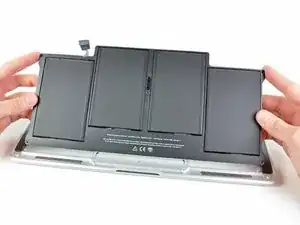
    • Levante a bateria pela borda mais próxima da placa lógica e remova-a da estrutura superior.

    • Se estiver instalando uma nova bateria, você deve calibrá-la após a instalação:

    • Carregue até 100% e continue carregando por ao menos mais duas horas. Em seguida, tire o plugue da tomada e use normalmente até descarregar a bateria. Quando vir o aviso de bateria fraca, salve seu trabalho e deixe o laptop ligado até entrar em modo repouso por bateria fraca. Aguarde 5 horas ou mais e carregue o laptop ininterruptamente até 100%.

    • Se você notar algum comportamento incomum ou problemas após a instalação da nova bateria, talvez seja necessário resetar o SMC do MacBook.

    • A bateria de reposição pode vir com revestimentos e películas de plástico. A película de plástico é facilmente removível e deve ser retirada antes da instalação. O revestimento é mais espesso e atua como uma camada protetora contra perfurações. Não remova o revestimento da bateria.

    Thanks for the easy step by step guide. MacBook working like a dream again

    Peter atkins -

Conclusão

Para montar novamente o dispositivo, siga estas instruções na ordem inversa.

Andrew Bookholt

598194 Reputação

18 comentários

I received the batter for my late 2010 in good order. The instructions were easy to follow and the replacement went well. The two tools mentioned are a must - the P5 pentalobe and T5 torx.

My disappointment is that the battery from iFixit is, in fact, not new. No, it has not been used and shows 6700 mAh design capacity. However, Coconut Battery reports the manufacture date of the battery as 12-14-2011 or 1134 days. Also, I am getting 4-6 hours when I expected 5-7. What is the shelf life of an unused battery?

Perhaps iFixit may wish to change the battery description from "Brand New" to "Never Used" and put the manufacture date.

Thanks

fwunder -

Great post and thanks for this tips.

see more : http://www.geeksonsite.co.nz/

lalit -

Just arrived the battery.

Replaced in 5 minutes.

Perfect!

My Mac is up, running and charging the new battery.

Thank you

Vinicio

vgusv -

Sounds like you did not follow the conditioning procedure?

grant varga -

My battery arrived today and I was able to install it in about 30 minutes (I have not done this before). My Mac is up and running and the battery has charged up and is in use.

Thanks for all the help.

SG 03/22/2017

Saadia Greenberg -

I followed this instructions. Everything is fine except that I cannot fully insert the pull tab back into the battery connector. How hard do you have to push ? Does it have to make a click ?

Julien Salort -

Hello Julien,

It will not click, but it will need about the same amount of force to push it in as the amount needed to pull it out. This being said, you should check the battery connector for any debris, and look at all the pins to make sure nothing is broken. Let us know if you succeed!

Scott

Scott Havard -

Worked great! I used an egg carton for the screws, an ifixit 52 piece toolkit — which I love! — and the battery switch was painless and worked immediately. Many thanks! The sixteen year old girl can get back to her tweeting now. Thank God.

Best,

Ira

airira -

All went smoothly! A little bit more explanantion about re-inserting the power connector would have been nice. . . . . . .

Saved my 2011 MacAir.

thanks!!!

Paul Harris -

If you don’t already have these tiny screwdrivers, you might want to also buy the P-5 Pentalobe screwdriver and the little plastic tool (“Spudger”) from IFIXIT. My local hardware store did not have the P-5, so it was a good thing I had ordered it. And the little plastic spudger was helpful in pushing the new battery connector plug into the jack on the board. Getting the T-5 Torx, too, could be handy just to avoid a trip to the hardware store. The price on IFIXIT was not significantly more than I paid at the local Ace hardware.

Jason D -

The instructions you have given to calibrate the new battery are different from the ones that came with it. How do I proceed?

Patricia Lacerda -

I have found the answer. There are 2 different procedures, one is called CONDITIONING and the other is CALIBRATING. Conditioning of a brand new battery involves one cycle of 12 h uninterrupted charging followed by complete drainage of the battery until MacBook shuts down (repeat this 3 times). Calibrating can be done afterwards on old batteries and involves the usual instructions given by many websites (here, Lifewire, Apple, etc).

Patricia Lacerda -

Hi. I did also reset the SMC after replacing the batteries.

Fabrice -

Do i remove the plastic film on the new battery?

John -

Hi John,

If the plastic film is an easily removable layer, you can remove it. If it is glued onto the battery, do not remove the layer.

Arthur Shi -

how important is it to keep the plastic film on the battery? i didn’t see the message at the beginning and removed it :(

if it is important, i would include that message to the step where the new battery is installed.

matthewyo -

Good point! I will add a note in the last step. The battery may come installed with a liner and/or thin plastic film. The plastic film is easily removable and should be removed before installation. The liner helps with installation and acts as a layer of defense against punctures.

Arthur Shi -

Instructions simples, il suffit de les suivre et c’est parfait.

10 minutes chrono sans se presser.

Avec le kit de tournevis c’est pratique.

Celina -