Introdução

If your Skullcandy Air Raid will not maintain power even after charging, it may be time to replace the battery.

  1. LB2YK4AbsgNGkdJn
    • Starting with the corners, gently pull the rubber cover off of the device.

  2. jVDJetEZVeyIYHNA
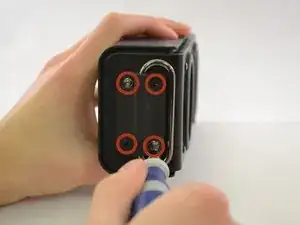
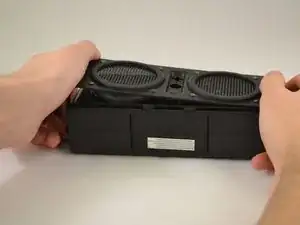
    • Using the T-6 hexagonal screwdriver, unscrew the four 10mm #6 hex screws on the right side of the device.

    • Remove the handle from the device.

  3. pDPnwiNLYTQCRoIK
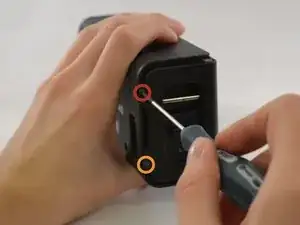
    • Unscrew the two screws on the left side of the device using the phillips #00 screwdriver.

    • One 5mm Phillips screw.

    • One 8mm Phillips screw.

  4. VbL3NTQQ6bEaJ3r6
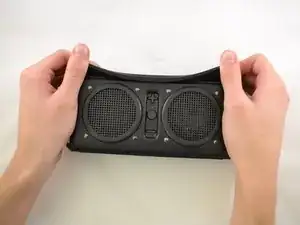
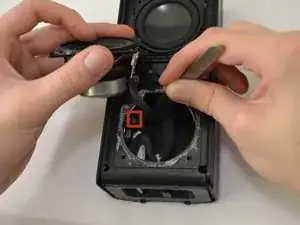
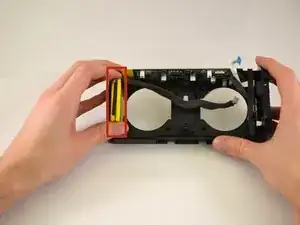
    • Gently pull the sides of the front plate outwards from the device.

    • Pull up on the front plate to remove it from the device.

  5. UqRIbB4QbTHDrRAN
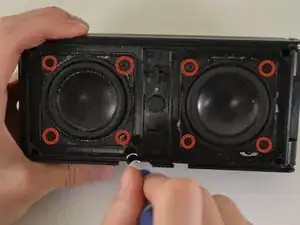
    • Using a #000 Philips Screwdriver, unscrew the four 8 mm Philips screws from each corner of both speakers (eight 8 mm Philips screws total).

  6. XYStDR3nVSW5BOSY
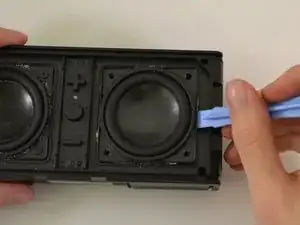
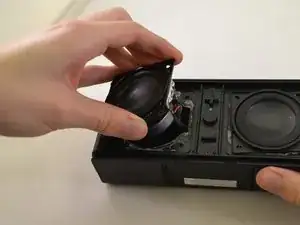
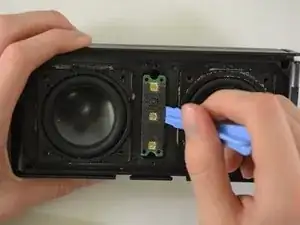
    • Using the plastic opening tool, pry around edges of the speaker to loosen glue contact with front plate.

    • If you are unable to loosen glue contact using the plastic opening tool, use a heat gun to assist in removal.

  7. ABGLQDiJFUPACV6r
    • Lift the speaker out of the device.

    • Be aware of the connection with the ribbon cable.

    • For reassembly, ensure proper orientation of the cable plug.

  8. Na1eOEMU1WtNQmXA
    • Firmly pull on the end of ribbon cable to disconnect the speaker from the motherboard.

  9. xN1uMjt1eRiqU2cD
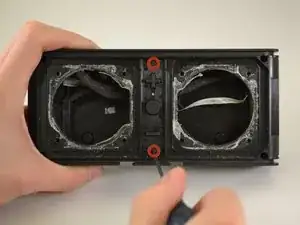
    • Using a Phillips #00 Precision Screwdriver, unscrew two 6 mm screws from the middle of the panel, above and below volume buttons.

  10. XhmqnZcrJGVKrv6N
    • Lift the button panel.

  11. xkWlKf6p5KTaOXBC
    • Using a Phillips #00 Precision Screwdriver, unscrew two 6 mm screws from the button motherboard.

  12. 4Rx3u5FRcp1a1vDu
    • Using a plastic opening tool, pry the button motherboard to detach it from the device.

    • The button motherboard is connected to a ribbon cable inside the device.

  13. mWP4slZOQinAbRMy
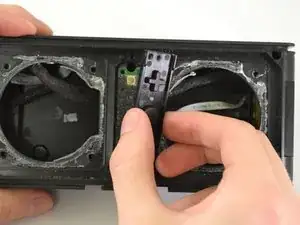
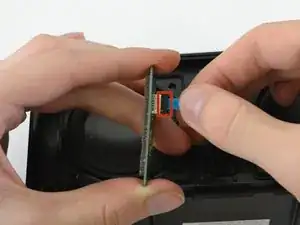
    • Pull the black ribbon cord attachment away from the motherboard.

    • Pull on the cable until it releases from the back of the motherboard.

    • The black attachment is part of the connector, not the blue ribbon cable, so it will not disconnect from the motherboard.

    No need to disconnect the ribbon cable just pull the board away to access the 2 screws behind it.

    vcdb -

  14. QMAsyPKsLVWKQe5y
    QMAsyPKsLVWKQe5y
    pDGEVxQoRv4uAIuH
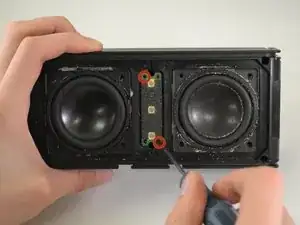
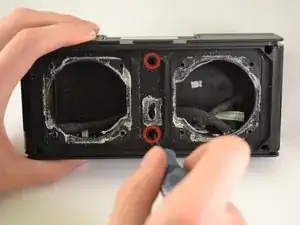
    • Using a Phillips #00 Precision Screwdriver, unscrew two 8 mm screws.

    • Lift off the back panel.

    How do you pull off the back panel? Those two parts are really stuck to each other.

    Brandon De La Rosa -

    There's four additional screws in the corners! How did you miss that?

    David Lassabe -

    Might want to update the four corner screws as you can't see it unless you open this comment page.

    vcdb -

  15. XVBTrIUk61iVeDuT
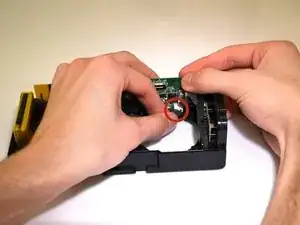
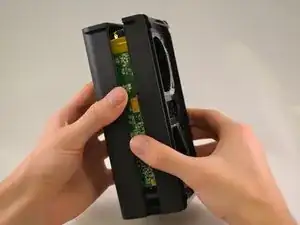
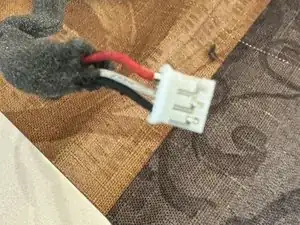
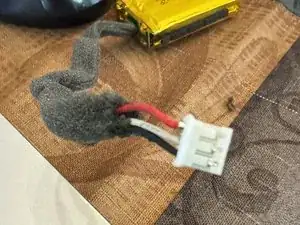
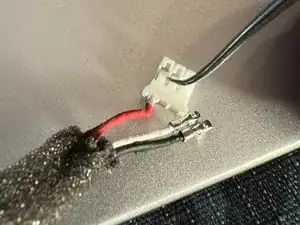
    • Pull on the ribbon cable that connects the battery to the motherboard until the connector releases.

  16. yqAGbf2atMW4U3NA
    • Pull battery straight out until it is completely out of device.

    • If you are unable to loosen glue contact, use a heat gun to assist in removal.

    Battery: 2000 mAh - 3.7v - 7.4Wh. Part number (printed on battery) AEC553450-2P.

    Andy Padilla -

    Can you please tell me where the white wire in from the battery terminal goes please .. I have a red a black and a white wire and the white wire is not connected anywhere .. i have just bought 3 of these skull air raids as faulty and would like to repair them for my kids .. many thanks

    Martin Cook -

    Great instructions. Very helpful. But is there any place to find this battery?

    shoretorun -

  17. mLJWb5aVOcTpHVpM
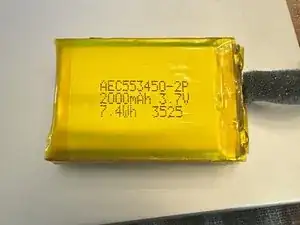
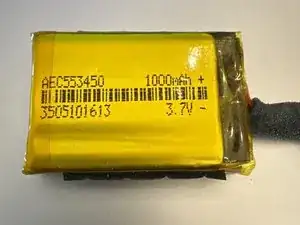
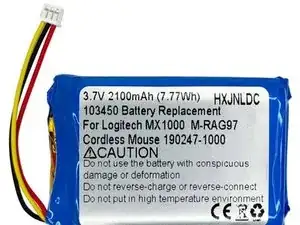
    • The battery has 3 wires - the middle white wire is to prevent overheating so look for a 3 wire replacement battery.

  18. pMLZAbXqQAPUsota
    pMLZAbXqQAPUsota
    ZNTdxDd3EHlpoXcX
    • If you aren't able to source an official replacement battery, follow the next two steps for tips on alternate battery replacements.

    • This is actually 2 × 1000mAh 3.7V batteries. The total is 2000mAhm, or 7.4Wh. The battery compartment is the limiting factor, so a replacement should be 10mm deep, 54mm long and 34mm wide.

  19. ANUlpbLWWUpSSIVL
    ANUlpbLWWUpSSIVL
    gjLsUBmWJ1AYvZJd
    c2BHVuXyvdRLI3hY
    • If you have a replacement battery picked out, you can remove and reorder the wires to fit the original connector. Pictured is an example replacement. This battery requires cutting and soldering the 3 leads from the old battery.

Conclusão

To reassemble your device, follow these instructions in reverse order.

Kristin

Membro desde: 14/01/15

495 Reputação

7 comentários

Hi, my name is Alex, and i have the same problem. The battery does not work anymore, but i don't know where can i find a replacement, and what is the its name. Or mabe something similar? I live in Romania so i need mabe an international online store to buy it. Thank you! My email is stanciualex_e@ yahoo.com

Alex -

What is the type of battery?

grigoriev85 -

I have the same issue. I want to acquire a replacement.

It is a rechargeable battery Model AEC553450-2P / 2000mA 3.7V 7.4Wh.

It there anybody out there who could help us I will appreciate it very much

Fernando Morales -

I also need a battery, have you found one?

Noah Larsen -

I have the same issue. I want to acquire a replacement.

It is a rechargeable battery Model AEC553450-2P / 2000mA 3.7V 7.4Wh.

It there anybody out there who could help us I will appreciate it very much

Noah Larsen -

ive been trying to fix this sme exact speaker and it is unessary to remove the speaker screews, so id recoment leaving those in place

Octavio Morales Guerrero -

It seems like the 2 batteries from the original pack share a ground, I purchased a single 2 wire 1000mAh Li-ion battery without realizing. I'm going to purchase another from digikey and attempt to put them together

Cole Miller -