Introdução
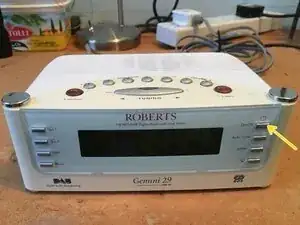
This 10year (?) old DAB radio had a faulty on/off switch such that sometimes it wouldn't turn on or off, then it would recover again.
The radio was dismantled and the standard momentary switch behind the on/off switch actuator, was flooded with contact cleaner. Now it works again.
Ferramentas
-
-
First image shows general view of radio and faulty on off push button switch (yellow arrow).
-
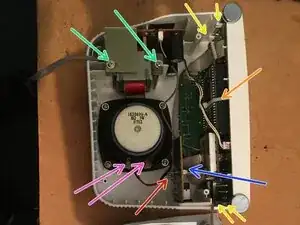
Second image shows the radio with bottom removed after undoing 4 screws on the base. Unfortunately, to get to the internal faulty switch, a near full disassembly is required.
-
The 2 connectors on the power board did not readily come apart so I removed the power board itself by undoing 2 screws (green arrows). I removed the ribbon cable (blue arrow) and speaker connectors (pink arrows). To make room, I also removed the earphone board (1 screw -red arrow).
-
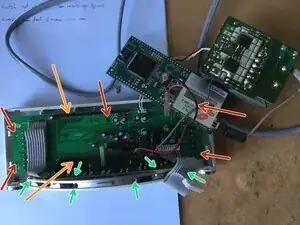
Note the front panel can now be detached by slightly bending the 4 white clips (yellow arrows).
-
Snip the plastic tie pull (orange arrow). It need not be replaced, unless the radio requires robustness (ie it's moved a lot).
-
-
-
With the tie pull removed, as in the previous step, the upper board can be lifted as it is only kept in place by the 2 long rows of pin connectors (orange arrows). This module can then be put to one side.
-
The main (largest) board can be removed by undoing 5 screws (red arrows- one hidden in image). Note this board is also held in place by a line of pin connectors (under the soldered in ribbon cable) so needs a little force (especially as the ribbon cable is a bit stiff).
-
In the above step, I also took 6 screws (green arrows) out of the front board for slightly more wiggle room, but it may not be necessary.
-
-
-
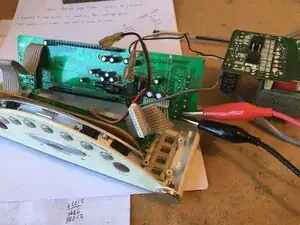
Turn the main board over and you can see the offending momentary on/off switch (red arrow). With electrical contact cleaner (I used 'Kontakt 10 Super') trickle a few drops down the black push button into the switch body and press the button about 100 times to clean the internal contacts.
-
If you have a multimeter, you can clip the probes onto the back of the switch to check progress. In my case, the resistance changed from about 300 +-100 ohms to less than 1 ohms ie the same as the other switches on the board.
-
If the switch cleaning is not effective, a new switch needs to be soldered in place (cheap eg 10 for £3 'Tactile Momentary or push button Switch 6mmx6mm 12V 4PIN' on eBay).
-
Note: I mistakenly removed the cosmetic shiny discs which were at the blue arrow location at each front corner. I had to glue these back on!
-

Assembly is the reverse of disassembly. Cleaning the switch restored full functionality.