Introdução

Este é um guia do tipo pré-requisito exclusivo! Este guia é parte de outro procedimento e não é destinado a ser usado isoladamente.

Use este guia para remover a tela do seu Pixel 7.

  1. RH1hNR5DYvEMTNGX
    RH1hNR5DYvEMTNGX
    kUNSpM2wM3aEGX23
    • Deixe a bateria descarregar abaixo de 25% antes de iniciar esse reparo. Uma bateria carregada pode pegar fogo se for danificada.

    • Desligue totalmente o telefone e desconecte todos os cabos.

    i replaced my pixel 7 screen, I noticed that my proximity sensor is no longer working, I have tried to calibrate it using 3rd part apps and it ddisnt work,i tried using developer settings to switch the proximity sensor and i also updated my android version...all these didnt work

    Ian -

    If you can't power down your device because the screen is cracked (in my case, the AMOLED didn't light up at all anymore) and the touch is broken, you can also press power, volume up, and volume down all at the same time for 20-30 seconds. This will actually power off the phone, and not restart it (for that, you would hold the power button and volume up for a while).

    Max -

  2. uWsCCoGWV5JIrUns
    uWsCCoGWV5JIrUns
    qBuyTnEhoZIp4ycS
    rCPFaRmEDnGc6YSe
    • A tela do Google Pixel 7 é fixada por clipes de plástico e adesivo.

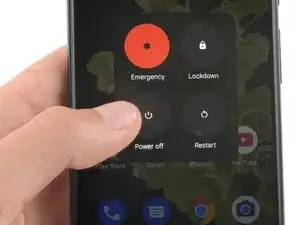
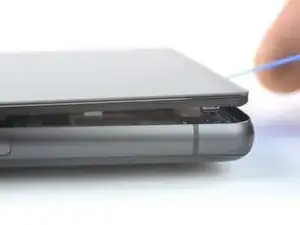
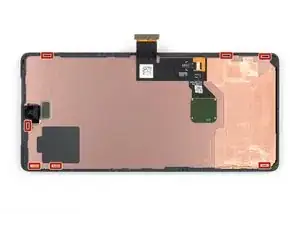
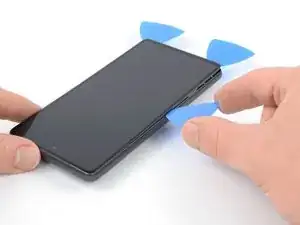
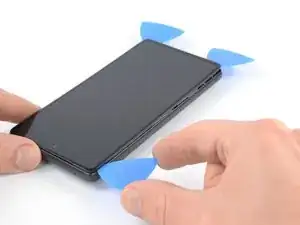
    • Durante o procedimento de remoção, certifique-se de inserir as palhetas de abertura na posição correta, para evitar separar a tela da estrutura de segurança em vez do conjunto do telefone.

    • Insira a palheta somente até ~3,5 mm durante o procedimento de remoção, para não danificar os componentes internos e não causar problemas nos clipes de plástico.

    • Há vários clipes de plástico ao redor de toda a tela. Caso a palheta de abertura fique bloqueada durante o procedimento de remoção da tela, isso significa que a palheta foi inserida muito fundo sob a tela.

    I accidentally removed the screen from the safety frame. Thankfully, this wasn't a big issue since my screen was broken anyway. In that case, you can still easily pop up the frame, and carefully remove the remaining glue with some pliers afterward.

    Max -

    "During the removal procedure, make sure to insert your opening picks in the right position"

    But then don't share what that position is, or even how to start.

    Great way to start the guide. Fills me with so much confidence in doing a $150 repair.

    Off tonyoutube to find someone who did q better job at a guide.

    HA Halleman -

    Hi there! I apologize that the instructions were not clear. I have updated the guide to clarify where the right place to insert the opening picks.

    Alex Diaz-Kokaisl -

    @hahalleman :

    I think there is no need to be sarcastic. These people owe you nothing, and they created a 30-step guide to help us repair our stuff, so at least show a bit of gratitude.

    If you miss something, you can politely ask. I'll teach you, since it seems you parents didn't:

    "Can you please explain better how to insert the opening picks?"

    You are welcome.

    Jaume Devesa -

  3. uNWQn4O2iyarfTwP
    uNWQn4O2iyarfTwP
    X4Mot1WmVF3dl5H6
    hwdBtFR1G1bs6cUM
    • As próximas três etapas demonstram o Anti-Clamp, uma ferramenta que projetamos para facilitar o procedimento de abertura. Se não estiver usando o Anti-Clamp, pule as três etapas abaixo para um método alternativo.

    • Para obter instruções completas sobre como usar o Anti-Clamp, consulte este guia.

    • Se a tela estiver rachada, cubra-a com uma camada de fita adesiva transparente, para conferir maior aderência à ventosa.

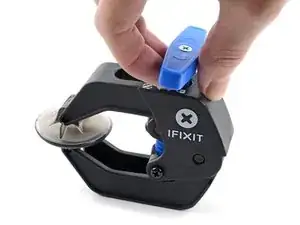
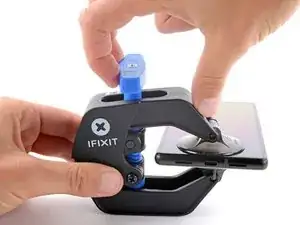
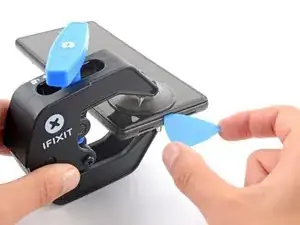
    • Puxe a pega azul para trás para destravar os braços do Anti-Clamp.

    • Deslize os braços sobre a borda esquerda ou direita do telefone.

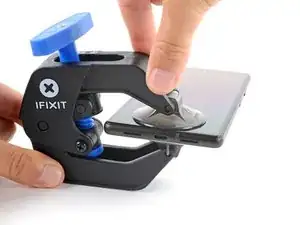
    • Posicione as ventosas próximo à borda inferior do telefone - uma na parte frontal e outra na parte traseira.

    • Aperte as ventosas para aplicar a sucção.

    • Se você achar que a superfície do telefone é muito escorregadia para que o Anti-Clamp se prenda a ela, você pode usar uma fita para criar uma superfície mais aderente.

  4. C5UOdfJGyBNrPmud
    C5UOdfJGyBNrPmud
    NT1pkIvVebv5WAbQ
    5q3uaImPG2XtyBUP
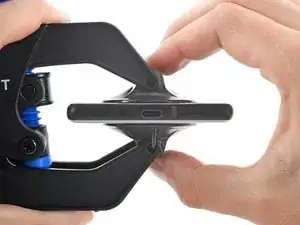
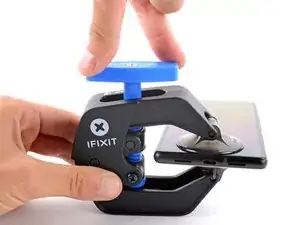
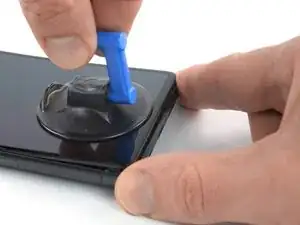
    • Puxe a pega azul para a frente para travar os braços.

    • Gire a pega 360 graus no sentido horário ou até que as ventosas comecem a se esticar.

    • Certifique-se de que as ventosas permaneçam alinhadas uma com a outra. Se elas começarem a se desalinhar, solte um pouco as ventosas e realinhe os braços.

  5. iu5TEcPWZeWgMueB
    iu5TEcPWZeWgMueB
    iklY4LILrc5nWFlx
    mI2NZfhUYJ3QJbYH
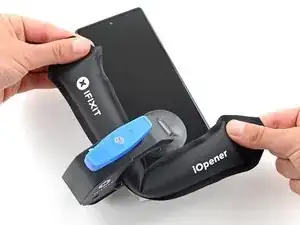
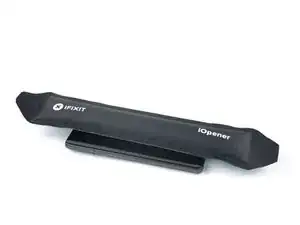
    • Aqueça uma bolsa térmica iOpener e passe-a pelos braços do Anti-Clamp.

    • Você também pode usar um secador de cabelo ou uma uma pistola de ar quente - mas o calor extremo pode danificar o visor e/ou a bateria interna, portanto proceda com cuidado.

    • Dobre a bolsa térmica iOpener de modo que ela fique sobre a borda inferior do telefone.

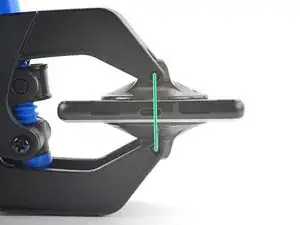
    • Aguarde um minuto para que o adesivo tenha a chance de se soltar e um vão se apresentar.

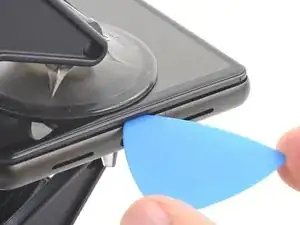
    • Insira uma palheta de abertura sob a moldura da tela quando o Anti-Clamp formar um vão suficientemente grande.

    • Se o Anti-Clamp não forma um vão grande o suficiente, aplique mais calor na área e gire a pega meia volta no sentido horário.

    • Não dê mais do que meia volta de cada vez e espere um minuto entre as voltas. Deixe que o Anti-Clamp e o tempo façam o trabalho por você.

    • Pule as próximas duas etapas.

  6. 6cKgLNhBJSeuArNm
    • Aplique uma bolsa térmica iOpener aquecida na tela para soltar o adesivo por baixo. Aplique a bolsa térmica iOpener por pelo menos 3 minutos.

    • Um secador de cabelos, uma pistola de ar quente ou uma chapa quente também podem ser usados, mas tome cuidado para não superaquecer o dispositivo. A borda deve estar levemente quente demais para ser tocada.

    This guide is a bit all over the place. Most of the previous pictures show the iOpener being placed on the left side first (with the device having the camera facing upwards)

    However this pictures shows placing the iOpener on the right side. Does it matter? Is there a best practice side to pry first?

    Zachary (Zach) -

    I left my iOpener on the phone for a out 5 or more minutes, but the bag should have been hotter I think (I put it in the microwave about 35 seconds, 30 is recommended starting amount). I highly suggest making sure the phone is well heated before taking the screen off because I think that is the only way to make the adhesive easier to get off. I spent probably 30-45 minutes just scraping off adhesive with the tweezers.

    Samuel Y -

  7. CexARCSAqGYQbmha
    CexARCSAqGYQbmha
    4gF4DCWXWHNS2aGI
    gfaVVfZV1RGTbMLx
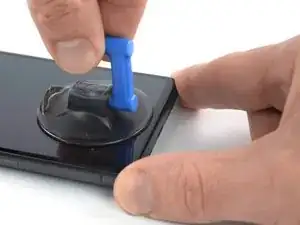
    • Quando a tela estiver quente ao toque, aplique uma ventosa de sucção na borda inferior da tela.

    • Se a tela estiver severamente rachada, cobri-la com uma camada de fita de embalagem transparente pode conferir maior aderência à ventosa de sucção. Como alternativa, uma fita muito resistente pode ser usada em vez da ventosa de sucção. Se tudo o mais falhar, você pode usar supercola fazer a ventosa de sucção grudar na tela quebrada.

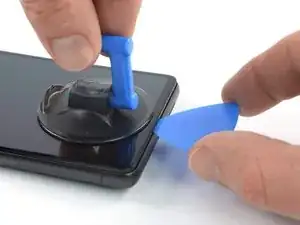
    • Levante a tela, incluindo a estrutura de segurança, com a ventosa de sucção para criar um pequeno vão entre tela e conjunto do telefone.

    • Dependendo da idade do seu telefone, isso pode ser difícil. Se estiver tendo problemas, aplique mais calor na borda inferior e tente novamente.

    • Insira uma palheta de abertura no vão.

    If you're having trouble getting the first pick in, try a different hand position than what is shown. Grip the suction cup's handle with your index finger, and keep your thumb and middle finger on either side of the screen. Choose a forgiving surface underneath in case you slip. Then hold firmly and keep it stable (no need to really push down). Just be prying it open deliberately and evenly. Then take your pick and use gentle prodding, experimenting with your angle and pressure, feel around. That should be all you need to get in.

    Orin Zebest -

  8. IBUeZvgemYHWImZc
    IBUeZvgemYHWImZc
    2SO1E2gi6C2FiaZI
    • Para evitar causar danos ao seu fone, não introduza a sua palheta mais do que aprox. 2,5 mm, caso contrário você separa o adesivo da tela. Observe as seguintes áreas:

    • O cabo da tela encontra-se um pouco abaixo da meia altura na borda esquerda do fone. Tenha muito cuidado aqui para evitar desgastar o cabo.

    • Há vários contatos de mola em todo o perímetro do fone. Tenha muito cuidado nessas áreas para evitar empenar os contatos.

  9. wtdv5UrUMow2CECH
    wtdv5UrUMow2CECH
    djiNoNgaVURRqAnE
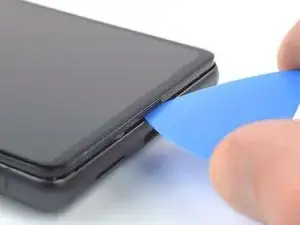
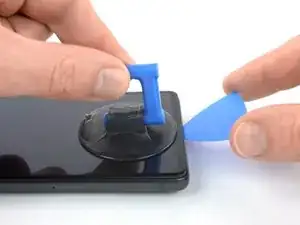
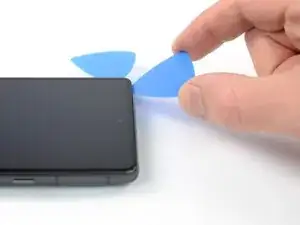
    • Deslize a palheta de abertura para o canto inferior direito da tela para cortar o adesivo.

    • Deixe a palheta de abertura no lugar para evitar que o adesivo volte a selar.

  10. BvVyMHlKdFsfT4jJ
    BvVyMHlKdFsfT4jJ
    STqP6jEultQQM41x
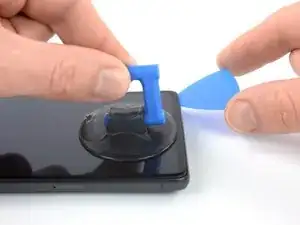
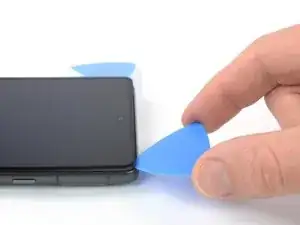
    • Insira uma segunda palheta de abertura na borda inferior e deslize-a até o canto inferior esquerdo da tela para cortar o adesivo.

    • Deixe a palheta de abertura no lugar para evitar que o adesivo volte a selar.

  11. 3TahkFe4ry6RCiY4
    3TahkFe4ry6RCiY4
    3JU6OqcJvHWxqoST
    6ZPHWVqkfEhNxfpF
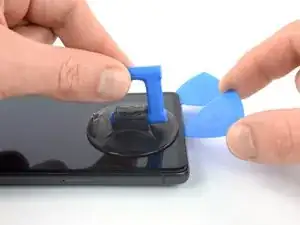
    • Insira uma terceira palheta de abertura por debaixo do canto inferior esquerdo da tela.

    • Deslize a palheta de abertura ao longo da borda esquerda da tela para cortar o adesivo e liberar os clipes de plástico.

    • Deixe a palheta de abertura no canto superior esquerdo para evitar que o adesivo volte a selar.

    Heating is crucial - don't force the pick. If it feels hard to push through, stop, and reheat the edge you're working on.

    The iOpener cools down too quickly. Ideally you should use a thermometer to monitor the temperature - the ideal temperature is around 55 Celsius. I found that I had to reheat the iOpener twice while working through the four sides of the phone. Each time I found the iOpener cool to around 40C (and no longer just a little too hot to the touch), and heated it back up for 10 seconds.

    YMMV and read the iOpener safety instructions carefully.

    Max Z -

  12. RAqKHAsrl3xCRUU1
    RAqKHAsrl3xCRUU1
    snvx1NYmrDPfUDaX
    cnPPFVoxMmq3nELB
    • Se o adesivo ficar difícil de cortar, é provável que tenha esfriado. Use a bolsa térmica iOpener ou a pistola de ar quente por 1 a 2 minutos para reaquecê-lo.

    • Ao cortar perto da câmera frontal, insira apenas a ponta da palheta de abertura (~2,5 mm) para evitar danificar ou manchar a câmera.

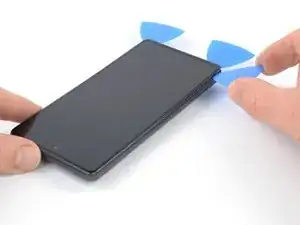
    • Insira uma quarta palheta de abertura no canto superior esquerdo da tela.

    • Deslize a palheta de abertura ao longo da borda superior do telefone para cortar o adesivo.

    • Deixe a palheta de abertura no canto superior direito para evitar que o adesivo volte a selar.

    This is the only slice that makes me nervous. Never had a problem, but yeah... extra care because of the camera.

    Orin Zebest -

  13. PnfIw3f25Eqr1XHF
    PnfIw3f25Eqr1XHF
    KenvqZiSWYaywVKu
    TZuqyojhZfgKo23H
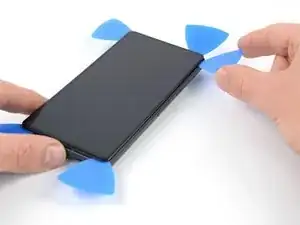
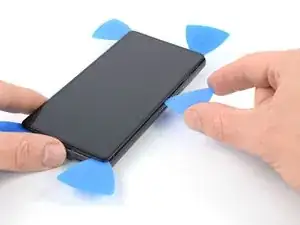
    • Insira uma quinta palheta de abertura e deslize-a ao longo da borda direita do telefone para cortar o adesivo restante e liberar os clipes plásticos à direita.

    • Não tente remover a tela completamente ainda, pois a tela ainda está conectada ao conjunto do telefone por um cabo flex.

  14. rhQqo5C35FvoYK3U
    rhQqo5C35FvoYK3U
    IrVMIJexBS6bDSeP
    jLlFZYjxMwL21C2X
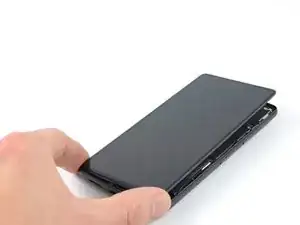
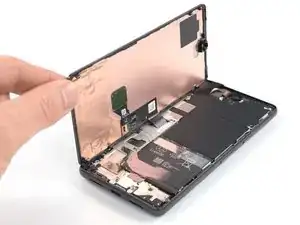
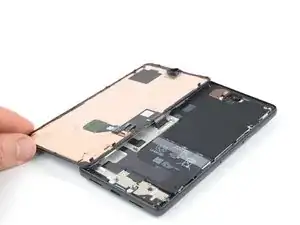
    • Levante a borda direita da tela e em direção ao lado esquerdo do dispositivo, como se estivesse abrindo um livro.

    • Não vire a tela nem a afaste muito da estrutura, para evitar esticar ou danificar o cabo conector flex.

    • Coloque a tela com a face virada para baixo e paralela à estrutura antes de continuar.

    The adhesive still sticking to the screen might trip you up... don't let it pull the screen in weird ways. Just pick that stuff off and the screen sits perfectly next to the phone, as pictured.

    Orin Zebest -

  15. PSmtyE4SOWOdAwOu
    PSmtyE4SOWOdAwOu
    EP6lSfkEvCqupEtr
    • O suporte do cabo da tela está bem preso e requer alguma força para ser liberado.

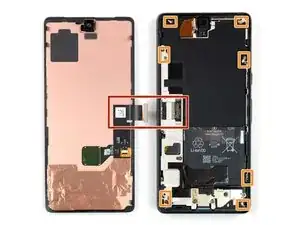
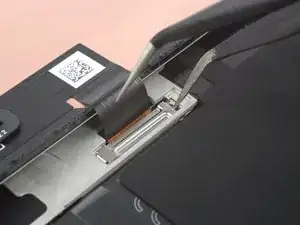
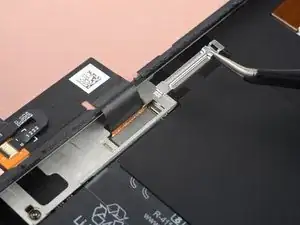
    • Insira uma ponta de uma pinça na abertura da extremidade superior do suporte do cabo da tela.

    • Empurre o suporte para dentro e levante-o para liberá-lo.

    The way this piece is wedged in there can be a difficult to imagine, so you may need to apply force at a different angle than you expect. I bent mine a few times, but just bent it back into shape with no issue.

    Orin Zebest -

    This was a pain to get out! Felt like I was going to rip the whole cable out. But it popped out eventually.

    Alex Thengvall -

    I found this much easier to remove than put it back.

    If you insert the tweezers exactly as in the picture and push like suggested, it will come out.

    Andrea Caltroni -

    This was tricky to put back at first, but once I realized you just needed to insert the one tab into the slot and push straight down with firm, controlled force, it clicked into place. You can use the spudger's flat side to help apply pressure on the length of the tab farthest away from the screen ribbon.

    Ashley Papineau -

    WARNING: pressing inwards or downwards with the tweezer will destroy the connector! Please add this warning to the guide as I'm now out of a working phone and the cost of the kit, not to mention a brand new battery now destined for the landfill. Very disappointed.

    Che Yu L -

  16. WKPNiJHhVHnhCorC
    WKPNiJHhVHnhCorC
    LhAcZy62xFSngm3n
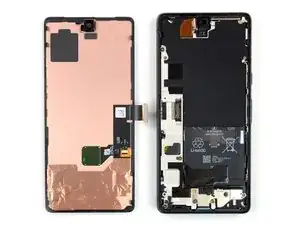
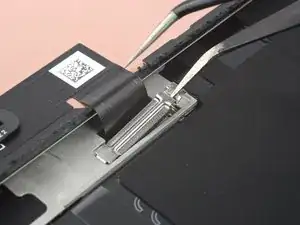
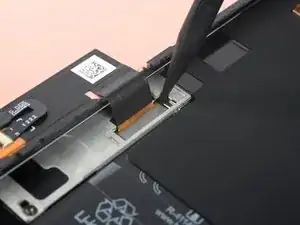
    • Com uma pinça, remova o suporte do cabo da tela, puxando-o por baixo da estrutura intermediária e na direção das câmeras.

    I forgot to replace this the first time. It's not a dealbreaker (phone works fine without it), but if you ever open your phone again you must be super-extra careful -- nothing is securing the connection.

    Orin Zebest -

    I bent the top of the bracket backwards by accident, but it released easier this way. Then I just bent the bracket back before putting it back.

    Also, make sure you add the adhesive before plugging the new screen in.

    Samuel Y -

  17. jRnnMxxSKtAwg2aW
    jRnnMxxSKtAwg2aW
    HaPX5khLMl4bDRNB
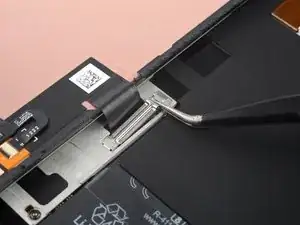
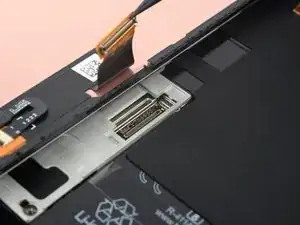
    • Com uma espátula, desconecte o cabo conector flex da tela, levantando o conector e afastando-o em linha reta do soquete.

    • Para reconectar conectores press-fit como este, alinhe e pressione cuidadosamente um lado até que ele se encaixe e, em seguida, repita no outro lado. Não pressione no centro. Se o conector estiver desalinhado, os pinos podem entortar, causando danos permanentes.

    Getting the press connector aligned properly is a very fiddly task and impossible without a light touch and several tries. My only advice is to take a break if you get frustrated. There's no 'click' or anything to help you notice that you've got it right. But when you do, it'll just... fit. And you'll probably think, "wait I did it? oh, not as hard as it sounded. just took awhile."

    Orin Zebest -

    Beware! I tried using the forceps instead of my finger and I ended up tearing into the ribbon cable. So be careful and use your finger if possible. I wouldn't use a sharp tool like I did. There are a couple Youtube videos that probably can help if you search "pixel 7 screen replacement". Sadly I didn't do that first.

    Alex Thengvall -

    Be careful not to hit any circuitry or jumpers in the process. They are so tiny that I did and now sound doesn't work on my bottom speaker. There's a YouTube video on this topic. Take your time!

    Louie Popov -

    Very easy to pull out but tricky to put back in place because it's difficult to align it with the socket that you barely see.

    Use the iFixit Opening Tool and press gently on one side (left worked for me) until you don't see it moving anymore. There is no clear click when it's in place.

    Andrea Caltroni -

    As others mentioned, reattaching the connector is fiddly! For me, it was the most difficult part of the entire battery replacement project. Take your time and use a magnifying glass if necessary.

    Sparky1991 -

    The blue pick worked better than the tweezers & the bracket came out easy after watching a video, way more easier. SMH

    Stephen -

    The blue pick worked better than the tweezers & the bracket & the flex cable with the spudger; I watched a video & it saved me from buying a new screen or bracket, edited*

    Stephen -

    Tip: in the PCB, there's a mark in the bottom-right corner of the socket indicating where the corner of the connector should be placed. Aligning the connector to that corner helped me plug it in again.

    Adrià -

Conclusão

Compare a sua nova peça de reposição com a peça original — pode ser que você precise transferir componentes remanescentes ou remover suportes adesivos da nova peça antes de instalá-la.

Para a remontagem de seu dispositivo, siga os passos acima na ordem inversa.

O reparo não está indo conforme o planejado? Tente soluções de problemas básicas, ou peça ajuda na nossa comunidade de respostas para o Google Pixel 7.

Dominik Schnabelrauch

Membro desde: 23/11/16

252795 Reputação

0 comentários