Introdução

Este é um guia tipo pré-requisito exclusivo! Este guia é parte de outro procedimento e não deve ser usado isoladamente.

Use este guia para remover a tela de seu Pixel 7 Pro.

  1. pcCOWHCOgiE1OqGw
    pcCOWHCOgiE1OqGw
    jJUWoaZ3KpXfhiPF
    • Deixe a bateria descarregar abaixo de 25% antes de iniciar o reparo. Uma bateria carregada pode pegar fogo se for danificada.

    • Desligue totalmente o telefone e desconecte todos os cabos.

    I am not able to power off. Broken screen does not respond. I have the battery fully discharged but would like to know before beginning my repair if I can plug in the charger to try the screen after replacement to verify all is functioning before reassembly.

    Mary -

    Step 2 is VERY VERY IMPORTANT!!!!!!
    I had to remove the adhesive and take out the plastic from the old screen, which was still on the phone and had to reapply it. It was a nightmare.
    Please DON'T TAKE IT EASY

    Kevin Döring -

    I thought i was careful enough, but got between the display and its frame.

    So, the display is broken now..!!

    The main problem was the battery, which became thicker and caused a big space on the right hand side of the phone.

    Now i have to replace the (expensive) display.

    You really have to be very careful !!

    Benjamin Janzen -

    ..oh, by the way. I just got my new Display. I cannot understand why they do not put the selfadhesive screen sticker within.

    I did not need another repair kit, so i only ordered the part. And now i am wondering why they will not put the sticker within, i mean at that price.

    Benjamin Janzen -

  2. r4cF1OLmMUoCTLb3
    r4cF1OLmMUoCTLb3
    rWVVVxdKliEb2ajr
    GupbaQq5eGmqFscR
    • A tela do Google Pixel 7 Pro é fixada por clipes de plástico e adesivo. Observe o seguinte:

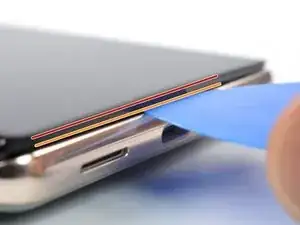
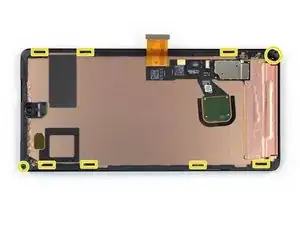
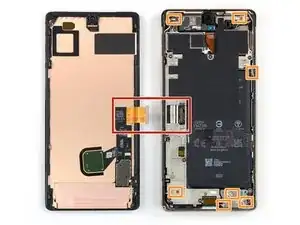
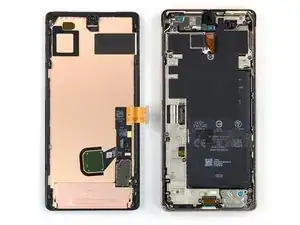
    • Emenda da tela: esta emenda separa a tela do resto do fone. Não separe nesta emenda.

    • Emenda da moldura: aqui é o ponto de encontro entre a moldura de plástico projetado para proteção da tela e a moldura. Ela está fixada por clipes de plástico. É neste ponto que você precisa separar.

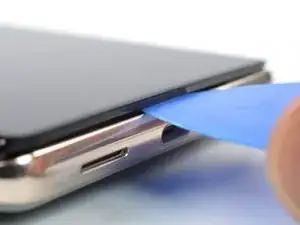
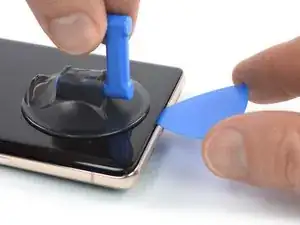
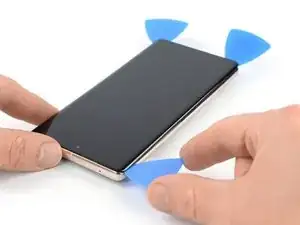
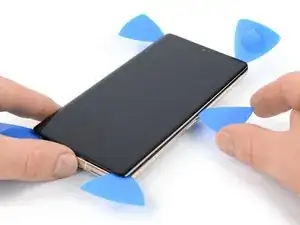
    • Durante o procedimento de remoção, certifique-se de inserir as palhetas de abertura na posição correta para evitar separar a tela de sua estrutura de segurança.

    • Introduza a palheta somente até ~3,5 mm durante o procedimento de remoção para não danificar os componentes internos e não interferir nos clipes de plástico.

    • Há vários clipes de plástico ao redor de toda a tela. Se a palheta de abertura ficar bloqueada durante o procedimento de remoção da tela, é porque a palheta foi inserida muito fundo sob a tela.

    About the paragraph:

    During the removal procedure, make sure to insert your opening picks in the right position to avoid separating the screen from its safety frame.


    It was not clear to me what the safety frame was until I opened the phone; I was careful but while opening the phone I slid a pick between the screen and the frame, and they became separated in one corner, I wonder if this resulted to my screen being damaged after the repair.

    An image that shows what the security frame is would be helpful.

    Eduardo CGZ -

    It is VERY difficult to get an angle into the frame and under the plastic bezel. Since this repair is for a screen, you don't have to worry about damaging it further because you will. I've done dozens of these repairs and have gotten ONE removed without further damage. Just an FYI. I also use 91% alcohol around the edges off the frame as well as heat (I have a hot plate set at 80*c that I lay it on after adding alcohol around the edges, place on hot plate for about 10 minutes, add more alcohol around the edges and then place on hot plate for another 5 minutes).

    Gregg Stanley -

    Thank you so much for the info about the degrees, amount of time, and when to apply alcohol! I really needed this info!!! Hallelujah!!

    Rachel Kelley -

    So what do we do if we DO separate the frame? Is there a way back from this?

    Sean Frisbey -

    Note: MIC DAMAGE - it is very easy to damage the mic when removing the screen. After I followed this tutorial, which is great BTW, and finished the screen replacement, I discovered my mic only works for phone calls. Here is a great post about it: After screem replacement microphone only works for calls

    Samantha H -

  3. AYwHUCCnKa1PMPBk
    AYwHUCCnKa1PMPBk
    yNNd3VhQocdUMaOI
    SCh6OtwmLUCIn5j1
    • As próximas três etapas demonstram o Anti-Clamp, uma ferramenta que projetamos para facilitar o procedimento de abertura. Se não estiver usando o Anti-Clamp, pule três etapas para um método alternativo.

    • Para obter instruções completas sobre como usar o Anti-Clamp, consulte este guia.

    • Se a sua tela estiver rachada, cubra-a com uma camada de fita adesiva transparente para que a ventosa de sucção possa aderir.

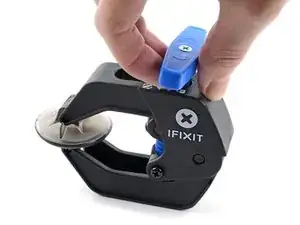
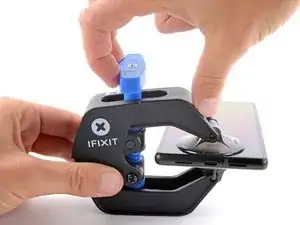
    • Puxe a pega azul para trás para destravar os braços do Anti-Clamp.

    • Deslize os braços pela borda esquerda ou direita do iPhone.

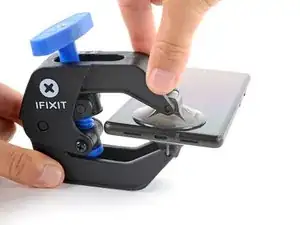
    • Posicione as ventosas próximo à borda inferior do fone - uma pela frente e a outra pela traseira.

    • Aperte as ventosas uma contra a outra para aplicar sucção.

    • Se você achar que a superfície do fone é muito escorregadia para o Anti-Clamp se prender, você pode usar fita para deixar a superfície mais aderente.

    The pixel 7 pro kit does not come with the clamp and may have to be purchased separately

    juji juman -

    was für n müll tolle anleitung wenn im reparaturset nicht alles enthalten ist und man jeden mist extra kaufen muss

    FireCube -

  4. s4bXrPEIrDSclUY1
    s4bXrPEIrDSclUY1
    xOmcoIQRPcMiuOrf
    trhAAYQPS13QxU3X
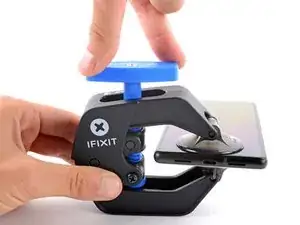
    • Puxe a pega azul para a frente para travar os braços.

    • Gire a pega 360 graus no sentido horário ou até que as ventosas comecem a se esticar.

    • Certifique-se de que as ventosas permaneçam alinhadas uma com a outra. Se elas começarem a ficar desalinhadas, solte um pouco as ventosas e realinhe os braços.

  5. qnrEDsCQlNx3INRF
    qnrEDsCQlNx3INRF
    YdcsV4CGCCD2YxkZ
    HuaYDv3YNjHEvN5X
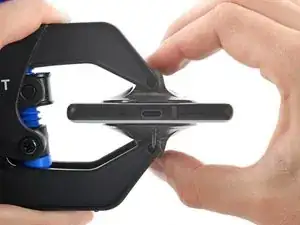
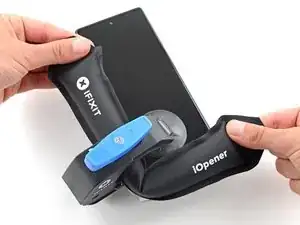
    • Aqueça uma bolsa térmica iOpener e passe-a pelos braços do Anti-Clamp.

    • Você também pode usar um secador de cabelo ou uma pistola de ar quente - mas calor extremo pode danificar o visor e/ou a bateria interna, portanto, proceda com cuidado.

    • Dobre a bolsa térmica iOpener de modo que ela fique sobre a borda inferior do fone.

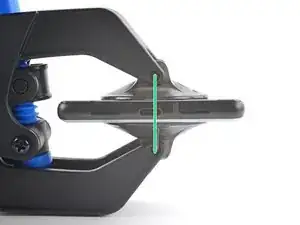
    • Aguarde um minuto para que o adesivo tenha a chance de se soltar e apresentar um vão para a abertura.

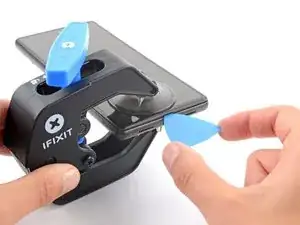
    • Insira uma palheta de abertura sob a moldura da tela quando o Anti-Clamp formar um vão grande o suficiente.

    • Se o Anti-Clamp não formar espaço suficiente, aplique mais calor na área e gire a pega meia volta no sentido horário.

    • Não gire a pega mais do que meia volta de cada vez e espere um minuto entre cada volta. Deixe que o Anti-Clamp e o tempo façam o trabalho por você.

    • Pule as próximas três etapas.

  6. kYIPqvhXCJ1NBLIi
    • Aplique a bolsa térmica iOpener aquecida na tela para amolecer o adesivo por baixo. Aplique a bolsa térmica iOpener por ao menos 3 minutos.

    • Um secador de cabelo, uma pistola de ar quente ou uma chapa quente também podem ser usados, mas tenha cuidado para não sobreaquecer o dispositivo. A borda deve estar ligeiramente quente demais para se tocar.

    Don't forget to remove your screen protector if you haven't already.

    Nathan Yang -

  7. PeNGZEHQUUUXVT1r
    PeNGZEHQUUUXVT1r
    L4JtimoXTuDctFTG
    JIGomFFqcX2UFdaU
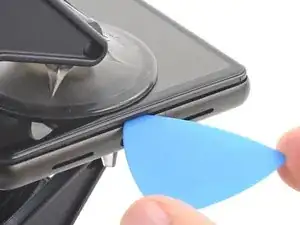
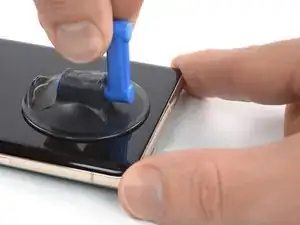
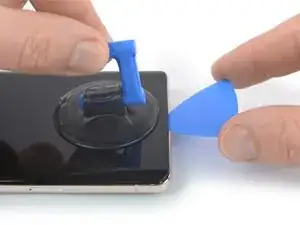
    • Quando você sentir que a tela está quente para se tocar, aplique uma ventosa de sucção na borda inferior da tela.

    • Se a sua tela estiver severamente rachada, cobri-la com uma camada de fita de embalagem transparente poderá ajudar a ventosa de sucção a aderir. Como alternativa, uma fita muito resistente pode ser usada em vez da ventosa de sucção. Se tudo o mais falhar, você pode colar a ventosa de sucção na tela quebrada com supercola.

    • Levante a tela incluindo a sua moldura de segurança com a ventosa de sucção para formar um pequeno vão entre a tela e o conjunto do fone.

    • Dependendo da idade de seu fone, isso pode ser difícil. Se você estiver tendo dificuldade, aplique mais calor na borda inferior e tente novamente.

    • Insira uma palheta de abertura no vão.

    The crack on my screen is along the bottom, on a diagonal. I cannot get the suction cup to lift off the edge. I've tried more heat using a hair dryer, using tape, but nothing seems to work! The phone is only a few months old, could that be the issue? I'm really frustrated after trying multiple times throughout the day today.

    AMB -

    I’m having the same issue unfortunately. I’ve superglued the suction cup and have it under weight. Going to wait 24 hours to see if it helps. Without a proper seal, there’s no way it’s going to lift. I made sure to leave about a half inch gap from the bottom of the phone to try and use the warming pad one more time

    Claudio Sandoval -

    There are white line after one month only!!!

    There are warranty or anything else

    Abdelrhman omar -

    Killed my screen with white strips horizontally simply by minimal bending. No cracks etc. Pity.

    Andrey Los -

  8. WtsW1wWeNrRMUTmr
    WtsW1wWeNrRMUTmr
    IGkvmFQmLJALAeSW
    • Para evitar danos ao seu fone, não introduza a sua palheta mais do que aprox. 2,5 mm, caso contrário você separa o adesivo da tela. Observe as seguintes áreas:

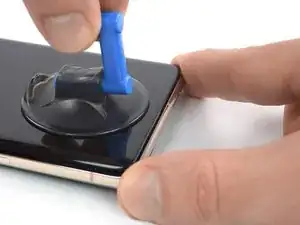
    • O cabo da ela encontra-se um pouco abaixo de meia altura da borda esquerda do fone. Tenha muito cuidado aqui para evitar desgastar o cabo.

    • Há vários contatos de mola em todo perímetro do fone. Tenha muito cuidado nessas áreas para evitar empenar os contatos.

    I noticed some bending in the contact, particularly in the upper half right side. I believe I managed to straighten it out, but now it feels a bit loose. Despite this, I went ahead and fixed the screen over it, and everything seems to be functioning properly. However, I'm somewhat concerned about the implications of this. Should I be concerned about anything?

    FloatBird -

    Same here, the upper half right side. while in the prosses of straightening it out i managed to break it! so now i want to know if my screen will work before i continue and put in, i'm afraid i'll just waste my new screen?

    Cusman Cumar -

    What happen if one spring contact broke ? Like the top right one ?

    Maxime Allard -

    idk, but i broke mine....

    John Hoarau -

  9. omlR6Jkq43Lt3Vp4
    omlR6Jkq43Lt3Vp4
    eaXnOrF2qrKe5EPi
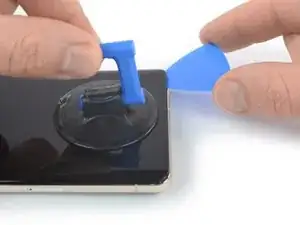
    • Deslize com a palheta de abertura para o cantor direito inferior da tela para cortar o seu adesivo.

    • Deixe a palheta de abertura no local para evitar que o adesivo volte a selar.

    is there any top speaker grill/mesh on Pixel 7 pro?

    Mostafa Kamel -

  10. 4NQTIvBDbIAyxkFV
    4NQTIvBDbIAyxkFV
    yR5ymuvShRAeDLVc
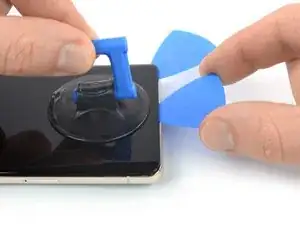
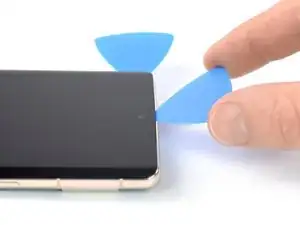
    • Insira uma segunda palheta na borda inferior e deslize-a para o cantor inferior esquerdo da tela para cortar o adesivo.

    • Deixe a palheta de abertura no local para evitar que o adesivo volte a selar.

    • Há um clipe plástico no canto inferior esquerdo que irá bloquear a sua palheta de abertura. Use somente a ponta da palheta de abertura (~1 mm) para abrir caminho ao redor dele.

  11. tArTDTqN2LK6GhId
    tArTDTqN2LK6GhId
    5vMVYYuPuERQHXqy
    JACYuENUqUA5bvoW
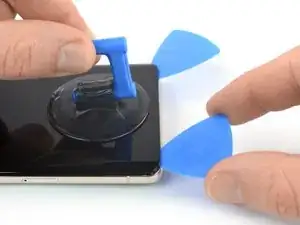
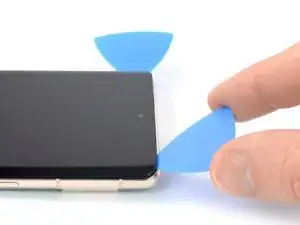
    • Insira uma terceira palheta de abertura abaixo do canto inferior esquerdo da tela.

    • Deslize a palheta de abertura ao longo da borda esquerda da tela para cortar o adesivo e liberar os clipes de plástico.

    • Deixe a palheta de abertura no canto superior esquerdo para evitar que o adesivo volte a selar.

  12. UO6jX5pnbY321YRC
    UO6jX5pnbY321YRC
    5PtIvBbaZ6bIQCI4
    UoguGE13LKwywumV
    • Se o adesivo ficar difícil de cortar, é provável que ele tenha esfriado. Use a sua bolsa térmica iOpener ou uma pistola de ar quente por 1 a 2 minutos para reaquecê-la.

    • Ao passar perto da câmera frontal, insira apenas a ponta da palheta de abertura (~2,5 mm) para evitar danificar ou manchar a câmera.

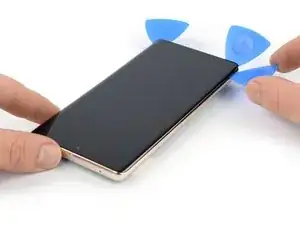
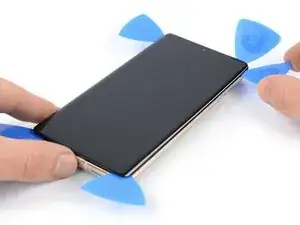
    • Insira uma quarta palheta de abertura no canto superior esquerdo da tela.

    • Deslize a palheta de abertura ao longo da borda superior do telefone para cortar o adesivo.

    • Deixe a palheta de abertura no canto superior direito para evitar que o adesivo volte a selar.

  13. l5pYkUOOVLpkPl32
    l5pYkUOOVLpkPl32
    VIiGmqFDhmZJ4FWT
    mBm34rSKijkgG25V
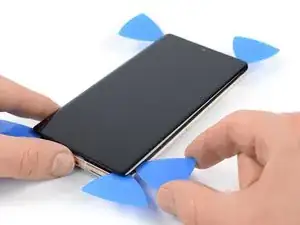
    • Insira uma quinta palheta de abertura e deslize-a ao longo da borda direita do telefone para cortar o adesivo restante e liberar os clipes plásticos do lado direito.

    • Não tente ainda remover completamente a tela, pois ela ainda está conectada ao conjunto do telefone por um cabo conector flex.

  14. cyGRQp6UwNmhnB6T
    cyGRQp6UwNmhnB6T
    vCf5HqyX2FKfIAtt
    EbGcFSX5cdP3PrlN
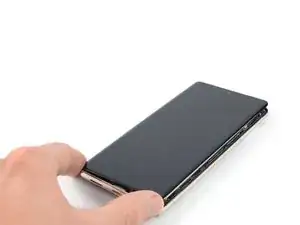
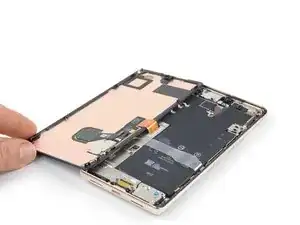
    • Levante a borda direita da tela em direção ao lado esquerdo do dispositivo, como se estivesse abrindo um livro.

    • Não gire a tela no eixo vertical nem a afaste muito da estrutura para evitar esticar ou danificar o cabo conector flex.

    • Coloque a tela com a face para baixo em posição paralela à estrutura.

  15. EqZdPNUuC5LFAgRG
    EqZdPNUuC5LFAgRG
    nIvkgQ5cQZSCZTSV
    • O suporte do cabo da tela está bem preso e requer alguma força para ser liberado.

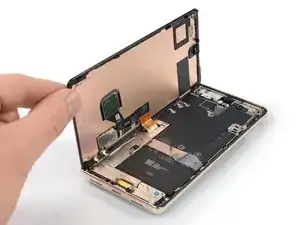
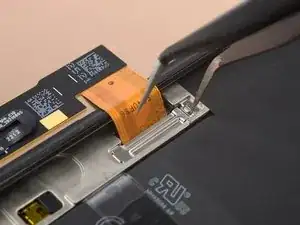
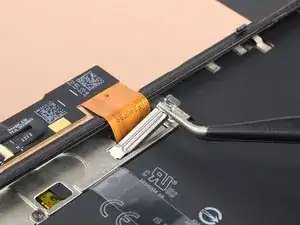
    • Insira um braço de uma pinça na abertura da extremidade superior do suporte do cabo da tela.

    • Empurre o suporte para dentro e puxe para cima para liberá-lo.

    This picture is a bit misleading and I ended up bending my bracket as a result. The picture shows the tweezers inserted in the bend of the bracket. If you insert it where the END of the bracket is, you'll have a much more natural way to remove it without much force! (this is just a little to the right of where it shows in the pictures...

    Edwin R -

    Arrows showing how to move the bracket would be helpful. "Push the bracket inwards" is ambiguous.

    Raphael L -

  16. ZT2CSWdPIEV36jbJ
    ZT2CSWdPIEV36jbJ
    upn1sPjlWOBlBlMw
    G5TJqWF6l1rpJXZ5
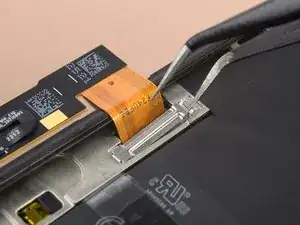
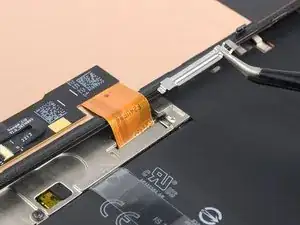
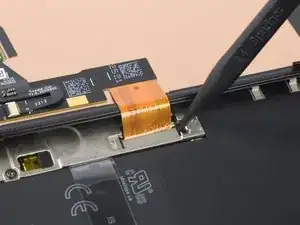
    • Com uma pinça, remova o suporte do cabo da tela, puxando-o por debaixo da estrutura intermediária, na direção da câmera.

  17. hkaumpj4K3uXMnUD
    hkaumpj4K3uXMnUD
    1uXl52GPnG6yFc5W
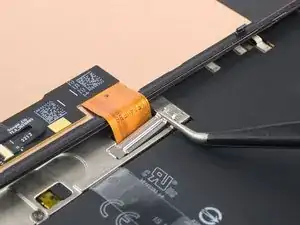
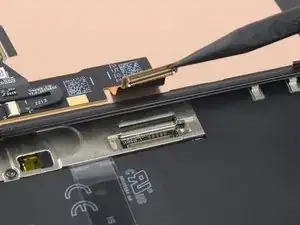
    • Com uma espátula, desconecte o cabo conector flex da tela, levantando em linha reta o conector do soquete.

    • Para reconectar conectores press fit como este, alinhe cuidadosamente e pressione um lado até que ele se encaixe e, em seguida, repita no outro lado. Não pressione no centro do conector. Se o conector estiver desalinhado, os pinos podem ficar tortos, causando danos permanentes.

Conclusão

Compare a sua nova peça de reposição com a peça original - pode ser que você precise transferir componentes remanescentes ou remover suportes adesivos da nova peça antes de instalá-la.

Para a remontagem de seu dispositivo, siga os passos na ordem inversa.

O reparo não está indo conforme o planejado? Teste soluções de problemas básicas, ou peça ajuda na nossa comunidade de Respostas para o Google Pixel 7 Pro.

Dominik Schnabelrauch

Membro desde: 23/11/16

252795 Reputação

0 comentários