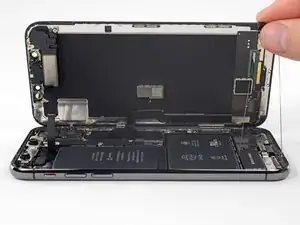
Introdução

Guia tipo pré-requisito exclusivo para abrir o iPhone X, abrindo acesso a componentes internos para reparo e reposição.

  1. Whblnhy2uvYmFjIL
    Whblnhy2uvYmFjIL
    4URQtwUtqSQUKdHH
    NgjPkqJtEMhTXkd3
    • Se o seu iPhone tiver uma tela rachada, mantenha as rachaduras sob controle e evite danos corporais durante o reparo colocando fita adesiva sobre o vidro.

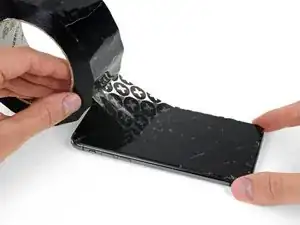
    • Coloque tiras sobrepostas de fita adesiva transparente sobre a tela do iPhone até que toda a superfície fique coberta.

    • Use óculos de segurança para proteger seus olhos de qualquer vidro que possa ser liberado durante o reparo.

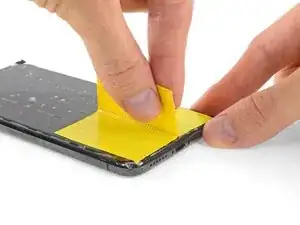
    • Se não conseguir fazer com que a ventosa grude nas próximas etapas, dobre um pedaço de fita adesiva resistente (como fita adesiva vedante) na forma de uma pega e levante a tela com ela.

    • Se tudo mais falhar, você pode colar a ventosa na tela com supercola.

  2. aaO4KYlBJShASHjk
    aaO4KYlBJShASHjk
    1r6VLlUjodppndSN
    BMhMJ35CLUOmyNqB
    • As próximas três etapas demonstram o Anti-Clamp, uma ferramenta que projetamos para facilitar o procedimento de abertura. Se não estiver usando o Anti-Clamp, pule três etapas para um método alternativo.

    • Para obter instruções completas sobre como usar o Anti-Clamp, consulte este guia.

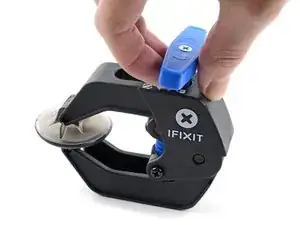
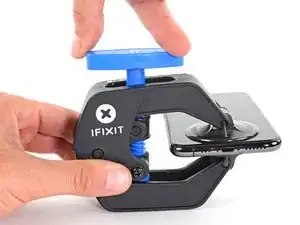
    • Puxe a pega azul para trás para destravar os braços do Anti-Clamp.

    • Deslize os braços pela borda esquerda ou direita do iPhone.

    • Posicione as ventosas próximo à borda inferior do iPhone - uma pela frente e a outra pela traseira.

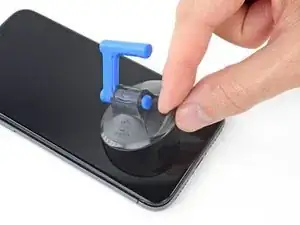
    • Aperte as ventosas uma contra a outra para aplicar sucção na área desejada.

    • Se você achar que a superfície do iPhone é muito escorregadia para o Anti-Clamp se prender, você pode usar fita para deixar a superfície mais aderente.

  3. fm1Txb6ZWoZVRccg
    fm1Txb6ZWoZVRccg
    ASYBeEfJh2IqKXlL
    qYIoimNJqUrEuJAT
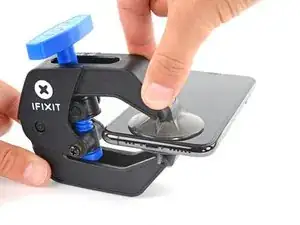
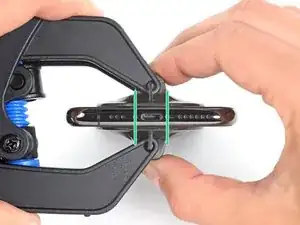
    • Puxe a pega azul para a frente para travar os braços.

    • Gire a pega 360 graus no sentido horário ou até que as ventosas comecem a se esticar.

    • Certifique-se de que as ventosas permaneçam alinhadas uma com a outra. Se elas começarem a ficar desalinhadas, solte um pouco as ventosas e realinhe os braços.

  4. fqtITHlwZLOFLmTY
    fqtITHlwZLOFLmTY
    321YFxdKNFRFVwk3
    YctteqQxMcE3kxyP
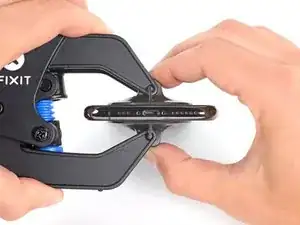
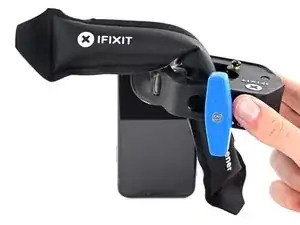
    • Aqueça uma bolsa térmica iOpener e passe-a pelos braços do Anti-Clamp.

    • Você também pode usar um secador de cabelo, uma pistola de ar quente ou uma chapa quente - mas calor extremo pode danificar o visor e/ou a bateria interna, portanto, proceda com cuidado.

    • Dobre a bolsa térmica iOpener de modo que ela fique sobre a borda inferior do iPhone.

    • Aguarde um minuto para que o adesivo tenha a chance de se soltar e apresentar uma vão para a abertura.

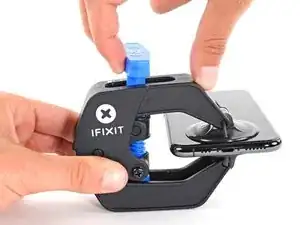
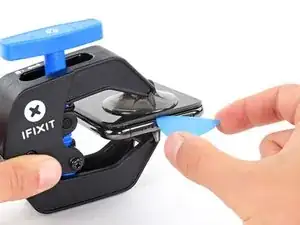
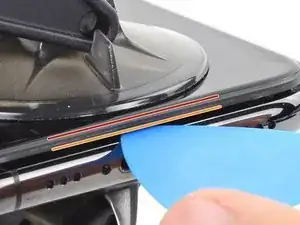
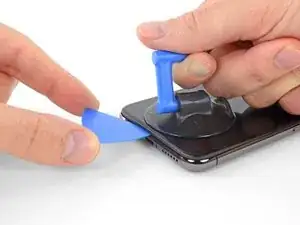
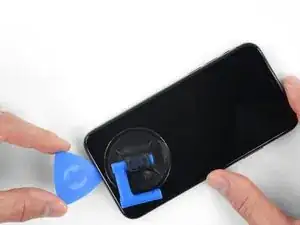
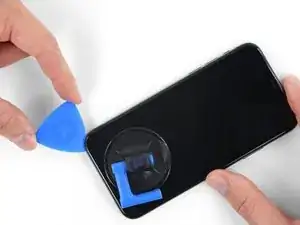
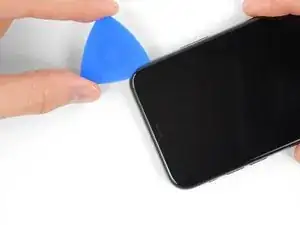
    • Insira uma palheta de abertura sob a tela e o painel de plástico, mas não abaixo da própria tela.

    • Se o Anti-Clamp não formar espaço suficiente, aplique mais calor na área e gire a pega um quarto de volta.

    • Não gire a pega mais do que um quarto de volta de cada vez e espere um minuto entre cada volta. Deixe que o Anti-Clamp e o tempo façam o trabalho por você.

    • Pule as próximas três etapas.

    DO NOT separate the glass from the plastic bumper or rim around it. These instructions don't clarify that the pick has to be inserted between the plastic rim and the metal body. It is likely that the glass will lift slightly off the plastic surround before the plastic will lift out of the metal body. I had success sliding a card or pick back and forth along the bottom edge of the plastic rim while pulling on the suction cup. Eventually there was a space large enough for the pick to go under the plastic rim.

    Anessa -

    Thanks for pointing this out! I'll revise this step to clarify this point.

    Arthur Shi -

  5. JYhTvDYuGLQw3jiI
    • O aquecimento da borda inferior do iPhone ajudará a amolecer o adesivo que prende a tela, facilitando a abertura.

    • Use um secador de cabelo, uma pistola de ar quente ou prepare uma bolsa térmica iOpener e aplique-o(a) na borda inferior do iPhone por cerca de um minuto para amolecer o adesivo que se encontra por baixo.

    General tip regarding heating necessary to remove adhesive:

    consider using a heated tip of a small screwdriver or metal spudger (not the one made of plastic, provided in kit), rather than to heat the device itself.

    Uri -

    You then need to be careful about the temp of the tool which if hot enough can melt plastic components or harm them. Keeping the heat source (heat gun) far enough away from the object that you’ll eventually melt the glue but would be much harder to melt components. I try to keep 4” or 5” gap between the source & object

    Sandman619 -

    Thanks for the info. Could a air convector do the job

    dominique.br -

    When opening a device that has previously been worked on, and on which the adhesive might not have been replaced, be extremely carful when opening the phone. It will open much more easily than expected. If you’re not careful you might rip a cable.

    jonpol -

    Is this tool required or can I just use the Anti-Clamp by itself.

    Mikail -

    If you have a 3d printer, heat the bed to 80c and put the phone screen side down on it for 30 secs

    philip.joseph123 -

    thaks for this advise, I was looking for this as I dont have a heat gun haha, nice hack

    Andres Chaparro -

  6. qXGGZ2MpZIYeQjKI
    qXGGZ2MpZIYeQjKI
    tGDwxj5neYkh3MDh
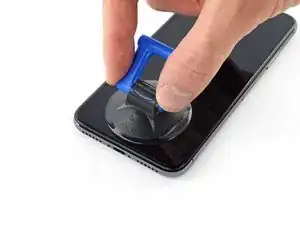
    • Se estiver usando uma ventosa de sucção única, aplique-a na borda inferior do telefone, evitando a parte curva do vidro.

    If you were using some form of screen protector, it may come off first as soon as you pull on the suction cup. Do not be alarmed. That is normal behavior.

    Alain-Daniel Wa-Baguma -

    3m VSB double stick tape will stick to the screen when the suction cups fail (see my comment on step 1)

    Tawan Khamapirad -

  7. uTXCGQFa5j4E5T3Y
    uTXCGQFa5j4E5T3Y
    DWfsuj4RCooAtKRa
    Zw4PcEZSTKHaLcqq
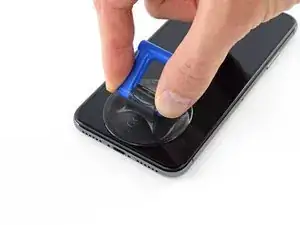
    • Puxe a ventosa para cima com pressão firme e constante para criar um pequeno vão entre a tela e a estrutura.

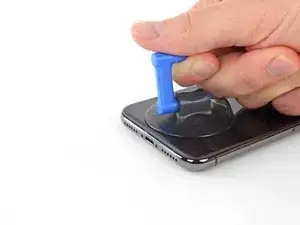
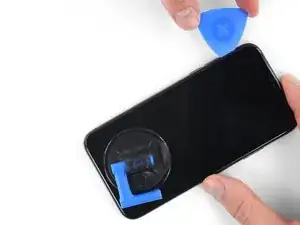
    • Insira uma palheta de abertura no espaço sob a moldura de plástico da tela, mas não debaixo da própria tela.

    • O adesivo à prova d'água que mantém a tela no lugar é muito forte; a formação dessa abertura inicial requer uma quantidade significativa de força. Se estiver com dificuldade para abrir um vão, aplique mais calor e balance a tela para cima e para baixo para amolecer o adesivo, até se formar um vão de tamanho suficiente para inserir a ferramenta.

    In addition to safety goggles, I would recommend you also wear good gloves to avoid getting cut with the glass as you try to pry it open.

    Alain-Daniel Wa-Baguma -

    The top about applying more heat and gently rocking the screen up and down to weaken the adhesive did the trick for me. Thank you!

    Monil Shah -

    There needs to be more clarity on where to shove the opening pick into. There is actually two openings that the pry tool can be forced into: one below the black plastic bezel, and one above the black plastic bezel. When I heated my screen with a warming pad and pulled up the suction cup, it actually pried apart above the black plastic bezel which removed the touch screen from the display panel. With this being the first newer iPhone I'd opened since the 3GS, I didn't realize that I was opening the wrong opening as the directions only mentioned one opening and did not warn of this. I was pretty disappointed in the lack of mentioning this, as I was taking my time and following it to the tee. As a result, it destroyed my original iPhone screen.

    Caleb Davison -

    DO NOT separate the glass from the plastic bumper or rim around it. As someone else noted, these instructions don't clarify that the pick has to be inserted between the plastic rim and the metal body of the phone. When pulling upwards with the suction cup, it is likely that the glass will lift slightly off the plastic surround before the plastic will lift out of the metal body. I had success sliding a card or pick back and forth along the bottom edge of the plastic rim while pulling on the suction cup. Eventually there was a space large enough for the pick to go under the plastic rim.

    Anessa -

    Thank you for pointing this out! I've updated the step to reflect this.

    Arthur Shi -

    The suction cup doesn't work at all... The minimum force I apply to lift it up, it comes off completely. This is very frustrating!!!

    Mario Silva -

  8. QE4lOUoglbyWQUwm
    QE4lOUoglbyWQUwm
    cHHBBJPBr4bVv24U
    agDTTsHWFYyI2WBC
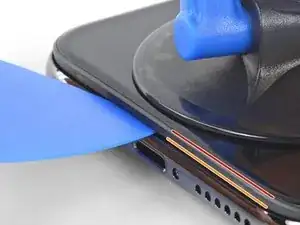
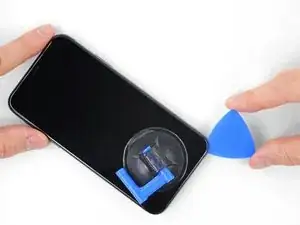
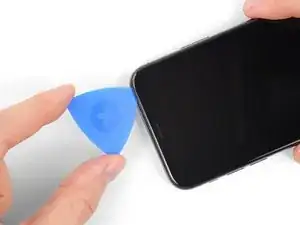
    • Deslize a palheta de abertura pelo canto inferior esquerdo e pela borda esquerda do iPhone, cortando o adesivo que mantém a tela no lugar.

    • Não insira a palheta mais do que 3 mm, pois isso pode danificar os componentes internos.

  9. mkLvBfvMoYsfQbGS
    • Há cabos sensíveis ao longo da borda direita do iPhone. Não insira a palheta aqui, pois isso pode danificar os cabos.

    Wouldn’t it be better to put this part BEFORE the step where you have to pry open the phone?

    Jan D. Höllwarth -

    Mercie mais trop trop de détails

    PACOME SERI -

    Qui ne serve à rien

    PACOME SERI -

  10. OEUEsoSAmOAWxAMR
    OEUEsoSAmOAWxAMR
    YOhTValkxrevLipu
    aSZ2MAdtw4ZImiCD
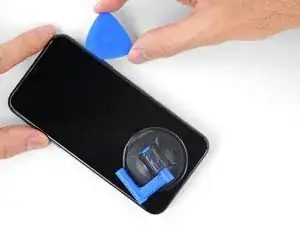
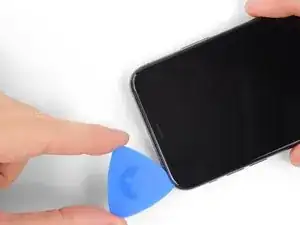
    • Insira novamente a palheta na borda inferior do iPhone e deslize-a para cima no lado direito para continuar separando o adesivo.

    • Não insira a palheta mais do que 3 mm, pois isso pode danificar os cabos da tela.

    If you have flat feeler gauges (for adjusting engine valve tappet clearance, ignition points … old school) the .003” thick gauge goes right in. Work your way up in thickness until you can get the pic or supplied pry tool in. Don’t insert metal feeler gauge in too far, just enough to hold crack open. I didn’t need to use the suction cup. I used a hot/cold gel pack heated in microwave to heat edges to soften glue a bit. Made sure it wasn’t so hot I couldn’t stand it on my skin.

    William Olstad -

  11. WfcjjEBfMZqEySEf
    WfcjjEBfMZqEySEf
    PCXKpWMWg6GWEViY
    McqYslJ4vV1SOOnm
    • A borda superior da tela está fixada com cola e clipes.

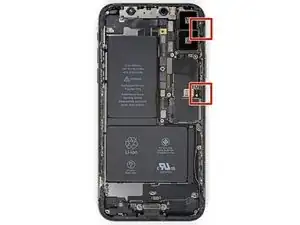
    • Deslize a palheta de abertura pelo canto superior da tela e, ao mesmo tempo, puxe ou movimente a tela com cuidado para baixo na direção do conector Lightning.

    • Os clipes romperão se você usar muita força. Trabalhe com cuidado e seja paciente.

    • Não insira a palheta mais do que 3 mm, pois isso pode danificar o conjunto de sensores do painel frontal.

    • Deslize a palheta para o canto oposto e corte todo o adesivo restante que esteja prendendo a tela.

    These are the best instructions I’ve ever read for anything.! Thank you!

    Peter Andrew -

  12. GnieimxVeXdJJobM
    • Puxe a pequena lingueta da ventosa para removê-la do painel frontal.

  13. XFu5RLJA6ncMAhxo
    XFu5RLJA6ncMAhxo
    nCGOAuVQLFmYsrOd
    XjQSuyqDe1k51mua
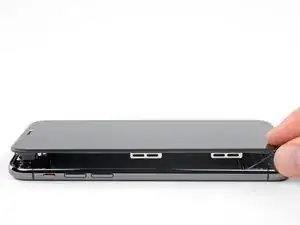
    • Abra o iPhone virando a tela para cima a partir do lado esquerdo, como se fosse a contracapa de um livro.

    • Não tente separar totalmente a tela ainda, pois vários cabos planos frágeis ainda a conectam à placa lógica do iPhone.

    • Conforme mostra a foto, verifique se a moldura se solta com a tela e não fica presa no dispositivo.

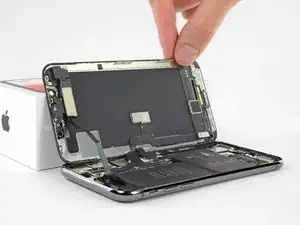
    • Encoste a tela em algo para mantê-la apoiada enquanto estiver trabalhando no telefone.

    • Durante a remontagem, coloque a tela em posição, alinhe os clipes ao longo da borda superior e pressione cuidadosamente a borda superior antes de encaixar o restante da tela. Se ela não se encaixar facilmente e você não ouvir um click, verifique a condição dos clipes ao redor da tela e certifique-se que eles não estejam tortos.

    My phone came apart in a different way and looks not right the little box at the top of the display as actually bolted to the top of the frame body I think something went really wrong when I opened it.

    Mike Kostersitz -

    It opens like a book but be careful not to open it all the way — only as far as shown in the photo. Otherwise it will strain the thin cable that connects the sensor module and then no more FaceID for you (or, as it turns out me). This could have been made more explicit in the instructions.

    Richard Tucker -

    It opens like a book but be careful not to open it all the way  … the small stainless steel tabs that hold the screen around the metal frame, that are on the bend place (right side of the phone)… are tend to bend, you can straighten them back to 90 deg. but the plastic base that they are on? very fragile- watch out not to break the plastic bezel … it may come apart of the glass.

    dabur872 -

    Advice for re-assembly: Before closing up the phone with the seal, check if phone is powering up again and speaker, mic and sensors are still working. If done this check even before installing the board connector bracket in Step 13.

    Alexander Nowak -

Conclusão

Para montar novamente o dispositivo, siga estas instruções na ordem inversa.

Jeff Suovanen

Membro desde: 06/08/13

450006 Reputação

0 comentários