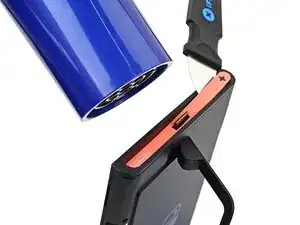
Introdução

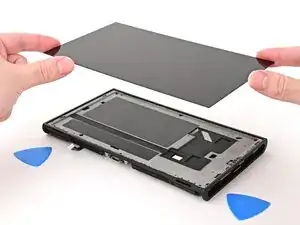
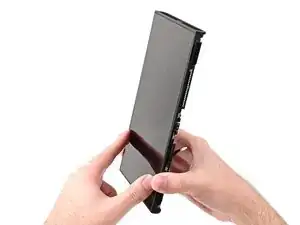
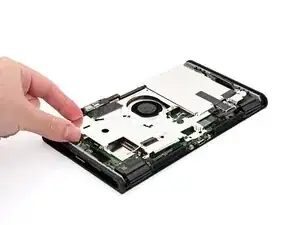
Follow this guide to replace a cracked or broken screen on a Nintendo Switch 2 game console.

The Switch 2 uses JIS screws. If you use a non-iFixit Phillips driver in JIS screws, you'll risk stripping them. iFixit's Phillips bits are designed to be compatible with JIS screws.

You’ll need new thermal putty and regular thermal paste to complete this repair.

  1. NQsFgQ1fC1wBuILk
    NQsFgQ1fC1wBuILk
    k2pFyTPIZxMXGMcY
    mgVMJXcfpXGxpxvI
    • For your safety, discharge the battery below 25% before disassembling the console. This reduces the risk of a fire if the battery is damaged during the repair. If the battery is swollen, take appropriate precautions.

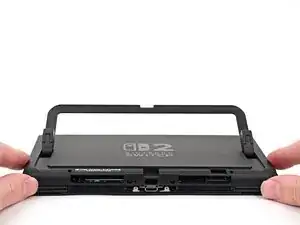
    • Remove any game cards and disconnect any cables, controllers, or other accessories from the console.

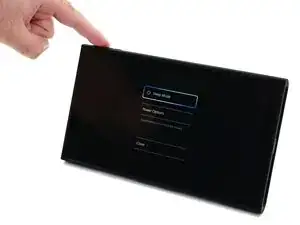
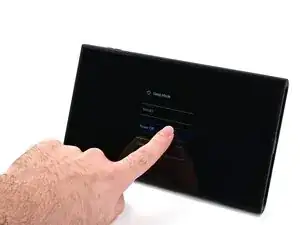
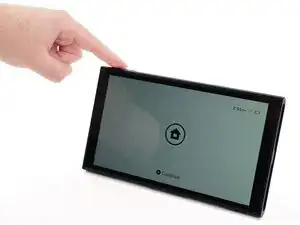
    • Power off the console by holding down the power button, selecting Power Options, then pressing Power Off.

  2. 5YVNpBaCsqgshIAj
    5YVNpBaCsqgshIAj
    GKJalBLCUFb4sFLQ
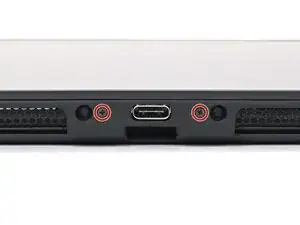
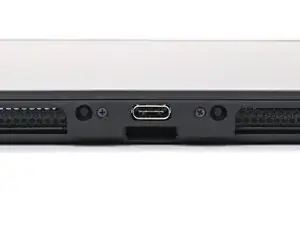
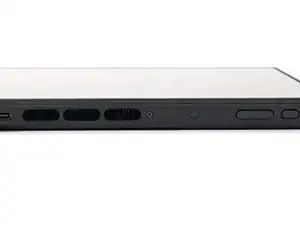
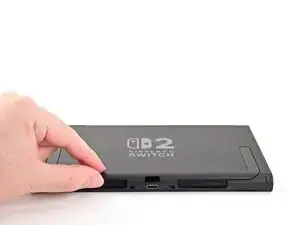
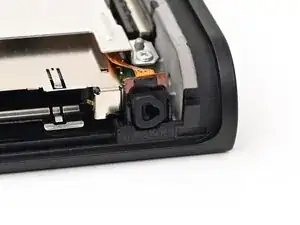
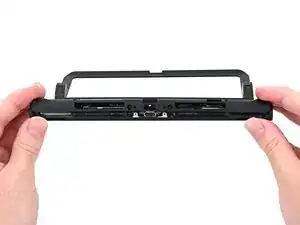
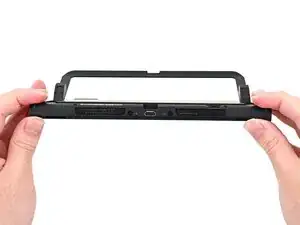
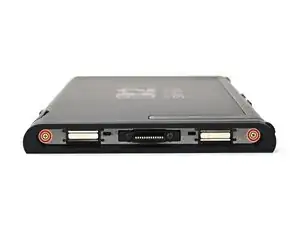
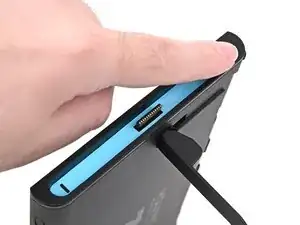
    • Use a JIS 00 driver to remove the two 3.1 mm‑long screws on either side of the bottom USB-C port.

    • You can try a non-iFixit Phillips driver in a pinch, but you risk damaging or stripping the screw. Push down firmly on the driver and twist slowly.

  3. jlL63CHmnGBMytYI
    jlL63CHmnGBMytYI
    we1DAds4sRAvig3L
    • Use a JIS 00 driver to remove the 3.1 mm‑long screw on the top edge of the console (next to the ventilation cutouts).

  4. bZVWHoC1W1mgYUh6
    • The Switch 2 has stickers on either side that need to removed to access the screws securing the back cover. It's easy to damage the stickers during removal, but you can mitigate this by regularly reheating the stickers and working carefully.

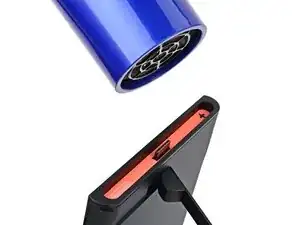
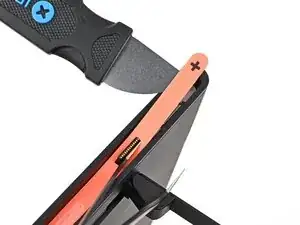
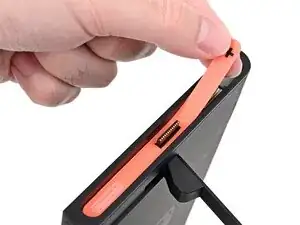
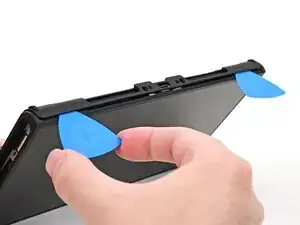
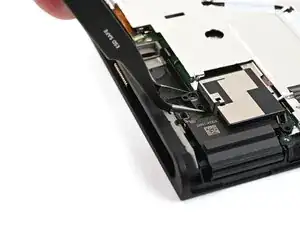
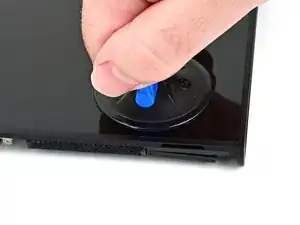
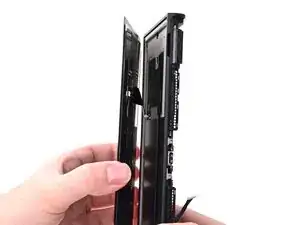
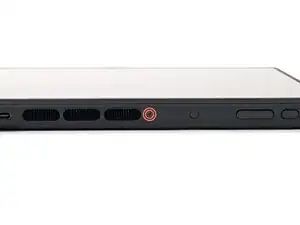
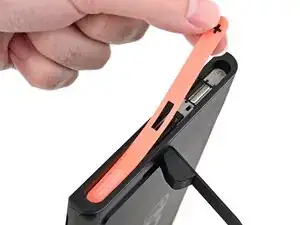
    • Use a hair dryer or heat gun to heat the sticker on the right side of the console, labeled with a "+" symbol, until it's hot to the touch.

    • You can use the kickstand to prop the console up vertically for easier access.

    • If you're using a heat gun, set it to low to avoid melting the plastic edge of the console.

  5. OKUSRtVWgoTdIJHM
    OKUSRtVWgoTdIJHM
    ao4XkPrFUXVEwjnE
    BBVFo3I2R5OkIAaO
    • The pointed end of the tweezers can damage the sticker from the underside, leaving a noticeable mark. If it's difficult to lift, apply more heat instead of using more force.

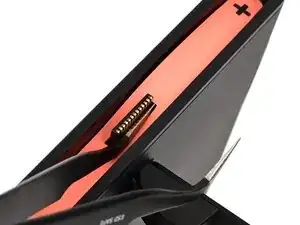
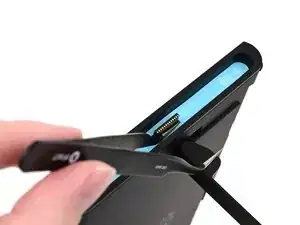
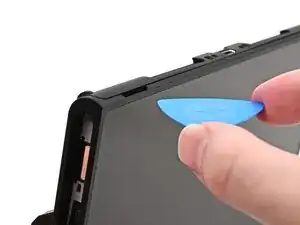
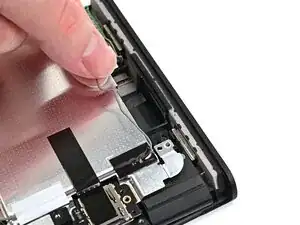
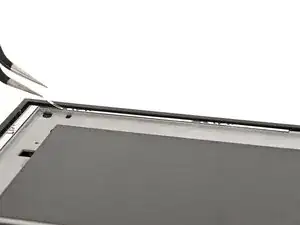
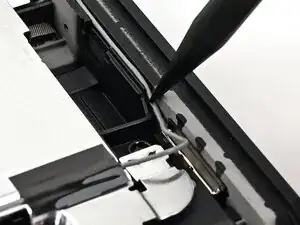
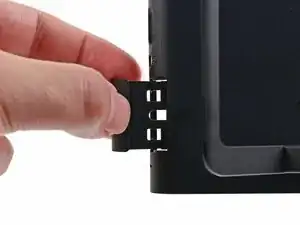
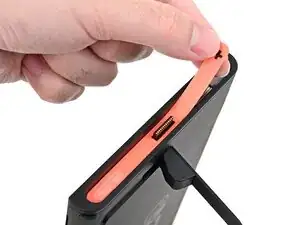
    • Slide one arm of angled tweezers underneath the sticker from its cutout around the right Joy‑Con 2 connector.

    • Gently pry up on the sticker until it starts to lift from the console.

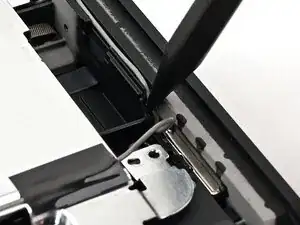
    • Leave the tweezers in place to keep the sticker lifted.

  6. SSHxFVejMfpHGJA2
    SSHxFVejMfpHGJA2
    J1QBmuIPqd6MFrTw
    SXBJ1O1ugK2pY1BA
    • Insert the tip of a Jimmy into the gap formed between the long edge of the console and the sticker.

    • Gently pry up the sticker, working your way up the long edge until the top of the sticker is separated from the console.

    • Remove the tweezers once the sticker is lifted.

    • You can leave the Jimmy in place to hold the top of the sticker off the frame—if it falls back into its recess, repeat this procedure to lift it back up.

  7. wjdVrm2URbcSArBQ
    • Reheat the bottom of the right side until it's hot to the touch.

  8. vJxKQYyTutICrubh
    vJxKQYyTutICrubh
    TJPcnDmIZj1EuXPM
    PYVXYyNYBH45MwPn
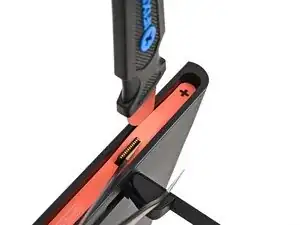
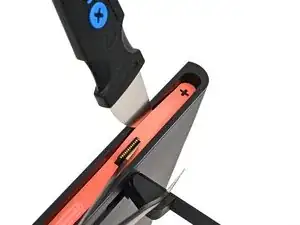
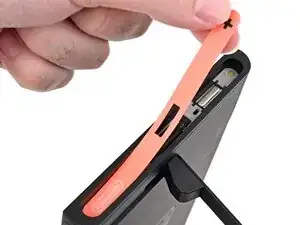
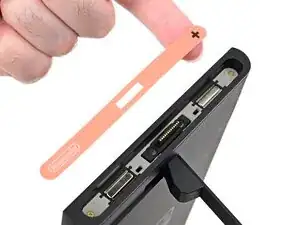
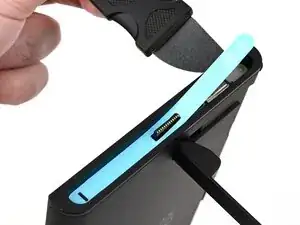
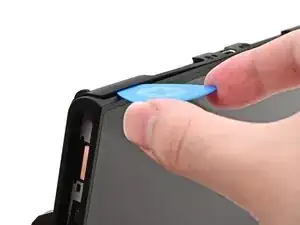
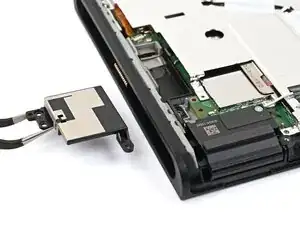
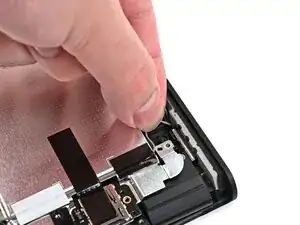
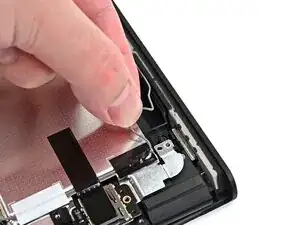
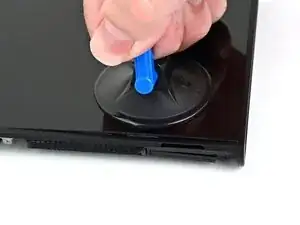
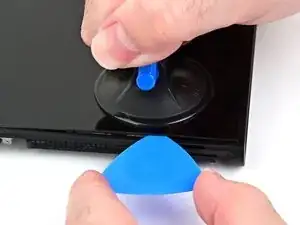
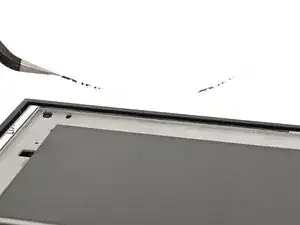
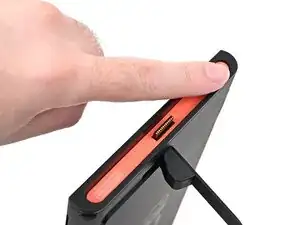
    • Carefully lift the sticker over the Joy‑Con 2 connector, then peel it up fully to remove it.

  9. 4JgLYAUkBPKHYL5N
    4JgLYAUkBPKHYL5N
    QdPU16ygx5WaXIOv
    Xt2DD4nGwtT11WTm
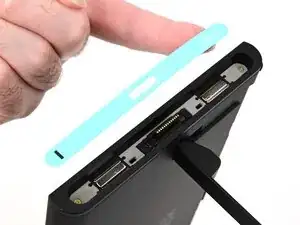
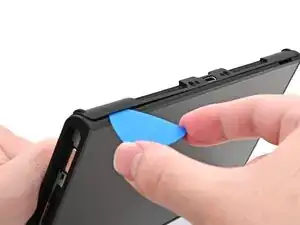
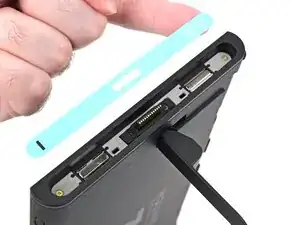
    • Repeat this procedure to remove the sticker along the left side of the console, labeled with a "-" symbol.

  10. QVVJCYqdQNmEJSpX
    QVVJCYqdQNmEJSpX
    scvilok6pD5gCZvZ
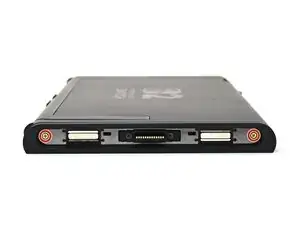
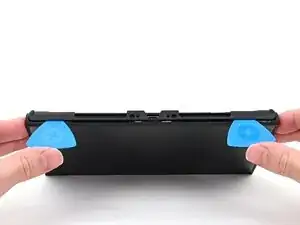
    • Use a JIS 00 driver to remove the two 3.6 mm‑long gold screws on each side of the console (four in total).

  11. 6i3X4ALKCNjQSqSD
    6i3X4ALKCNjQSqSD
    NP4lX6nYvxKhTfTQ
    RaITkR2vdQGZxRiP
    • Use your fingers to flip up the kickstand on the back of the console.

    • If there's a microSD Express card installed, remove it now before you continue to the next step.

  12. lFPPWotqhiCQDcvj
    lFPPWotqhiCQDcvj
    wiEGCoNC1dmsRgIJ
    • Use a Y00 driver to remove the two 4.4 mm‑long screws in the kickstand cutout.

  13. JoHeqQiUYhLrECIv
    JoHeqQiUYhLrECIv
    jUrqv1dwQQCgGxyb
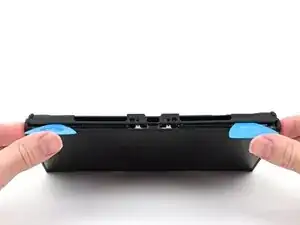
    • Insert an opening pick into the gap between the back cover and speaker cutout on the bottom edge of the console.

  14. cfJBwTZgEEalAn1Q
    cfJBwTZgEEalAn1Q
    IaF3XLZP3SpincUb
    • Slide the opening pick towards the USB-C port until it's underneath the screw hole next to the port.

  15. Ef3HiXgUlqP42rES
    Ef3HiXgUlqP42rES
    ETDCZYoSnOKTK13P
    qThFHMcpbOd31vL1
    • Insert a second opening pick underneath the screw hole on the opposite side of the USB-C port, and slide it to the corner of the console.

  16. 1vMRiPFOONkGwlZm
    1vMRiPFOONkGwlZm
    QqNvCOWsKavoX6mC
    • Slide the first opening pick back to where it was first inserted.

  17. wrN6QkEAU3sY5CFG
    wrN6QkEAU3sY5CFG
    mUqGchwWQVXF2eXE
    XVWaUHWhVCdPAXTI
    • Be careful not to drop your console. Once the back cover pops up, the opening picks will fall out of place.

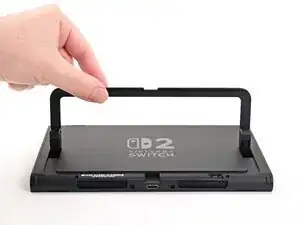
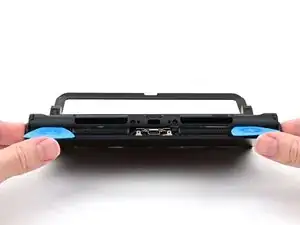
    • Hold the console with two hands. Rest your thumbs on the opening picks.

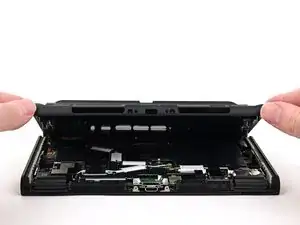
    • Push up on the opening picks to lift the back cover until it pops up above the USB-C port.

  18. OfZYXVPDOPAdKZpY
    OfZYXVPDOPAdKZpY
    H1krkBLPGZNL4OFd
    by4KabwvvEnPDlPP
    • Lift the back cover up from the bottom edge and remove it.

  19. yUINxtt2JccXMRVi
    yUINxtt2JccXMRVi
    3Zd1HTvIDHjLBsOb
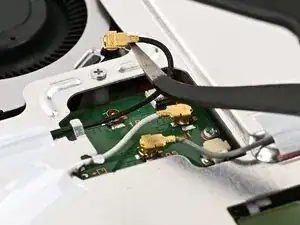
    • Use a JIS 00 driver to remove the three 4.4 mm‑long silver screws securing the lower antenna.

  20. 5RpO5GQji44FWCUr
    5RpO5GQji44FWCUr
    pRipdAlsxjSJXDmB
    • Use tweezers or your fingers to remove the lower antenna.

  21. jC53BveXKEYEqlUI
    jC53BveXKEYEqlUI
    sAYFyvwHGPeFMywp
    • Use a JIS 00 driver to remove the two screws securing the upper antenna:

    • One 4.4 mm‑long silver screw

    • One 4.6 mm‑long green screw

  22. bGWBESkLk54DPEUw
    bGWBESkLk54DPEUw
    BZRDRtoNkxSUeDkK
    • Use tweezers or your fingers to remove the upper antenna.

  23. JYawFZ2fAjORiCTh
    JYawFZ2fAjORiCTh
    MIb4NWZKsMPGeBv3
    SHORs4ixoADsjAbX
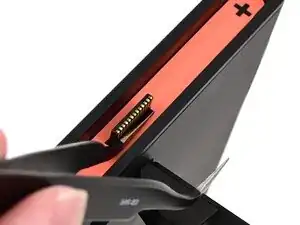
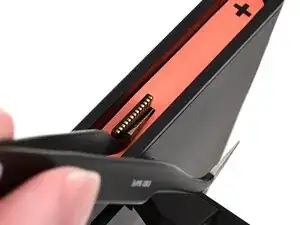
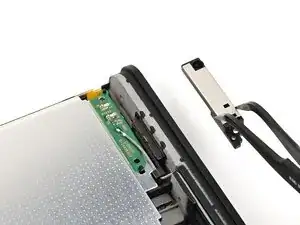
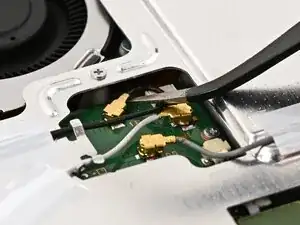
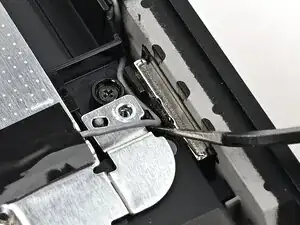
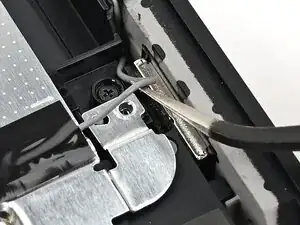
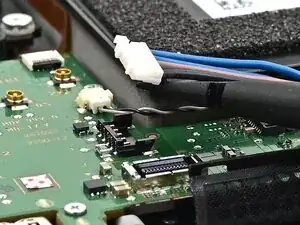
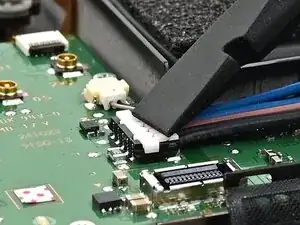
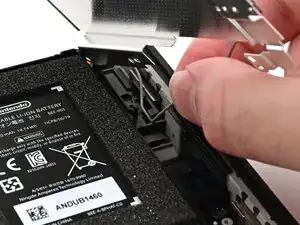
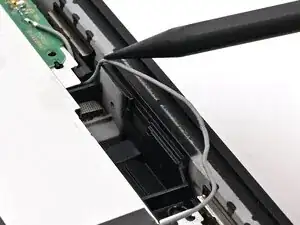
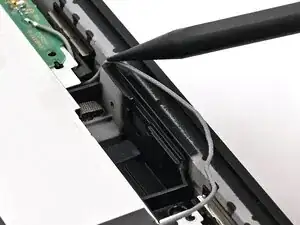
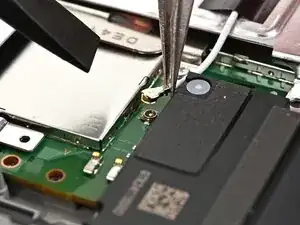
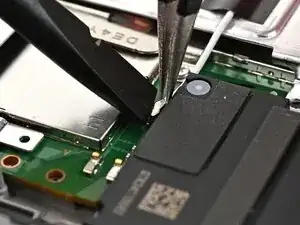
    • Insert an arm of angled tweezers under the metal neck of the white interconnect cable coaxial connector (located beneath the lower antenna) and lift straight up to disconnect it.

  24. 6rGSkmqlwFRHwhn2
    6rGSkmqlwFRHwhn2
    ObCwAQPFAcQvjyC1
    JBKvGj1X4OaKhkTg
    • Repeat this procedure to disconnect the three central coaxial connectors from the board.

  25. BtXyRdmtfmwHfyE3
    BtXyRdmtfmwHfyE3
    hxaMIZVcj6APPP1k
    Q13OE4tSMvxpmuwA
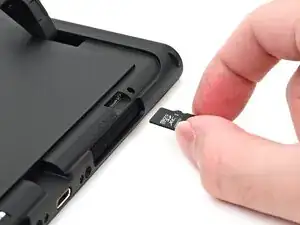
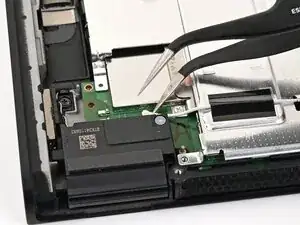
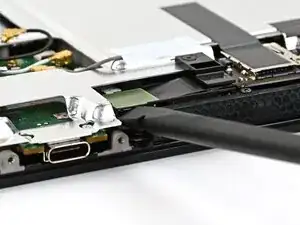
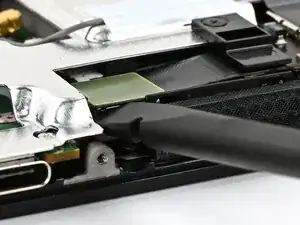
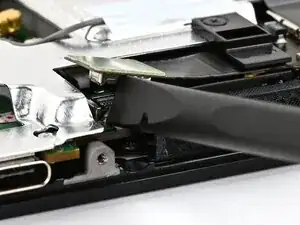
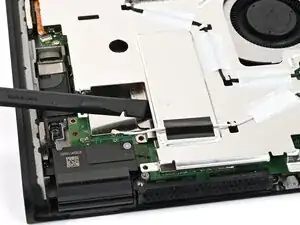
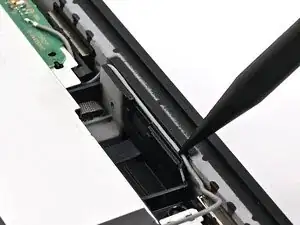
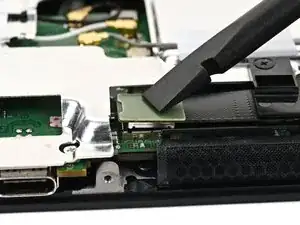
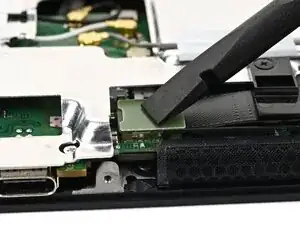
    • Use the flat end of a spudger to pry up and disconnect the MicroSD card reader press connector, located next to the bottom USB‑C port.

  26. bqpoQgshqObqk5KS
    bqpoQgshqObqk5KS
    HayjKJVgRNi4wsoo
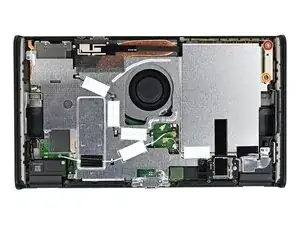
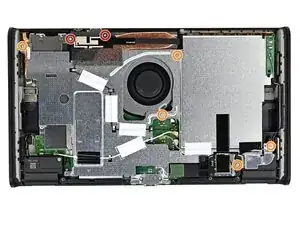
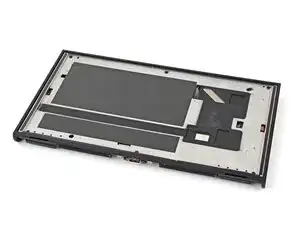
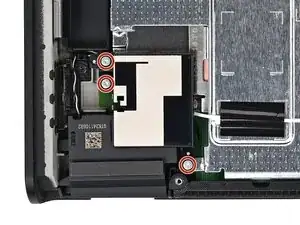
    • Use a JIS 00 driver to remove the seven screws securing the shield plate:

    • Two 6.2 mm‑long silver screws

    • Five 4.4 mm‑long silver screws

  27. V3w363uMCVAgIbCw
    V3w363uMCVAgIbCw
    6MGPPF63BbMhVDMp
    HBpyqYLfivWONNgf
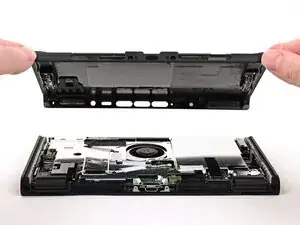
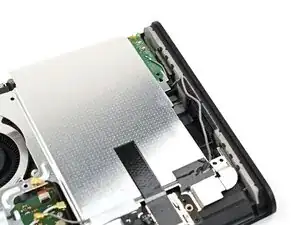
    • Insert the flat end of a spudger between the shield plate and the processor's heat sink, next to the square (⛶) marking on the shield plate.

    • Twist the spudger to lift the shield plate and separate the thermal putty bonded to it. Keep lifting the shield plate until you don't feel resistance.

  28. MjfijmcCnISrMyBJ
    MjfijmcCnISrMyBJ
    QW3Bfoix1WgRqNLD
    QdnpOBHaba52xkcB
    • Lift the left edge of the shield plate to ensure it's fully separated from the thermal putty.

    • Gently set the shield plate back down.

  29. JBhpxTJNtwAdCiYs
    JBhpxTJNtwAdCiYs
    2ilKrxE4yHCDGpS1
    rukRxG3qWsJwlE2N
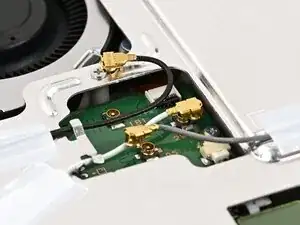
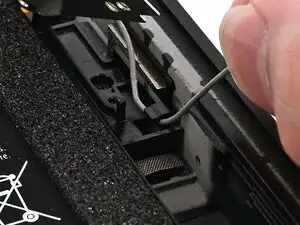
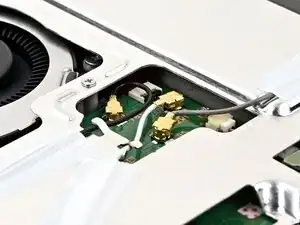
    • Insert one arm of angled tweezers underneath the gray antenna cable at the bottom-right corner of the console.

    • Lift the cable out of the black clip securing it to the frame.

  30. P6O6YGUEKW1OJdSk
    P6O6YGUEKW1OJdSk
    DyDJTVrhdclhCHWK
    iCLA4uhQPBRsDH1e
    • Unroute the gray antenna cable from its channel along the right edge of the console.

  31. MRYYVyKo2rD3LmAQ
    MRYYVyKo2rD3LmAQ
    xPS41OHOvOEYFKVP
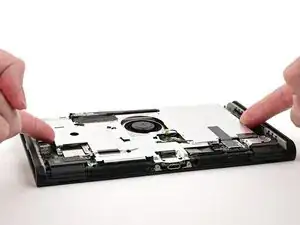
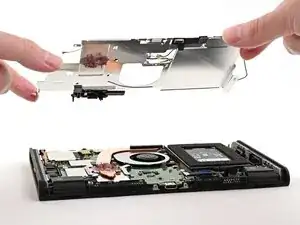
    • Lift and slide the shield plate away from the right edge of the console until the gray antenna cable is completely free.

  32. SCkg4gMqMOo5UCZe
    SCkg4gMqMOo5UCZe
    CjnnRkpCrujacoSG
    • Pick up and remove the shield plate.

  33. vac1WpOCE5meWfcx
    vac1WpOCE5meWfcx
    JnSa4jH4SP212wPj
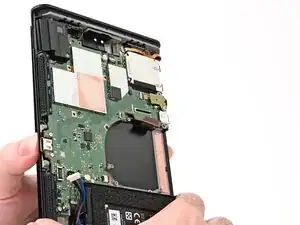
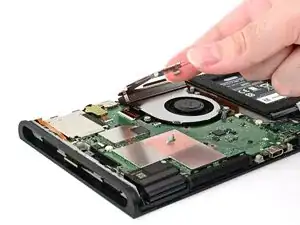
    • Insert the flat end of a spudger underneath the flat-topped battery connector, located next to the battery, and pry up to disconnect it.

  34. Ux1iIrOdeVG5efPg
    Ux1iIrOdeVG5efPg
    6HF6QJGDRJOQoMww
    QoAr3hmI5NybUc11
    • If you don't have replacement thermal putty, use the flat end of a spudger to distribute the old putty evenly across the heat pipe, as thick as possible to ensure proper contact. Repeat this process on the shield plate, then skip this step.

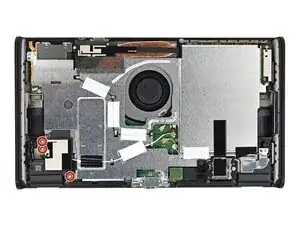
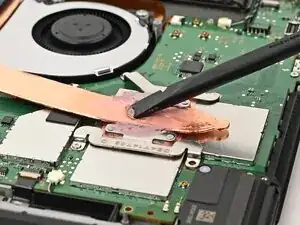
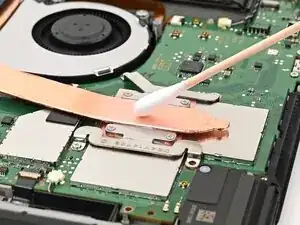
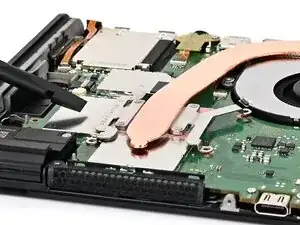
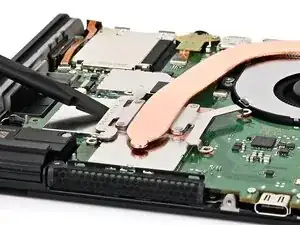
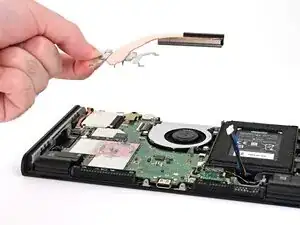
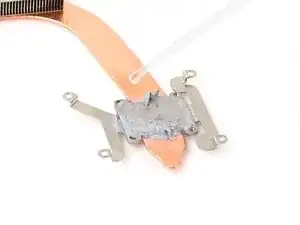
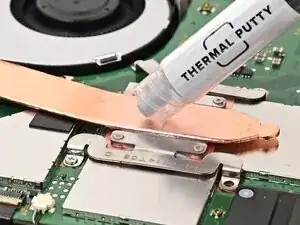
    • Use the flat end of a spudger to scrape off the thermal putty on top of the copper heat pipe.

    • Apply high-concentration (90% or higher) isopropyl alcohol or thermal material remover to a cotton swab or lint-free cloth and wipe away any remaining thermal putty on both the heat pipe and shield plate.

    • Don't use a paper towel or rag, as they may scratch the shield plate.

  35. FxeaWKG6jY31ePXS
    FxeaWKG6jY31ePXS
    fTKLVXCfpJRIMDAQ
    • Use a JIS 00 driver to remove the four 3.4 mm‑long silver screws securing the heat sink.

  36. xU5pBrkc4GoJmZ4G
    xU5pBrkc4GoJmZ4G
    O5ol2pjO3YbIkR4e
    Ovtp3ZQd1GPIRqGk
    • Insert the flat end of a spudger between the heat sink and the processor's heat spreader.

    • Twist the spudger to lift the heat sink and separate the thermal paste bonded to it.

  37. HIUTWVMHLKtOQFkH
    HIUTWVMHLKtOQFkH
    ct4WeugudXnmWIIb
    gVIUtodg6ZqggCLR
    • Lift the heat sink slowly to avoid bending its thin copper heat pipe.

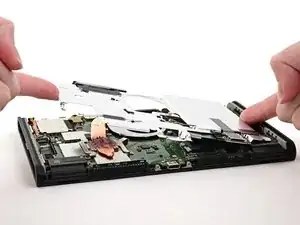
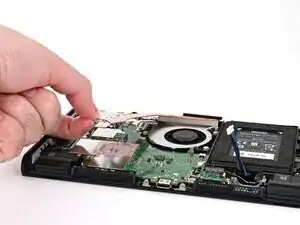
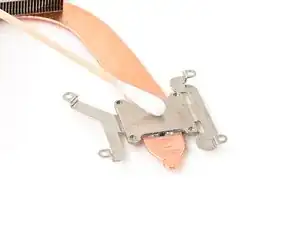
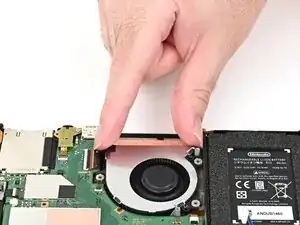
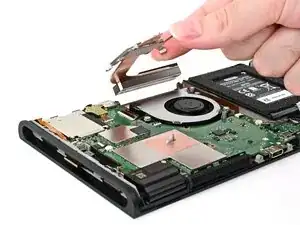
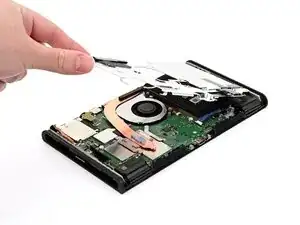
    • Slowly lift the heat sink from the front, until the aluminum fin stack at the back is detached from the adhesive beneath it.

    • Remove the heat sink.

  38. isorEmoc2YST1PmT
    isorEmoc2YST1PmT
    gKRRXLEyV2yMX2AY
    EjBjOMvIIJfNBhFy
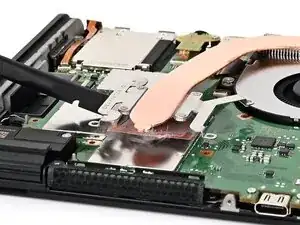
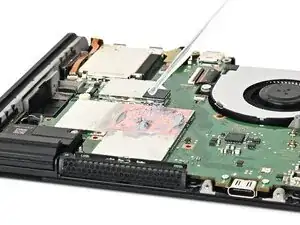
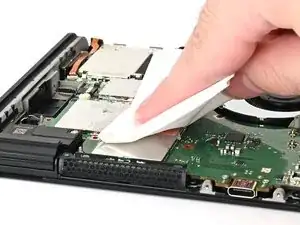
    • Use high-concentration (90% or higher) isopropyl alcohol or thermal material remover to soak the thermal paste on the processor's heat spreader for one minute.

    • Use a lint-free cloth or cotton swabs to wipe away the thermal paste.

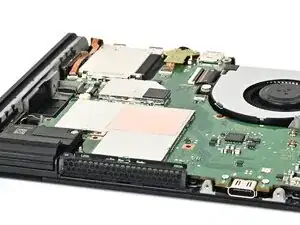
    • Repeat this process until the processor's heat spreader is clean.

  39. EHcZJMKNOpANBwE3
    EHcZJMKNOpANBwE3
    gOWNNQxSTZchwxva
    • If you're replacing your heat sink, skip this step.

    • Repeat this process to clean the thermal paste off the bottom of the heat sink.

  40. CRyykHLHvwlPKM5y
    CRyykHLHvwlPKM5y
    prtKJljcSVchAuCP
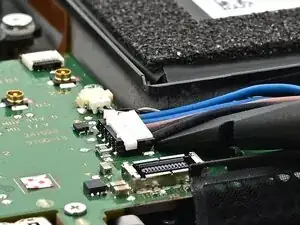
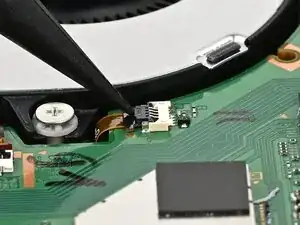
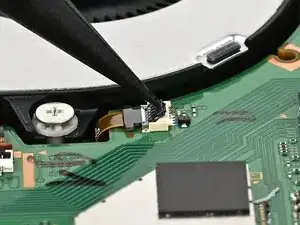
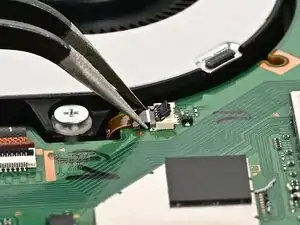
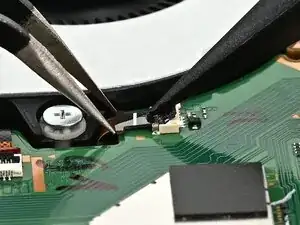
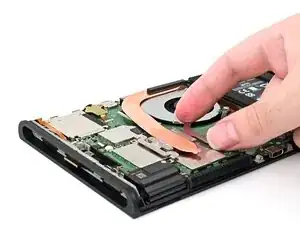
    • Use the point of a spudger to flip up the locking flap on the fan cable ZIF connector, located next to the fan on the console's board.

  41. 4QBYtvPXlANLKrBR
    4QBYtvPXlANLKrBR
    eD5DiLWVBrGjt6T2
    vFYf1nLbNDxNGeQP
    • Use tweezers or your fingers to gently pull the cable out of its socket.

    • If you're using tweezers, pull the cable out by its "wings" instead of gripping the cable itself.

  42. N1aIEH5HFNENKevO
    N1aIEH5HFNENKevO
    D6YpjmKgyhPNSEG3
    • Use a JIS 00 driver to remove the three 5.2 mm‑long silver screws securing the fan.

  43. LYqjEdhfNLluKUoN
    LYqjEdhfNLluKUoN
    lynkDqVpQSCfqtyy
    qOvYnIopb1MAFced
    • Slide the fan out of its recess to free its cable, then pick it up to remove it.

  44. EkVvAVPpwdvLqrtY
    EkVvAVPpwdvLqrtY
    oYRvL1VhAnnxkbIS
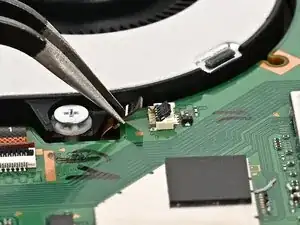
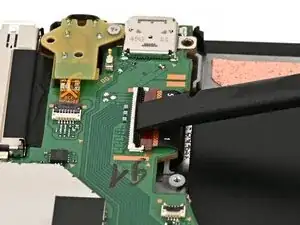
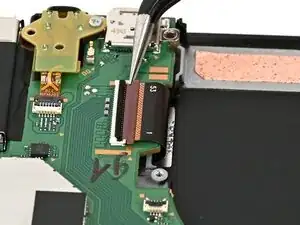
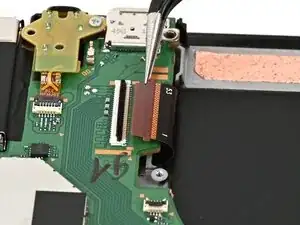
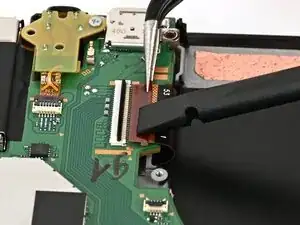
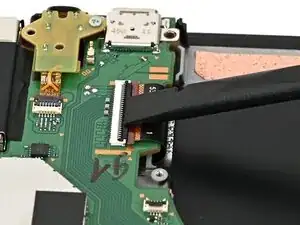
    • Use your finger or the flat end of a spudger to flip up the locking flap on the screen cable ZIF connector.

  45. b1EQOblasZhTRr1J
    b1EQOblasZhTRr1J
    XsN3aHALvMUBIvdL
    • Use tweezers or your fingers to gently pull the cable out of its connector.

  46. CgjXPMLUIHnnMnqi
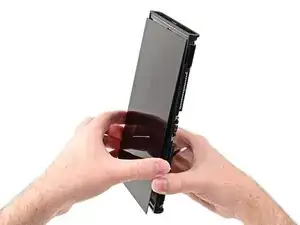
    • Flip the console over so the screen is facing up.

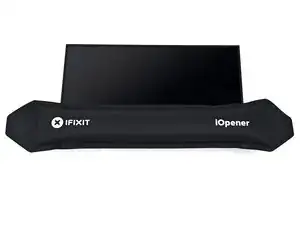
    • Apply a heated iOpener to the bottom edge of the screen for two minutes.

    • Alternatively, you can use a hair dryer or heat gun to heat the bottom edge of the screen until it's hot to the touch.

    • Be careful not to heat the console hotter than this—the frame is susceptible to heat damage.

  47. hmi162gAcqGRJGSE
    hmi162gAcqGRJGSE
    FnHqsNFZKR6FEuDD
    EKBRxikrNdYaGfOm
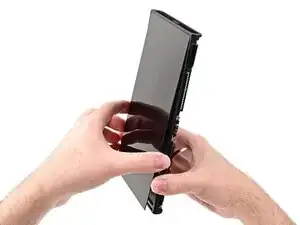
    • Apply a suction handle to the bottom edge of the screen, above the right speaker and ventilation cutouts.

    • Pull up on the handle with a strong, steady force to create a gap between the screen and the frame.

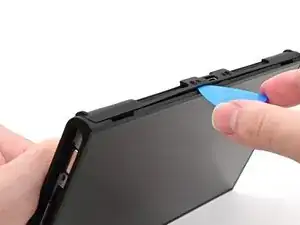
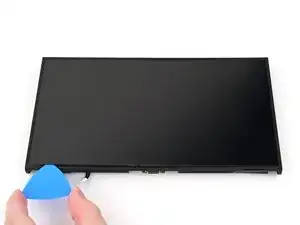
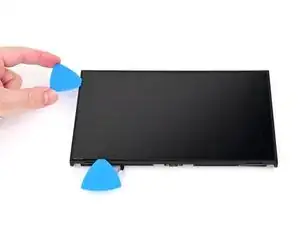
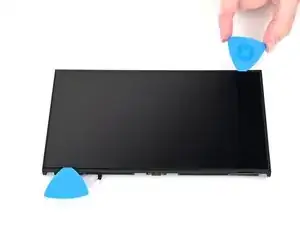
    • Insert the tip of an opening pick into the gap.

    • If you can't create a gap large enough to fit an opening pick, reheat the bottom edge of the screen and try again.

  48. IsBTlLIxQvfXZNy2
    IsBTlLIxQvfXZNy2
    XCmI3kNPNZeqm1uM
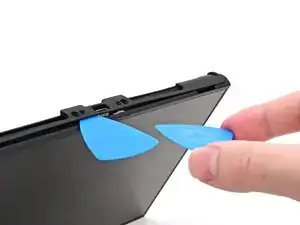
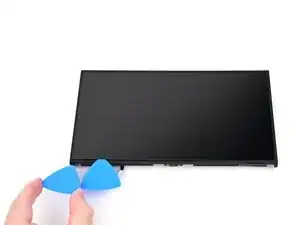
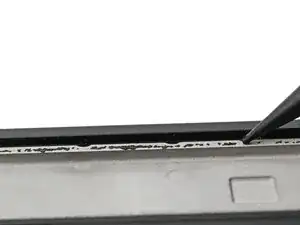
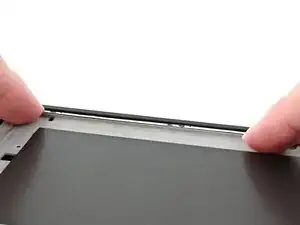
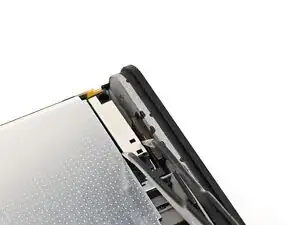
    • Slide your pick across the bottom edge to separate the adhesive.

    • Leave your pick inserted in the bottom left corner to prevent the adhesive from resealing.

  49. UJ2tsScubKhxo3mx
  50. DICNWGE6idwXDpkc
    DICNWGE6idwXDpkc
    qDvIGjYhqEo5SlmN
    DsBuyLnPJTCbPjkP
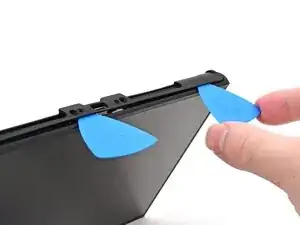
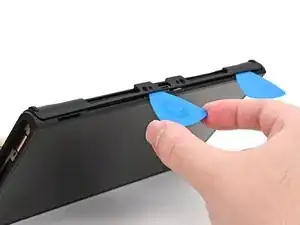
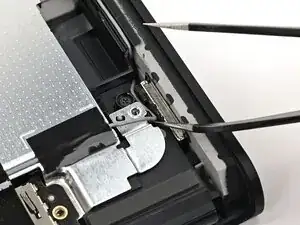
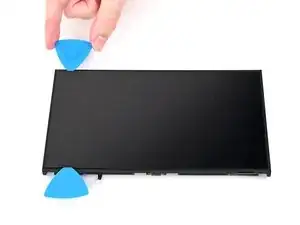
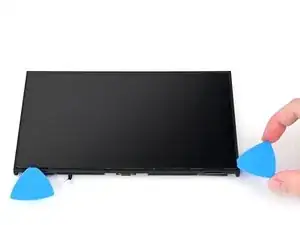
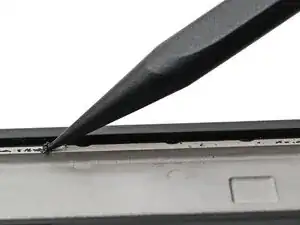
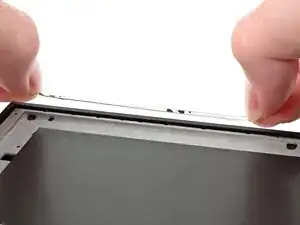
    • Insert a second opening pick next to the first one and slide it up the left edge of the screen.

  51. khoKed4QjDqCCXbq
    khoKed4QjDqCCXbq
    5Fuyj1HBlEUbHqkW
    KHFQTZ6PB4c3DQMW
    • Repeat the heating and sliding procedure along the remaining screen edges.

  52. 2bewTNyKWLdAoMke
    2bewTNyKWLdAoMke
    2QfCWKN2NKYRXrZW
    • Lift the screen off the frame to remove it.

    • If any adhesive strips are still stuck to the frame, peel it up with slow, steady force to release it.

  53. joqvyGxvAljqRWdk
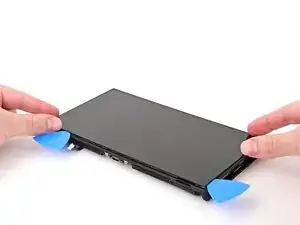
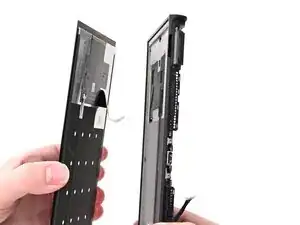
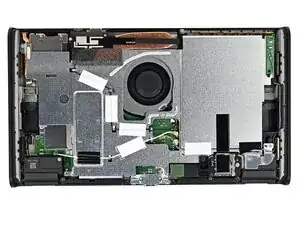
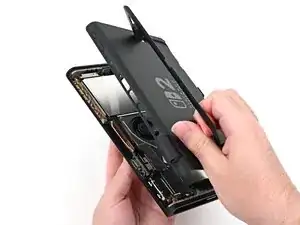
    • Congratulations on completing disassembly! The remaining steps will show how to reassemble your console.

  54. VlGodeljvgwhfS4O
    VlGodeljvgwhfS4O
    edvMIqOYCtVRjGfd
    oMSEFXsAjPSsdJJa
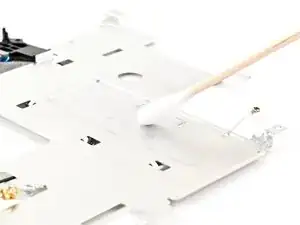
    • Use the point of a spudger to scrape off any adhesive left on the frame.

    • Apply a bit of isopropyl alcohol to a cotton swab or lint-free cloth and clean the frame until it's free of adhesive residue.

    • Alternatively, use our adhesive cleanup kit.

  55. Mwykt4QKGKYFPibB
    Mwykt4QKGKYFPibB
    3oORBsufOOBNGnbK
    vgXEVvQEShmGE5Nf
    • If your replacement screen comes with adhesive pre-applied, skip this step.

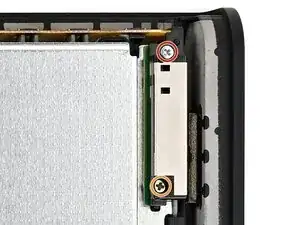
    • Use your fingers to install strips of thin, double-sided tape to the raised lip along the edges of the frame. Use 1 mm strips for the top and bottom edges and 2 mm strips for the sides.

  56. mPMcMDJBvLtEkPPg
    mPMcMDJBvLtEkPPg
    2VaDA4sWgZGtlALi
    EArDFpdNGpow1Dvq
    • Use angled tweezers to peel off all liners from the adhesive.

  57. qnRFV3PUC2AZLLcQ
    qnRFV3PUC2AZLLcQ
    iwQVZEjGjxPUKJWB
    UlKSlYnysFGvFSdZ
    • Don't adhere the screen to the frame yet.

    • Align the screen's cable with its cutout in the frame.

    • Route the cable through its cutout, ensuring it reaches its connector on the board.

  58. wYbvUXMDIbYPWjWs
    wYbvUXMDIbYPWjWs
    C2nRMJTUTCWJgX65
    f41w2fYtQgYV6X1W
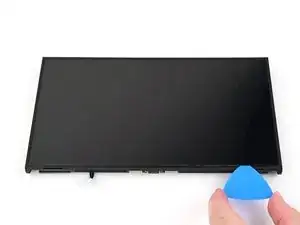
    • Align the right edge of the screen with its recess in the frame.

    • Press the right edge of the screen into place, then work your way to the left edge until the entire screen is adhered to the frame.

    • If the screen starts to feel misaligned as you work your way down, lift it back up and try again. Try to avoid stretching or creasing the adhesive.

  59. oRn2FWGOE6UkqgLX
    oRn2FWGOE6UkqgLX
    le2FOFMZTvyphSOe
    foINKmrUv4Irkn2R
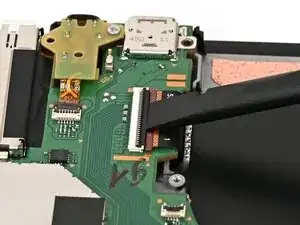
    • Use tweezers or your fingers to slide the screen cable into its ZIF connector until it's fully seated.

    • If you're using tweezers, you can use the flat end of a spudger to help guide the cable into its connector.

    • Flip the hinged locking flap down to secure the cable.

  60. PeAD6vdLJEUpeXIv
    PeAD6vdLJEUpeXIv
    oJNbAMS2WYojGAPU
    CFf42rkhTYYVUg3y
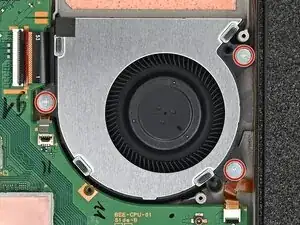
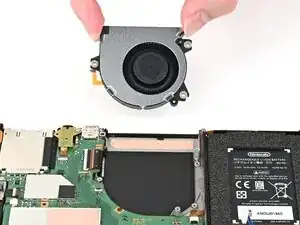
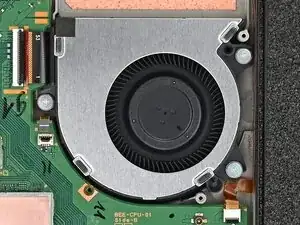
    • Slide the fan into its recess. Ensure its cable slides underneath the edge of the board.

    • Align the fan with its screw posts on the frame.

  61. fRWASZxFJq3RcNuE
    fRWASZxFJq3RcNuE
    h32lUnmvDwgYnkp3
    • Use a JIS 00 driver to install the three 5.2 mm‑long silver screws securing the fan.

  62. FWSAlgdC6pI4wHcs
    FWSAlgdC6pI4wHcs
    TuxFBgBTHuPOMnx1
    EWRC3pY2bhcC5k5I
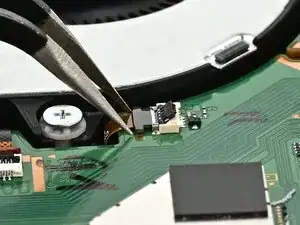
    • Use tweezers or your fingers to slide the fan cable into its ZIF connector until it's fully seated.

    • If you're using tweezers, you can use a spudger to help guide the cable into its connector.

    • Flip the hinged locking flap down to secure the cable.

  63. mTUjpkdIKEVoxG5f
    mTUjpkdIKEVoxG5f
    TUdnrROdgtDsQgOI
    QYssKcvmZlvdRJKD
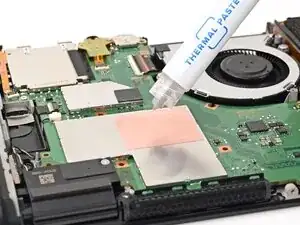
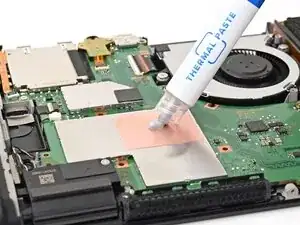
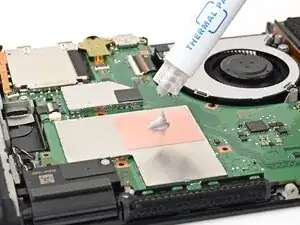
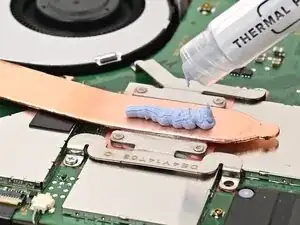
    • Apply a bead of new thermal paste to the center of the processor's copper heat spreader, roughly the size of a pea.

  64. F1tkWPMBDQiECB45
    F1tkWPMBDQiECB45
    HqNBajSbb2PHyPWo
    BiVC3JwcbN6V4mFy
    • Set the heat sink's aluminum fins into its recess behind the fan, then lower the heat sink onto the board.

  65. OtMW3qDcjDslfmOn
    OtMW3qDcjDslfmOn
    PN61lZaEPbyOQ3xU
    • Use a JIS 00 driver to partially install the four 3.4 mm‑long silver screws securing the heat sink.

    • Tighten the screws in an X pattern. For example: bottom left, top right, bottom right, then top left.

  66. bwdoZogPBUUHHlB3
    bwdoZogPBUUHHlB3
    6XfShaGovCkxPRD6
    • Align the battery connector over its socket on the board.

    • Use your finger or the flat end of a spudger to press the battery connector onto its socket until it's fully seated.

  67. eHOfRJar42UuEDTv
    eHOfRJar42UuEDTv
    Qy2PJfNZRqIlDmFW
    vCuionWKSeZTeOXP
    • Apply a line of new thermal putty down the center of the heat pipe, roughly the thickness of a pea.

  68. rJxdXHshoL3XQgCv
    rJxdXHshoL3XQgCv
    CB4DvsvmMW2HZ1p2
    rYgSbJtaRAXOrLRL
    • Hold the top‑right corner of the shield plate above the top‑right corner of the console.

    • Route the gray antenna cable underneath the black hook near the top corner of the frame.

    Make sure to re-connect the lithium ion battery connector (disconnected in step 33) before putting the shield plate back on!!

    GirlNamedMaggie -

    The guide has been updated. Thank you!

    Nick Schultz -

  69. eaLvDSwrk1JM1SKq
    eaLvDSwrk1JM1SKq
    oEmmhMxHIyLNxgKE
    • Lower the shield plate into place and align it with its screw holes.

  70. LLJvXT1LG1xLhry6
    LLJvXT1LG1xLhry6
    kqcqg4rXQhWicPkB
    nFJvVTSqtJ6ldEH2
    • Route the gray antenna cable down its channel on the right edge of the frame.

  71. rVLThVicVNCmIM1O
    rVLThVicVNCmIM1O
    GtTJpuhObako6F6E
    PB1t2GJePnfXEaED
    • Press the gray antenna cable into its groove at the bottom of its channel, and continue routing until it's secured to the clip at the bottom of the frame.

  72. rY3R5w3DISZi5WTB
    rY3R5w3DISZi5WTB
    f41XCLeAhMGFPqOD
    • Use a JIS 00 driver to install the seven screws securing the shield plate:

    • Two 6.2 mm‑long silver screws

    • Five 4.4 mm‑long silver screws

  73. ELplHNShBRsC42YS
    ELplHNShBRsC42YS
    kl6RTHMNaGFLWGnk
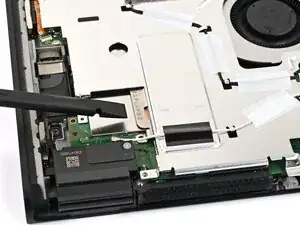
    • Use your finger or the flat end of a spudger to press the MicroSD card reader press connector onto its socket on the board.

    • Don't try to force the connector into place. If you're having trouble, reposition it and try again.

  74. kcHbMoCPIePqxuAK
    kcHbMoCPIePqxuAK
    GeUTbSJQQ2pLKjca
    CiABLTY1uWCxKVS1
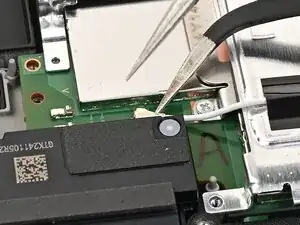
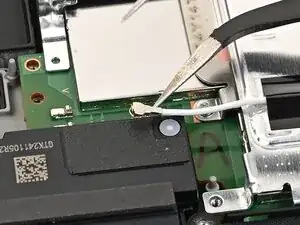
    • Use tweezers to hold the lower antenna coaxial connector in place over its socket and gently press down with your finger or a spudger—the connector should "snap" into place. If you're having trouble, reposition the head instead of using more force.

    • Repeat this process to connect the three central coaxial connectors to their respective sockets.

    • The black cable connects to the socket closest to the fan, the white to the middle, and the gray the furthest away.

  75. RyoavYxAmaFuHn1h
    RyoavYxAmaFuHn1h
    Yo3dSGTOgCFM5sRS
    DO2P1qw2oHbpru2e
    • Use tweezers or your fingers to align the upper antenna with its screw holes and black alignment pegs and set it into place.

    • Use a JIS 00 driver to install the two screws securing the upper antenna:

    • One 4.4 mm‑long silver screw

    • One 4.6 mm‑long green screw

  76. EnX6ME1IVWfILCFs
    EnX6ME1IVWfILCFs
    euIIYJRAK2JGEFZ4
    AtyZKy4pD4p6O4C2
    • Use tweezers or your fingers to align the lower antenna with its screw holes and gray alignment pegs and set it into place.

    • Use a JIS 00 driver to install the three 4.4 mm‑long screws securing the lower antenna.

  77. pjGoYIMeLVmy1UvQ
    pjGoYIMeLVmy1UvQ
    3QuAVGxoVkLJAutr
    XaA2wtFDKsCKjpGW
    • Fully pull out the game card tray.

    • Double-check the power and volume buttons to ensure they're seated correctly. If the rubber membrane beneath the buttons is out of place, ensure it's aligned with its pegs.

    • Check the microphone to ensure it's fully seated in its slot in the frame.

  78. sSyULZE5yvE6kQLS
    sSyULZE5yvE6kQLS
    aKWKHfsLgGKvrZRp
    LmvcHTVaG3uF1BnZ
    • Align the top of the back cover with the top of the console.

    • Set the top edge of the back cover into place, checking the buttons and ports to ensure they're aligned properly. If they aren't, lift the back cover and try again.

    • Press along the top edge to fasten the clips securing the back cover to the console.

  79. DT64xZbXdxJfjZYW
    DT64xZbXdxJfjZYW
    PKuZdnNTaT1cvy2V
    • Squeeze the rest of the back cover and console together to fasten the clips.

  80. RnlwvPPTcBxlp3Mc
    RnlwvPPTcBxlp3Mc
    gQEivitJcMgvO6hy
    5R1bMuQkx6bZWrNa
    • Use a JIS 00 driver to install the three 3.1 mm‑long screws securing the back cover: one on the top edge of the console, and two on either side of the bottom USB-C port.

    • Use a Y00 driver to install the two 4.4 mm‑long screws in the kickstand cutout.

  81. cZ2jKSfXSxgXEuQL
    cZ2jKSfXSxgXEuQL
    Aob1o2jGToYPQD1q
    • Install the two 3.6 mm‑long gold screws on each side of the console (four in total).

  82. SAON1nUn2dJvZvWO
    SAON1nUn2dJvZvWO
    YsnER4viWUJvbNV5
    • Power on the console and test functionality to ensure it's working as expected.

  83. x1YrSApBUaLMVSjQ
    x1YrSApBUaLMVSjQ
    yxOooYlXQJgsavwD
    ExwPA1ihlwYNPaQU
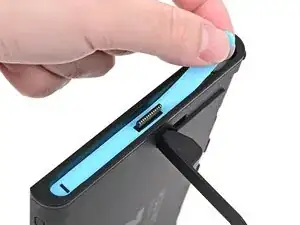
    • Align the right side sticker with its recess. Ensure the cutout in the sticker is aligned with the Joy-Con connector.

    • Set the sticker into its recess, first on one side, then the other.

    • Use your finger or the flat end of a spudger to press the sticker into place.

    • If the sticker isn't sticking well, apply heat after you press it into place.

  84. DMSbsh2jifYxVTYr
    DMSbsh2jifYxVTYr
    UkifYsMS3XLXNjj1
    NrAcZGVWIrSFWsXM
    • Repeat this procedure to install the left side sticker.

Conclusão

You finished fixing your Switch 2!

Take your e-waste to an R2 or e-Stewards certified recycler.

Repair didn’t go as planned? Try some basic troubleshooting, or ask our Nintendo Switch 2 Answers Community for help.

Nick Schultz

Membro desde: 24/03/24

45909 Reputação

2 comentários

Where can I find replacement screen?

Ashutosh Sah -

They're not available yet! We'll update the guide once we have the part.

Nick Schultz -