Introdução

Use this guide to replace the fan in a 2019 MacBook Air.

  1. 4a1VSQBgdQXAZah2
    • Before starting this procedure, you should disable your Mac's Auto Boot feature. Auto Boot powers on your Mac when you open the lid, and may be accidentally triggered during disassembly. Use this guide to disable Auto Boot.

    • If your MacBook is running Big Sur v11.1 or later, disabling Auto Boot may not work. You can proceed normally, but make sure to disconnect the battery as soon as you're inside.

    • Completely power off and unplug your MacBook Air before you start. Close the display and flip the entire laptop upside-down.

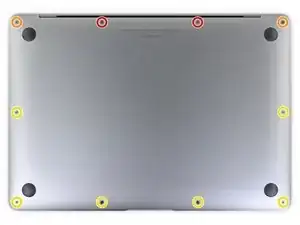
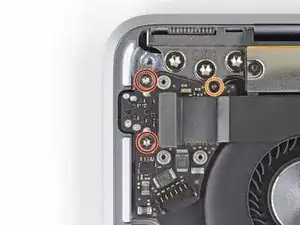
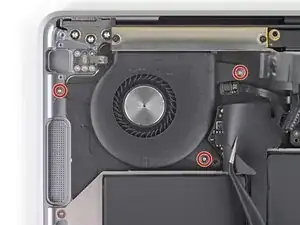
    • Use a P5 driver to remove the following screws:

    • Two 7.9 mm screws

    • Two 7.1 mm screws

    • Six 2.6 mm screws

    If the first thing you do is disconnect the battery, is it really an issue if you don’t (or can’t) disable auto-boot?

    maccentric -

    I agree, why disable Auto-Boot when the lid is closed and the battery is disconnected immediately? – I've never had an issue since 2016 when the feature was introduced.

    stevebsiegel -

    On my machine, the longest two screws were in the corners, while the other two long screws were in the middle. Perhaps previous service in the past had them replaced into the wrong place? In any case, the longest screws do seem to fit in either place. I guess 0.8mm is not very much of a difference. Seems like poor design if they could have used one size of screw.

    johann beda -

    Just did one, and it also had longest screws in the corners.

    maccentric -

    Just did another, and the long ones were in the middle. Definitely poor design and quality control.

    maccentric -

    HIGHLY recommend reading the entire guide AND all the step comments before starting. For example: before the battery can be fully disconnected, the battery disconnect "gold button" on the logic board needs to be held down. Step 25 calls for a T5 Torx bit that is not included in the kit for example. Double-sided pull tab stretch tape will likely be needed to reinstall batteries and speakers.....

    Sam -

    I agree with the suggestion to read the entire instructions first before attempting the battery replacement. Here are a few other suggestions: 1) Have a magnifying glass or a pair of cheap magnification glasses on hand, 2) wear a head-light to see better, 3) several pairs of tweezers was helpful, 3) I searched the web for instructions to disable autoboot for my MacBook that is using Sonoma 14.7.5 - I followed those instructions and they didn't work so I would also suggest ignoring this procedure, 4) I found that a Torx #3 was too small for some of the screws even though it was suggested but a Torx #4 worked just fine.

    This was my first battery replacement and took 3 hours, not the 30 mins to one hour suggested so give yourself time. If you are lucky all will go smoothly. In my case, one of the stretch tapes under a speaker broke. You do NOT want this to happen. I was able to retrieve the broken piece after some time so prying up the speaker was not necessary.

    Alexander -

    A final comment - with the Canada Post strike on when I wanted to order parts, iFixit was not able to deliver my order in a timely manner. They graciously refunded my purchase. I then turned to Amazon - gag. I purchased a SeaPlant replacement battery kit which contained the battery, P5 T5 and T3 drivers, stretch tape, a spudger, and gloves all for $77.

    Alexander -

    Dear God $77 for a battery!,…that’s what I paid for my entire MacBook! I always bought my battery’s for my pro here and at most those were 30 bucks

    3arthShineDivine -

    Also I can’t get my keyboard to respond,…I’m going to buy a type c wired keyboard but has anyone had this issue? I can’t type on my password to login and the onscreen keyboard function is inconveniently not functioning properly. I am quite unsure if they even make plug and play keyboards with a type c instead of usb a given that I would not be able to pair Bluetooth in this state it on,…my trackpads working but not dbl clicking for those options nor a single keys responsive I think maaaaaybe I hit the power button and I think that started it up one time but I’m stumped

    3arthShineDivine -

  2. 4Kra6VLGEa3eGmd6
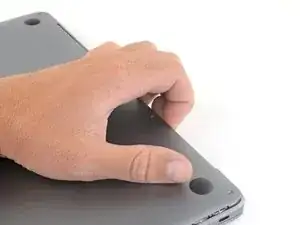
    • Wedge your fingers between the display and the lower case and pull upward to pop the lower case off the Air.

    • Remove the lower case.

    • After reassembly, your MacBook might not turn on until it's connected to a power source (a low power phone charger may work). To test your repair, plug in your charger, allow two minutes for your MacBook to turn on, and check that everything works as expected.

    Das geht etwas schwer, da das Unterteil mittig noch von 2 Druckverschlüssen gehalten wird.

    facebook -

    translated and true:
    This is a bit difficult because the lower part is still held in the middle by 2 pressure fasteners.

    Tom -

    Are there any suggestions to removing the pressure fasteners more easily?

    Drea Mastromatteo -

    I used a suction cup to lift up the cover. I mean those to lift up an iPhone display. Worked like charm.

    Juergen Stawska -

  3. xVJrmDjjKX3L1VEp
    • Peel back the tape covering the battery connector enough to reveal the connector underneath.

    There was no tape covering the battery connector on my 2018 MacBook Air.

    Alexander -

  4. NZT3TL4hoGyeLE6L
    NZT3TL4hoGyeLE6L
    XZ2jGZmJoO1c5OHn
    • Use a spudger to slide the battery connector parallel to the logic board and out of its socket on the logic board.

    Before the battery can be fully disconnected, the battery disconnect button needs to be held down. There is a gold button just above the battery socket, along with a small LED much like the 12” machines. Once this has been held down and the LED has switched off it is safe to remove the battery.

    Aaron Dalziel -

    This seems like an important step?

    maccentric -

    Also, seems like this should be done after the battery is disconnected, not before? Otherwise, wouldn’t the battery re-charge it?

    maccentric -

    What if the white LED dosent light up after pressing the yellow button again?

    Iron05 -

    I just performed this repair on my late 2018 mac air. I did click the gold button but saw no LED illuminated or otherwise. Question- after reassembly does the button get pressed again to connect the battery? Please clarify if this button is to be pressed and if it needs pressing again after the repair.

    All said - I pressed again after the battery connector clicked, assembled the back and all worked perfectly. The original issue was one dead port (no charge, no communication). The battery charge lightening bold icon was acting funny too. Genuis bar guy in Naperville said it was likely a logic board too. But it was not. The port was apparently confusing the logic board with regards to the charge function. Thanks Adam for saving me $440 and sending my computer back to Apple. I am 71 yrs young - who says an old dog can’t learn new tricks with good training!!

    William Lane -

    I didn't see Aaron's comment before completing the battery replacement. Afterwards, the computer would not turn on despite multiple SMC reset procedures. Upon double-checking the comments I see the importance of pressing the gold button. I pressed the gold button before disconnecting the new battery, then pressed it again after reconnecting for good measure. Computer booted!

    It would be good of iFixit to add this important step as most people probably don't open up every single comment on (seemingly) simple steps.

    Corey Matsumoto -

    Seconding Corey's comment. If paid more attention to the comment section, I would have avoided 15-30 minutes of panic. (BTW I did not notice any LED, but the golden button was easy to find).

    Lorenzo Sorbo -

    Where is the gold button? I replaced my battery and my laptop will not start

    Candace Williams -

    Where is the white LED you are referring to?

    Sam -

    Well... I have a 2018 MacBook Air and just replaced the battery. I did not see this comment about pressing a gold button. I took pictures during disassembly and it is only now that I see the gold button. Even thought I did not press the magic gold button all is working fine. I have had no issues with re-boot or battery charging since replacement. One suggestion though is when reconnecting the battery, make sure you feel a click when you re-insert the connector into the socket.

    Alexander -

    One note when reassembing, be sure to press down lightly on the plug with the spudger, so that it fully slides into the socket on the logic board.

    Thomas Ventimiglia -

  5. Zm4XSSu1KHHaeJEB
    Zm4XSSu1KHHaeJEB
    TRm2RcVoPDV6UPxS
    • Slide the tip of a spudger underneath the speaker cable and pry straight up to disconnect the speaker.

    This seems unnecessary as you've covered disconnecting and removing the right speaker already. Some clarification would be nice.

    Wesley -

    Be very careful to pry up the cable and not the surface mounted connector. I've done this type of repair many, many times, and I accidentally popped the connector off the audio board.

    Doug -

  6. pYWrBx3kZIVVyd2V
    pYWrBx3kZIVVyd2V
    ZQMW5OFZtKYWZO4W
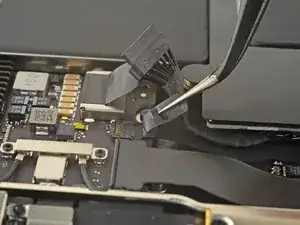
    • Use a T3 Torx driver to remove the three 1.4 mm screws securing the audio board cable bracket.

    • Remove the cable bracket.

    For my repair I had to use a T3 here. T4 too big

    Macrepair SF -

  7. 2PIBvu6fHSTNvJbj
    2PIBvu6fHSTNvJbj
    wnwGf6cyTsgB2WRt
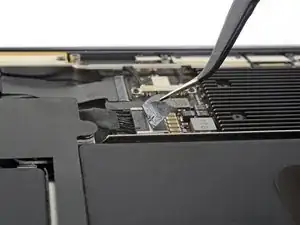
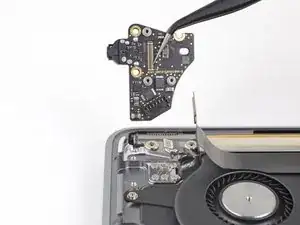
    • Use the flat end of a spudger to pry the audio board connector straight up and disconnect it.

  8. en61kxAd1SdgFXDk
    en61kxAd1SdgFXDk
    nAqpAmJ4s2VIxjqs
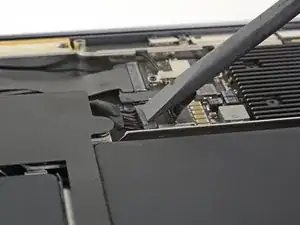
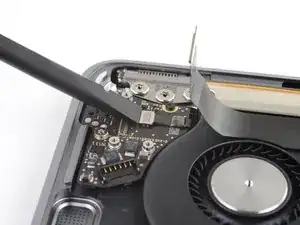
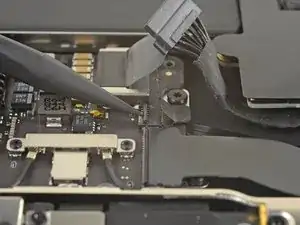
    • Use the flat end of a spudger to pry the Touch ID sensor connector straight up and disconnect it.

  9. ZXExtv1awoHaHbjB
    • Remove the following screws:

    • Two 4.3 mm, T5 Torx screws

    • One 2.4 mm, T3 Torx screw

    In my case, the audio board was mounted with two 4.3 mm T4 screws and one 2.4 mm T3 screw.

    benston -

  10. ghEClKaXGlPnTIUa
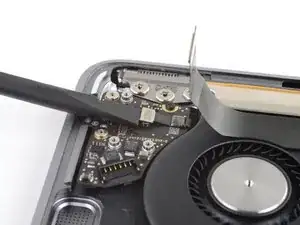
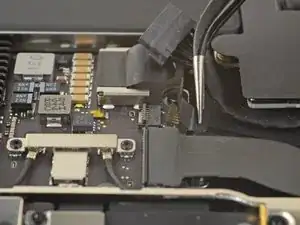
    • Slide the flat end of a spudger underneath the Touch ID sensor cable to slice through the adhesive securing it to the audio board.

  11. HfoawvGRUDPAmnxV
    • Remove the audio board.

  12. MJFnhDBBs5viKxda
    • Peel back the black tape covering the fan cable connector.

  13. DEVDqKfeInKGbhvS
    DEVDqKfeInKGbhvS
    sT2L6bbGL4j1Y4FI
    VGOJEV2NNVaiDZ2E
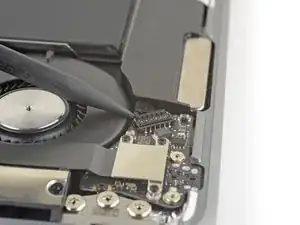
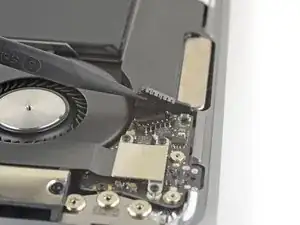
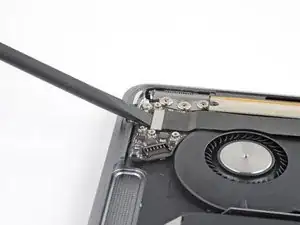
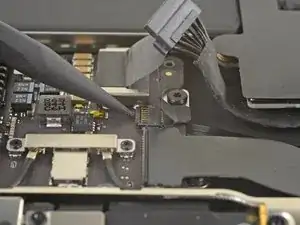
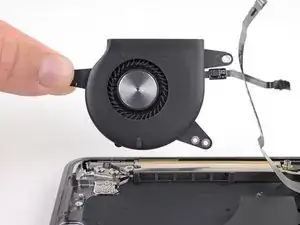
    • Use the tip of a spudger to lift up the locking flap on the fan cable's ZIF connector.

    • Slide the fan cable out of the ZIF connector.

  14. putjRPIZfATRW2oJ
    putjRPIZfATRW2oJ
    3JPA3rcMgI5sFORn
    QVQ4YbViAWoFcVEk
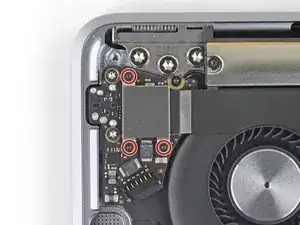
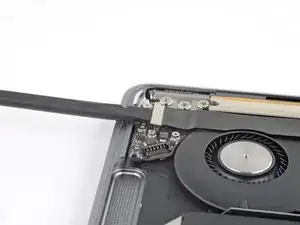
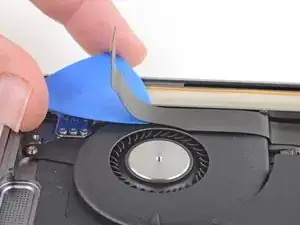
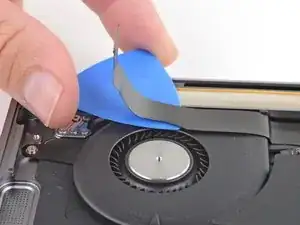
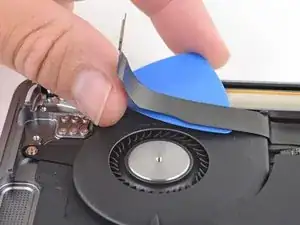
    • Slide an opening pick under the audio board cable to slice through the adhesive securing it to the fan.

  15. 1YpjWJaNCyW1wTjG
    • Use a T5 Torx driver to remove the three 2.7 mm screws securing the fan.

  16. djateSmUXPD4BrVV
    • Lift the fan out of the case and remove it.

    Fan ribbon cable was fattened on to case with glue. Used a flat metal blade type tool to gently separate ribbon cable from case.

    Macrepair SF -

Conclusão

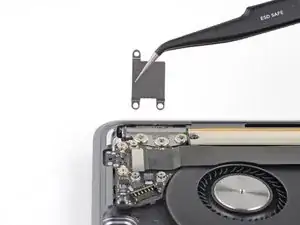
Compare your new replacement part to the original part—you may need to transfer remaining components or remove adhesive backings from the new part before installing.

To reassemble your device, follow the above steps in reverse order.

Take your e-waste to an R2 or e-Stewards certified recycler.

Repair didn’t go as planned? Check out our Answers community for troubleshooting help.

Adam O'Camb

Membro desde: 11/04/15

220314 Reputação

0 comentários