Introdução

If your touch ID no longer functions you may have a faulty touch ID. To determine if you need to replace the touch ID, follow the steps in this guide to access the ribbon cable. If the ribbon cable is disconnected, reconnect the cable. If the touch ID still fails to read your fingerprint, replace it using this guide. Ensure you are replacing the touch ID with Lenovo ThinkPad X1 Yoga 2nd Generation’s Touch ID part. This guide is not particularly difficult, but take care when removing parts such as the ribbon cable to avoid damage.

  1. RUVanctWGYInflPC
    • Ensure the laptop is powered off and the charging cable is disconnected before opening the back cover.

    • Flip over the laptop to access the back cover.

    I've seen also that it's recommended to activate the option : <Disable Built-in Battery> in the BIOS > POWER

    As the battery apparently still emits a little bit even when turned off.

    Laurent -

  2. CIooEkrOuiwyjePc
    CIooEkrOuiwyjePc
    ncptBZUdWSkQD3Ke
    • Use a Phillips #0 screwdriver to remove the eight 8 mm screws.

    More pricesely, screws need to be unscrewed, but not removed, since they stay attached to the back cover. Trying to remove them may damage the small gaskets around the screw shaft.

    Edouard Rossignol -

  3. 5YNLPLYLjWPDbLPI
    • Remove the back cover.

    • A popping sound may occur when the back cover is removed.

    Good solution, but where do I find the battery?

    Brian Arnold -

  4. PICdA6GZFLXDNXLw
    PICdA6GZFLXDNXLw
    MQ1thHDgkauXxrgR
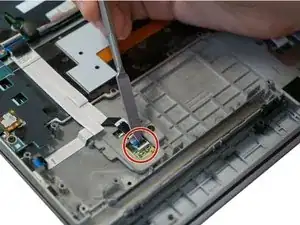
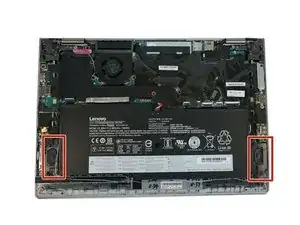
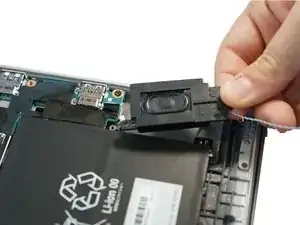
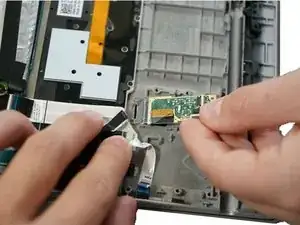
    • Follow the ribbon cable that runs from the left speaker to the motherboard.

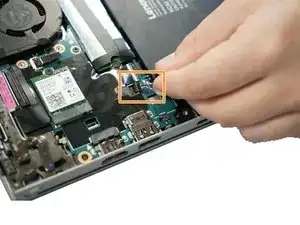
    • Pull the black connector up and release the cable wire by hand.

    • If needed, pull this connector up using the Pro/ESD/angled tweezers.

    I didn't find a black connector so I skipped this

    Ron B -

  5. cpE231ZGmboWYgMi
    cpE231ZGmboWYgMi
    hibJkwMQYWDmDB6L
    • Remove two 6 mm Phillips #0 screws from each speaker.

  6. gTaOaeZiCBeNUQ1K
    gTaOaeZiCBeNUQ1K
    jHeQt2bOxnAWCZFb
    • Use your fingers to remove the speakers from the device.

  7. 4BKE1HuVTFBFwbFH
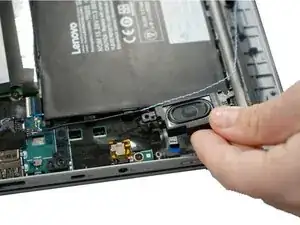
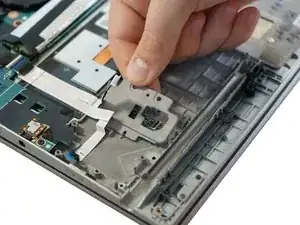
    • Use a spudger to pop the ribbon cable that runs from the upper-middle portion of the battery to the motherboard out of the motherboard.

    • Do not use a metal spudger as indicated in the photos. The metal spudger should only be used for serious prying power. If it's used on the internal components of a device, it may puncture or damage the components in your device.

  8. OHQ516jIe1qAR4KM
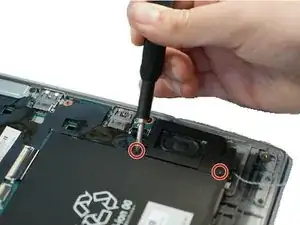
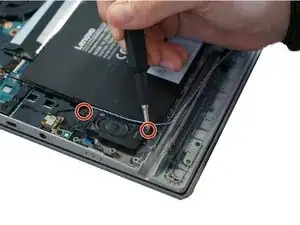
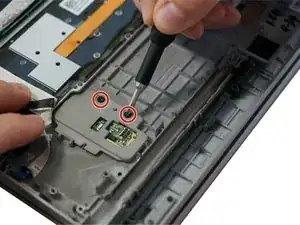
    • Use a Phillips #0 screwdriver to remove one 6 mm screw from the bottom-middle portion of the battery.

  9. GSHhKXZdlLRPOQxd
    • Remove the battery.

    Good Lord. That shot of the metal death spudger lifting up the battery connector... Great way to turn your battery into an IED.

    Ash Cooper -

  10. aYEBqJBpNkW4up6q
    aYEBqJBpNkW4up6q
    OoQBjhHVJWchhPjU
    • Use a metal spudger to lift the tab containing the black ribbon cable.

    • Do not use the metal spudger unless if it's used for serious prying power. The metal spudger may damage or puncture the internal components in the device, so please use the plastic opening tools or the nylon spudger instead.

    • Use nylon-tipped reverse tweezers to slowly pull out the ribbon cable.

  11. fcc5iOy6XxqHylFC
    • Remove two 4 mm screws using the Phillips #0 screwdriver.

  12. xPcSBUmQGraMSlFY
    xPcSBUmQGraMSlFY
    Jf1Afh6ilCiEuHSS
    • Remove the gray covering from the Touch ID.

    • Remove the Touch ID chip from the device.

Conclusão

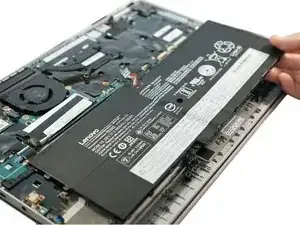
To reassemble your device, follow these instructions in reverse order.

Alex Shacoski

Membro desde: 10/02/20

285 Reputação

0 comentários