Introdução
Manual Parts Test mode is a hidden service feature on many Maytag washers from about 2010 through 2021 that lets you force individual functions to run, such as the water valves, drain pump, spin, and agitate. Use it to narrow down which part isn’t working, confirm a symptom quickly, and compare your washer’s behavior to the built-in service manual for model-specific differences.
Ferramentas
-
-
Confirm the washer is a Maytag design from about 2010 through 2021 with a control dial that has selectable positions (often shown as oval markers).
-
-
-
Use a screwdriver to remove the three screws from the back of the washer top.
-
Remove one screw from the left side, one screw from the right side, and one screw from the wire or harness cover area.
-
-
-
Move the washer near a wall so the top can pivot up and rest safely against the wall.
-
Use tape on the front to secure the lid closed to the top panel before lifting the top.
-
Pull the top forward, lift up, and then push the top rearward to unhook it.
-
Pivot the top up and back, and rest it on the two small metal tabs, one on each side.
-
-
-
Look in the front left corner under the top panel for the service manual in a small plastic bag.
-
Move the drum as needed to reach the manual.
-
-
-
Pivot the top back down toward the front of the washer and verify it slides off the two metal support tabs.
-
Align the top on both sides, then lock it by pulling it forward, pushing down, and pushing it rearward.
-
Reinstall the rear screws, slot the harness cover back into place if removed, and secure it with the remaining screw.
-
-
-
Plug the washer in and make sure all the control panel lights are off.
-
If needed, unplug the washer for 30 seconds, plug it back in, and wait about a minute for it to boot.
-
-
-
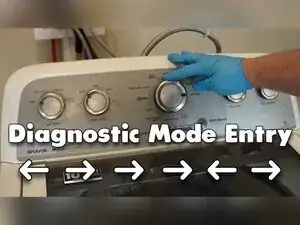
Rotate the dial counterclockwise until it points to the 12 o’clock position.
-
Enter the code within 6 seconds: rotate three clicks clockwise, one click counterclockwise, and one click clockwise.
-
Watch for all the control panel lights to start flashing to confirm diagnostic mode.
-
-
-
With the lights flashing, rotate the dial clockwise three times until the Spin and Done lights are on.
-
Press the Start/Pause button to enter Manual Parts Test mode.
-
Confirm Manual Parts Test mode by checking that all lights turn off and the washer makes no sound.
-
-
-
Use the Start/Pause button to start and stop the currently selected manual test.
-
Recognize that the first position with no lights on is the lid lock test, and it must be active to run spin or agitation tests on many models.
-
-
-
Turn the dial to the water fill or valve tests listed in the service manual for your model.
-
Press Start/Pause to run the selected valve test, and press Start/Pause again to stop it.
-
Watch and listen for water flow into the tub to confirm the valve and control command are working.
-
-
-
Turn the dial to the drain pump test listed in the service manual for your model.
-
Press Start/Pause to run the drain pump, and press Start/Pause again to stop it.
-
Listen for the pump motor and check that water leaves the tub and flows out through the drain hose.
-
-
-
Turn the dial to a spin test listed in the service manual, and press Start/Pause to start or stop it.
-
-
-
Turn the dial to an agitation test listed in the service manual, and press Start/Pause to start or stop it.
-
-
-
Rotate the dial through the remaining test positions until you reach a state with nothing lit, then press Start/Pause to unlock the lid when the washer is fully stopped.
-
Press and hold Start/Pause for more than 3 seconds to cancel any test and exit all diagnostic modes back to normal operation.
-
Keep the service manual from inside the washer handy because test names and availability can vary by model. Don’t change tests until the basket is fully stopped, don’t bypass the lid lock, and double-check that any covers and screws removed for access are reinstalled securely before running a normal cycle.
