Introdução
This guide shows how to access hidden diagnostic features on newer Whirlpool side-by-side refrigerators (including the WRS321SDHZ and similar models). You’ll learn how to enter diagnostics, run forced modes like forced defrost, interpret what the control panel is telling you, and turn demo (showroom) mode on or off so your refrigerator can cool normally again. Instructions are included for both styles of controls: models with an in-door water/ice dispenser display, and models without in-door water/ice that use an internal “Athena-style” control panel.
Ferramentas
-
-
Unplug the refrigerator before starting any mode that requires a reboot or before handling door switches.
-
-
-
Use the dispenser display instructions if the refrigerator has in-door water and in-door ice controls on the front panel.
-
Use the internal control instructions if the refrigerator has no in-door water/ice and the buttons are inside the cabinet near the top of the door area.
-
-
-
Unplug the refrigerator.
-
Wait two to three minutes.
-
Plug the refrigerator back in.
-
Wait 30–45 seconds for the refrigerator to boot until the temperature segments come back on.
-
-
-
Press the freezer temperature button until it’s set to only one blue increment.
-
Press the refrigerator temperature button until it’s set to only one blue increment.
-
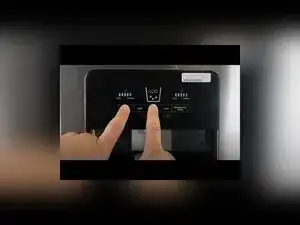
Press and hold the freezer temperature and ice type buttons together for about five seconds.
-
Confirm entry by checking that every light on the display flashes on.
-
Press all five keys in order from the leftmost to the rightmost key to confirm the buttons and reset the interface for diagnostic inputs.
-
Confirm the interface reset when all lights flash again and then turn off.
-
-
-
Press the light key (the second button) to advance to the next diagnostic step.
-
Press the lock key (the fourth button) to go back to the previous diagnostic step.
-
Press the rightmost key to turn a mode on or off when the selected step supports it.
-
Read the left-side segments as the step indicator, and read the right-side segments as the test result or feedback.
-
-
-
Use the light and lock keys to select the forced defrost step.
-
Press the rightmost key to start forced defrost.
-
Expect the compressor and every fan to shut off while the refrigerator attempts to run the freezer defrost heater.
-
Press the rightmost key again to turn forced defrost off if the step supports toggling.
-
-
-
Use extra patience for the ice maker harvest test because it can take a significant amount of time to complete.
-
Run the ice maker harvest test before running the ice maker water fill test.
-
-
-
Unplug the refrigerator, and plug it back in to reboot.
-
Within two minutes of booting, press and hold the freezer temperature and refrigerator temperature buttons together for five seconds.
-
Confirm demo mode by watching for an animation on the display.
-
Repeat the same button-hold code to clear demo mode and restore cooling.
-
-
-
Open the refrigerator door and look for the control system on the right side, near the top left area inside the cabinet.
-
-
-
Unplug the refrigerator, and plug it back in.
-
Within 30 seconds of power-on, press the temperature select button until only the single top light is selected.
-
Press and hold the door switch to simulate the door being closed.
-
Press and hold the temperature setting button for five seconds.
-
Confirm service mode when all lights flash, then wait about 10 seconds for the lights to shut off.
-
-
-
Press the temperature setting button to cycle through modes, and wait about three seconds between button presses.
-
Press the temperature setting button once to force-run the refrigerator compressor system.
-
Press the temperature setting button again to turn the compressor off and turn the service lights off.
-
Press the temperature setting button again to turn on the defrost heater for forced defrost.
-
Press the temperature setting button again to turn the defrost heater off and turn the lights off.
-
Keep cycling until you reach the error code or display fail mode, where any stored failures show as flashing lights.
-
-
-
Unplug the refrigerator, wait 15–30 seconds, and plug it back in.
-
Within two minutes of booting, press the temperature setting button until maximum cooling mode is reached.
-
Press and hold the door switch to simulate the door being closed, then press and hold the temperature setting button for about three seconds.
-
Confirm demo entry when each UI button flashes individually in a repeating cycle, then press the temperature setting button again to fully engage demo mode.
-
Repeat the same maximum-cooling and door-switch sequence to exit demo mode and restore cooling.
-
If the refrigerator isn’t cooling after troubleshooting, double-check that demo (showroom) mode is off because it disables the compressor. On internal-button (Athena-style) models, error codes appear as flashing “D” indicator lights in the error code mode, and no lights means no failures are detected; one example shown is D8 and D9 flashing together for a refrigerator and defrost sensor error. If diagnostics won’t exit or the UI behaves oddly, a power reset (unplug, then plug back in) returns the unit to normal operation.
