Introdução
Use the built-in diagnostic mode to read stored fault codes, run component tests, and reset control logic on your GE top load washer. This guide shows the exact button sequence for models that use either a ring of status lights or an 8-segment display. Entering diagnostics lets you confirm problems before ordering parts or calling for service.
-
-
Unplug the washer for about 30 seconds to clear the control.
-
Plug the cord back in and wait 15–30 seconds for the control to boot.
-
-
-
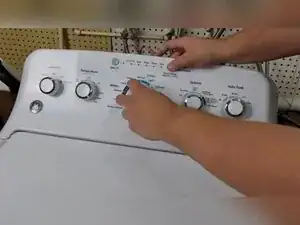
Press and hold the Start button on the control panel.
-
While holding Start, rotate the cycle selector knob seven clicks counter-clockwise.
-
Release the Start button; a chime confirms that diagnostics is active.
-
-
-
Turn the knob clockwise to advance to the next test number.
-
Turn the knob counter-clockwise to go back to the previous test number.
-
Test 1 is Fault Code Mode and is shown by the Spin light or the digit 1 on the display.
-
-
-
With Fault Code Mode highlighted, press Start once to show the first stored code.
-
Press Start again to cycle to the next stored code.
-
Press Start after the flash sequence to return to the first code if needed.
-
-
-
On circular-light models, count the lit position; for example, the third light corresponds to fault code 4.
-
On 8-segment display models, read the numeric code directly from the display.
-
Write each code down and compare it with the 32-code chart supplied by GE.
-
-
-
Rotate the knob once in either direction to exit Fault Code Mode and return to the main diagnostic menu.
-
Press Start without turning the knob to replay the stored codes from the beginning.
-
-
-
Turn the knob to choose any of the 18 available control or component tests.
-
Press Start to launch the highlighted test; turn the knob again to end it and select another test.
-
-
-
Press and hold the Start button for 3–5 seconds until all diagnostic lights turn off.
-
The control returns to normal cycle selection once the lights extinguish.
-
You have successfully accessed, read, and cleared the diagnostic information on your GE top load washer. Record any codes before leaving diagnostics so you can reference GE’s official chart for repair steps.
