Introdução
Use this guide to enter the service-diagnostic mode on your 2021 GE side-by-side refrigerator, run the built-in tests, clear demo mode, reset the controls, and troubleshoot a unit that will not cool. The button sequences are identical on most GSS25-series models, but minor display differences are possible, so keep your tech sheet handy.
Ferramentas
-
-
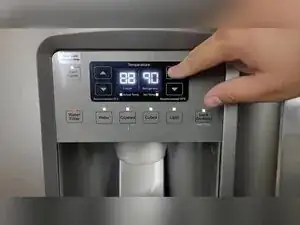
Tap any temperature key on the dispenser to bring the display out of sleep.
-
Confirm the digits illuminate before starting service mode.
-
-
-
Press and hold Refrigerator Up, Refrigerator Down, Freezer Up, and Freezer Down simultaneously for three seconds.
-
-
-
With the zeros flashing, tap any temperature key once to move the cursor into code selection.
-
-
-
Code 01 toggles showroom demo; lights stay on but cooling stops.
-
Clear demo by unplugging the unit for at least 30 seconds, then reconnecting power to reboot the controls.
-
-
-
Verifies two-way communication between the dispenser board and the main board and reports pass or fail.
-
-
-
All dispenser lights illuminate; press each key to confirm it toggles and registers.
-
Exit the self-test by holding the far-left and far-right keys or by holding both refrigerator temperature buttons for three seconds.
-
-
-
Select code 15 and press any key to initiate a full control reset; the refrigerator reboots in about one minute.
-
-
-
Select code 16 to close service mode and return the display to normal temperature readouts.
-
-
-
If the refrigerator warms while the lights stay on, first confirm it is not in demo mode using code 01.
-
-
-
Identify harness labels such as J2 or J4 and match them to the tech sheet wiring chart.
-
Insert multimeter probes into the correct pin pair to confirm voltage or resistance without disassembling the cabinet.
-
You now have the button sequences and test descriptions needed to diagnose most control-related problems on your GE refrigerator. Always cancel active tests or reset the controls before leaving the machine unattended, and keep the tech sheet nearby for wiring values that are specific to your serial number.
