Introdução
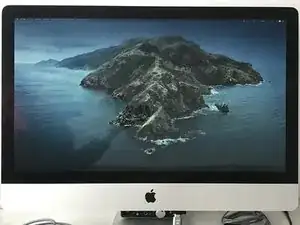
So, your 2009-2012 27" iMac suddenly won't power on, you tried everything: resetting PRAM, rebooting, cleaning RAM, etc.
Your machine is gone probably because of overheating which desoldered your CPU/GPU (90% of the cases) or because of some desoldered/fried component on the logic board.
You don't want to repair it because it would cost too much/it's too old.
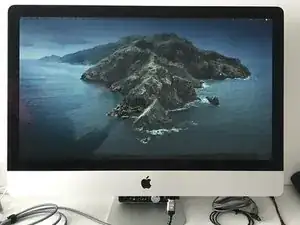
But hey, everything's not lost, you can turn your dead iMac into an external display!
You need just an LCD driver board, some basic tools and lots of patience.
!! DISCLAIMER !!
THIS GUIDE INVOLVES INTERACTING WITH HIGH VOLTAGE EQUIPMENT, DON'T TRY UNLESS YOU KNOW WHAT YOU'RE DOING!
-
-
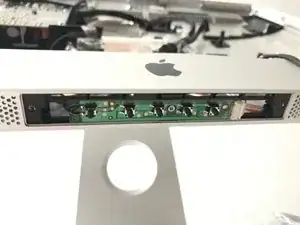
For disassembling you can refer to the perfectly made iFixit teardown guide iMac Intel 27" EMC 2309 and 2374 Teardown
-
-
-
Check on the back of your display the brand and model of it
-
It will probably be an LG display
-
Mine was model LM270WQ1 (SD)(C2)
-
Search for a LCD driver board compatible with your display
-
I found one on AliEx for about 25€ LM270WQ1 (S2)(C2) LCD Driver Board
-
-
-
Now you have to plan what you want to use
-
If you want you can use the iMac PSU by repurposing it [WARNING! DO IT ONLY IF YOU KNOW HOW TO HANDLE HIGH VOLTAGE!]
-
You can check in the next step how to do it
-
Otherwise you can buy a simple 12V-5A brick PSU and use that one
-
You can also re-use the iMac internal speakers and play audio via HDMI
-
-
-
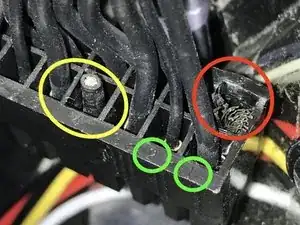
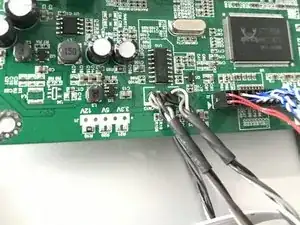
The iMac PSU has a 16-pin connector and the number of the pin is printed on the connector itself (green circles)
-
You will need pins 4 & 8 in this case
-
Pin 4 (yellow) is 12V and we have PP12V_G3H_ACDC: that's the power the PSU gives when it's connected to the outlet (the same that powers LED #1 on the logic board)
-
Pin 8 (red) is GND
-
Always check with a DMM if you have the right voltage!
-
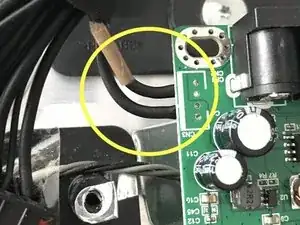
I cutted the two wires and (temporarily) soldered them onto the board 12V and GND pads.
-
In the next future I will buy a 5.5x2.1 DC connector and solder the two cables there, so I can plug the connector directly in the DC female connector of the board, that's the best way to do it
-
-
-
The iMac internal speakers have 4 wires each, 2 for the tweeters and 2 for the woofers
-
Connect white-white and brown-black together
-
Then here you can choose: you can use a JST male connector following the pinout and connect it to the board (easiest way) or you can desolder the JST female and solder the wires directly onto the board
-
The dark wires are the positive (+) and the white ones are the negative (-)
-
On the driver board you have negatives on the outside and positives on the inside
-
VORN/VORP are right negative/right positive while VOLN/VOLP are left negative/left positive
-
NB You'll probably hear some strange sounds from the speakers once you turn on everything and you use audio over HDMI, that's probably due to the poor quality of the audio amp stage of the board. But it works and it's cheap, so it's ok.
-
-
-
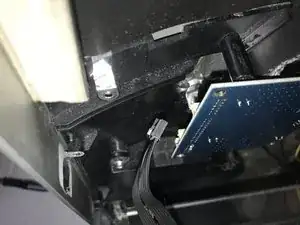
Now you have to mount the boards inside the chassis
-
You can follow my positioning, I found it to be very comfortable
-
Main board on the left side where the right fan was positioned
-
Inverter board with backside visible (so it won't interfere with the display) screwed with the bottom-left screw of the power supply
-
For this you have to break a little piece of the plastic piece that was separating the PSU from the original iMac inverter board
-
-
-
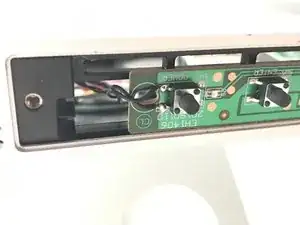
In the first image you can see how to connect the controller board to the chassis
-
I re-used one of the screw that was holding the RAM aluminum panel in place
-
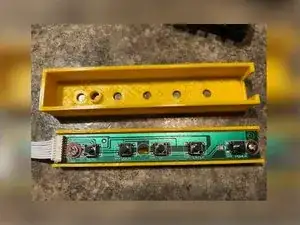
You can also use the original iMac power button! Just cut it where the connector is and solder the two wires on the corresponding pads of the control board, where the power button is, like I did
-
This way you can turn on and off the screen using the original power button
-
I also found this nice 3D print project for the EH1406 controller board, in the next future I'll add it to the iMac display since I think it's nicer that way EH1406 3D Print
-
-
-
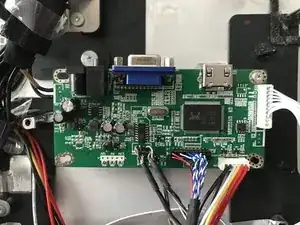
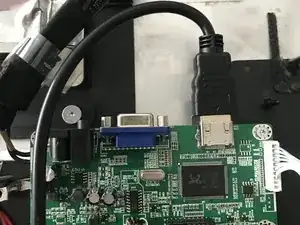
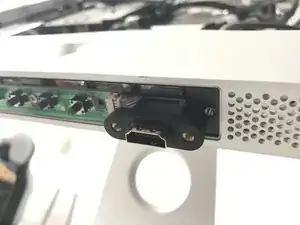
I don't need the VGA connection, so I'll use only the HDMI connection
-
You can use a long cable, connect it to the board and let it out from the chassis
-
Or you can also buy an HDMI extender cable and connect it like I did (it's more practical to have a detachable HDMI cable)
-
-
-
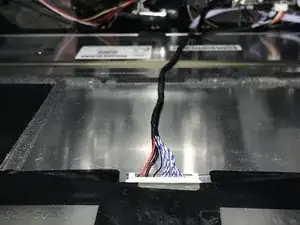
Now you have to connect the inverter and LVDS cables
-
They have only one way to connect so you can't go wrong
-
Once you did it, everything is ready!
-
-
-
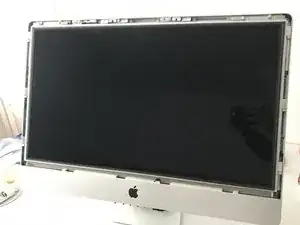
Put the display in place and fix it with two screws (top left and bottom right) so it doesn't move
-
Now connect your PSU (if you used an external one) or you original iMac cable (if you re-purposed the original PSU)
-
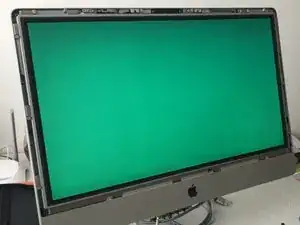
The display should turn on and do an RGB test (should cycle with different colours changing every 2-3 seconds) while the controller board green LED should light up
-

Reduce
Reuse
Recycle

8 comentários
Hi Bob,
Firstly, I would like to thank you for your efforts to create such a manual, which has inspired me to turn my iMac A1213 into a monitor. I ordered a DP HDMI To EDP Drive board (for the LM270WQ1-SDC2 panel in my case). I followed your instructions using the iMac PSU, I also connected the speakers. I must admit that everything works well except the brightness.
My iMac is connected to the Mini Mac M4 via HDMI, and compared to my Benq 27" it looks yellowish and about 30% dimmer. Unfortunately, I forgot to measure the brightness on the iMac when it was still working, so I do not know if the screen was already dimmed.
My question is, do you have any idea of the cause of my problem?
Best,
Bob -
Hi!
When I was writing this guide I was reading and doing researches online on how to do it and I remember that a lot of people said their screen looked different compared to when they used it as an Apple device, I remember especially the two things you said.
Since the board should have a "remote" board attached to it, you can try to edit the settings for brightness and color, which can probably improve the situation (but keep in mind that it'll probably never look as good as the original iMac display).
Have a good day :)
Bob M -
Hi Bob,
Firstly, thank you for your excellent tutorial, it inspired me to give my old iMac a new life. I followed your tuto and I purchased the same logic board you recommended. Also, I decided not to reuse the internal speakers and opted for an external PSU.
After connecting everything to test the final montage, the display illuminated, but rather than performing the RGB test, it remained dark. While the controller's green LED lit up as expected, it soon transitioned to red after about 5-10 seconds. I double-checked all the connections between the inverter board and logic board, and tried it both with and without an HDMI cable – no change though.
This is my first time doing something like this, so I'm a bit stuck on figuring out what's going wrong. Any ideas or advice you might have would be super helpful!
Thanks again for the detailed tutorial !
Ben
(Sorry for any spelling mistakes, English is not my native language)
Ben -
Hi Ben!
Aside from the RGB test not appearing when turned on, does the screen function as expected?
If not, did you buy the correct board? Did you check the screen code in the lower corner tag of the display before buying it?
Also, what power supply are you using? How many amperes does it have?
Bob M -
Hi, thank you for your response!
The screen does not function as expected. As soon as the power is connected, the display turns on, but only shows a black screen. I have plugged my laptop into the screen via an HDMI cable, and my laptop detected the external display, but the screen remains black.
I re-checked the screen code: LM270WQ1 (S2)(C2). It's the same as the one you're using, so I bought the driver board you recommended using your AliEx link.
Concerning the power supply, it's a 12V5A brick that I found at home.
Maybe the driver board is damaged for some reason?
Ben
Ben -
Hi Ben,
Yes, it does seem like the board is defective. You should at least see a "no signal" warning when you turn it on.
Sometimes I experience a similar issue, unplugging and replugging the LVDS and inverter cables usually gets it working again. You could try this one last time, just to be sure.
If that doesn't help, I think it's best to return the board and ask the seller for a working replacement.
Best,
Rob
Bob M -
Hello! I had a question. I notice in your tutorial I only see 1/2 speakers in the iMac. Am I only able to reuse one speaker or both?
Thank you! (:
ryan -
Hi! If you look closely, you’ll see both speakers are there.
You can connect them since the LCD driver board has both L & R audio outputs :)
Bob M -