Introdução
This guide walks you through checks for Whirlpool, KitchenAid, Maytag, and some Amana refrigerators when the freezer is cold but the fresh-food section warms up. You will remove the interior panels, test the damper, fan, thermistors, and defrost system, replace any failed parts, and clean the condenser. Each procedure follows the exact steps shown in the service video so a basic DIYer can diagnose and fix the problem safely.
-
-
Lift and slide out all shelves and drawers to clear the rear cabinet.
-
Remove the glass top, chef pantry drawer, and rear crossbar by lifting and tilting the bar upward.
-
-
-
Depress the center retainer tabs on the air tower with a flat screwdriver.
-
Pull the air tower forward until its top edge stops against the filter housing.
-
-
-
Insert a thin 1/4-inch hex driver through the two small access holes and remove the hidden screws.
-
Pry the light cover panel off with a putty knife, working slowly against the rear barbs.
-
-
-
Grip the exposed lip and slide the air tower out of the cabinet.
-
On single-evap units, press the sensor clip, unthread the white thermistor, and pass it through the tower.
-
-
-
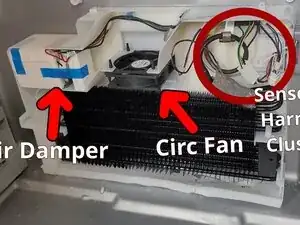
Single-evap models contain only a damper and thermistor harness behind the tower.
-
Dual-evap models have a damper on the left, fan in the center, and harness on the right.
-
-
-
Remove the right hinge cover screw and lift the cap to retrieve the folded technician sheet.
-
-
-
Press and hold the two left dispenser buttons for three seconds to enter Service Test Mode.
-
Select the damper test—typically code 3—and watch the door open and close.
-
-
-
Release the locking tabs and unplug the harness to remove the combined fan–thermistor module.
-
Slide the new module into the bracket, snap it in place, and reconnect the harness.
-
-
-
Disconnect the thermistor leads and measure resistance with a multimeter.
-
Replace the harness if resistance is not within the published range.
-
-
-
Position the evaporator cover and push the air tower upward until it locks under the shelf rail.
-
Route the thermistor back into its clip and reinstall the sensor cover.
-
Reconnect all light harnesses and guide the upper barbs of the water tank cover into the cabinet.
-
Install the two housing screws, reinsert the water filter, and close the cover.
-
Return the crossbar, glass, drawers, and shelves to their original positions.
-
-
-
Remove the rear cardboard service panel and confirm the condenser fan spins freely.
-
Open the freezer door slightly and pull off the kick plate to reveal the front coils.
-
Brush and vacuum the condenser coils thoroughly, or blow them clean with compressed air.
-
-
-
Enter Service Test 38 and start a short or long defrost cycle per the tech sheet.
-
Listen for hissing after 5–10 minutes, indicating the heater is melting ice.
-
Verify a draw of 400–450 W or about 3.6 A with a kilowatt meter or amp clamp.
-
After testing, replacing parts, cleaning the coils, and updating the defrost schedule, restore power, allow the unit 24 hours to stabilize, and verify that refrigerator temperatures return to 37 °F. Recheck airflow and gasket seals if cooling does not improve.
