Introdução
This guide walks you through opening your GE dryer, inspecting every common noise-making component, cleaning or lubricating them, and reassembling the machine without replacing major parts.
-
-
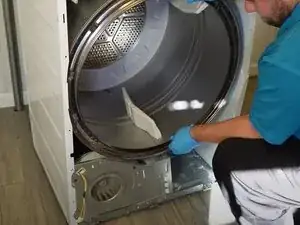
Open the door and examine the plastic bearing where the drum meets the door frame for cracks, wear, or missing pieces.
-
-
-
Inside the door opening, remove the left and right Phillips screws securing the front panel top edge.
-
-
-
Insert a flat screwdriver under the front seam and pry upward to pop the top panel clips, then tilt the top open slightly.
-
-
-
Take out the two quarter-inch hex screws located on the inside left and right cabinet walls that secure the front panel.
-
-
-
Support the door, pull the front panel forward, and lift it straight up to clear the three lower retaining fingers.
-
Slide the plastic shield aside, press the latch, and unplug the door-switch harness.
-
Set the front panel aside where it cannot fall or strain the wiring.
-
-
-
Lift the drum rim slightly and rotate it by hand, noting any scraping, grinding, or thumping sounds.
-
Watch the blower wheel through its housing to confirm it spins freely and is clear of lint or foreign objects.
-
-
-
Reach under the drum, pull the idler pulley arm to the right to slacken the belt, and rest the arm on the motor tab.
-
Slip the belt off the motor pulley and the idler wheel.
-
-
-
Lean the top and console backward against a wall and brace them with a box so they cannot fall.
-
Use the belt as a handle to lift the rear of the drum and slide it straight out of the cabinet following the side grooves.
-
-
-
Check the drum interior for lodged items or debris that could rub while tumbling.
-
Inspect the rear shaft and bearing cup for rust, pitting, or excessive wear.
-
Apply a thin coat of lithium or bearing grease to the shaft if it appears dry.
-
-
-
Pull the door-switch wire bundle out of the square opening in the blower cover.
-
Remove eleven quarter-inch hex screws from the blower front plate.
-
Take out one Phillips screw at the bottom and the two long black Phillips screws at the top of the housing.
-
From behind the motor, remove the three quarter-inch hex screws securing the motor plate.
-
Lift the idler pulley arm upward to free it from the front slot on the motor housing.
-
Remove the small quarter-inch ground screw on the right side of the motor frame.
-
Slide the motor assembly rearward slightly, then pull the blower cover forward and right to release its plastic fingers.
-
-
-
Vacuum lint and clear any objects from the blower wheel and housing, checking the wheel for damaged vanes.
-
Reposition the cover and install at least two screws to hold it while you work.
-
Push the motor and housing forward until their mounting fingers lock into the chassis slots.
-
Seat the idler pulley arm back into its rear catch and front motor-housing finger.
-
Reinstall the three motor plate screws and the ground screw.
-
Replace the two long black Phillips screws, the lower Phillips screw, and the remaining short hex screws around the blower cover.
-
-
-
Examine the four upper plastic glides for cracks, thinning, or missing sections and replace if damaged.
-
Check the lower felt and bearing for looseness or tears that could let plastic scrape the drum.
-
-
-
Spin the idler pulley; it should rotate smoothly without flat spots or wobble.
-
Ensure a light film of grease remains on the idler arm pivot and re-grease if dry.
-
Inspect the belt for fraying, glazing, or missing ribs and replace if compromised.
-
-
-
Pull the idler arm rightward again and rest it on the motor tab to provide belt slack before the drum is installed.
-
-
-
Fit the belt onto the rear groove of the drum, matching the original belt mark.
-
Slide the drum into the cabinet and guide the rear shaft straight into the bearing cup.
-
Rotate the drum a half-turn to confirm smooth seating and freedom from obstructions.
-
-
-
Turn the drum several revolutions by hand and watch the blower wheel to ensure synchronized movement and absence of noise.
-
-
-
Set the bottom of the door panel onto the three lower cabinet fingers.
-
Pivot the panel toward the cabinet until the bearing meets the drum rim.
-
Reconnect the door-switch harness and snap the plastic cover into position.
-
Align the side locator tabs and install the two upper quarter-inch hex screws inside the door opening.
-
-
-
Lower the top panel forward and press down to engage the front clips securely.
-
Reconnect the drum-light harness if your model is equipped with one.
-
-
-
Install the two long Phillips screws through the top of the front bulkhead into the chassis.
-
Reinstall the two rear console screws and any previously removed wire terminals.
-
Seat the console tabs into the chassis slots and tap the rear to lock the console in place.
-
Replace the ground screw and align the rear metal cover fingers with the console before securing them with four screws.
-
Install the two top hex screws that fasten the console to the top panel.
-
-
-
Run the dryer through a full cycle and listen for any remaining abnormal sounds, repeating inspections if needed.
-
Your GE dryer should now tumble quietly and smoothly. Regularly clean lint, keep slides and bearings lubricated, and replace worn glides, belts, or pulleys as soon as you notice wear to prevent future noise and damage.
