Introdução

This guide shows how to remove and install Input Modules for your Framework Laptop 16.

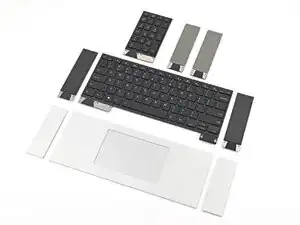
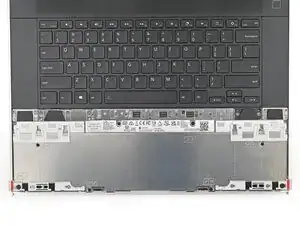
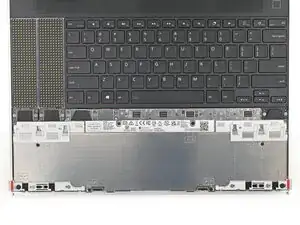
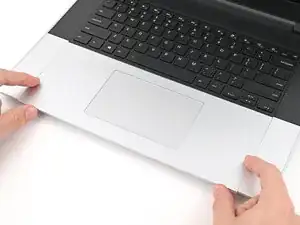
The Input Modules are the different devices that allow you to customize the "Input Deck" on your laptop. These include the Touchpad Module, Touchpad Spacers, keyboard, numpad, LED Matrix, RGB Macropad, and decorative spacers.

The Input Modules are hot-swappable. You can install and remove them without turning off your laptop.

For all possible Input Module combinations, click here.

  1. F2lYds55XuRAGDxk
    F2lYds55XuRAGDxk
    XPDt6qvwxLnTKYar
    GFEZ5t6L2gpwLoSh
    • The bottom row of Input Modules includes the Touchpad Module and Touchpad Spacers.

    • The Touchpad Module can be placed either on the left, center, or right edges of the laptop. The Touchpad Spacers fill in the empty spaces.

    • Note: for the Touchpad Module to be on the left, the keyboard can't be installed in the center.

  2. EqQnI4UMWabqWxob
    EqQnI4UMWabqWxob
    S6FDHCif3FlwxiwS
    Tqkfj6h2Y1XBPjgb
    • The next four steps show how to remove the Touchpad Spacers and Touchpad Module.

    • Use your fingernail to pull out the two Input Module latches and unlock them.

    • This unlocks the bottom row of Input Modules, i.e., the Touchpad Module and Touchpad Spacers.

    • The latch will show red if it's unlocked.

  3. nHqLfMPtMrwU2V1Y
    nHqLfMPtMrwU2V1Y
    Y2Yq3WKNonLWYQKu
    MkGSKTDCpZKdomhg
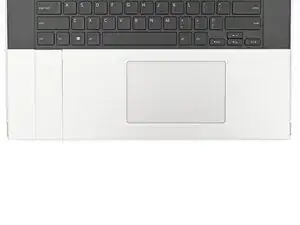
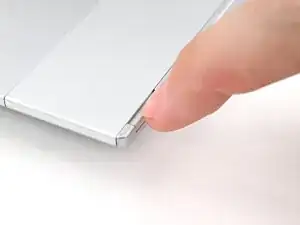
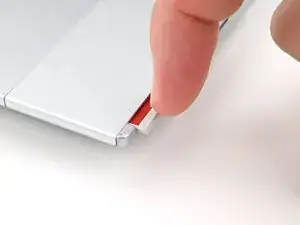
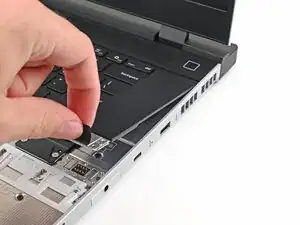
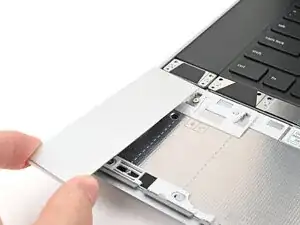
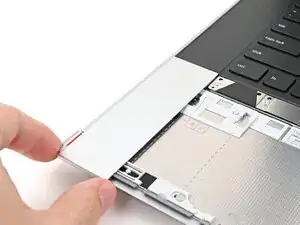
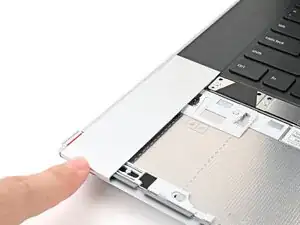
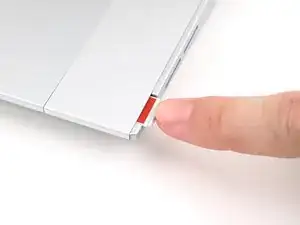
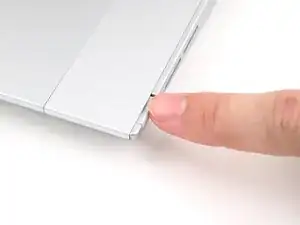
    • Use your fingers to slide the Touchpad Spacer toward the bottom edge of the laptop and unclip it.

    • If you're having trouble, check if the corresponding Input Module latch is properly unlocked.

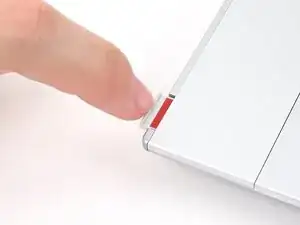
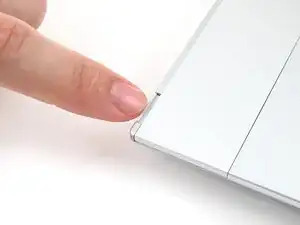
    • Lift the Touchpad Spacer off the laptop and remove it.

  4. rgIqyirxJLG61M4R
    rgIqyirxJLG61M4R
    GdWxYEJOLkEpIXcj
    BElPODGH2DZdG3ud
    • Repeat the previous step for the other Touchpad Spacer.

  5. WkgwHtuvmnsJQAt2
    WkgwHtuvmnsJQAt2
    ImCkfQtA2GocbsjT
    yVDrAaDB6BBEhTyr
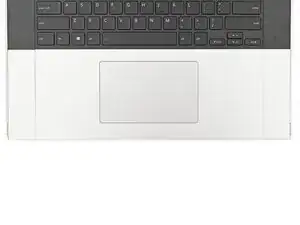
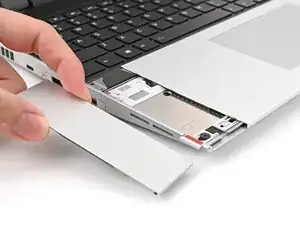
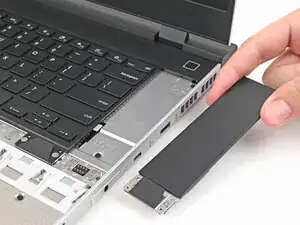
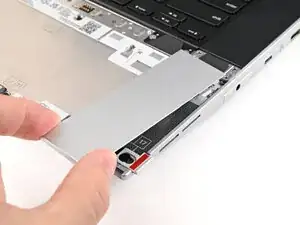
    • Use your fingers to slide the Touchpad Module toward the bottom edge of the laptop and disconnect it.

    • If you're having trouble, check if the Input Module latches are properly unlocked.

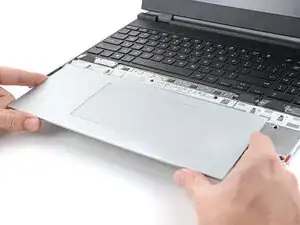
    • Lift the Touchpad Module and remove it.

  6. NMBDmqtWbQa16l5x
    NMBDmqtWbQa16l5x
    wMHAkGRmRvdhQUaR
    nMf6TiS5nI6MkYD6
    • The top row of Input Modules can include a combination of a keyboard and two spacers or a keyboard and a numpad.

    • The keyboard can be placed either on the left, center, or right edges of the laptop. Two spacers or a numpad can fill in the empty spaces.

  7. aTx3L4dPXcUlKIiW
    aTx3L4dPXcUlKIiW
    oIlxRFeHUAidhyBQ
    EqGMFmQTWXeHwX2H
    • The next three steps show how to remove the numpad, spacers, and the keyboard.

    • The numpad is held in place with strong magnets. Apply gradually increasing force to avoid having the numpad violently eject.

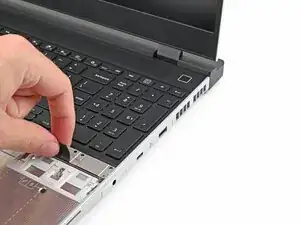
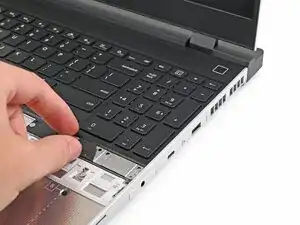
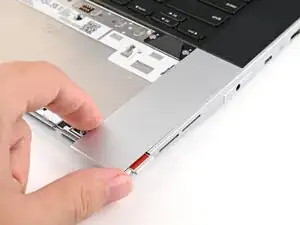
    • Grip the pull tab at the bottom of the numpad.

    • Lift the pull tab until the numpad magnets release.

    • Remove the numpad.

  8. CBNsrywvpiwBNaH2
    CBNsrywvpiwBNaH2
    fgQCFuZWWrydKX1v
    DwCj1KEqtGsLtYAu
    • To remove a spacer, follow the same removal procedure as the numpad.

  9. M2uXYBWtRSxvGdqk
    M2uXYBWtRSxvGdqk
    Au5kJLdXdHryMakf
    nQHYEnGoqB31oqne
    • The keyboard is held in place with strong magnets. Apply gradually increasing force to avoid having the keyboard violently eject.

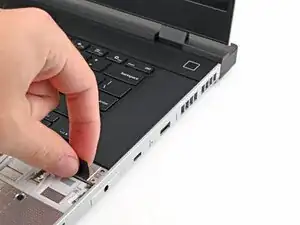
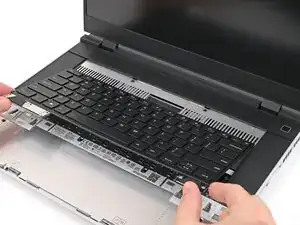
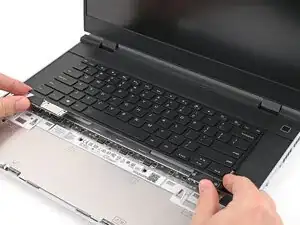
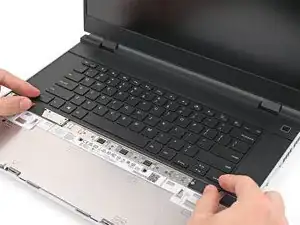
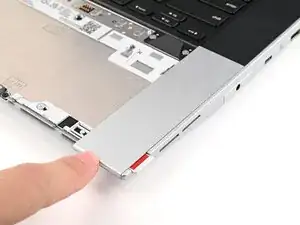
    • Grip the two pull tabs along the bottom of the keyboard.

    • Lift the pull tabs until the keyboard magnets release.

    • Remove the keyboard.

  10. 3OPQIW5vYF55mCGK
    3OPQIW5vYF55mCGK
    JOuKrgT24FM1Jdcc
    q1Gq6Vft56ALeCUe
    • The next three steps show how to install the top row of Input Modules.

    • Hold the Input Module at a slight downward angle and align it with one of the dotted lines on the Mid Plate.

    • Slide the top lip of the Input Module underneath the ventilation plate and lay the module down flat to let the magnets pull it into place.

    • Make sure the alignment pegs are slotted into the Input Module and that it sits flat. Otherwise, pull the module off the Laptop and readjust it.

  11. JfhHmTHJYi52YJYH
    JfhHmTHJYi52YJYH
    n5etjCTjKfarMMKf
    oY2peHYSyTDrRyrH
    • To install a numpad, follow the same procedure—except it'll require twice the amount of free space.

  12. Ri3KvAKFNDYWiZng
    Ri3KvAKFNDYWiZng
    4aWVhKGJpiK4Z4bg
    aTeFueCpBMkAkFVr
    • Hold the keyboard at a slight downward angle and align it with two of the dotted lines on the Mid Plate.

    • The keyboard can be placed either on the left, center, or right edges of the laptop.

    • Slide the top lip of the keyboard underneath the ventilation plate and lay the keyboard down flat to let the magnets pull it into place.

    • Make sure the alignment pegs are slotted into the keyboard and that it sits flat. Otherwise, pull the keyboard off the Laptop and readjust it.

  13. Hc3IXMPMqsLDSGEK
    Hc3IXMPMqsLDSGEK
    dufskrmbxwqmCMrs
    J2hfkQ2EMWM3FZlB
    • The next four steps show how to install the bottom row of Input Modules.

    • Place the Touchpad Spacer over its spot on the laptop with the bottom edge overhanging slightly.

    • Slide the Touchpad Spacer towards the top of the laptop to secure it.

  14. PuGEUQZR54ClYiSC
    PuGEUQZR54ClYiSC
    YY61fN146BMQVixw
    xe1KG1AYtstKK2AM
    • Repeat the previous step for the other Touchpad Spacer.

  15. t5EkCnWAOTVso5EI
    t5EkCnWAOTVso5EI
    Ag5RFfqCC6RVuCTt
    PiQCBeVR1DiHBvSS
    • Place the Touchpad Module flat on its cutout so its clips are properly aligned.

    • Press the Touchpad Module down and slide it into place so it lines up evenly with the bottom edge of the laptop.

  16. wWhtNXEYIZevTerX
    wWhtNXEYIZevTerX
    oNdJLox3NFdQMABg
    NTvlJ1ipxjjITZLX
    • Push the Input Module latches back into place to lock them.

Conclusão

If you need help, contact Framework support.

Alex Diaz-Kokaisl

Membro desde: 16/01/22

227430 Reputação

0 comentários