Introdução
If the fresh food (refrigerator) compartment is getting warm, leaking water inside, or making a fan noise, ice and frost buildup behind the upper evaporator panel is a common cause on Samsung refrigerators with the fridge compartment on top. This guide shows how to remove the evaporator panel, confirm the frost pattern, splice in a secondary heater along the refrigerant lines, and test the repair using forced defrost mode.
Ferramentas
Peças
-
-
Look for poor cooling in the fresh food cabinet, water leaking inside the cabinet, or fan noise coming from behind the upper rear panel.
-
-
-
Use a Phillips screwdriver to remove the three screws along the bottom of the evaporator panel.
-
Pry off the plastic cover at the top of the metal rail to reveal the hidden screw.
-
Use a Phillips screwdriver to remove the hidden screw at the top of the metal rail.
-
-
-
Pull the evaporator panel off by working fingers around the edges and pulling gently but firmly.
-
Locate the wire harness on the left side inside the evaporator area.
-
Separate the harness connectors from the refrigerator liner so the panel can come free.
-
-
-
Inspect the removed evaporator panel for water-damaged foam or extensive rust.
-
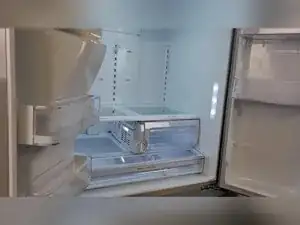
Inspect the evaporator area and look for frost buildup on the copper tubes behind the panel.
-
-
-
Route the secondary heater wire along the refrigerant lines where frost and ice buildup are worst.
-
Double the heater wire over in the worst icing areas, because the heater cable is long enough to overlap.
-
Use the high-temperature cable ties to secure the heater wire to the lines so it stays in place.
-
Locate the white sensor on the right side, because it acts as a shutoff for the heater.
-
-
-
Find the brown main defrost heater wire where you will tap in the new heater so it runs with the normal defroster.
-
Trim back excess heater wire, but leave some extra length for safety.
-
Strip about a quarter of an inch of insulation from the heater wire using a wire stripper set to 22 gauge.
-
Twist the exposed strands together so they don’t splay out.
-
Attach the stripped heater wire into the tap-style splice connector, and tighten it securely.
-
Install the splice connector’s piercing saddle onto the brown wire and tighten the hub to pierce and make the connection.
-
-
-
Trim the ends of the cable ties to tidy the wiring.
-
Measure and cut the remaining heater wire so it can reach the left defrost heater wiring, leaving a little excess length.
-
Strip about half an inch of insulation from the heater wire for the second splice connection.
-
Put the piercing saddle on the heater wire first, then tighten the hub to pierce it for a cleaner installation with less kinking.
-
Attach the remaining splice connector piece onto the heater’s electrical wire to complete the second connection.
-
-
-
Plug the fan and sensor Molex connectors from the evaporator panel back into the refrigerator liner.
-
Rest the evaporator panel on the water filter housing or another stable spot to keep the connectors plugged in during testing.
-
Wait five to 10 minutes for the refrigerator to start running normally with no error codes.
-
-
-
Press and hold the top left button and the middle right button for about eight seconds until the display enters forced mode and starts beeping.
-
Press the middle right button three times until the display shows RD to start forced heating mode for the refrigerator cabinet.
-
Wait 30 seconds to one minute for the heating process to begin.
-
Use an infrared thermometer or thermal camera to verify the gray heater wire warms above the background temperature.
-
-
-
Press and hold the upper left button and the middle right button for about eight seconds to re-enter forced mode settings.
-
Press the right-side button twice to exit forced mode and return the refrigerator to normal operation.
-
-
-
Clean the condenser coils on the back of the refrigerator to support normal cooling performance.
-
Check whether the drain line is frozen, because a frozen drain can contribute to water buildup.
-
Install the Samsung drain probe clip if the drain line freezes and you haven’t added the probe already.
-
Flush the drain line with water to confirm it is clear.
-
If the gray secondary heater wire warms during RD forced heating mode, the splice connections are working and the modification should reduce frost buildup on the upper refrigerant lines. Recheck the white sensor position if icing returns quickly, and address drain and condenser coil maintenance if you still see water buildup or weak cooling.
