Introdução

This guide will give you step-by-step instructions on how to remove your battery. Make sure you have a clean, dry, uncluttered, and roomy work space that has good lighting before you start. Also, make sure that your battery actually needs to be replaced by consulting our troubleshooting guide.

  1. J1dBGmUKtkaeodcv
    J1dBGmUKtkaeodcv
    jdVGKPAjRCTTh2kp
    • Before you begin, be sure to turn off your laptop and discharge the battery down to 25%.

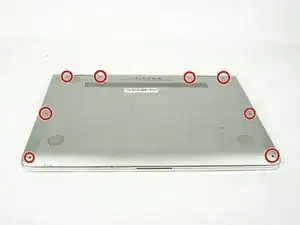
    • Turn the computer upside down.

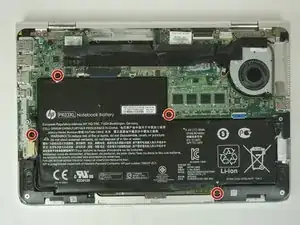
    • Use the T5 Torx Screwdriver to remove the eight 3.3 mm screws.

    • Make sure to use the magnetic project mat to help you keep track of the small screws.

  2. d5NmWPjFaSrMcKMe
    d5NmWPjFaSrMcKMe
    KIMJLC5UxjQUCBE1
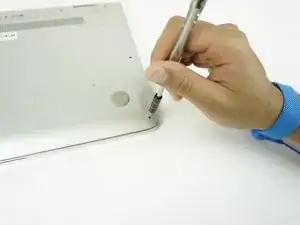
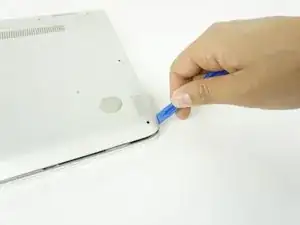
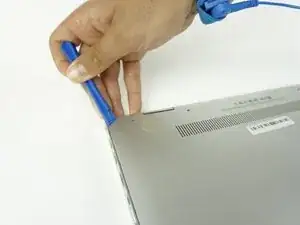
    • Use an opening tool to pry up and loosen the back case from the laptop.

    • If the back case doesn't loosen easily, there may be screws hidden underneath the rubber feet. Carefully pry a foot up and remove any hidden screws.

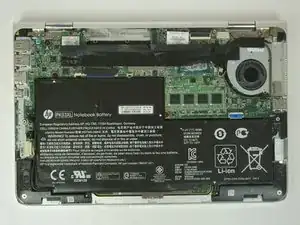
    • Remove the back case.

  3. AhLZNKTNOK6DxNMR
    AhLZNKTNOK6DxNMR
    2XaUXT4eUZFdKF4N
    • Remove the four 2mm Phillips #00 screws securing the battery.

    • The screw locations are marked by small white arrows on the battery.

  4. lOfBUl5OEF4tMcJO
    lOfBUl5OEF4tMcJO
    ArGCDbvpoxZjk3RL
    DIEd4OYWTYseJpjF
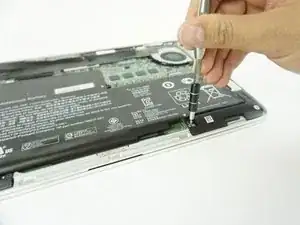
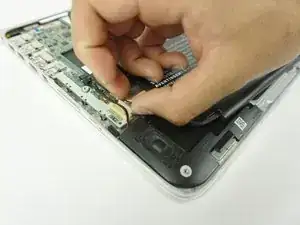
    • Peel off the adhesive on the left side of the battery holding the speaker wire down.

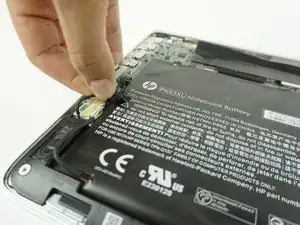
    • Move the battery slightly to gain access to the battery plug, located on the left edge of the battery.

    • Carefully unplug the battery by pulling the connector towards the battery.

    • Pull parallel to the battery, not straight up.

    • Remove the battery.

    • It is normal for your battery to flex and bend a bit where the wider section meets the narrower section.

    Super article qui rend bien service et sécurise ce remplacement !

    Peut-être quelques précisions après avoir remplacé cette batterie :

    - Côtés extrêmes gauche et droite en haut, 2 vis plus longs que les autres. Un tournevis Torx T5 est plus approprié que le 4 car 2 vis étaient bien scellés.

    Il vaut mieux soulever le capot côté charnière en commençant par cet endroit mais en finalisant par l’avant de l’appareil. En effet, le côté charnière du PC en contient également sous le capot gênant la sortie de cette partie arrière.

    Le tournevis cruciforme 2,5 est plus approprié que le 2.

    Merci pour vos astuces :-)

    Patrice BONNEFOY -

    Bonjour

    J'arrive à dégager la partie avant du couvercle mais ça bloque juste sous les pieds arrière.. et je n'ose pas forcer…. avez vous une astuce ????

    BAIGUE RENE -

    Bonjour, Il faut vérifier qu'il n'y a plus de vis qui maintient la pièce. Attention, sur certains modèles de PC portables il peut y avoir des vis sous le caoutchouc des pieds du pc.

    Brendan -

Conclusão

To reassemble your device, follow these instructions in reverse order.

For optimal performance, after completing this guide, calibrate your newly installed battery.

Take your e-waste to an R2 or e-Stewards certified recycler.

Repair didn’t go as planned? Try some basic troubleshooting, or ask our Answers community for help.

Alie Antar

Membro desde: 29/01/18

663 Reputação

10 comentários

I have five T4 screws that came out without issue and three that refuse to budge. Now I am trying to figure out how to remove those without damaging the laptop itself.

fxb -

Thank you! iFixit repair kit made getting the screws out easy. Now have a renewed laptop ready with 6 plus hours of battery life.

Nicholas Steblay -

Tutoriel parfait, excepté peut-être qu’un double-fil côté droit de la batterie doit être libéré avant de sortir la batterie.

Bravo et merci, ça m’a tout simplement permis de me dépanner seul.

FirstName LastName -

The official HP Manual (http://h10032.www1.hp.com/ctg/Manual/c04...) mentions using Torx T5 to remove the bottom cover.

Gitesh Agarwal -

Thanks! I will correct the step with the right screw size.

Arthur Shi -

Because this website doesn't allow a lengthy comment, I'm being forced to cut mine into pieces. It's a bit ridiculous things have to be done this way.

#####

Part1

#####

I want to add some critical notes to this whole process. The write-up is good, but it could use the additional details below. I also wish we could attach pics to these comments, as the power cable of the new battery is longer and bulkier than the factory one, which I note in my comments below:

#########################

When removing the T5 screws from the bottom cover, keep track of where the two longer T5 screws came out of. Mine were in the two corners (same side as the hinges). The other T5 screws are pretty short.

Carolina hiker -

#####

Part2

#####

Once you remove the T5 screws on the bottom, you want to try and pry up on the side OPPOSITE the hinges. The reason for this is there are two plastic pieces that fit kind of under the hinges, so if you pry at the non-hinged side, you want to lift up gently and work your way back to the hinged area so you don't break those two pieces that rest UNDER the hinged area.

The battery is supposed to have a white triangle stamped on it to indicate where each of the screws are. There are FIVE screws total, but only four are marked with the white triangle. If you follow the power cable from where it plugs into the board and follow it around until it "disappears" into the battery itself, the screw is about 2" from that point.

Carolina hiker -

#####

Part3

#####

One of the screws holding the battery in place (the screw that is NOT marked with a white triangle) must be removed using a Philips 0 screwdriver. I used a Philips screwdriver at least twice as large as the Philips 0 to remove the other four screws. That larger size was needed to get enough torque to break them loose. I'd also recommend getting a magnetic tray from Home Depot or Lowes to keep all the screws secure and in one place (so they don't get knocked off the table).

The power cable of the new battery is NOT close to being made like the factory power cable. The replacement battery's cable is longer and bulkier, so it took time to get it to fit properly. The plug itself was a perfect fit into the socket though.

Carolina hiker -

#####

Part4

#####

It's not noted in the procedures above, but you DO need to remove a black & white cable on the side OPPOSITE of the power plug. That must be taken out of the "channel" it's sitting in to be able to remove the battery. I used a small, pointed spudger to get it out of that channel. You do NOT need to unplug that cable.

Because the power cable was longer and bulkier than the factory one, you need to spend the time to get it to fit as good as possible. But despite doing that, THAT corner of the lid did not sit flush like the other corner. It was close, but there was a definite gap. But once I put the screws in, it was ok.

Carolina hiker -

#####

Part5

#####

When you put the cover back on, you'll want to slowly work those plastic "tabs" under the hinges, but also note there are some thin, black pieces that need to be fitted under the laptop body as well (they're not very visible, so you'll need to look for them). So once you've kind of positioned those plastic pieces under the hinges, slowly lower the lid while trying to make sure those barely-visible black "tabs" get positioned properly. It'll make sense when you get the cover off. It takes a little finesse to get it right, so take your time.

Carolina hiker -