Introdução
If your GE front-load washer stays dark when you press the power button, the user-interface assembly may have failed—but so can the main control board, wiring, or even the wall outlet. This guide walks you through safe electrical tests that prove the interface is truly at fault, shows how to load the required software, and details the complete removal and installation of the new board. Follow each step to avoid buying a $200+ part you don’t need and to ensure you order the correct interface for your exact model.
-
-
Locate the complete model number on the door frame decal so you know exactly which washer you own.
-
-
-
Confirm the washer is plugged into a live 120 VAC outlet and the breaker is on by running a different appliance.
-
-
-
Pull the detergent drawer forward, press the rear release tab, and slide the drawer all the way out.
-
-
-
Grasp the left end of the interface panel, lift it about 20 degrees, slide it right, and pull it forward to free it from the cabinet.
-
-
-
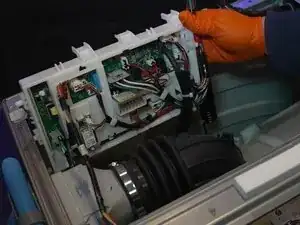
From the rear panel remove the three Phillips screws holding the top cover.
-
Slide the lid toward you and lift it off to expose internal components.
-
-
-
Remove the single plastic screw and the two metal shield screws covering the main board.
-
Slide the shield forward, take out the hidden bottom screw, and move wire looms aside.
-
-
-
Restore power and look for two flashing LEDs on the main board; these are the board heartbeat.
-
-
-
Set the multimeter to AC, back-probe the black and white wires at connector J101 on the board.
-
-
-
Probe pins 8 (red) and 4 (black) at connector J615 on the main board; you should again read 13.8 V DC.
-
-
-
If 13.8 V reaches the interface but the washer will not power up, plan to replace the interface assembly.
-
-
-
Unplug the washer, wait one minute, then plug it back in without pressing any buttons.
-
Pop the rubber RJ-45 cover inside the dispenser well and plug in the supplied Ethernet cable.
-
Connect the other end of the cable to the SUM programming module.
-
-
-
Unplug the washer again, press the latch on the RJ-45 jack, and roll it out.
-
Remove one screw at the start⁄stop PCB, three at the dial PCB, and two at the options PCB.
-
Depress the clear and gray frame tabs while pushing each PCB rearward to free them.
-
-
-
Snap the options PCB into the right-hand clips.
-
Rotate the dial so its flat aligns with the flat on the middle PCB, then seat the PCB and engage its top clip.
-
Place the start⁄stop PCB in its slot and fit the plastic brace over it.
-
-
-
Reconnect the harness, reinsert the push-mount cable tie, and snap the RJ-45 jack back into its pocket.
-
Hook the right side of the panel on its pivot screw, swing the panel down, and press the left side until it locks.
-
-
-
Plug the washer in, press Power, and confirm the display lights, buttons respond, and the dial registers cycles.
-
-
-
Replace the top cover, secure its three rear screws, and slide the detergent drawer housing forward while fitting the two coarse center screws.
-
Add the three outer screws, then slide the detergent drawer back until it clicks.
-
Your GE front-load washer should now power up and accept cycle selections. Keep the unused screws, the SUM module, and these notes in a safe place for future service. If the unit still will not start, revisit the diagnostic sections to confirm board, wiring, or polarity issues before replacing additional parts.
