Introdução
GE and Hotpoint dryers often stop heating because the factory-installed purple heater wire burns or breaks. Replacing it with the WE49X37037 kit restores full heat and prevents repeat failures. Follow these instructions to safely disassemble the dryer, swap the wire, and reassemble the machine without damaging other components or yourself.
-
-
Using a quarter-inch nut driver, remove the two hex screws at the lower rear corners of the cabinet.
-
-
-
Push the control console straight back until both rear tabs pop free from the top panel.
-
Rock the console upward and lay it flat on the top of the dryer cabinet.
-
-
-
Remove the two Phillips screws located at the rear corners of the top panel.
-
Re-seat the console by sliding its front tabs into the lid and snapping it down so the lid can pivot later.
-
-
-
Open the dryer door and remove the two Phillips screws hidden under the front lip of the lid.
-
Tilt the lid backward and rest it against a wall or sturdy support to keep it out of the way.
-
-
-
Remove the two quarter-inch hex screws located midway up the cabinet sides.
-
Pull the front panel forward to expose the short door switch harness at the upper left.
-
Press the locking tabs and disconnect the door switch plug, then lift the panel straight up off the three lower chassis fingers.
-
Set the door assembly aside in a safe location away from the work area.
-
-
-
Reach in from the right side, pull the idler pulley to the right, and rest it on the motor tab to hold the spring back.
-
Slip the drive belt off both pulleys and slide the drum straight out of the cabinet.
-
-
-
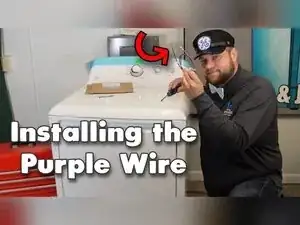
Detach the purple heater wire from the heater pan spade terminal.
-
Cut or release the plastic cable ties securing the wire to the chassis and harness bundle.
-
Remove the two or three strips of electrical tape holding the wire inside the main harness.
-
-
-
Insert a small flathead screwdriver beside the purple wire terminal inside the motor plug and depress the metal lock tab.
-
Push the wire forward through the connector body until the terminal clears the plastic housing.
-
If the terminal refuses to pass, cut the terminal off and pull the wire free from the plug.
-
-
-
Clean light oxidation with fine-grit sandpaper; replace the heater pan if the terminal is badly burnt or eroded.
-
-
-
Slide the new wire terminal fully onto the heater pan spade until completely seated.
-
Snap the plastic anchor of the wire through the adjacent chassis hole to stabilize the lead.
-
Bundle the wire with the main harness and secure it using high-temperature cable ties or fresh electrical tape.
-
-
-
Insert the new terminal into the vacant slot in the plastic motor connector until it clicks and will not pull out.
-
Plug the harness back onto the motor, making sure both top and bottom latches lock firmly.
-
-
-
Pull the idler pulley right and park it on the motor tab before inserting the drum.
-
Slide the drum into the cabinet, seating its rear bearing in the back cradle.
-
Route the belt around the drum’s rear groove, over the idler pulley, and around the motor pulley, then release the idler to tension the belt.
-
Hand-spin the drum to confirm smooth rotation and proper belt tracking.
-
-
-
Set the door panel onto the three lower chassis fingers and pivot it upright against the cabinet.
-
Reconnect the door switch harness and snap its plastic cover back over the connector.
-
Align the inner tabs and reinstall the two quarter-inch hex screws on the cabinet sides.
-
Reconnect the drum light harness if your model uses one.
-
-
-
Swing the lid down, slide it forward, and press along the front edge until it snaps onto the cabinet.
-
Install the two Phillips screws under the lid lip to lock the top panel.
-
Pivot the console down, align its six mounting fingers, and tap the console rearward to lock it in place.
-
Drive the two quarter-inch hex screws through the console into the top panel to finish securing it.
-
Your GE or Hotpoint dryer should now heat reliably with the new WE49X37037 wire installed. Keep the spare cable ties and tape handy in case you need to revisit the harness, and always clean the heater pan terminal if you service the dryer again.
