Introdução
Replace the drain pump when the machine stops draining, shows a drain-related error, or the original pump is damaged by debris. Swapping the pump restores proper water removal and prevents flood errors without replacing the entire appliance.
-
-
Have a Philips screwdriver, small flat-blade screwdriver, pliers, 14 mm socket wrench, multimeter, and a door-seal spring tool within reach.
-
-
-
Pull each detergent and softener drawer fully forward until it stops.
-
Depress the rear release tab and slide the drawer completely out of its housing.
-
-
-
Locate the five deep screw holes exposed by the removed drawers.
-
Use a long Philips driver to remove the four upper screws recessed in the housing.
-
Pull the filter forward, press the left-side tab, and lift the entire filter housing out of the console.
-
-
-
Pull the left front corner of the console toward you to release it from the cabinet.
-
Press the clip on the door-light connector and separate that harness from the console shell.
-
-
-
Grip the thermistor body with needle-nose pliers, squeeze its sides, and pull it straight out of the rubber grommet in the heat shield.
-
-
-
Open the door and locate the stainless retaining wire hidden behind the blue gasket folds.
-
Leverage the wire outward with the flat-blade screwdriver and remove it from the gasket groove.
-
-
-
Take out the two Philips screws holding the plastic door-lock cover and lift the cover away.
-
Remove the two Philips screws securing the lock, then lift the lock body through the gasket opening.
-
-
-
Tilt the washer backward and support it, then remove the three underside Philips screws from the front panel.
-
-
-
Use a 14 mm socket to remove the four bolts securing the concrete counterweight to the tub front.
-
Slide the weight forward off the locating dowels and remove it from the washer.
-
-
-
Unscrew the pump filter cap and drain remaining water into a towel or shallow pan.
-
Squeeze the two large spring clamps on the blue and black hoses and slide them back, then pull the hoses off the pump ports.
-
-
-
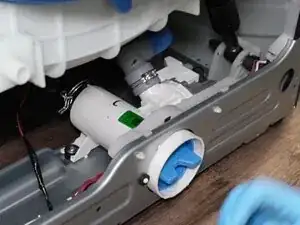
Remove the two upward-facing Philips screws securing the pump to the base plate.
-
Push the pump rearward, lift it off the eyelets, and withdraw it from the cabinet.
-
Disconnect the three-wire harness from the pump motor.
-
-
-
Guide the replacement pump into the cabinet from the left side and reconnect the wire harness.
-
Seat the plastic alignment tabs in the front eyelets and install the two mounting screws to secure the pump.
-
-
-
Slide the blue and black hoses fully onto their ports and reposition the spring clamps with pliers.
-
-
-
Lift the panel onto the plastic dowels, check that the door lock and gasket are clear, and slide the panel downward until it seats.
-
-
-
Install the six upper Philips screws, placing the wide-head screw at the far right position.
-
Lower the washer onto the floor and reinstall the three underside screws.
-
-
-
Align the lock so its plastic catch rests on the metal door frame and secure it with its two screws.
-
Refit the plastic lock cover with its two screws.
-
Work the gasket lip completely over the metal rim, using a small amount of dish soap for lubrication if needed.
-
Compress the spring clamp with a door-spring tool or heavy zip-ties and guide it evenly around the gasket groove.
-
-
-
Route the wiring through the push-mount clips or new zip-ties and reconnect the four console harness plugs.
-
Insert the fan thermistor back into its grommet on the heat shield.
-
Engage the console with the heat shield and press it right until it locks over the two wide screws.
-
-
-
Install the five Philips screws through the dispenser housing; the lower left screw uses fine threads.
-
Slide both detergent drawers straight in until they click into place.
-
The drain pump is now replaced. Inspect all hose joints for leaks during the first wash cycle and verify that water evacuates quickly. If drainage problems persist, trace wiring to the control board and confirm output voltage.
