Introdução
The Festool CT 26 E HEPA dust collector shares a power cord with other similar Festool dust collector models. The cord is a 14 ga 3-conductor type SJTW with molded plug. Many users have noted that the grounding pin on the plug can sometimes separate, requiring replacement of the cord or just the plug itself. The SJTW cord also has a thermoplastic jacket which makes the cord very stiff, especially in cooler weather. I replaced my cord with a longer one of type SJOOW, which has a rubber jacket and insulation and is much more flexible.
-
-
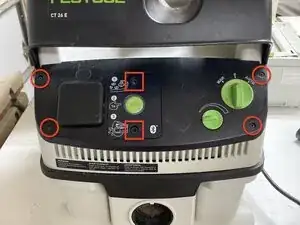
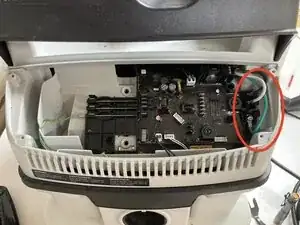
Using a T15 Torx driver, remove the four screws from the front panel as circled in red.
-
Use a 5mm hex key to remove the two cap screws from the accessory panel (red squares)
-
-
-
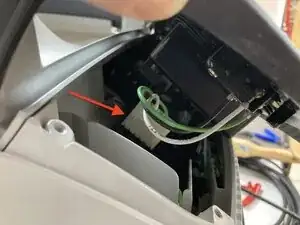
Starting on the left side, lift the left side of the front control panel away from the dust collector body. Reach inside and disconnect the white rectangular wire connector. This connector separates fairly easily.
-
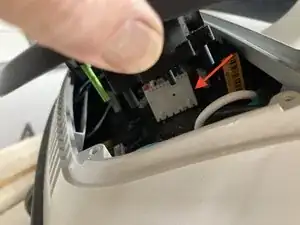
Lift the right side of the front control panel away from the body and disconnect the remaining white rectangular wire connector. The wires here are shorter so space is limited. This connector will require a great deal more force to separate than the first one. Use a flat-bladed screwdriver or automotive fastener removal tool for leverage if needed.
-
The front panel is now separated. Set aside.
-
-
-
The inside of the control panel area will have some accumulation of sawdust and dirt. Now would be a good time to use canned air, compressed air, or a blower to blow everything out and make it nice and clean.
-
-
-
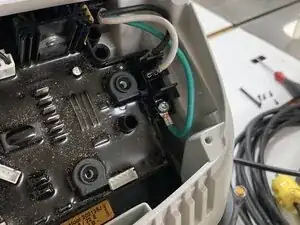
Using a Torx T15 driver, unscrew the M4 screw holding the green ground wire and ring connector. There is a toothed washer between the screw and the connector. Be careful to not lose it.
-
Using needle nose pliers, pull the two female quick disconnect terminals off of their spade terminals (black and white wires).
-
-
-
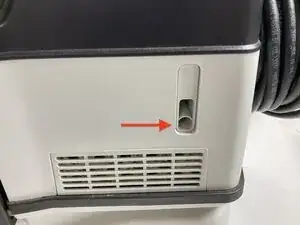
The cable enters the dust collector body from the rear and passes through a conduit inside the dust collector body, exiting on the right side of the front control panel area. The cable is locked in place by a strain relief clamp on the right rear side of the dust collector body.
-
Use a Torx T20 driver to unscrew the strain relief. Once unscrewed, you can pull it free with your fingers or needle nose pliers.
-
-
-
Take the new cord and use a sharp knife to cut through the outer insulation 4.5 inches from one end. Be careful not to cut into the individually insulated wires. Pull the outer insulation piece off and discard.
-
Cut off any paper or plastic packing that is now exposed. Cut off 1.75 inches from the black and white wires. DO NOT CUT the green wire.
-
Using wire strippers, strip off 1/4 inch of insulation from each of the black, white, and green wires.
-
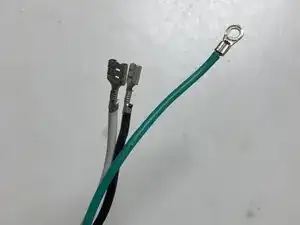
Using your crimping tool, insert the green wire into the 14AWG ring terminal and crimp.
-
Place a 14AWG 1/4" female non-insulated quick disconnect terminal on the black wire and crimp. Repeat the same on the white wire.
-
Preparation of your new cable is now complete.
-
-
-
Working from the rear of the dust collector, insert the new cable with its connector into the funnel-shaped opening at the rear. Push the cable forward until the end with the connectors is visible in the control panel area. You will push about fifteen inches of cable through the unit.
-
Use needle nose pliers to push the two quick disconnects onto the spade lugs. The black wire goes onto the top lug. The white wire goes onto the next one down.
-
Insert the M4 screw and star washer through the ring connector on the green wire and screw into place with a Torx T15 driver.
-
-
-
Installation of the cable clamp is the reverse of removal. Insert clamp into slot on right rear side of the dust collector and tighten screw with a Torx T20 driver until seated.
-
-
-
Replacement of the front control panel is the opposite of removal.
-
Place the control panel in the general location, reach inside from the right and reattach the white connector. It fits tightly and you may need to press it into place with the shaft of a flat-bladed screwdriver. Push until completely seated.
-
Repeat with the white wire connector on the left side.
-
Reinsert the four black Torx screws at each corner and tighten with a Torx T15 driver.
-
Insert the two long black cap screws back through the accessory panel and tighten with a 5mm hex key.
-
-
-
Loosen the clamp at the back end of your replacement NEMA 5-15 120V 15A plug and slide it onto the end of the cable.
-
Using a sharp knife, strip off about 1.25" of jacket insulation. Cut off any paper or plastic packing and discard.
-
Using a wire stripper, strip off 1/4" of insulation from each of the black, white and green wires.
-
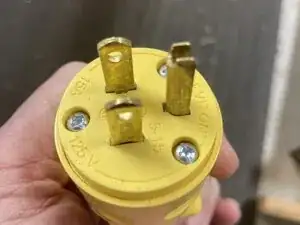
Insert each wire into its respective clamp on the inside of the plug and tighten its screw firmly. The green wire goes into the clamp at the base of the grounding pin, the white wire to the clamp with the silver screw, and the black wire to the clamp with the brass screw.
-
Push the plate with the electrical contacts into the plug body and tighten the three screws with a Phillips #2 screwdriver until snug.
-
Push a bit of the cable extending out the back of the plug in far enough that the clamp at the back of the plug will make full contact with the cable when tightened. Alternate turning the screw on each side of the clamp until the cable is held firmly in place.
-
-
-
Insert the new plug into an electric receptacle. Turn on the dust collector to make sure it runs. You should be good to go.
-