Introdução

Use este guia para desconectar a bateria de seu smartphone modelo Huawei P10 Lite.

  1. YqiUymRKMTYinZcE
    YqiUymRKMTYinZcE
    1x5qv4HPtVGSmvpD
    byJlAME6WaXCgGa2
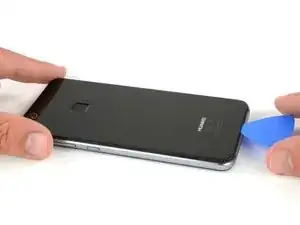
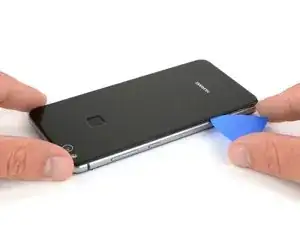
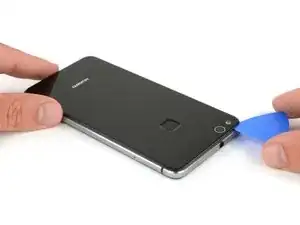
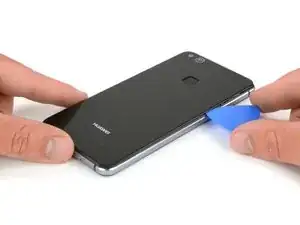
    • Insira a ponta de uma palheta de abertura entre a tampa traseira e a estrutura intermediária e deslize ao redor do smartphone, para desfazer a união adesiva.

    • Usar um punho de sucção para levantar a tampa traseira pode ser um recurso útil para abrir uma primeira fenda e entrar com a palheta.

    • Se o adesivo estiver difícil de cortar, use uma bolsa térmica de gel iOpener para amolecê-lo.

    Mit dem Saugnapf die Rückseite anheben hilft ungemein…

    Matthias Eberle -

    Had to use blue wedge tool to wedge open bottom plate from the rim part in order to then use the tip of the blue opening pick under the back plate to then cut the glue. It’s like placing a pie server or knife under the plate once there’s a gap between the rim and the back plate.

    Jane -

    Be careful, there’s a cable to fingerprint sensor, very close to the edge (see pictures below)… It’s very easy to cut it through with the pick, as I just learned :)

    dambig -

  2. F5lCy2LZ2xfWDDqg
    F5lCy2LZ2xfWDDqg
    Na6gp15IRbPSW3Ll
    2xyqfXZApukGpaZe
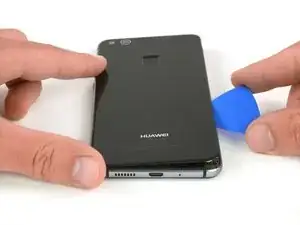
    • Uma vez desfeita a união adesiva em todos os cantos, faça alavanca girando sua palheta, para separar a tampa traseira do smartphone.

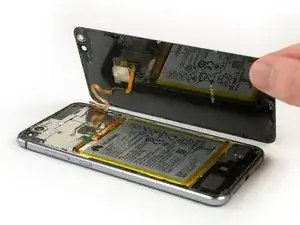
    • Vire a tampa traseira para o lado direito do smartphone.

  3. oPLqQqGCxyiCQ6oZ
    oPLqQqGCxyiCQ6oZ
    gZgRjiB2CuBip3Xu
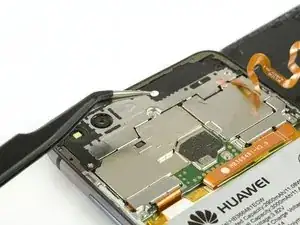
    • Use uma pinça para remover o indicador.

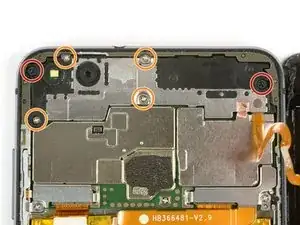
    • Remova ambos os parafusos Phillips tipo #00.

    • Remova os quatro parafusos Phillips tipo #00, tamanho 2,5 mm.

    Schritt 3 und 4 kann man sich komplett sparen. Wozu auch. Kann gleich mit Schritt 5 weitergemacht werden, zuvor einfach das Flachbandkabel vom Fingerabdrucksensor an der Rückabdeckung abklemmen und fertig.

    Bobby mcgee -

    There are four silver screws and two black to be removed.

    Jane -

    Translate what Bobby mcgee said:

    Step 3 and 4 can be completely ignored. What for? You can continue with step 5, just disconnect the ribbon cable from the fingerprint sensor on the back cover and you're done.

    Antonio Sun -

    However, the reason step 3 and 4 should not be skipped is Step 6 — Use an iOpener to loosen the adhesive beneath the battery. I.e., the adhesive cannot be easily removed without heat, however, that heat might damage the electric chips. Thus they’d better be removed first.

    Antonio Sun -

  4. jMQb6f2oPStGtZUm
    jMQb6f2oPStGtZUm
    QdMRkHKjOFsRwEGW
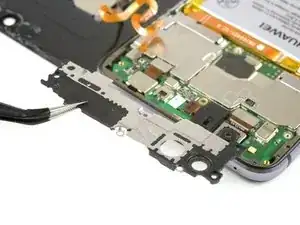
    • Use uma pinça para remover a placa protetora da placa-mãe.

    • Use a ponta achatada de uma espátula para desconectar o cabo conector flex do sensor de impressão digital.

    • Ao montar novamente, aplique novo adesivo, quando necessário.

    Welchen Klebstoff soll man verwenden?

    josef navratil -

    Hallo Josef,

    sollte bei deinem Ersatzteil kein Klebstoff oder Klebeband dabei gewesen sein, kannst du dünne Streifen Doppelseitiges Klebeband verwenden. Es gibt für das Huawei P10 Lite auch schon zugeschnittene Klebestreifen zu erwerben, hierbei gilt aber je nach Händler Rezessionen zu lesen, ob die Klebestreifen auch wirklich halten.

    Dominik Schnabelrauch -

    Note that there is a copper-colored sticker to lift up near the flat cable connected from the phone the finger pad. Lift the main board plate (shield) up SLOWLY from the camera side to the other end as the plate is wedged in place.

    Jane -

    what adhesive is recommended? thanks

    darren -

    Hi darren,
    pre-cut adhesive would be the best solution if you can source it. Otherwise a two-sided adhesive tape or carefully used E6000 adhesive glue will be your friend.

    Tobias Isakeit -

  5. Ee6bcQgCPtQGuSwT
    Ee6bcQgCPtQGuSwT
    mAFuE2UeYPHsL42O
    qSBmSxYoBbbj6NBB
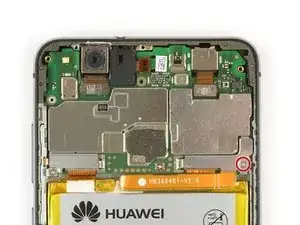
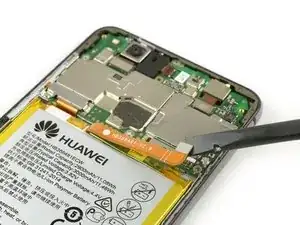
    • Remova o parafuso Phillips tipo #00.

    • Remova a placa metálica que cobre o cabo conector flex da bateria.

    • Use a ponta fina de uma espátula para desconectar o cabo conector flex da bateria.

    Very gently lift the silver connecter that was under the battery connecter plate and is at the end of the orange battery cable with the flat end of the spudger as indicated.

    Jane -

Conclusão

Para montar novamente seu dispositivo, siga estas instruções na ordem inversa.

Dominik Schnabelrauch

Membro desde: 23/11/16

252795 Reputação

0 comentários