Introdução

This guide will show you how to replace and upgrade the RAM on this computer.

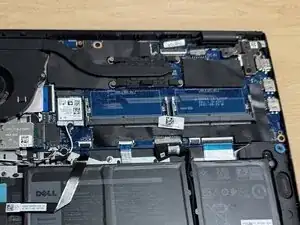
You may need to replace or upgrade your RAM if your laptop frequently crashes or experiences performance issues.

Upgrading the RAM may help prevent the system from slowing down when you open more programs or use memory-intensive software like games or editing tools.

Before you begin, power off the laptop and disconnect it from the charging adapter and any peripherals.

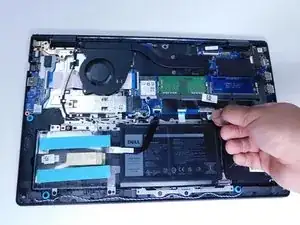
Note: You don’t need to remove the battery to complete this repair, but be sure to disconnect the battery connector from the motherboard.

  1. T1tfX4CTU2VHDqvw
    T1tfX4CTU2VHDqvw
    CAACGfimIlSVjWTs
    • Ensure the laptop is powered off.

    • Flip the laptop over.

  2. NmrSXlHVGeNZ5qIE
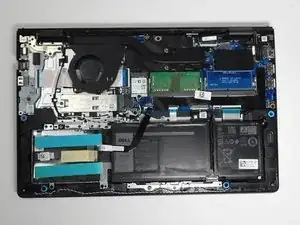
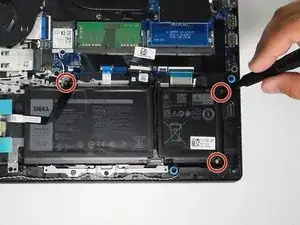
    • Use a Phillips #0 screwdriver to remove the screws highlighted with red circles.

    • Loosen the two 1 mm captive screws (orange circles in the image) on the back corners of the bottom cover.

    • Keep track of each screw and make sure it goes back exactly where it came from to avoid damaging your laptop.

  3. ER2L66uAQgdHusNl
    ER2L66uAQgdHusNl
    HabbJvYAKiDGVRBs
    • Open up the back cover of the laptop.

    • It is much easier to open up the laptop with any type of spudger or with Jimmy.

  4. xxDv6I1NdEfXspKV
    xxDv6I1NdEfXspKV
    HYBQHdRYqRG6lVuw
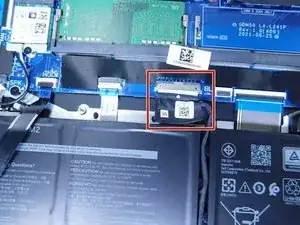
    • Remove the battery cable from the motherboard by lightly pulling on the black tape attached to the ribbon cable.

  5. HDccP2spbWaQEqcu
    • Use a Phillips #0 screwdriver to remove the three battery screws.

    • Carefully move the additional sata storage ribbon cable to the side.

  6. 2bgYPvaRRbIhEoqC
    • Gently remove the battery from the laptop.

    • Be careful with the other ribbon cables.

  7. jvcwADDiuNEjNBmA
    jvcwADDiuNEjNBmA
    KSgYHMM12HFhNPrB
    • Use your fingers to gently push the clips outward until the RAM module pops up slightly.

    • Don't use excessive force, as this may damage the clips.

  8. WOOpPQwRWTeWYEZk
    WOOpPQwRWTeWYEZk
    QFRUvZANSOAJWsGt
    • Avoid bending or twisting the RAM to prevent damage.

    • Gently slide the RAM module out of its socket.

Conclusão

To reassemble your device, follow these instructions in reverse order. Take your e-waste to an R2 or e-Stewards certified recycler.

Carlos Fonseca

Membro desde: 23/09/25

88 Reputação

0 comentários