Introdução
This guide will walk you through the steps to replace the battery for an Asus Chromebook CX1100CN. If you are having battery issues, such as short battery life, difficulty charging, or battery overheating, replacing your battery may fix these issues.
Ferramentas
Peças
-
-
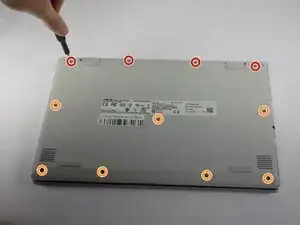
Remove the four 7.6 mm screws from the back panel using a Phillips #0 screwdriver.
-
Remove the seven 6.2 mm screws from the back panel using a Phillips #0 screwdriver.
-
-
-
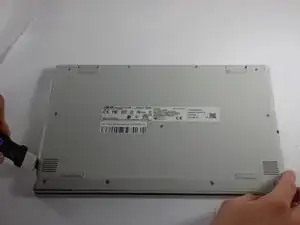
Place a Jimmy in the gap between the back plate and the laptop, along the bottom edge of the laptop.
-
Pry along the seam with the Jimmy to remove the back plate from the laptop.
-
-
-
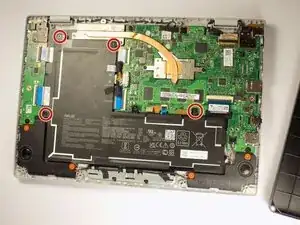
Peel the two stickers off the battery.
-
The stickers help keep the cables tied together, so they should not be cut from the laptop, just peeled off the battery.
-
Gently lift the battery from the top of the short leg and remove the cable.
-
You may have to work the cable out by wiggling it back and forth while gently pulling. Be careful not to pull too hard, as you may cause damage to the cable and connectors.
-
If you struggle with using your fingers to remove the cable, you can use a prytool to push the cable out, using the same back and forth wiggling method.
-
-
-
Remove the battery
-
Along the bottom and right side of the long leg of the battery, there are 3 tabs attached which fit into 3 matching slots on the laptop. They slide in and out easily, but they may cause the battery to get hung up during removal if you aren't aware of them.
-
-
-
When installing your new battery, keep these things in mind:
-
Make sure the tabs and slots are aligned properly
-
Plug the battery cable into the new battery before you drop the battery fully into the slot. It is much easier to get the cable back in place this way.
-
We recommend also reapplying the stickers to keep the internals of your device from becoming cluttered, though they are not necessary for your laptop to function.
-
The two leftmost screw tabs on the battery will have two holes; one for the screw, and one for an alignment pin. One hole should be aligned with the screw hole, the other with the alignment pin.
-
Make sure to leave the central screw hole empty, as that screw is replaced with the backplate.
-
To reassemble your device, follow these instructions in reverse order.