Introdução
-
-
READ EVERYTHING BEFORE STARTING OR YOU WILL DESTROY YOUR LAPTOPS RIBBON CABLES
-
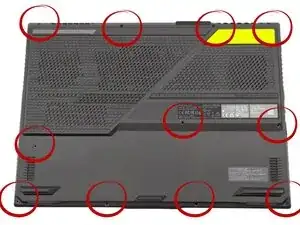
Removing the Bottom Cover Screws Flip the laptop over and locate all screws securing the bottom cover. Use the correct Phillips-head screwdriver (usually PH0 or PH1) to remove all screws. Place them aside in a container or on a labeled diagram to remember where each one goes, as they may be different lengths.
-
Prying Open the Bottom Cover Once all screws are removed, use a plastic opening tool or a spudger/guitar pick to gently pry open the seam between the bottom cover and the main chassis. Start at a corner or an edge where there is a clear gap. Carefully run the tool around the perimeter to release the internal plastic clips.
-
Disconnecting the Bottom Cover (Crucial Step) This is the most important step Do NOT immediately pull the bottom cover completely off It may be connected to the main board by a ribbon cable (often for the LED light bar, speakers, or I/O board). Carefully lift the cover just enough to expose the connectors.
-
Locate the ribbon cable connector(s) that attach the bottom cover to the laptop's main body. Use a plastic tool or your fingernail to gently flip up the locking clasp on the ribbon cable connector.
-
Once the clasp is unlocked, CAREFULLY pull the ribbon cable straight out of the connector socket. After the ribbon cable is disconnected, you can safely remove the bottom cover completely and set it aside.
-
-
-
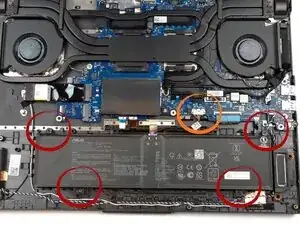
The battery should now be visible, held in place by a few screws and connected by a main power cable to the motherboard. FIRST, disconnect the battery connector from the motherboard (MARKED IN ORANGE) BEFORE removing any battery screws. This prevents accidental short-circuiting.
-
Then, remove the screws securing the battery to the chassis and lift the battery out. (Marked in Red)
-
Now repeat the steps backwards to reinstall a new battery and make sure to reconnect the cables you disconnected
-
To reassemble your device, follow these instructions in reverse order.